Heater core?

Tiny
SERVICE WRITER
  • MECHANIC
  • 9,123 POSTS
My BAd, J&N would be correct that it is vacuum not electrical. Was thinking something wasn't re-installed right but was thinking electrical.
Was this
answer
helpful?
Yes
No
Wednesday, August 19th, 2020 AT 8:13 PM (Merged)
Tiny
ZIGGY61
  • MEMBER
  • 5 POSTS
  • 2001 CHEVROLET BLAZER
  • 6 CYL
  • 4WD
  • AUTOMATIC
  • 86,500 MILES
I replaced the thermostate on sunday. Had heat yesterday. Today no heat. Could the core need flushing or the heater control valve be stuck? I have no leaks nor is there a smell of coolant.
Was this
answer
helpful?
Yes
No
Wednesday, August 19th, 2020 AT 8:13 PM (Merged)
Tiny
JACOBANDNICKOLAS
  • MECHANIC
  • 108,269 POSTS
Try this test. With the engine on, hot, and the heater on high, are both heater core hoses hot? Also, is the engine running at a normal operating temo?

Let me know.
Joe
Was this
answer
helpful?
Yes
No
+1
Wednesday, August 19th, 2020 AT 8:13 PM (Merged)
Tiny
ZIGGY61
  • MEMBER
  • 5 POSTS
Both hoses were hot. One more so than the other, I think the outbound side ( left ). The engine temp is running normal as well.

Today I let it run for 20 min prior to your suggestion & there was heat.
Was this
answer
helpful?
Yes
No
Wednesday, August 19th, 2020 AT 8:13 PM (Merged)
Tiny
JACOBANDNICKOLAS
  • MECHANIC
  • 108,269 POSTS
THe reason I aske that you do that was to determine if the heater core is plugged. If both hoses were hot, it isn't. That is a good thing.

WHat is left is the blend door. It is located near the heater core. Its job is to do the following:

WHen you want heat, closes on one direction to force the fan to blow over the (hot) heater core. When you want AC, closes the other direction to block the heat and allow AC to enter. If it isn't closing fully, it will block all or some of the air going to the heater core. As a result, you don't get much heat if any at all. Again, the heater core is good; therefore, the blend door must not be working properly.

Have that checked and let me know what you find.

Joe
Was this
answer
helpful?
Yes
No
Wednesday, August 19th, 2020 AT 8:13 PM (Merged)
Tiny
ZIGGY61
  • MEMBER
  • 5 POSTS
The blend door works fine as well. I still get warm to moderate hot air one day andcold the next. I'm going with the heatercore is somewhat blocked.
Was this
answer
helpful?
Yes
No
Wednesday, August 19th, 2020 AT 8:13 PM (Merged)
Tiny
J.MURPHY
  • MEMBER
  • 1 POST
  • 2001 CHEVROLET BLAZER
  • 6 CYL
  • 4WD
  • AUTOMATIC
  • 156,000 MILES
Was wondering how to remove the heater core from my blazer? Also; how long should such a task take? Could I veiw a picture of the procedure over the internet?
Was this
answer
helpful?
Yes
No
Wednesday, August 19th, 2020 AT 8:13 PM (Merged)
Tiny
RASMATAZ
  • MECHANIC
  • 75,992 POSTS
2001 Chevy Truck S10/T10 Blazer 4WD V6-4.3L VIN W

HEATER CORE REPLACEMENT

REMOVAL PROCEDURE


https://www.2carpros.com/forum/automotive_pictures/12900_hcc1_2.jpg


1.Remove the HVAC module. See: Housing Assembly HVAC Service and Repair
2.Remove the heater core access cover screws.
3.Remove the heater core access cover.


https://www.2carpros.com/forum/automotive_pictures/12900_hcc2_2.jpg


4.Remove the heater core from the HVAC module.

INSTALLATION PROCEDURE


https://www.2carpros.com/forum/automotive_pictures/12900_hcc3_1.jpg


1.Install the heater core to the HVAC module. NOTE: Refer to Fastener Notice in Service Precautions.


https://www.2carpros.com/forum/automotive_pictures/12900_hcc4_1.jpg


2.Install the heater core access cover. Tighten Tighten the heater core access cover screws to 1.9 N.m (17 lb in) .
3.Install the HVAC module. Refer to Heater/Vent Module Replacement.
Was this
answer
helpful?
Yes
No
Wednesday, August 19th, 2020 AT 8:13 PM (Merged)
Tiny
CBRO3
  • MEMBER
  • 1 POST
  • 2001 CHEVROLET BLAZER
  • 6 CYL
  • 4WD
  • AUTOMATIC
  • 175,000 MILES
Need to fig out what all do I need to take out of the dash to remove and install the heater core like where do you start iv replaced them before just not in this vehicle this thing has got my mind boggled
Was this
answer
helpful?
Yes
No
Wednesday, August 19th, 2020 AT 8:13 PM (Merged)
Tiny
BLUELIGHTNIN6
  • MECHANIC
  • 16,542 POSTS
Removal & Installation

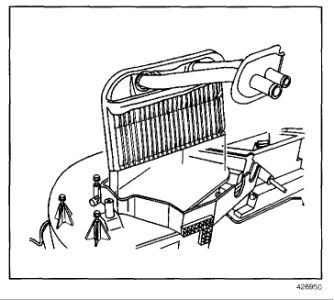
Remove the HVAC module-auxiliary.
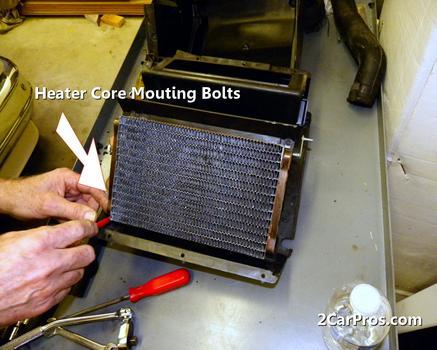
Remove the screws from heater core cover-auxiliary from the HVAC module-auxiliary.
Remove the heater core cover-auxiliary.
Remove the HVAC module pass thru seal-auxiliary.
Remove the heater core-auxiliary from the HVAC module-auxiliary.
To install:

Install the heater core-auxiliary to the HVAC module-auxiliary.
Install the HVAC module pass thru seal-auxiliary.
Install the heater core access cover-auxiliary to the HVAC module-auxiliary.
Install the screws to the heater core access cover-auxiliary and tighten to 18 inch lbs. (2 Nm).
Install the HVAC module-auxiliary.

HVAC MODULE REMOVAL/INSTALLATION:
Removal & Installation

Drain the cooling system.
Raise and support the vehicle.
Remove the nuts from rear A/C line block fittings. NOTE
Cap or tape the open A/C refrigerant lines immediately.
Remove the A/C line block fittings and discard the O-ring seals.
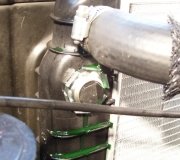
Remove the nuts from the heater hoses block fittings.
Remove the heater hoses block fittings from the HVAC module-auxiliary.
Remove the nuts from the HVAC module studs.
Lower the vehicle.
Remove the right side rear quarter trim.
Disconnect the electrical connectors from the HVAC module.
Disconnect the rear compartment air outlet ducts from the HVAC module.
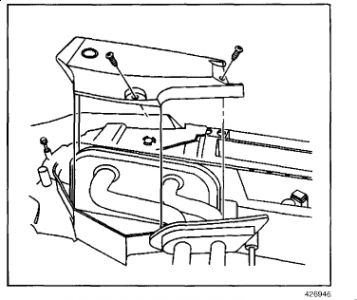
Remove the mounting bolts from the HVAC module.
Remove the HVAC module.
Remove and discard the HVAC module pass through seal.
To install:

Install new HVAC module pass through seal.
Install the HVAC module.
Install the HVAC module mounting bolts and tighten to 89 inch lbs. (10 Nm).
Install the air outlet ducts.
Connect the electrical connectors.
Install the right side rear quarter trim panel.
Raise and support the vehicle.
Connect the heater hoses to the heater core.
Install the nuts to the HVAC module studs. Tighten the nuts to 89 inch lbs. (10 Nm).
Remove the cap or tape from the A/C lines.
Install the new O-ring seals.
Install the nuts to the evaporator core studs and tighten to 15 ft. Lbs. (20 Nm).
Lower the vehicle.
Fill the cooling system.
Evacuate and charge the system.
Leak test the fitting of the component.

Thanks for using 2CarPros. Com!
Was this
answer
helpful?
Yes
No
Wednesday, August 19th, 2020 AT 8:13 PM (Merged)

Please login or register to post a reply.

Sponsored links