Hi and thanks for using 2carpros. Com Check out the diagrams (Below).
Are you referring to the pinion flange bolt (see pic 1)? I ask because this vehicle doesn't have a carrier bearing on the drive shaft. Regardless, neither would require replacement of the drive shaft.
I have a feeling you're replacing the pinion seal. If that is the case, here are the directions. I'm adding them in case you need them. If this isn't what you are referring to, let me know.
REAR DRIVE AXLE/DIFFERENTIAL - FORD 8.8-INCH RING GEAR
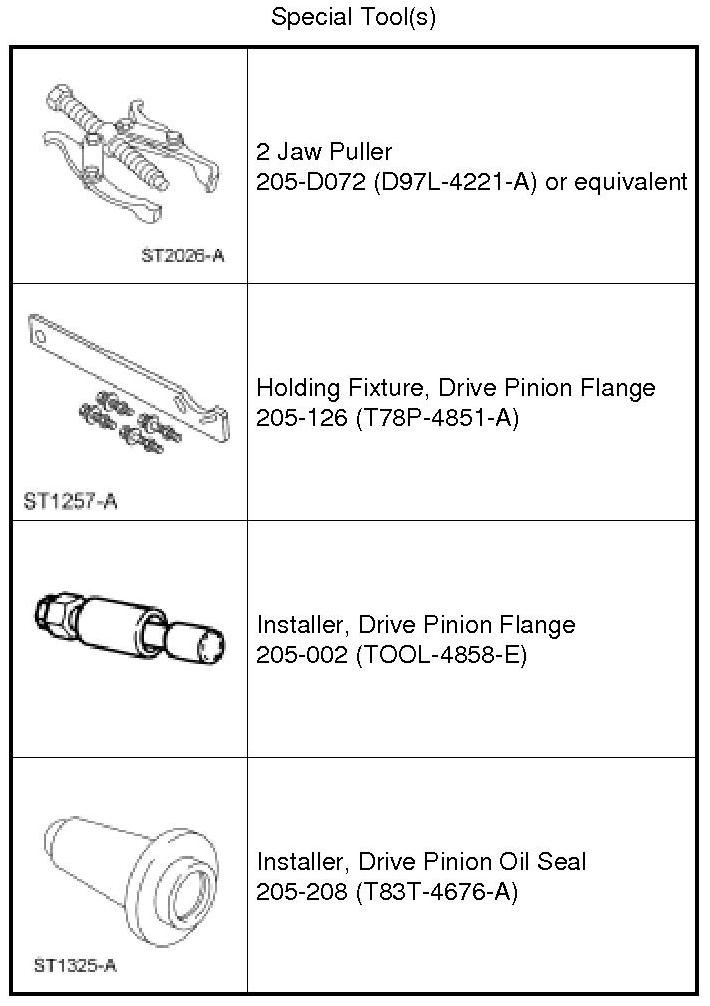
Drive Pinion Flange and Drive Pinion Seal
See pics 2-5
Removal
NOTICE: The color on the rear face of the drive pinion nut is critical to this repair. Use the same color new drive pinion nut for installation. If a new collapsible spacer must be installed for pinion bearing preload reduction, install the nut supplied with the new spacer or damage to the component may occur.
1. With the vehicle in NEUTRAL, position it on a hoist. For additional information, refer to Vehicle Jacking and Lifting.
2. Remove the brake disc. For additional information, refer to Disc Brake System.
3. Remove the driveshaft. For additional information, refer to Drive/Propeller Shafts, Bearings and Joints.
4. Using a Nm (lb-in) torque wrench on the pinion nut, record the torque required to maintain rotation of the pinion gear through several revolutions.
5. Using the Drive Pinion Flange Holding Fixture to hold the pinion flange, remove and discard the pinion nut.
6. Index-mark the pinion flange in relation to the drive pinion stem to make sure of correct alignment during installation.
7. Using the 2 Jaw Puller, remove the pinion flange.
8. Force up on the metal flange of the drive pinion seal. Install gripping pliers and strike with a hammer until the drive pinion seal is removed.
Installation
1. Lubricate the new drive pinion seal with grease.
2. NOTE: If the new drive pinion seal becomes misaligned during installation, remove the drive pinion seal and install a new drive pinion seal.
Using the Drive Pinion Oil Seal Installer, install a new drive pinion seal.
3. Lubricate the pinion flange splines with axle lubricant.
4. NOTE: Disregard the scribe marks if a new pinion flange is being installed.
Align the pinion flange with the drive pinion shaft.
5. Using the Drive Pinion Flange Installer, install the pinion flange.
6. NOTICE: Install a new pinion nut with the same color as the original if not replacing the collapsible spacer. If a new collapsible spacer is installed, install the nut in the kit or damage to the component may occur.
Position the new pinion nut.
8.8-In Drive Pinion Nut
7. NOTICE: Under no circumstances is the pinion nut to be backed off to reduce drive pinion bearing preload. If reduced drive pinion bearing preload is required, a new drive pinion collapsible spacer and pinion nut must be installed or damage to the component may occur.
NOTICE: The color on the rear face of the drive pinion nut is critical to this repair. Use the same color new drive pinion nut for installation. If a new collapsible spacer must be installed for pinion bearing preload reduction, install the nut supplied with the new spacer or damage to the component may occur.
NOTE: Remove the Drive Pinion Flange Holding Fixture while taking drive pinion bearing preload readings with the Nm (lb-in) torque wrench.
Using the Drive Pinion Flange Holding Fixture to hold the pinion flange, tighten the pinion nut.
- Rotate the drive pinion occasionally to make sure the drive pinion bearings are seating correctly.
- Install a Nm (lb-in) torque wrench on the pinion nut.
- Rotating the drive pinion through several revolutions, take frequent drive pinion bearing preload readings until the original recorded drive pinion bearing preload reading is obtained.
- If the original recorded drive pinion bearing preload is lower than specifications, tighten to the appropriate specifications for used drive pinion bearings. If the drive pinion bearing preload is higher than specification, tighten the pinion nut to the original reading as recorded. For additional information, refer to Specifications.
8. Install the driveshaft. For additional information, refer to Drive/Propeller Shafts, Bearings and Joints.
9. Install the brake disc. For additional information, refer to Disc Brake System.
Let me know if this helps or if you have other questions. If I got the wrong part, let me know specifically what you are working on. Check out the diagrams (Below). Please let us know if you need anything else to get the problem fixed.
Images (Click to make bigger)
SPONSORED LINKS
Tuesday, January 22nd, 2019 AT 8:30 PM