2003 Buick Rendezvous Changing front wheel hub assembly

Tiny
KLIGHT68
  • MEMBER
  • 2003 BUICK RENDEZVOUS
  • 6 CYL
  • FWD
  • AUTOMATIC
  • 79,000 MILES
I would like to change my front wheel hub assembly myself. What are the steps to replace the hub assembly?
Do you
have the same problem?
Yes
No
Monday, April 6th, 2009 AT 8:49 AM

5 Replies

Tiny
DENNYP
  • MECHANIC
  • 1,824 POSTS
Wheel Bearing/Hub Replacement - Front

Tools Required
J 28733-B Front Hub Spindle Remover
Removal Procedure

Raise and support the vehicle. Refer to Vehicle Lifting.
Remove the tire and wheel.
Disconnect the wheel speed sensor electrical connector.
Remove the wheel speed sensor electrical connector from the bracket.
Remove the wheel drive shaft nut.
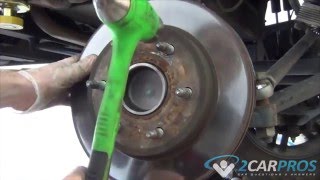
Remove the brake rotor.


https://www.2carpros.com/forum/automotive_pictures/102900_w1_1.gif


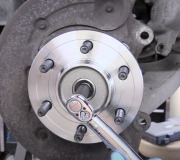
Install the J 28733-B to the wheel bearing/hub.
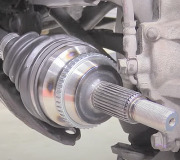
Use the J 28733-B in order to push the wheel drive shaft out of the wheel bearing/hub. Caution: These fasteners MUST be replaced with new fasteners anytime they become loose or are removed. Failure to replace these fasteners after they become loose or are removed may cause loss of vehicle control and personal injury.


https://www.2carpros.com/forum/automotive_pictures/102900_w2_1.gif


Remove and discard the wheel bearing/hub bolts. Important: Ensure that the wheel drive shaft outer seal (boot) is not damaged.
Remove the wheel bearing/hub.
Installation Procedure


https://www.2carpros.com/forum/automotive_pictures/102900_w3_1.gif


Install the wheel bearing/hub. Notice: Refer to Fastener Notice in Service Precautions.
Install NEW wheel bearing/hub bolts.
Tighten the new wheel bearing/hub bolts to 130 Nm (96 ft. lbs.).
Install the brake rotor.
Install the wheel drive shaft nut. Important: Ensure that the connector clip engages the bracket properly.
Install the wheel speed sensor electrical connect to the bracket.

Connect the wheel speed sensor electrical connector.
Install the tire and wheel.
Lower the vehicle.
Was this
answer
helpful?
Yes
No
+2
Monday, April 6th, 2009 AT 7:35 PM
Tiny
ATARI
  • MEMBER
  • 2 POSTS
I got down to the part where you start using the J 28733-B and got scared.
They don't tell you to remove the 3 bolts that hold the bearing/hub on.
When and how do I remove these bolts and are they ones they must be replaced?
Was this
answer
helpful?
Yes
No
+1
Tuesday, June 23rd, 2009 AT 3:01 PM
Tiny
DENNYP
  • MECHANIC
  • 1,824 POSTS
The step after installing the special tool involves removing the three bolts. GM recommends replacing the bolts, but it is perfectly fine to reuse them if you apply some loctite to them.
Was this
answer
helpful?
Yes
No
+2
Tuesday, June 23rd, 2009 AT 4:26 PM
Tiny
ATARI
  • MEMBER
  • 2 POSTS
Good to know about the loctite.
The step after install but not using the tool?
How to I get at the bolts I cant get a tool behind the thing the hub is mounted to.
The only thing I can think of is to disconnect it from the shock while using to tool and to comply remove the entire assembly that's shone in the last image you have.
Was this
answer
helpful?
Yes
No
Tuesday, June 23rd, 2009 AT 5:02 PM
Tiny
DENNYP
  • MECHANIC
  • 1,824 POSTS
Use a long handle 3/8 ratchet with a 3" extension and a 13mm 6point shallow socket.
Was this
answer
helpful?
Yes
No
+2
Tuesday, June 23rd, 2009 AT 8:45 PM

Please login or register to post a reply.

Sponsored links