Welcome to 2CarPros. That description sounds like a bad air mix door actuator for the drivers side. The door actuator on the case is on the drivers side. However replacement isn't an easy thing as the entire dash has to come out to access the part. Below is the process.
1. Precaution
2. Recover refrigerant from refrigeration system
3. Position front wheels straight ahead
4. Remove front wheel lh
5. Disconnect cable from negative battery terminal
caution: wait for 90 seconds after disconnecting the cable to prevent the airbag from deploying
6/7. Remove front wiper arm and blade assembly's
8. Remove cowl top ventilator louver sub-assembly
9. Remove windshield wiper motor and link assembly
10. Remove cowl top outer panel sub-assembly
11. Disconnect heater outlet water hose
12. Disconnect heater inlet water hose
13. Disconnect cooler refrigerant liquid pipe
14. Disconnect no. 1 cooler refrigerant suction pipe
15. Remove lower no. 3 steering wheel cover
16. Remove lower no. 2 steering wheel cover
17. Remove steering pad
18. Remove steering wheel assembly
19. Remove steering column cover
20. Remove turn signal switch assembly with spiral cable sub-assembly
21. Remove instrument cluster finish panel assembly
22. Remove combination meter assembly
23. Remove center instrument panel register assembly
24. Remove center instrument cluster finish panel assembly (w/o smart key system)
25. Remove center instrument cluster finish panel assembly (w/ smart key system)
26. Remove air conditioning control assembly
27. Remove radio receiver assembly with bracket (w/o navigation system)
28. Remove navigation receiver assembly with bracket (w/ navigation system)
29. Remove front door scuff plate lh
30. Remove cowl side trim sub-assembly lh
31. Remove lower instrument panel finish panel sub-assembly
32. Remove front door scuff plate rh
33. Remove cowl side trim sub-assembly rh
34. Remove no. 2 instrument panel under cover sub-assembly
35. Remove lower instrument panel sub-assembly
36. Remove upper console panel sub-assembly
37. Remove no. 2 console box duct (w/o rear air conditioning system)
38. Remove lower rear console box
39. Remove console box assembly (w/o rear air conditioning system)
40. Remove console box assembly (w/ rear air conditioning system)
41. Remove front no. 1 console box insert
42. Remove front no. 2 console box insert
43. Remove engine switch (w/ smart key system)
44. Disconnect front door opening trim weatherstrip lh
45. Remove front pillar garnish lh
46. Disconnect front door opening trim weatherstrip rh
47. Remove front pillar garnish rh
48. Remove no. 1 instrument panel speaker panel sub-assembly
49. Remove front no. 2 speaker assembly (for lh side)
50. Remove no. 2 instrument panel speaker panel sub-assembly
51. Remove front no. 2 speaker assembly (for rh side)
52. Disconnect instrument panel wire assembly
53. Remove instrument panel safety pad assembly
54. Remove instrument panel safety pad assembly (for glass antenna type)
55. Remove brake pedal return spring
56. Remove stop light switch assembly
57. Separate brake master cylinder push rod clevis
58. Remove brake pedal support sub-assembly
59. Remove driver side knee airbag assembly
60. Remove no. 1 air duct sub-assembly
61. Separate steering intermediate shaft sub-assembly
62. Remove steering column assembly
63. Disconnect instrument panel junction block assembly
64. Remove power steering ecu assembly
65. Remove certification ecu (smart key ecu assembly) (w/ smart key system)
66. Remove air conditioning amplifier assembly
67. Remove rear no. 1 air duct
68. Remove rear no. 3 air duct
69. Remove no. 1 console box duct (w/o rear air conditioning system)
70. Remove center heater to register duct
71. Remove no. 1 instrument panel brace sub-assembly
72. Remove no. 2 instrument panel brace sub-assembly
73. Remove instrument panel reinforcement assembly with air conditioning unit (w/o ptc heater)
74. Remove instrument panel reinforcement assembly with air conditioning unit (w/ ptc heater)
75. Remove air conditioning unit
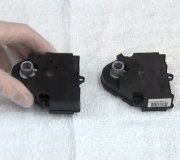
76. Remove front air mix control servo motor sub-assembly
Reverse these to reassemble the system.
What I would do first is look up above the gas pedal and see if you can see or reach that actuator before doing the above. If you can it might be possible to move the actuator enough to control the temperature without removing it for now.
SPONSORED LINKS
Thursday, August 22nd, 2019 AT 2:06 AM