Heater Core Removal

Tiny
TANDBERGII
  • MEMBER
  • 3 POSTS
Oh.99 durango, 5.9 w/ac
Was this
answer
helpful?
Yes
No
+1
Monday, January 7th, 2019 AT 6:23 PM (Merged)
Tiny
TANDBERGII
  • MEMBER
  • 3 POSTS
Time is a factor, im already a day behind. Any help be appreciated. -(: Thx
Was this
answer
helpful?
Yes
No
Monday, January 7th, 2019 AT 6:23 PM (Merged)
Tiny
MMOODY
  • MEMBER
  • 1 POST
  • 1999 DODGE DURANGO
Heater problem
1999 Dodge Durango V8 Four Wheel Drive Automatic

looking for installation instructions for this job so I dont remove any parts that I dont have to remove.
Was this
answer
helpful?
Yes
No
Monday, January 7th, 2019 AT 6:23 PM (Merged)
Tiny
DOCFIXIT
  • MECHANIC
  • 18,828 POSTS
Clickon site aat bottom of reply ie. Manuals
Was this
answer
helpful?
Yes
No
Monday, January 7th, 2019 AT 6:23 PM (Merged)
Tiny
JOSHG123
  • MEMBER
  • 1 POST
  • 1999 DODGE DURANGO
Heater problem
1999 Dodge Durango V8 Four Wheel Drive Automatic

where is the heater core located in the dash
Was this
answer
helpful?
Yes
No
Monday, January 7th, 2019 AT 6:24 PM (Merged)
Tiny
BLUELIGHTNIN6
  • MECHANIC
  • 16,542 POSTS
Location will be on passengers side near firewall, behind dash.

REMOVAL INSTRUCTIONS:
Disconnect the battery negative cable.
Remove the instrument panel from the vehicle.
If equipped with air conditioning, recover the refrigerant.
Disconnect the liquid line refrigerant line fitting from the evaporator inlet tube.
Disconnect the accumulator inlet tube.
Drain the cooling system.
Disconnect the heater hoses from the heater core tubes.
Remove the four nuts from the heater-A/C mounting studs on the engine compartment side of the dash panel.
Remove the nut(s) that secure(s) the heater-A/C housing mounting brace to the stud(s) on the passenger compartment side of the dash board.
Pull the housing rearward far enough for the mounting studs and evaporator condensate drain tube to clear the dash panel holes.
Remove the housing from the vehicle.
Lift the heater core out of the housing.
Installation is the reverse of removal.


https://www.2carpros.com/forum/automotive_pictures/261618_0900c1528018f2d7_2.jpg

Was this
answer
helpful?
Yes
No
Monday, January 7th, 2019 AT 6:24 PM (Merged)
Tiny
2CP-ARCHIVES
  • MEMBER
  • 4,542 POSTS
  • 1999 DODGE DURANGO
Power door locks, windows, blower motor, and interior lights don't work. Radio turns on when door is open along with climate control back light. Replaced heater core and not sure all grounds were connected to appropriate place. Fuse box has power to it. Components started failing 2 weeks after heater core replacement (blower, then interior lights, then door locks, and finally windows). Please help. I have reached my limit of knowledge and have no one else's brain to pick. Thank you.
Was this
answer
helpful?
Yes
No
Monday, January 7th, 2019 AT 6:24 PM (Merged)
Tiny
FREEMBA
  • MECHANIC
  • 1,152 POSTS
You need to check the ground connection at the right kick panel. There is a nut with two big ground wires. Make sure it is tight and clean.
Was this
answer
helpful?
Yes
No
+1
Monday, January 7th, 2019 AT 6:24 PM (Merged)
Tiny
FREEMBA
  • MECHANIC
  • 1,152 POSTS
If the grounds are OK, check the Central Timer Unit (CMT).
To get to the CTM in the 1999 and 1998 Dodge Durango take out the globe box and there will be a panel to the right. The are four screws that hold it in, take them out then the panel and the CTM will come out. The CTM will have a white and green connector connected to it.
Was this
answer
helpful?
Yes
No
+1
Monday, January 7th, 2019 AT 6:24 PM (Merged)
Tiny
HMAC300
  • MECHANIC
  • 48,601 POSTS
There are thre grounds for locks windows an dinterior lights at lh rear of body see if that has broken or dirty. Also on lh side of dash for interio lights.
Was this
answer
helpful?
Yes
No
+1
Monday, January 7th, 2019 AT 6:24 PM (Merged)
Tiny
LEONARD GODBEY
  • MEMBER
  • 1 POST
  • 2001 DODGE DURANGO
Heater problem
2001 Dodge Durango V8 All Wheel Drive Automatic

How to remove the heater core for replacementc
Was this
answer
helpful?
Yes
No
Monday, January 7th, 2019 AT 6:24 PM (Merged)
Tiny
IMPALASS
  • MECHANIC
  • 3,112 POSTS
Hello -

Here is the info you requested
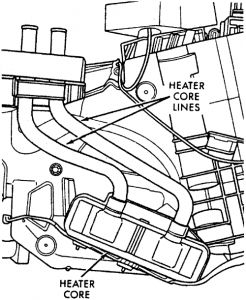
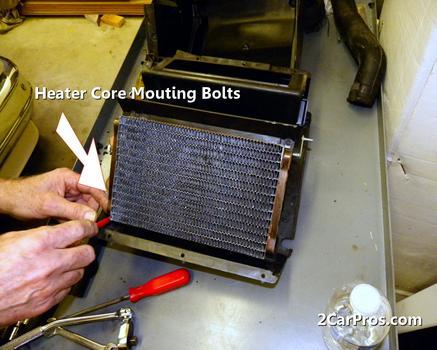
HEATER CORE

Removal & Installation

Remove heater assembly from vehicle. See HEATER ASSEMBLY. Disable heater assembly and remove heater core. To install, reverse removal procedure.

HEATER ASSEMBLY

Removal & Installation (Dakota & Durango)

Tips Click a link to view tip
Tech1 Tip: HEATER BOX REMOVAL

4th stud is located to immediate right of Trans Dipstick BEHIND fireproof material. This is also above and to the right of the Evap Core Drain. (shorter than other 3).

1. Disconnect negative battery cable. Drain cooling system. Remove instrument panel. See INSTRUMENT PANEL.

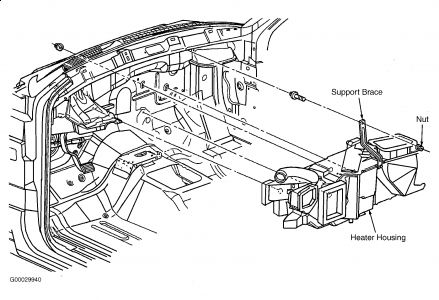
2. In engine compartment, disconnect heater hoses and plug all openings. Remove 4 heater assembly nuts from engine compartment firewall. Inside vehicle, remove heater assembly support brace screw, and swing support brace out of way. See Fig. 9. Move passenger seat rearward.

3. Carefully pull heater assembly rearward until studs and heater core tubes clear firewall. See Fig. 9. Lower heater assembly. Remove heater assembly from vehicle.

4. Place heater assembly on work bench with assembly housing cover facing down. Remove 2 bolts securing heater assembly housing cover to blower motor housing cover. Unplug vacuum harness connector from panel/defrost door actuator.

5. Remove floor duct from heater assembly housing. Remove 2 bolts securing heater assembly housing cover to lower housing near floor outlet. Turn assembly over. Disengage vacuum harness retainer and vacuum harness. Remove 13 screws securing housing cover.

6. Remove blend-air door lever. Gently pry panel-defrost door lever off. Pull up on heater assembly housing cover far enough to separate cover sealant and remove cover.

7. Ensure blower motor housing cover sealant is in place and in good condition. To complete installation, reverse removal procedure. See Fig. 9.


https://www.2carpros.com/forum/automotive_pictures/248015_9_14.jpg


INSTRUMENT PANEL

Removal & Installation (Dakota & Durango)

1. Disconnect negative battery cable. Disable air bag system. See AIR BAG SYSTEM SAFETY article in GENERAL SERVICING. Place front wheels in straight-ahead position. Remove door sill trim from both doorways. Remove kick panel covers from both sides of vehicle. Remove mounting bolts for hood release handle. Remove knee bolster.

2. Remove steering column trim panel and support bracket. If equipped, remove tilt steering column lever. Remove upper and lower shrouds from steering column. Disconnect driver's side air bag module. Loosen multifunction switch wiring harness connector screw and disconnect from switch. Screw will remain in connector.

3. Disconnect PRNDL cable. Disconnect shift cable from steering column. Remove steering coupler lock pin. Remove toe plate retaining bolts. Remove steering column mounting bolts and remove steering column from vehicle.

4. Remove screw from bulkhead wiring harness connector and disconnect. Disconnect 2 body wiring harness connectors, located next to bulkhead connector. Disconnect 3 wiring harness connectors, located nearest to dash panel junction block. Disconnect brake light switch. If equipped, disconnect Rear Wheel Anti-Lock (RWAL) brake module, located near steering column support brackets.

5. Disconnect plastic retainer clip from parking brake linkage rod, located at back of parking brake release handle. Remove rod end from parking brake handle. Remove instrument panel center support bracket. Unplug vacuum harness connector located at left end of heater assembly housing. Disconnect Air Bag Control Module (ACM) connector.

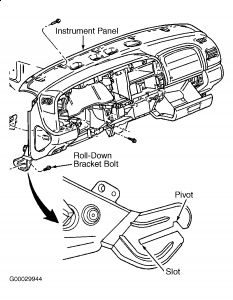
6. Remove glove box. Reach through glove box opening and disconnect antenna coaxial cable. Disconnect blower motor connector located above glove box opening, near support brace for heater assembly housing. Disconnect radio ground strap. Loosen instrument panel roll-down bracket bolts about 2 turns (bolts are located at lower corners, on both sides of instrument panel). See Fig. 15. Remove 5 bolts across top of dash panel, at base of windshield, removing center screw last.

7. Roll down instrument panel and install a temporary support hook that is about 18" (457 mm) in length. Install hook from center hole in instrument panel to center hole of dash panel. Pull lower instrument panel outward until both roll-down bracket bolts are in slotted roll-down pivot position. See Fig. 15. Instrument panel should now be supported and away from firewall.

8. Disconnect 2 body wiring harness connectors, located on a bracket near right end of instrument panel. Disconnect blower motor resistor. Disconnect temperature control cable from heater assembly housing and remove from housing. Disconnect defrost duct flexible hose from heater assembly housing.

9. Ensure all electrical and vacuum connectors are disconnected and instrument panel is free and clear for removal. With the aid of an assistant, remove temporary support hook. Lift instrument panel off of roll-down bracket bolts and remove from vehicle. See Fig. 15.

10. To install, reverse removal procedure. See Fig. 15. Ensure all wiring and hoses are clear and not pinched. Adjusting temperature control cable. See TEMPERATURE CONTROL CABLE under ADJUSTMENTS. Tighten bolts and nuts to specification. See TORQUE SPECIFICATIONS. Enable air bag system. See AIR BAG SYSTEM SAFETY article in GENERAL SERVICING.


https://www.2carpros.com/forum/automotive_pictures/248015_15_11.jpg


Was this
answer
helpful?
Yes
No
+1
Monday, January 7th, 2019 AT 6:24 PM (Merged)
Tiny
IMPALASS
  • MECHANIC
  • 3,112 POSTS
Hello -

Also, it looks like you may have some recalls on your vehicle. The dealer may fix these for free. Please contact the dealer service department, give them the VIN number of your car and have them check on these to see if they apply to you.


https://www.2carpros.com/forum/automotive_pictures/248015_recall_7.jpg

Was this
answer
helpful?
Yes
No
Monday, January 7th, 2019 AT 6:24 PM (Merged)
Tiny
2CP-ARCHIVES
  • MEMBER
  • 4,542 POSTS
  • 1999 DODGE DURANGO
  • 150,000 MILES
Replace heater core but know it does not throw out hot air just luke warm
Was this
answer
helpful?
Yes
No
Monday, January 7th, 2019 AT 6:24 PM (Merged)
Tiny
ASEMASTER6371
  • MECHANIC
  • 52,797 POSTS
Did you change the thermostat and bleed the system of air?

Roy
Was this
answer
helpful?
Yes
No
Monday, January 7th, 2019 AT 6:24 PM (Merged)
Tiny
MEXICO HAYDEN
  • MEMBER
  • 2 POSTS
  • 1988 DODGE DURANGO
  • V8
  • 4WD
  • AUTOMATIC
  • 140,000 MILES
How do I change the heater core.
Thanks
Was this
answer
helpful?
Yes
No
Monday, January 7th, 2019 AT 6:24 PM (Merged)
Tiny
BMRFIXIT
  • MECHANIC
  • 19,053 POSTS
1988 durango?
Was this
answer
helpful?
Yes
No
Monday, January 7th, 2019 AT 6:24 PM (Merged)
Tiny
GOULDFRED
  • MEMBER
  • 1 POST
  • DODGE DURANGO
How do I replace the heater core in a 1998 Dodge Durango V-8 w/AC. I was told that you have to take the whole dash out. I have worked as mechanic for alot of years, this is a first for me. Can you help me out here. Thanks, Fred
Was this
answer
helpful?
Yes
No
Monday, January 7th, 2019 AT 6:24 PM (Merged)
Tiny
BLACKOP555
  • MECHANIC
  • 10,371 POSTS
Yes im sorry but you have to remove the dash :(. Gone are the days where you just have to remove the glovebox.
Was this
answer
helpful?
Yes
No
Monday, January 7th, 2019 AT 6:24 PM (Merged)
Tiny
TOPMKER
  • MEMBER
  • 1 POST
  • 2001 DODGE DURANGO
  • V8
  • 4WD
  • AUTOMATIC
  • 125,000 MILES
Trying to identify a part so I can replace it 2001 Dodge Durango 4.8 engine
inline in the heater hose just before it goes thru firewall and into heater core their is a valve or control module that I have not been able to identify
Was this
answer
helpful?
Yes
No
Monday, January 7th, 2019 AT 6:26 PM (Merged)

Please login or register to post a reply.

Sponsored links