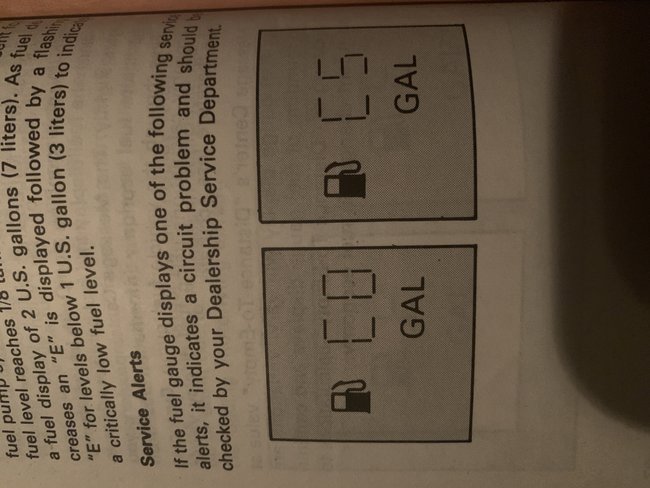
Instrument Cluster?

Tiny
GREENCHEVYMALIBU
  • MEMBER
  • 230 POSTS
Could u test it with a snap on verus? Could I have the unit rebuilt?
Was this
answer
helpful?
Yes
No
Thursday, August 27th, 2020 AT 10:48 AM (Merged)
Tiny
CADIEMAN
  • MECHANIC
  • 3,544 POSTS
Usally they have a fuel gauge tester. They hook it up and it sends ohms for e or 1/4-1/2-3/4 and full. The pump my not be alined properly because you buy the pump seperately from the sending unit. Then they go togeather to be installed. Before taking anything apart find a shop with a fuel gauge tester with the sending unit and the float is sticking.
Was this
answer
helpful?
Yes
No
Thursday, August 27th, 2020 AT 10:48 AM (Merged)
Tiny
ASEMASTER6371
  • MECHANIC
  • 52,797 POSTS
The verus will work. I dont know of anyone who re builds them

Roy
Was this
answer
helpful?
Yes
No
Thursday, August 27th, 2020 AT 10:48 AM (Merged)
Tiny
GREENCHEVYMALIBU
  • MEMBER
  • 230 POSTS
  • 1989 LINCOLN CONTINENTAL
  • 150,000 MILES
My guage for my gas reads cs and. My distance till empty reads cs. Is cs mean c, ircuit short and if so how to I fix it? Is the short in mg guage or the wire loom? How can I find out. Also my blower motor when I have it on ventwhen I push on tge gas the air blows kut the defroster when I let off tge gas it goes threw thevents again. Why
Was this
answer
helpful?
Yes
No
Thursday, August 27th, 2020 AT 10:48 AM (Merged)
Tiny
SEANGRANT00
  • MECHANIC
  • 334 POSTS
This sounds like it could be one of two things.

1) Damaged fuel tank sending unit connectors can be serviced by splicing in a new wire harness connector. The new connector can be obtained by ordering the fuel tank sending unit wire harness and cutting off the connector.

ACTION: Splice the new fuel tank sending unit connector to the existing wire harness.
Refer to the following procedure for service details.

2)The electronic instrument cluster (ETC) fuel gauge may intermittently show an increase in the fuel level or display circuit open †CO. This happens when the fuel tank level is above 12 full. The condition is caused by either an intermittent high resistance contact or an open circuit internal to the fuel sender unit.

ACTION: May need to replace fuel sender assembly.

Let me know if you need more instructions.

Sean
Was this
answer
helpful?
Yes
No
Thursday, August 27th, 2020 AT 10:48 AM (Merged)
Tiny
JAY BEHR
  • MEMBER
  • 1 POST
  • 1988 LINCOLN CONTINENTAL
Computer problem
1988 Lincoln Continental 6 cyl Front Wheel Drive Automatic

when engine is turn on the cluster say check DCL what do it mean?
Was this
answer
helpful?
Yes
No
Thursday, August 27th, 2020 AT 10:48 AM (Merged)
Tiny
ERNEST CLARK
  • MECHANIC
  • 1,730 POSTS
The Data Communications Link (DCL) is a wiring system that allows the sharing of information between the Electronic Engine Control System (EEC- IV), the Message Center Control Assembly (MCCA) and the Cluster Control Assembly (CCA) located in the electronic instrument cluster panel by using a common link (DCL).

The EEC-IV system transmits the following information through the DCL to the CCA and MCCA:

Engine rpm.
Engine coolant temperature.
EEC-IV malfunction indication.
Fuel used.
The CCA transmits the following information through the DCL to the MCCA:

Fuel level.
Odometer.
Speed pulses.
Cluster display temperature.
Battery voltage warning.
Oil pressure warning.
English/Metric mode.
Vehicle in Accessory/Run (ACC/RUN) mode.
Engine temperature warning.
Charging system warning.
There are two EEC-IV, DCL strategies. One covers the 49-state application, the other covers California. The California strategy uses the EEC-IV system to transmit Malfunction Indicator Lamp (MIL) information to the MCCA. The MCCA uses MIL information to generate a CHECK ENGINE warning in the event of an engine sensor failure.

In the event of a DCL failure, an alternating message of CHECK ENGINE then CHECK DCL is displayed on the MCCA.

Always check the fuses and relays first. If those check out, then check all the wiring and connectors. With a vehicle this old, it isn't uncommon to find wires that have frayed/broken/burned, and/or connectors that've worked their way loose.

If everything checks out, then suspect the computer. But don't just replace it. Check the input/output wires to see if the computer is actually accepting inputs and giving outputs according to spec. If not, then the computer is bad.
Was this
answer
helpful?
Yes
No
Thursday, August 27th, 2020 AT 10:48 AM (Merged)
Tiny
JOE SHARP
  • MEMBER
  • 5 POSTS
  • 1987 LINCOLN CONTINENTAL
  • 0.5L
  • V8
  • AUTOMATIC
  • 46,000 MILES
It has a digital dash. And its says C0 where the gas gauge is. The owners manual doesn’t help either.
Was this
answer
helpful?
Yes
No
Thursday, August 27th, 2020 AT 10:48 AM (Merged)
Tiny
JACOBANDNICKOLAS
  • MECHANIC
  • 108,244 POSTS
Welcome to 2CarPros.

The CO indicates Circuit Open. There was a technical service bulletin put out years ago regarding this issue, and it was related to several Ford Motor Co vehicles.

Here is the TSB. Take a look through it. I feel confident it is relevant in this situation.

____________________________________________

1987 Lincoln Continental V8-302 5.0L
Electronic Fuel Gauge - Erratic Readings
Vehicle Instrument Panel, Gauges and Warning Indicators Fuel Gauge Technical Service Bulletins Electronic Fuel Gauge - Erratic Readings
ELECTRONIC FUEL GAUGE - ERRATIC READINGS
Article No.
95-2-3

01/30/95

GAUGE - ERRATIC DISTANCE-TO-EMPTY AND FUEL GAUGE READINGS - VEHICLES BUILT BEFORE 1/1/94

GAUGE - FUEL - ELECTRONIC - "CO" DISPLAYED IN ELECTRONIC CLUSTER WITH TWO TOP/BOTTOM BARS HIGHLIGHTED - VEHICLES BUILT BEFORE 1/1/94

FORD:
1986-92 TAURUS
1989-94 PROBE
1990-94 CROWN VICTORIA
1993-94 THUNDERBIRD

LINCOLN-MERCURY:
1985-92 MARK VII
1986-94 CONTINENTAL, SABLE
1990-94 GRAND MARQUIS, TOWN CAR
1993-94 COUGAR, MARK VIII

LIGHT TRUCK:
1990-94 AEROSTAR

ISSUE:
There may be erratic Distance-To-Empty (DTE) and fuel gauge readings, or circuit open "CO" displayed in the electronic cluster with two (2) top/bottom bars highlighted. This is caused by fuel sender card overprint material and/or an intermittent connection between the spring and contact on the sender card.

ImageOpen In New TabZoom/Print

ACTION:
Install a revised sender assembly or fuel pump/sender assembly. Refer to the appropriate vehicle Service Manual, Fuel System Section, for removal and installation procedures. Refer to the Parts Block in this article for correct parts usage.

OTHER APPLICABLE ARTICLES: NONE
WARRANTY STATUS:
Eligible Under The Provisions Of Bumper To Bumper Warranty Coverage For 1992-94 Models And 1991 Lincolns, Major Component Warranty Coverage For 1990 And Earlier Model Lincolns, Basic Warranty Coverage For All Other Models

OPERATION DESCRIPTION TIME
950203A Replace Fuel Gauge 1.5 Hrs.
Sending Unit - Town Car
950203B Replace Fuel Gauge 0.9 Hr.
Sending Unit - Crown Victoria/Grand Marquis
950203C Replace Fuel Gauge 1.0 Hr.
Sending Unit - Taurus/Sable
950203D Replace Fuel Gauge 1.2 Hrs.
Sending Unit - Mark VIII
950203E Replace Fuel Gauge 1.1 Hrs.
Sending Unit - Probe
950203F Replace Fuel Gauge 1.2 Hrs.
Sending Unit - Thunderbird
950203G Replace Fuel Gauge 0.9 Hr.
Sending Unit Mark VII
950203H Replace Fuel Gauge 1.2 Hrs.
Sending Unit Aerostar

DEALER CODING BASIC PART NO. CONDITION CODE
9275/9H307 G25

OASIS CODES: 204000, 204100, 206000

___________________________________

According to the bulletin, the fuel pump sender assembly will need replaced.

Let me know if this helps.

Take care,
Joe
Was this
answer
helpful?
Yes
No
+1
Thursday, August 27th, 2020 AT 10:48 AM (Merged)
Tiny
JOE SHARP
  • MEMBER
  • 5 POSTS
Thanks bud helps alot. Do I have to drop the gas tank to get to the fuel pump?
Was this
answer
helpful?
Yes
No
Thursday, August 27th, 2020 AT 10:48 AM (Merged)
Tiny
JACOBANDNICKOLAS
  • MECHANIC
  • 108,244 POSTS
Welcome back:

Yes, the tank needs removed. Here are the directions:

1987 Lincoln Continental V8-302 5.0L
Removal and Installation
Vehicle Powertrain Management Fuel Delivery and Air Induction Fuel Pump Service and Repair Procedures Removal and Installation
REMOVAL AND INSTALLATION
WARNING: Do not smoke, carry lighted tobacco or open flame of any type when working on or near any fuel related component. Highly flammable mixtures are always present and may be ignited, resulting in possible personal injury.

CAUTION: Fuel supply lines will remain pressurized for long periods of time after engine shut down. This pressure must be relieved before servicing of the fuel system is begun. A valve is provided on the throttle body for this purpose. Remove the air cleaner and relieve system pressure by using Rotunda pressure gauge tool T80L-9974-A or equivalent and drain the system through the drain tube.

Removal
1. Place vehicle on hoist-Do not raise.
2. Depressurize fuel system as previously described.
3. Remove fuel from fuel tank by pumping out through filler. Use care to prevent combustion from fuel spillage.
4. Raise vehicle on hoist.
5. Disconnect supply line and return line fittings and vent line at the right and left hand side rear axle frame kick-ups.
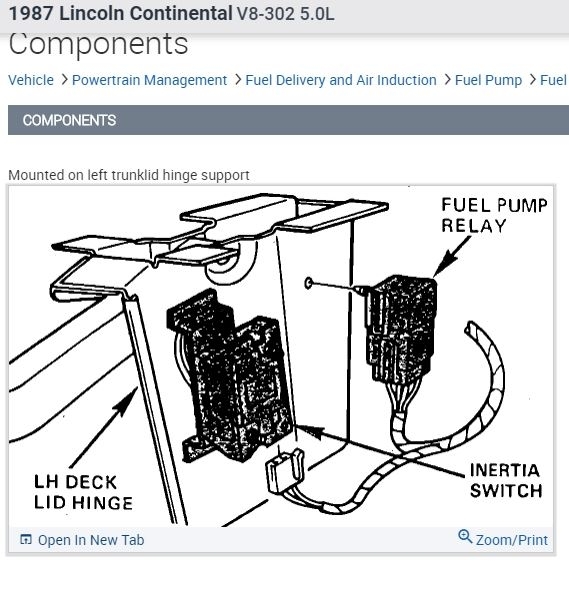
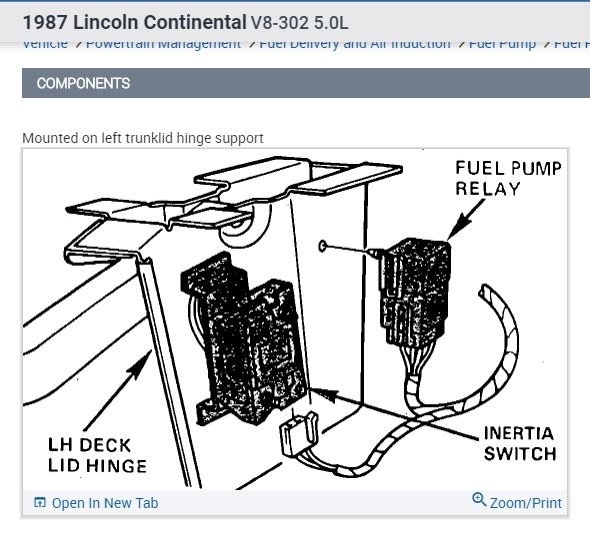
6. Disconnect electrical connector forward of tank.
7. Disconnect and remove fuel filler tube.
8. Remove fuel tank support straps and remove fuel tank to bench.
9. Remove any dirt that has accumulated around the fuel pump attaching flange so that it will not enter the tank during removal and installation.
10. Disconnect the supply line and return line fittings and the electrical connector.
11. Turn the fuel pump locking ring counterclockwise with the tool and remove locking ring.
12. Remove fuel pump and bracket assembly.
13. Remove seal gasket and discard.

Installation

1. Clean the fuel pump mounting flange and the fuel tank mounting surface and seal ring groove.
2. Put a light coating of heavy grease (Cl AZ-i 9590- B or equivalent) on a new seal ring to hold it in place during assembly and install in fuel ring groove.
3. Install fuel pump and bracket assembly carefully to insure that filter is not damaged. Be sure that locating keys are in keyways and seal ring remains in groove.
4. Hold pump assembly in place and install locking ring finger tight being sure that all locking tabs are under tank lock ring tabs.
5. Secure the fuel pump unit with the locking ring by rotating clockwise with tool until ring stops against stops.
6. Install electrical connector.
7. Lubricate fittings and install fuel line fittings and tighten to 13-20 Nm (10-15 lb-ft).
8. Install tank in vehicle, and tighten straps.
9. Connect electrical connections to fuel sender and fuel pump wiring harness.
10. Lower vehicle.
11. Install filler tube and attaching screws.
12. Connect vent line.
13. Lube fittings on right and left side of vehicle at kickup with light oil. Install fitting finger tight, then tighten 1/4 turn more.
14. Install a minimum of 38 liters (10 gallons) of fuel and check for leaks.
15. Install pressure gauge Tool T8OL-9974-A or equivalent on the fuel charging assembly fuel diagnostic valve and turn ignition key to On position for 3 seconds. Turn ignition key Oft and back On for 3 seconds repeatedly (5 to 10 times) until pressure gauge shows at least 241 kPa (35 psi). Check for leaks at fittings.
16. Remove pressure gauge, start engine, and recheck for leaks.

________________________

Let me know if this helps or if you have other questions. This is the only thing I could think of and find related to the issue.

Joe
Was this
answer
helpful?
Yes
No
Thursday, August 27th, 2020 AT 10:48 AM (Merged)
Tiny
JOE SHARP
  • MEMBER
  • 5 POSTS
Where is the fuel pump relay located at on the car listed above?
Was this
answer
helpful?
Yes
No
Thursday, August 27th, 2020 AT 10:48 AM (Merged)
Tiny
JACOBANDNICKOLAS
  • MECHANIC
  • 108,244 POSTS
Welcome back:

I attached picture. Let me know if it helps.

Joe
Was this
answer
helpful?
Yes
No
Thursday, August 27th, 2020 AT 10:48 AM (Merged)
Tiny
JOE SHARP
  • MEMBER
  • 5 POSTS
Mine doesn’t have a relay beside the LH Deck motor
Was this
answer
helpful?
Yes
No
Thursday, August 27th, 2020 AT 10:48 AM (Merged)
Tiny
JACOBANDNICKOLAS
  • MECHANIC
  • 108,244 POSTS
Welcome back:

That is the only place it is listed. Is the inertia switch there?

Joe
Was this
answer
helpful?
Yes
No
Thursday, August 27th, 2020 AT 10:48 AM (Merged)
Tiny
JOE SHARP
  • MEMBER
  • 5 POSTS
No.
Was this
answer
helpful?
Yes
No
Thursday, August 27th, 2020 AT 10:48 AM (Merged)
Tiny
JACOBANDNICKOLAS
  • MECHANIC
  • 108,244 POSTS
I checked 1986 and 1988 for location thinking it may have been a mid year production change, and nothing. The 1986 is the same and 1988 changed to an integrated module with the body style and engine change.

Have you checked under the hood in the power distribution box? Also, check to see if there is an EEC relay under the hood in the relay/fuse box and switch it with another relay with the same part number.

Let me know what you find.

Joe
Was this
answer
helpful?
Yes
No
Thursday, August 27th, 2020 AT 10:48 AM (Merged)

Please login or register to post a reply.

Sponsored links