Introduction
The front crankshaft seal, also known as the front main seal, is responsible for preventing engine oil from leaking out where the crankshaft exits the engine block. This seal is located at the front of the crankshaft as it protrudes from the engine block. The front part of the crankshaft is where the harmonic balancer or vibration dampener (same thing) is bolted, and is where the serpentine belt is driven from, (front pulley).
Typically the front main seal is pressed into the front timing cover or into the seal housing on timing belt engines. This seal is constructed with a metal outer ring, a rubber lip seal, and a small circular spring which holds tension on the lip seal as it rides against the sealing surface of the harmonic balancer hub.
What Goes Wrong?
As in with any engine seal, heat and engine vibration can cause the seal to become hard and loose its sealing ability which allows engine crankcase pressure to force oil past the seal and out of the engine, (oil leak).
Tools and Materials Needed
- Socket and ratchet set
- Torque wrench
- Seal puller or screwdriver
- Rubber mallet
- New front crankshaft seal
- Gasket sealer (if required)
- Jack and jack stands
- Service manual for torque specifications
Front Engine Crankshaft Seal Replacement
The car will need to be raised up in most cases and supported on jack stands. Wear protective eyewear and gloves, start with the engine cool.
1. Battery Disconnect
Anytime you are working on the engine there is the potential of creating short circuit if you touch a wrench or any metal piece from battery power to ground. To prevent this remove the negative cable of the battery to stop the electrical power to the car.
2. Serpentine Belt Removal
The serpentine belt is used to drive the accessories of the engine such as the alternator and water pump. This belt must be removed to gain access to the harmonic balancer.
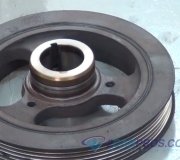
3. Harmonic Balancer Removal
To replace the front main seal the the harmonic balancer must be removed which is the most difficult part of the job.
4. Crankshaft Seal Removal
The front main seal will now be exposed at the front of the crankshaft. Use a large standard screwdriver or seal puller and pop the seal loose from the timing chain cover or seal housing. Work the seal loose by gently prying round the seal being careful not to score the metal of the seal housing or timing cover. Any major grooves into these parts can cause a leak once the new seal is installed. Once the seal has been removed inspect it for obvious failures such as dried, torn or dilapidated lip seals or a broken seal spring.
5. Front Main Seal Installation
Use a shop towel and clean the mounting surface of the seal, a small amount of carburetor cleaner works good for this, (don't spray cleaner down into the engine), also clean the front of the crankshaft as well. Match the old seal to the new unit to make sure the inner and outer diameters are the same. Then apply a small amount of silicone sealer to the outer rim of the seal. This will help protect against any oil leaks from around the outside of the seal body.
Be careful at this point because if you install the seal backward it will leak. The lip of the seal must be pointing inward toward the engine. Gently set the seal in place into the timing cover or seal housing. Now it is ready for installation, use a hammer and large socket or seal installer which you can rent from the local auto parts store. Gently tap the seal into place making sure the seal stays square throughout the installation process. The seal will sit flush or almost flush once it is fully installed, (do not push the seal too far inward).

6. Reinstall the Harmonic Balancer
Inspect the balancer's sealing hub for damage or grooves where the old seal rode against. You should see burnt oil residue which is present in all engines, use a small piece of emery cloth or fine sandpaper and prepare a new clean surface for the new front main seal to ride against. If these grooves are too deep or a fresh surface cannot be made smooth the dampener must be replaced or the new seal will leak.
In the image below you can see what it should look like once you are finished preparing the balancer seal hub. Clean the hub using a shop towel and make sure there is no sanding grit left behind.

Apply a small amount of grease to the balancer hub sealing surface. This will lubricate the seal once the engine is started up. If you do not add grease at this point when the engine is started, the balancer will rotate burning the seal and jeopardizing its ability to work correctly.

To finish the job reinstall the harmonic balancer and accessories.
Conclusion
Start the engine and allow it to run for a few minutes. Inspect the front crankshaft seal area for any signs of oil leaks. By following these detailed steps, you can successfully replace the seal and maintain your engine's performance.
Watch the Video!
Please watch this video of the job being done to glean additional helpful information.
Credits
This guide knowledge base was created by the 2CarPros Team, and by Ken Lavacot: Automobile repair shop owner and certified master automobile technician of over 30 years. If you have question or need help please ask one of our experts we are happy to help. Please visit our 2CarPros YouTube Channel.

Article published 2025-02-13