Welcome to 2CarPros.
It sounds like the motor if you only hear a click.
Here are the directions for removal of the motor. The attached pictures correlate with the directions.
___________________________
REMOVAL
CAUTION / NOTICE / HINT
HINT
* Use the same procedure for the RH side and LH side.
* The following procedure is for the LH side.
PROCEDURE
1. PRECAUTION
NOTICE:
After turning the ignition switch off, waiting time may be required before disconnecting the cable from the negative (-) battery terminal. Therefore, make sure to read the disconnecting the cable from the negative (-) battery terminal notices before proceeding with work.
See: Vehicle > Technician Safety Information > Repair Instruction - Precaution
2. DISCONNECT CABLE FROM NEGATIVE BATTERY TERMINAL
NOTICE:
When disconnecting the cable, some systems need to be initialized after the cable is reconnected.
3. REMOVE FRONT DOOR LOWER FRAME BRACKET GARNISH
See: Front Door > Overhaul > Disassembly
4. REMOVE FRONT DOOR INSIDE HANDLE BEZEL PLUG
See: Front Door > Overhaul > Disassembly
5. REMOVE POWER WINDOW REGULATOR MASTER SWITCH ASSEMBLY WITH FRONT DOOR UPPER ARMREST BASE PANEL (for Driver Side)
See: Front Door > Overhaul > Disassembly
6. REMOVE POWER WINDOW REGULATOR SWITCH ASSEMBLY WITH FRONT DOOR UPPER ARMREST BASE PANEL (for Front Passenger Side)
See: Front Door > Overhaul > Disassembly
7. REMOVE COURTESY LIGHT ASSEMBLY
See: Courtesy Lamp > Removal and Replacement > Removal
8. REMOVE FRONT DOOR TRIM BOARD SUB-ASSEMBLY
See: Front Door > Overhaul > Disassembly
9. REMOVE FRONT DOOR SERVICE HOLE COVER
See: Front Door > Overhaul > Disassembly
10. REMOVE FRONT DOOR GLASS SUB-ASSEMBLY
See: Front Door > Overhaul > Disassembly
11. REMOVE FRONT DOOR WINDOW REGULATOR ASSEMBLY
See: Front Door > Overhaul > Disassembly
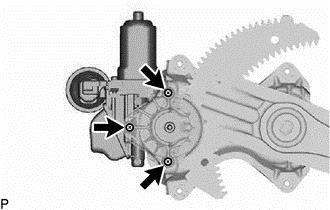
12. REMOVE POWER WINDOW REGULATOR MOTOR ASSEMBLY
(a)Using a T25 "TORX" socket wrench, remove the 3 screws and power window regulator motor assembly.
pic 1
______________________________________
Install:
CAUTION / NOTICE / HINT
HINT
* Use the same procedure for the RH side and LH side.
* The following procedure is for the LH side.
PROCEDURE
1. INSTALL POWER WINDOW REGULATOR MOTOR ASSEMBLY
NOTICE:
The regulator arm must be below the intermediate position when installing the power window regulator motor assembly.
(a)Using a T25 "TORX" socket wrench, install the power window regulator motor assembly with the 3 screws.
Torque : 5.4 Nm (55 kgf-cm, 48 in-lbf)
HINT
When replacing the power window regulator motor assembly, a new power window regulator motor assembly uses self-tapping screws to thread new installation holes when the self-tapping screws are installed.
2. INSTALL FRONT DOOR WINDOW REGULATOR ASSEMBLY
See: Front Door > Overhaul > Reassembly
3. INSTALL FRONT DOOR GLASS SUB-ASSEMBLY
See: Front Door > Overhaul > Reassembly
4. INSTALL FRONT DOOR SERVICE HOLE COVER
See: Front Door > Overhaul > Reassembly
5. INSTALL FRONT DOOR TRIM BOARD SUB-ASSEMBLY
See: Front Door > Overhaul > Reassembly
6. INSTALL COURTESY LIGHT ASSEMBLY
See: Courtesy Lamp > Removal and Replacement > Installation
7. INSTALL POWER WINDOW REGULATOR MASTER SWITCH ASSEMBLY WITH FRONT DOOR UPPER ARMREST BASE PANEL (for Driver Side)
See: Front Door > Overhaul > Reassembly
8. INSTALL POWER WINDOW REGULATOR SWITCH ASSEMBLY WITH FRONT DOOR UPPER ARMREST BASE PANEL (for Front Passenger Side)
See: Front Door > Overhaul > Reassembly
9. INSTALL FRONT DOOR INSIDE HANDLE BEZEL PLUG
See: Front Door > Overhaul > Reassembly
10. INSTALL FRONT DOOR LOWER FRAME BRACKET GARNISH
See: Front Door > Overhaul > Reassembly
11. CONNECT CABLE TO NEGATIVE BATTERY TERMINAL
NOTICE:
When disconnecting the cable, some systems need to be initialized after the cable is reconnected.
12. INITIALIZE POWER WINDOW CONTROL SYSTEM
* for Models with Jam Protection Function on 4 Windows:
See: Windows > Programming and Relearning > Initialization
* for Models with Jam Protection Function on Front Door Windows:
See: Windows > Programming and Relearning > Initialization
13. INSPECT POWER WINDOW OPERATION
* for Models with Jam Protection Function on 4 Windows:
See: Windows > Initial Inspection and Diagnostic Overview > Operation Check
* for Models with Jam Protection Function on Front Door Windows:
See: Windows > Initial Inspection and Diagnostic Overview > Operation Check
_________________________________
Let me know if this helps or if you have other questions.
Take care,
Joe
May 12, 2019 at 9:22 PM