Thank you for posting the printout. That puts us many steps ahead of the diagnosis.
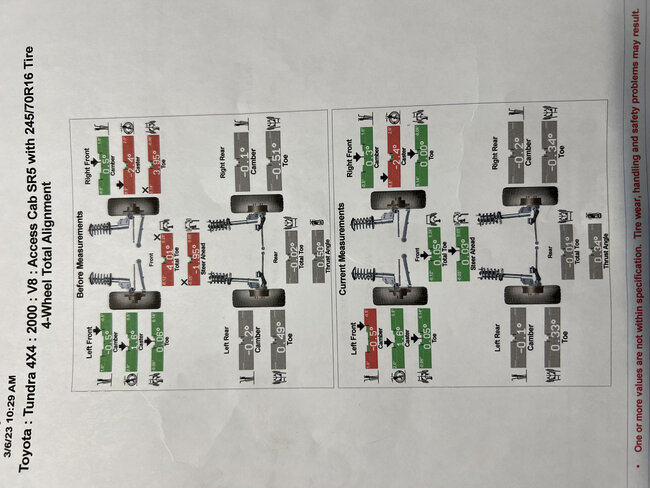
My first observation is this alignment computer is set to read caster and camber to one place past the decimal point. That is done when accuracy takes a back seat to speed. I always set my computers to read to two decimal places for more accuracy. Back in the '60s and '70s, with old mechanical alignment equipment, we were lucky if we could see down to the eighth or even the sixteenth of a degree. By the '90s, a lot of front-wheel-drive cars need to be adjusted to within 0.06 degrees. With rounding up or down, there is no way to be that precise as this computer is set up.
Alignment computers today are extremely precise, but the results have a lot of limitations. For example, the tires must be sitting on slip plates that can slide around freely. Dirt and rust impede that which can cause a tire's sidewall to flex a little rather than the wheel moving freely to its at-rest position. Additional weight in the box or back seat, especially on one side, will have a big effect on the readings. Same for mismatched tires, unequal air pressure, even leaving a door open just a few inches will change the readings. This become more of an issue of the mechanic's experience and if I can see how they're doing the job. It is also possible to have an extremely conscientious mechanic with recently calibrated equipment. That is just one of the variables that comes to mind.
As you can see from left front camber, the value is highlighted in green to show it's "in specs", while in the final, (current) reading, it's highlighted in red, meaning "out-of-specs, but they're the same number. The actual value is probably right on the border line of being in or out of specs, but as that number changes a little, it gets rounded to 0.5 degrees, so we don't see the value change. We would see it change if the computer was set to read to another decimal place. These computers are so sensitive, I used to joke that I could make the numbers change by breathing on the fender!
The first problem that jumped out right away are those two front camber readings. Camber is the inward or outward tilt of the wheel as viewed from in front of the truck, looking back at the wheel. Camber has the biggest effect on tire wear and it has the biggest effect on pulling to one side. In this case the left front wheel is leaning in on top, or to the right, (negative 0.5 degrees). The right one is also leaning to the right, 0.3 degrees. That's just a little more than specs call for, but acceptable. The problem is together they make a 0.8 degree pull to the right. That's a real lot. I would expect your arms to become tired after just a few miles of fighting that pull.
The next problem is caster on both front wheels. That has to do with the tilt of the struts or the line drawn through the upper and lower ball joints, as viewed from beside the wheel. Think of the angle of the fork of a bicycle and how it angles rearward on top. That is positive caster and is what allows us to ride no-handed, as long as there's weight on the bicycle. Wheels on cars are offset from the steering pivot points, (ball joints), so with positive caster, the weight of the truck makes the left front wheel want to turn to the right, or to the center of the truck. That force is so strong you would never be able to pull that wheel back by hand. Doing so actually raises that corner of the truck a fraction of an inch. The same thing is supposed to happen on the right wheel. It's when you connect them with the steering linkage that those two forces offset each other. They become unbalanced when you turn to one side. Trying to get back into balance is what makes the steering wheel come back to center on its own after turning a corner.
As a side note, vehicles as far back as the 1950s typically called for negative caster, (the upper ball joint was further ahead of the lower ball joint). That made it rather easy to turn the steering wheel on a big, heavy truck with no power steering. The huge drawback is negative caster is very unstable. You need to be constantly correcting the direction of travel. By the 1960s, people were driving faster and further, so they switched to positive caster for better directional stability, but they added power steering to make up for the greatly increased steering effort needed at lower speeds.
To add to the misery, Toyota provides about a dozen pages of alignment specifications for every conceivable variable, but they're all listed in degrees and "minutes". I can't convert that to degrees and tenths of a degree like we normally use here, but as near as I can tell, your truck calls for around 1.40 degrees caster. You have 1.6 degrees on the left front wheel which means that one is trying to turn to the right just a little harder than they had intended. This alone is perfectly fine and acceptable. The problem is the right front caster is at negative 2.4 degrees. That wheel is also trying to turn the right on its own, and pretty hard. The combined 4.0 degree caster pull to the right is very high and would be tiring on its own, even if that 0.8 degree camber pull wasn't there.
With this suspension design, caster has exactly half as much effect on pull as does camber, so if we look at that huge 4.0 degree caster pull as a 2.0 degree camber pull, plus the 0.8 degree camber pull we already have, that equates to 2.8 degrees camber pull to the right. I would consider the truck to be undriveable and would certainly never let it out of the shop like that.
To color this a little, it is customary to adjust in a little camber or caster pull to the left to make up for "road crown". That's the road's tilt to the right so water runs off. Without that slight pull to the left, the vehicle would drift to the right. With big, heavy rear-wheel-drive cars and trucks, 1/4 degree camber pull to the left was plenty, or 1/2 degree caster pull to the left, but not both. Today with little front-wheel-drive cars, I had the best results with exactly 0.06 degree camber pull to the left. There's no way to get that precise with old mechanical alignment equipment.
The next problem is the front toe readings. Toe and camber readings are always live and the numbers update on the screen as we make changes. Caster, on the other hand, has to be calculated. The computer does that by taking camber readings when the steering system is turned to the left a prescribed amount, then to the right the same amount, and then back to center. At that point, the computer takes a snapshot, so to speak, and puts those two caster values on the screen until that "caster sweep" is performed again. That sweep will be performed many times during the alignment. The problem is most people just let that initial snapshot stand and that is what is shown as the "Before" measurements. I preferred to reach in and place the steering wheel perfectly straight, then press a button to take a new initial snapshot. Without watching the person doing the alignment, I don't know if that was done, so there's no way to tell which one toe reading was incorrect or if both were incorrect. For all practical purposes, that isn't what's really important. What IS important is the total of the two values.
Toe is the direction the wheel is steering when the steering wheel is centered straight ahead. While camber has the biggest effect on tire wear patterns, toe is a close second. The computer is set up to read toe to two decimal places, but it's set to read it in degrees. I'm only familiar with inches, but as I recall, a reading in degrees is very close to twice that same reading in inches. That means where they show 4.01 degrees for total toe, (the sum of the readings from each front wheel), my computer would show it as 2.00 inches of "toe in". That is also huge and would make the truck undrivable. It would dart around following the tire with the most weight on it, which changes as you hit bumps and pot holes. It would have no "predictability" meaning you'd constantly be on guard to quickly make needed steering corrections, and you don't know how the truck will respond.
This total toe is the only thing I can see that was corrected. It is expected to be way out of specs since the tie rod ends were replaced. The connection between the inner and outer tie rod is the threaded adjustment.
At this point let me stop and mention there are no specs provided for the rear wheels. That is common for solid axle housings where nothing can be adjusted or should ever need to be adjusted. The boxes are highlighted in gray, and no minimum or maximum range is shown in the tiny numbers in the upper left and right corners. Regardless, all alignment computers still look at rear toe on each wheel, and use those values to tell us where to adjust front toe to. Those front toe adjustments are done while we have the steering wheel physically locked perfectly straight. Your total rear toe is as close to perfect as you can get, (0.01 degree). That's what's needed for best rear tire wear, but each rear wheel is steering slightly to the right. That's not nearly enough for someone following you to see, and really isn't bad enough to worry about, but for this story, both are steering to the right creating a "thrust angle" of 0.34 degrees. That would make the truck steer to the left and you'd have to correct it by turning the steering wheel to the right a little. Instead, alignment computers make up for that. They look at that steer ahead value, then calculate where we should adjust each front toe to, to end up with a straight steering wheel.
To say that a different way, imagine you have a truck with everything perfectly straight, parallel, and in perfect alignment with a straight steering wheel. Now lift the body up off the frame, turn is slightly, then set it back down. Nothing related to the alignment has changed, but the wheels are no longer perfectly parallel to the body. We don't care about that. It's the straight steering wheel we'll notice when it's wrong.
This printout is nice for showing where adjustments are in relation to where they're supposed to be. There is a different printout that I made for every customer, and a copy for myself, and I highlighted the things I adjusted. When you have the truck realigned, thank them for taking the time to make the printout, but ask if they can give you the one that shows just a big list of numbers. Specifically what I would like to see are the two numbers for "front SAI", (steering axis inclination). That has to do with an imaginary line drawn through the strut, or through the upper and lower ball joints, as viewed from in front of the vehicle. Specs for that are usually not provided. The only thing that is extremely important is it's the same on both sides. A typical value might be 28.0 degrees. We want to see it within about 0.2 degrees of each other. If those values are different, it could be a clue to improperly repaired crash damage, or in the case of front-wheel-drive GM cars, a mispositioned engine cradle. SAI is measured automatically during the caster sweep, or "swing", but we rarely look at it unless we're looking for something unusual.
SAI that has changed will affect camber values on the front too, but most inexperienced specialists will just readjust camber to specs without correcting the underlying SAI problem first. Unequal SAI will cause darting back and forth as the road surface changes. Once camber has been improperly "corrected", incorrect SAI has no effect on tire wear.
For my last point of confusion, if you aren't already, you should be aware of the differences with off-center steering wheels. If we were to assume the two "Before" front toe readings were correct, and everything else is equal, the RF wheel is steering very much to the left. The truck would tend to go that way, so you would correct it by turning the steering wheel to the right quite a bit. Actually, the steering system would find that center point by itself where both front wheels are steering toward the center of the truck an equal amount. The truck would go straight but if you let go of the steering wheel it would be sitting off-center to the right. That is simply an off-center steering wheel.
I took some liberties there. That story would hold water better when the total toe wasn't off so much. Instead of the 4.01 degrees / 2.00 inches, we commonly see vehicles come in with perhaps as much as 1/8" to maybe 1/4" total toe out of specs. That can be enough for tire wear patterns to show up over a few thousand miles.
As I mentioned earlier, the last time the "Current" values were updated and displayed was when the last two front toe adjustments were set to specs, and that is always done while the steering wheel is locked straight ahead. If all the other variables are equal side to side or are accounted for, the "steer ahead" value of almost a perfect 0.00 degrees, (0.03 degrees) indicates your steering wheel will be perfectly straight, but those numbers only apply to a truck that's standing still. The wildly unequal caster is putting pressure on the steering system to turn both wheels to the right, but the locked steering wheel is preventing that movement. The very high camber pull to the right only shows up when those tires are rolling. This is a case of where those pulls show up during driving, and while on paper the steering wheel s straight, you have to turn to the left to counteract those pulls. Technically this is not an off-center steering wheel. You can have both, but it can be confusing to differentiate between a crooked steering wheel and a straight one that's being turned to offset a pull.
To add still another dimension to this sad story, caster causes a pull by tugging unequally on the steering linkage, so if you let go of the steering wheel it will turn by itself in the direction of the pull. A camber pull has to do with the squishing or moving around unequally of the different sections of the tire tread where it contacts the road surface. As such, if you let go of the steering wheel and camber causes the truck to pull to one side, the steering wheel will remain straight ahead. Fun fact that can be a clue to the diagnosis before the alignment is started.
An even more elusive clue occurs when there's a big camber pull one way and an even bigger caster pull the other way. While it won't feel "right" or stable, the vehicle could go fairly straight, but the clue is when going over a bump across the road, like railroad tracks or an intersection, as the front of the truck bounces up and down, the steering wheel will oscillate left and right, while the truck keeps going straight.
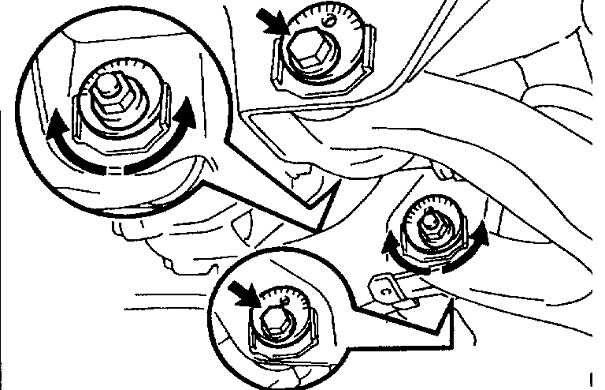
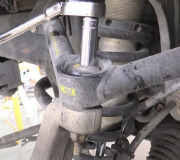
This drawing shows the two adjusters for caster and camber. They appear to be on the upper control arm. They're on the lower control arm on some models. The two adjusters have to be jockeyed back and forth to move the ball joint left and right or forward or rearward. The two adjustments interact. This style is very easy to set on one side. We go for perfect camber, then take what we get for caster as long as it's close to perfect. The problem is matching it on the second wheel. Now we have to make the adjustments, do a new caster sweep to see what we got for that, then readjust, do another sweep, and over and over sometimes a dozen times before both sides are close enough to equal. Some bosses ride their employees to hurry and get it out the door. I was lucky at my dealership where they never yelled at me for working too slowly. I had the time to get the best results and happy customers.
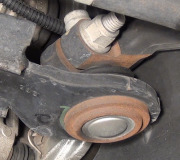
In this case nothing was adjusted for caster and camber. The only other reason I can think of is if those adjusters are rusted tight. These are too far out to have been caused by age and wear, so a better suspect now would be the chassis ride height. Start by standing in front or in back of the truck and observing if it is sitting level. If it is not, we'll need to see if there are torsion bars that can be adjusted or if the coil springs are weak or broken. Ride height should always be measured first and corrected before trying to align any vehicle. I had a lot of Dodge Dakotas come in for alignments that ended up simply needing the right torsion bar adjusted up a little. That instantly brought all the alignment numbers right back to where they were when it left the factory.
To sum this up, proper response is to return to the shop that did the alignment, point out the horrendous numbers, and ask to have this redone. Every alignment must include a test-drive after, and many specialists like to do one before. There's no way this pull or off-center steering wheel should have been missed. The only excuse I can think of is they only adjusted front toe because only the tie rod ends were replaced. We still perform steering and suspension system inspections to insure there's no worn parts. To overlook something that prevents the alignment from holding is to open ourselves up to liability issues.
Please let me know if there's other details that might be relevant, and keep me updated on how this turns out.
Image (Click to make bigger)
Monday, March 6th, 2023 AT 3:23 PM