Welcome to 2CarPros.
If you have a bad TPM sensor, the tire will need to be removed from the wheel. You will need a tire machine to do that. Also, if you replace the sensor, the new sensor will need to learn the frequency to transmit a signal. That requires a special tool and directions are included below.
Here are the directions for replacing the TPMS. Remember, the tire needs to be removed from the wheel.
TIRE PRESSURE MONITORING (TPM) SENSOR - INSTALLATION
INSTALLATION
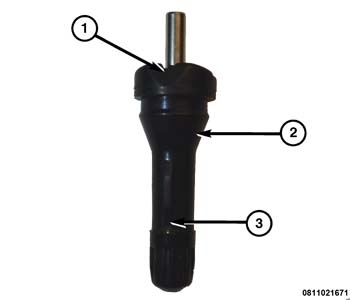
pic 1
CAUTION:
Any time a sensor is to be reinstalled in a wheel, a new valve stem assembly must be installed to ensure air tight sealing.
NOTE:
When installing a new valve stem (2), do not install it with the sensor (3) attached. If it is a new sensor, separate the valve stem from the sensor first then install the components separately.
NOTE:
Replace the valve stem (2) assembly with each tire change or when the tire is removed from the wheel.
1. Wipe the area clean around sensor/valve stem mounting hole in wheel. Make sure surface of wheel is not damaged.
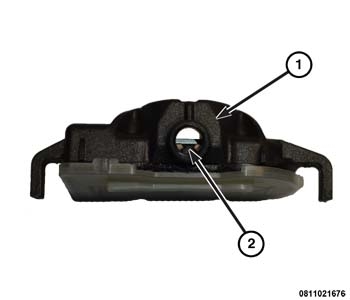
Pic 2
NOTE:
When installing a new valve stem (2), water or water/soap solution should be used for proper installation into the wheel.
2. Position the valve stem (2) into the wheel mounting hole with the rib (3) at the 12 o'clock position to the wheel, then pull through to seat with a standard valve stem installation tool.
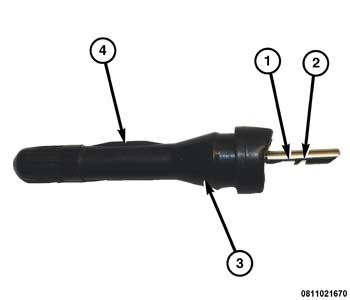
Pic 3
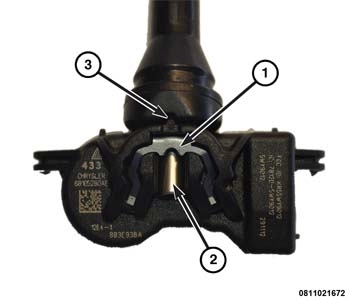
3. Install the sensor (1) onto the valve stem by aligning the rib in the sensor (2) to the valve stem.
Pic 4
NOTE:
The valve stem (3) has 2 notches (1, 2) on the locking pin where the sensor can be installed depending on the thickness of the rim on the wheel. Refer to steps 4 and 5 for installation on both types of wheels. The sensor is properly installed if the sensor is as close as possible to the valve and the locking pin is visible past the spring clip.
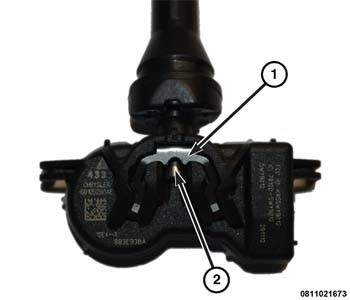
Pic 5
4. The first notch is for a wheel with a thick rim, push down on the spring clip (1) using a small screwdriver and slide the sensor up until it stops against the bottom part of the valve. Gently pull down to verify the spring clip has engaged.
NOTE:
The locking pin (2) will be visible sightly after installed.
Pic 6
5. The second notch is for a wheel with a thin rim, push down the spring clip (1) using a small screwdriver and slide the sensor up until it stops against the bottom part of the valve. Gently pull down to verify the spring clip has engaged.
NOTE:
The locking pin (2) will be highly visible after installed and orientation notch (3) seated.
NOTE:
When dismounting or mounting the tire on the wheel, follow the tire changer manufacturers instructions while paying special attention to avoid damaging the pressure sensor.
6. Mount tire on wheel and install tire and wheel assembly on the vehicle See: Tires > Removal and Replacement > Tires - Installation.
7. Adjust air pressure to that listed on Tire Inflation Pressure Label (Placard) provided with vehicle (usually applied to driver's side B-pillar). Make sure original style valve stem cap is securely installed to keep moisture out of sensor.
8. Remove the support and lower the vehicle.
9. Perform one of the following to make the system learn the new sensor ID:
- Use the TPM-RKE Analyzer, 9936, with the Scan Tool to program the RF Hub module with the tire pressure sensor ID. This is part of the TPM Diagnostic Verification Test See: A L L Diagnostic Trouble Codes ( DTC ) > Verification Tests > Tire Pressure Monitor (TPM) Verification Test.
- Once the vehicle has remained stationary for more than 20 minutes, drive vehicle for a minimum of 20 minutes while maintaining a continuous speed above 20 mph (32 km/h). During this time, the system will learn the new sensor ID. This is part of the TPM Diagnostic Verification Test See: A L L Diagnostic Trouble Codes ( DTC ) > Verification Tests > Vehicle Theft Security RF Hub Verification Test.
NOTE:
If a sensor cannot be trained, refer to appropriate diagnostic information.
As far as resetting, the system will automatically update and the "Tire Pressure Monitoring Telltale Light" will turn off once the system receives the updated tire pressures. The vehicle may need to be driven for up to 20 minutes above 15 mph (24 km/h) in order for the TPMS to receive this information.
____________________________________________________________
Let me know if this helps or if you have other questions.
Take care,
Joe
Images (Click to make bigger)
Sunday, May 19th, 2019 AT 7:54 PM