Welcome to 2CarPros.
Here are the directions for replacing the timing chains. I can tell you, this isn't the easiest job to perform. Take your time and make sure the timing marks are correct. Also, once the chains are back on and you are sure they are correct, turn the crankshaft at least 10 full revolutions to confirm it is smooth and nothing is hitting internally and stopping you from turning it. Do not force it if you hear anything or it stops and you can't turn it any more. In that event, recheck the timing marks. I can not over stress the importance of making sure the timing is correct. If it is off and you try to start it, internal engine damage will occur. All pictures correlate with the directions.
____________________________________________________
TIMING DRIVE COMPONENTS
Timing Drive Components
Removal
CAUTION: During engine repair procedures, cleanliness is extremely important. Any foreign material, including any material created while cleaning gasket surfaces that enters the oil passages, coolant passages or the oil pan, can cause engine failure.
CAUTION: Failure to verify correct timing drive component alignment will result in severe engine damage.
1. Remove the engine front cover.
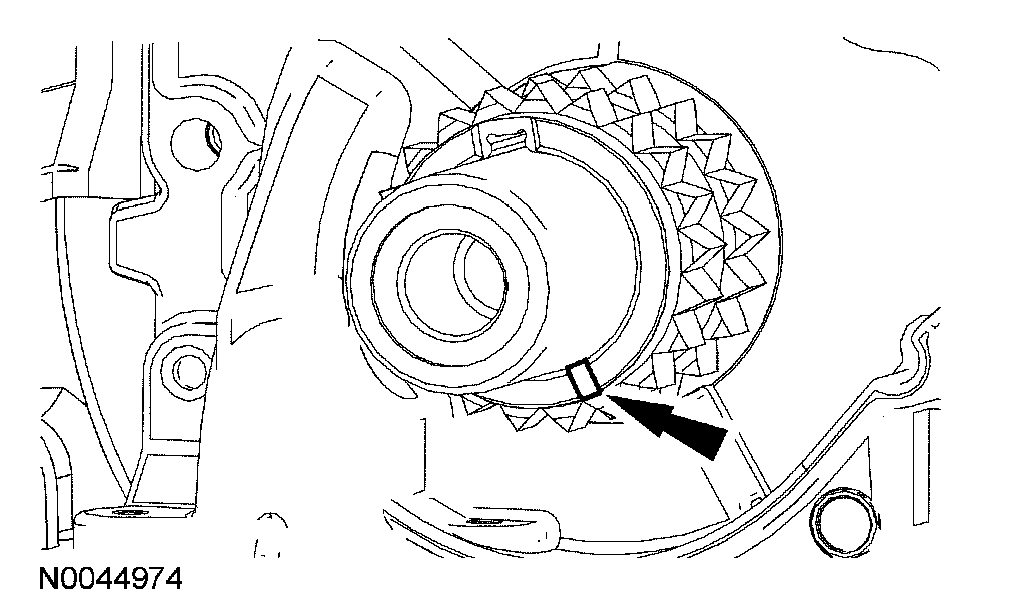
2. CAUTION: This pulse wheel is used in several different engines. Install the pulse wheel with the keyway in the slot stamped "30RFF" (orange in color).
pic 1
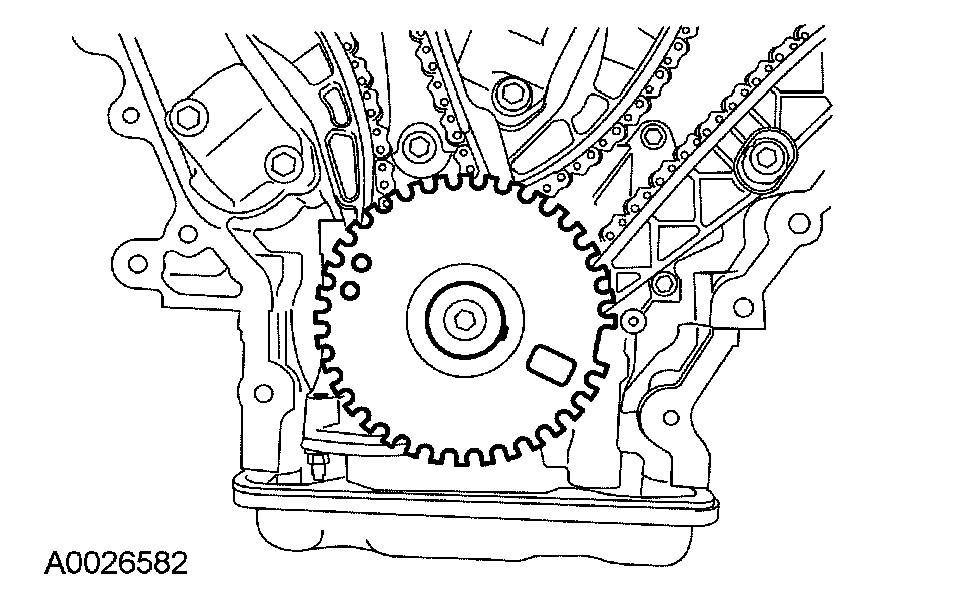
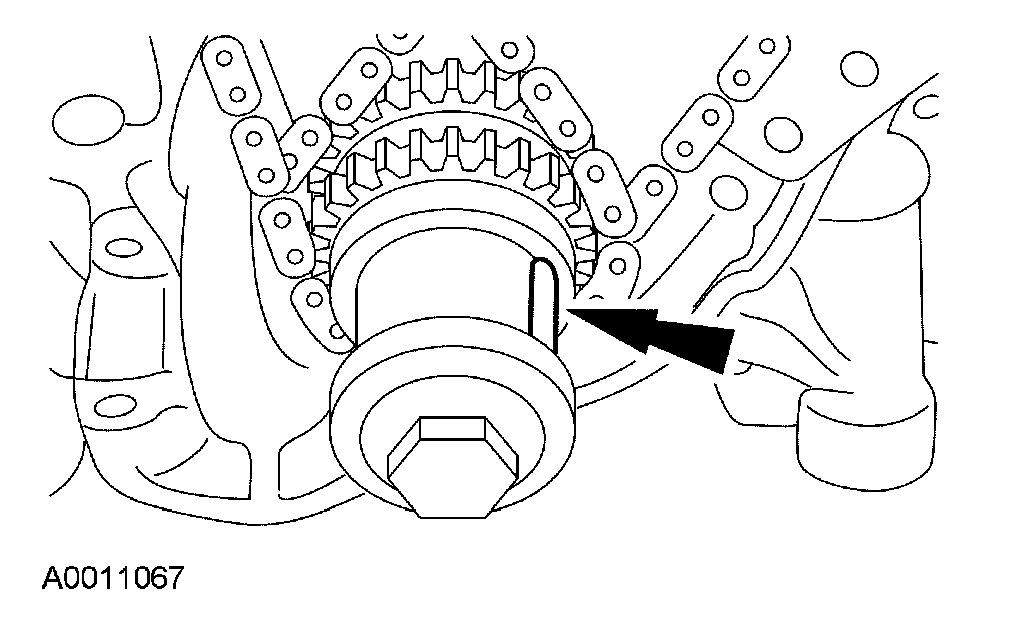
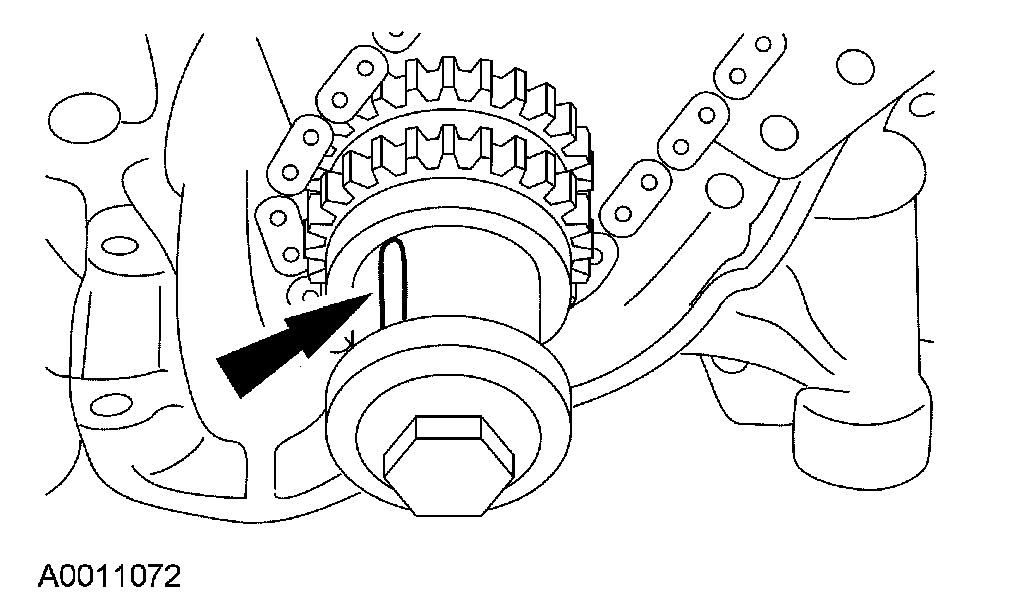
Remove the ignition pulse wheel.
pic 2
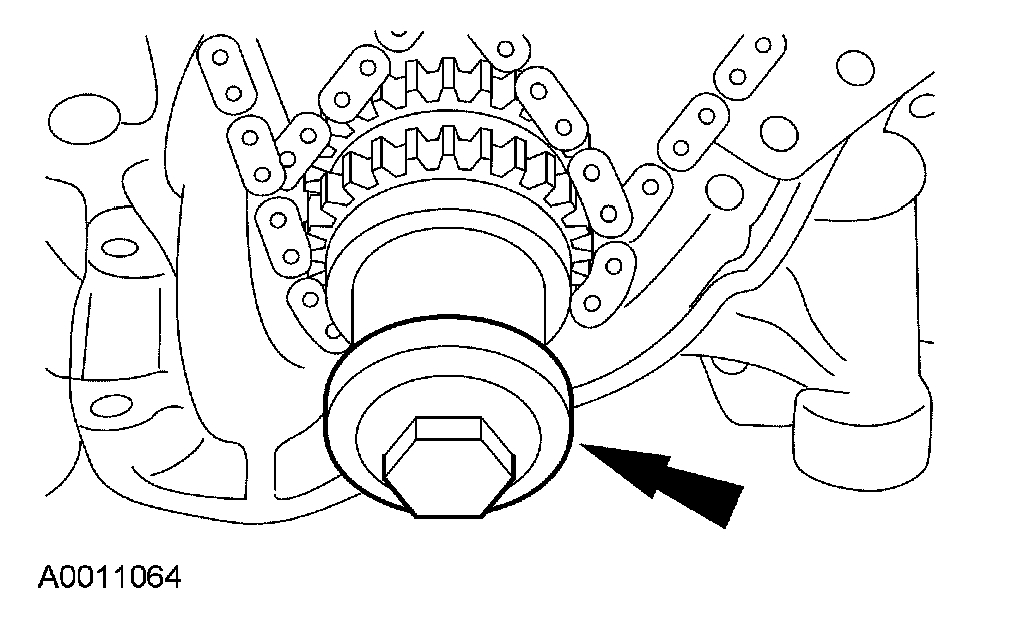
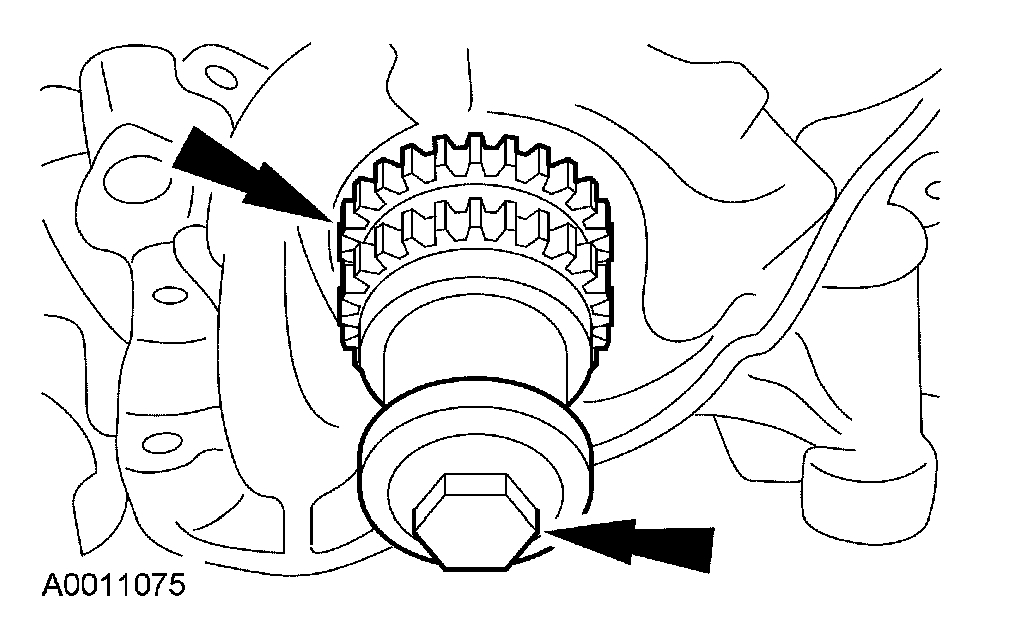
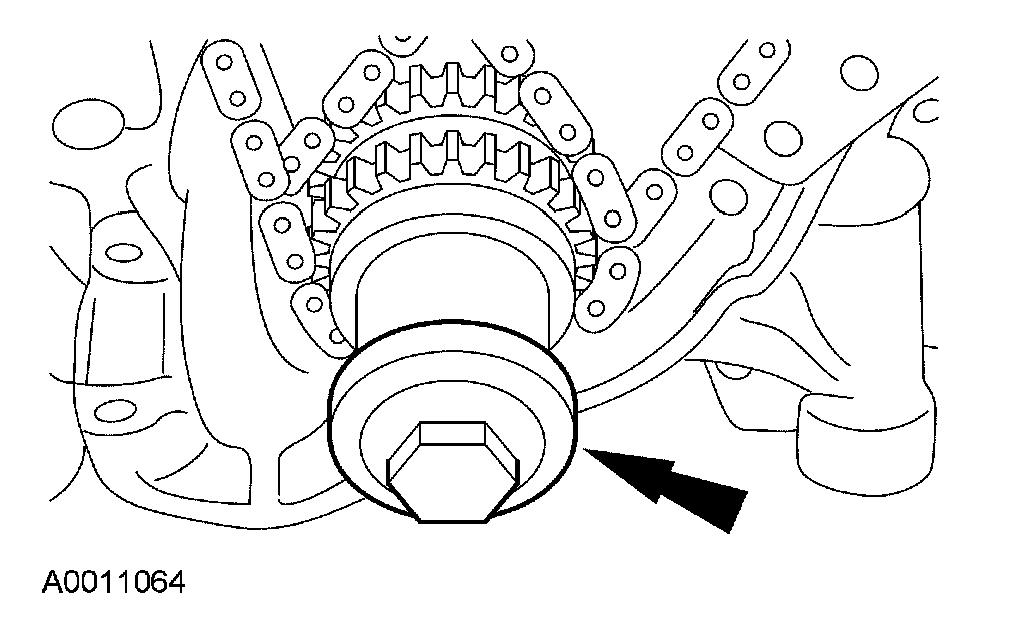
3. Install the crankshaft pulley bolt and washer.
pic 3
4. NOTICE: Only use hand tools when removing or installing the spark plugs or damage can occur to the cylinder head or spark plug,
NOTE: Use compressed air to remove any foreign material in the spark plug well before removing the spark plugs.
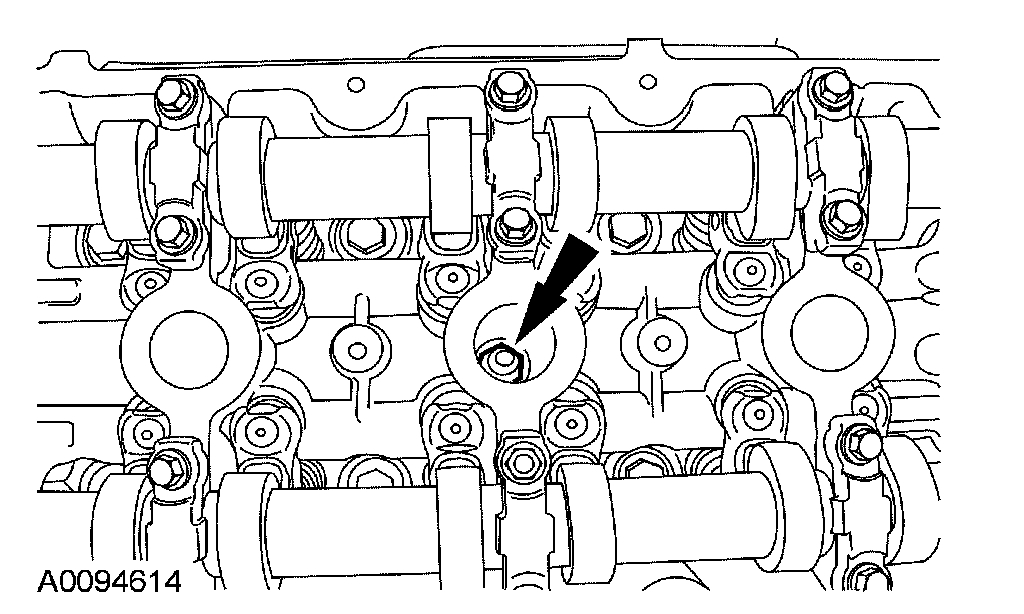
Remove the 6 spark plugs.
pic 4
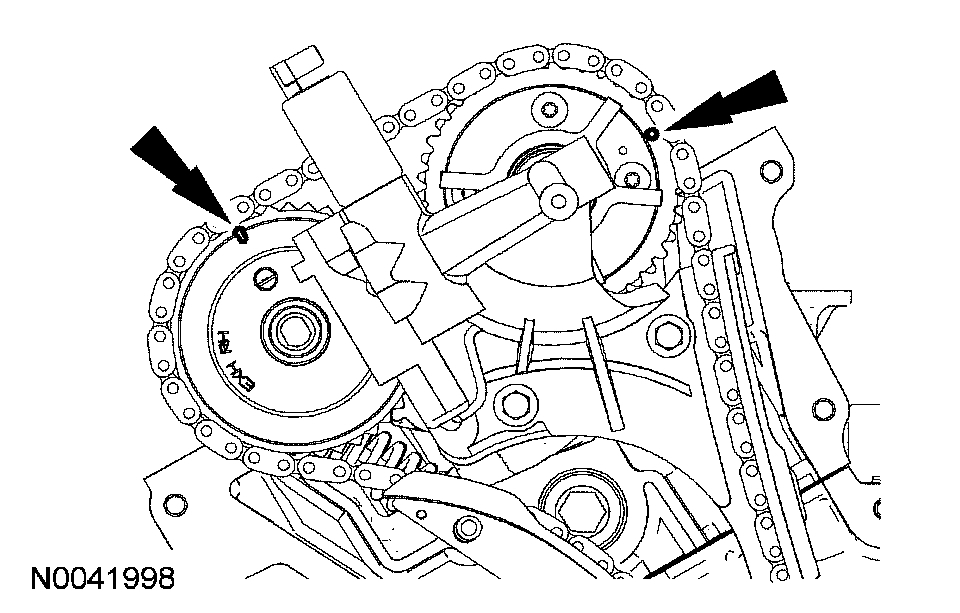
5. Rotate the crankshaft clockwise to position the crankshaft keyway in the 11 o'clock position and position the camshafts in the correct position. This will position the No. 1 cylinder at top dead center (TDC).
^ Verify that the camshafts are correctly located. If not, rotate the crankshaft one additional turn and recheck.
pic 5
6. Rotate the crankshaft clockwise 120 degrees to the 3 o'clock position to position the RH camshafts in the neutral position.
pic 6
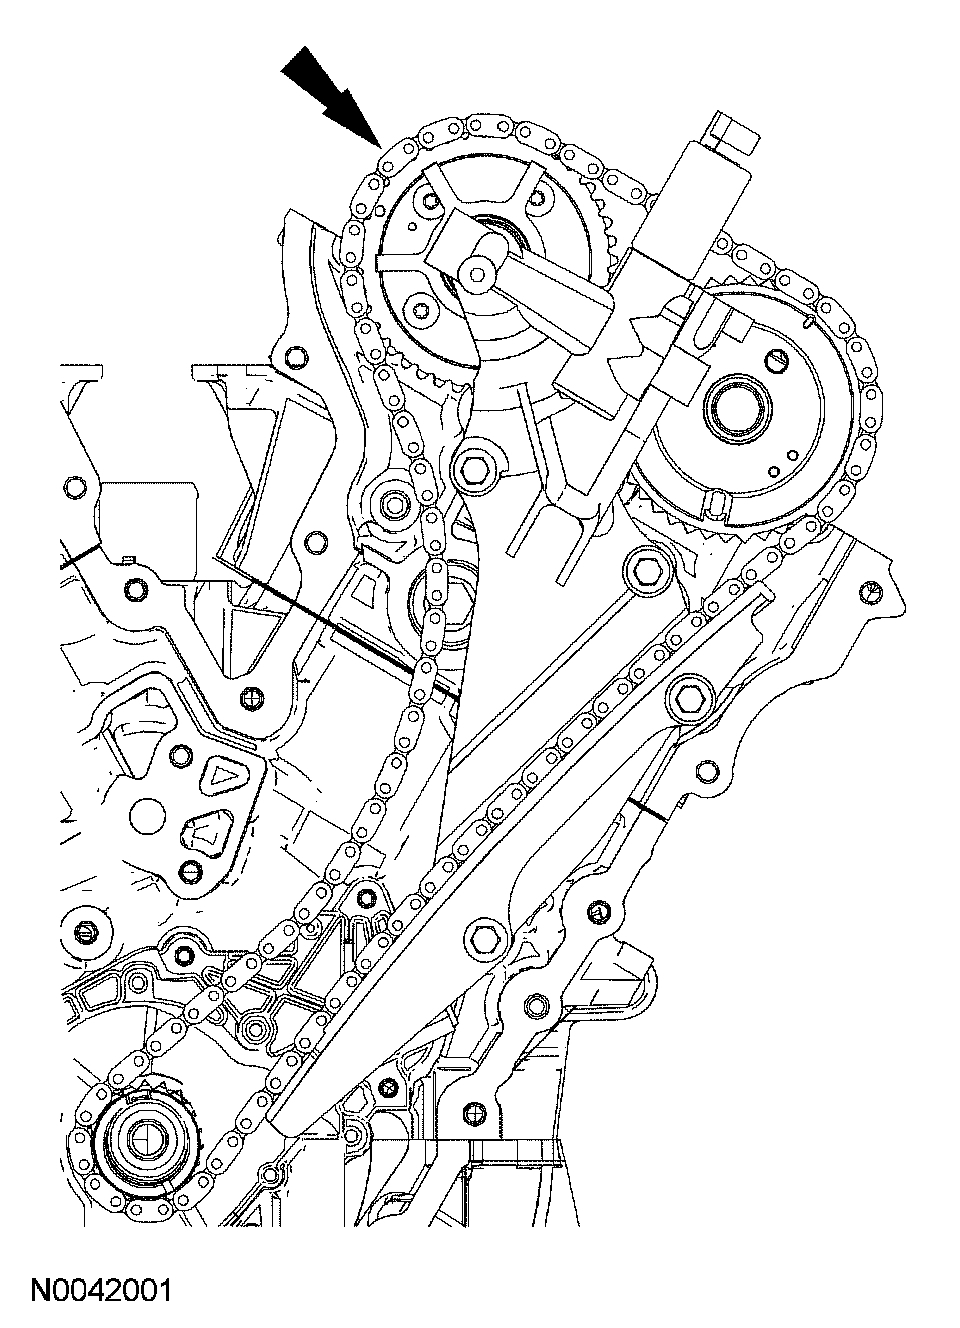
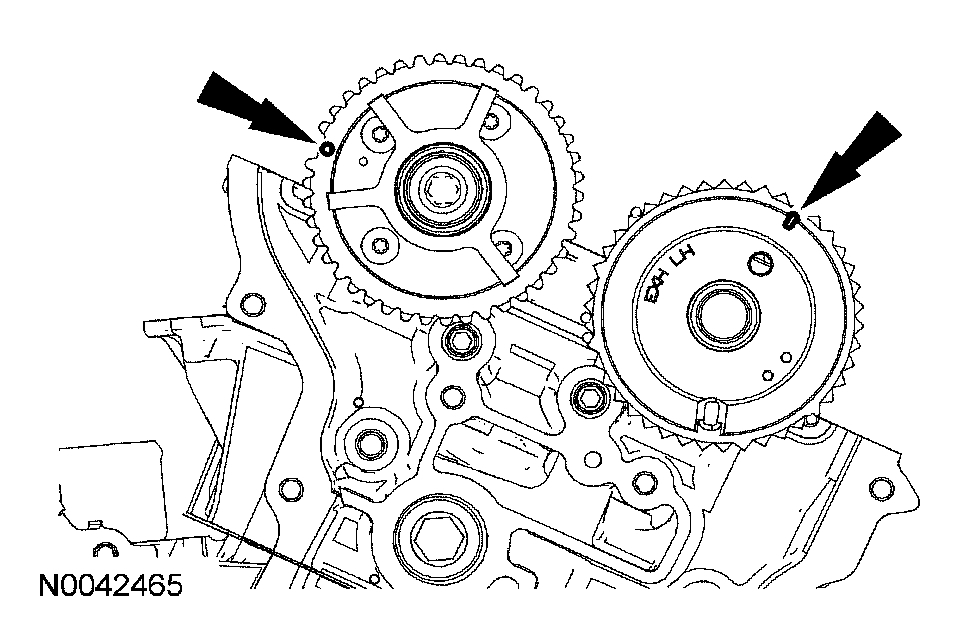
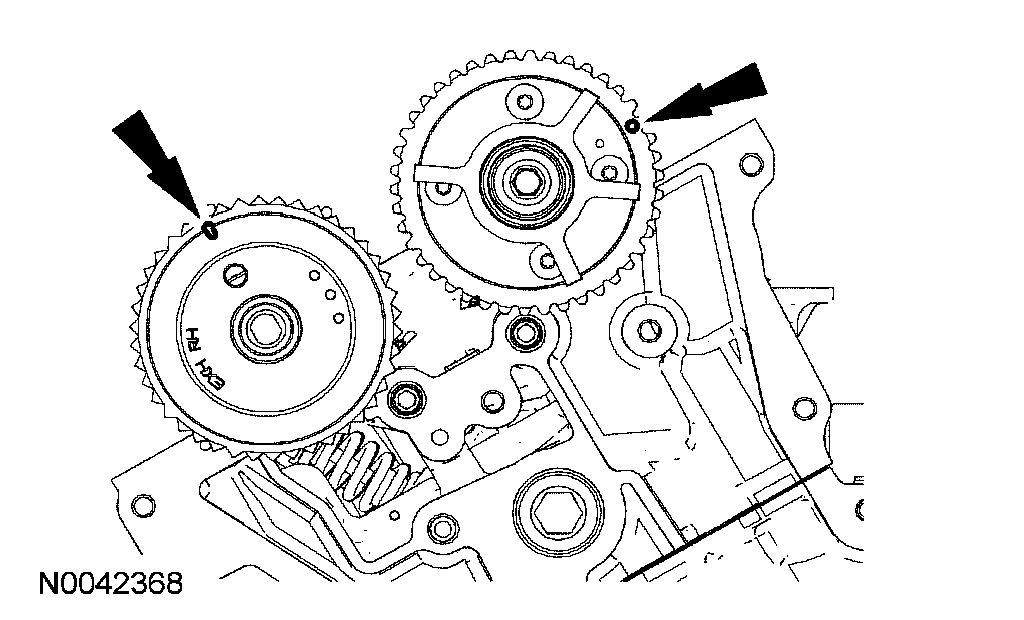
7. Verify that the RH camshafts are in the neutral position.
pic 7
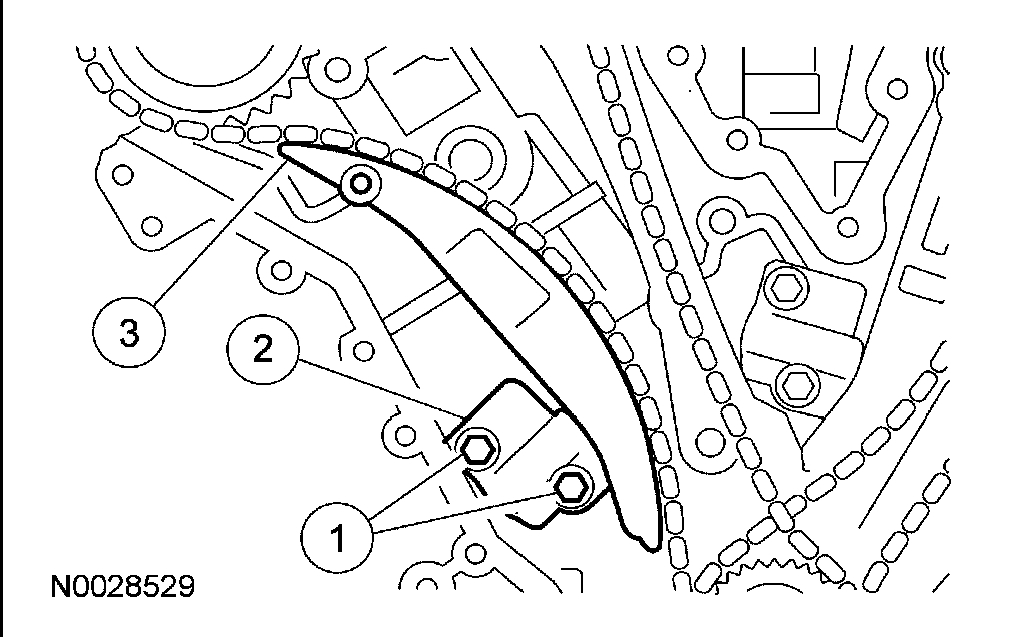
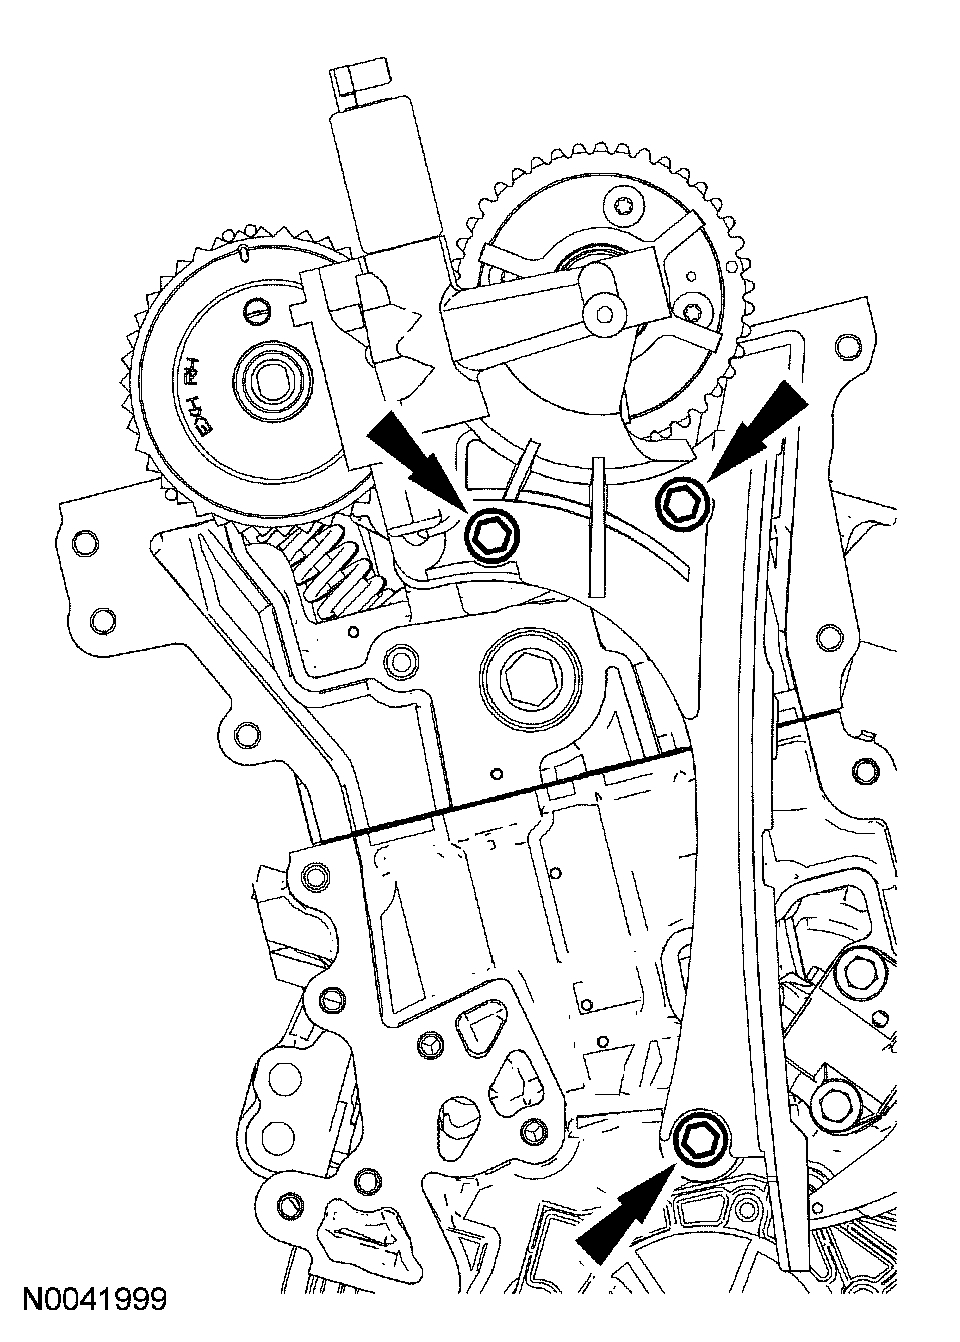
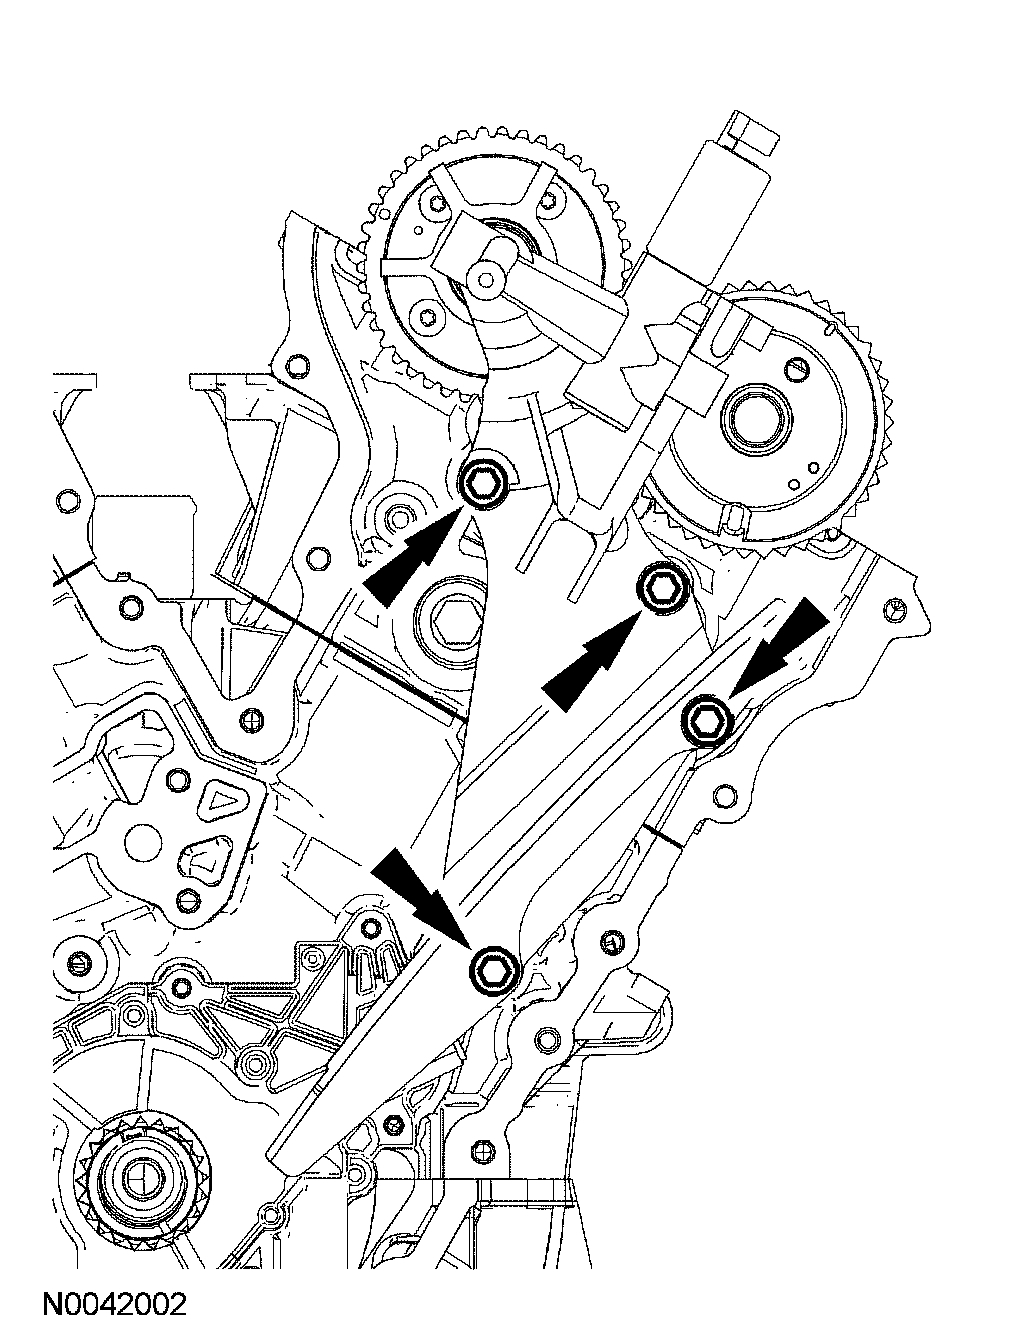
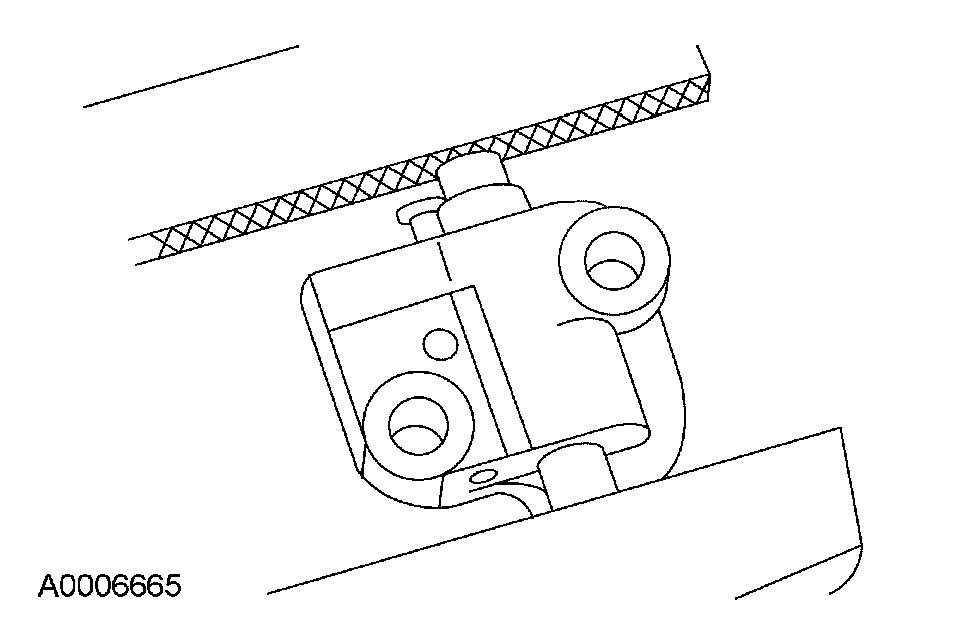
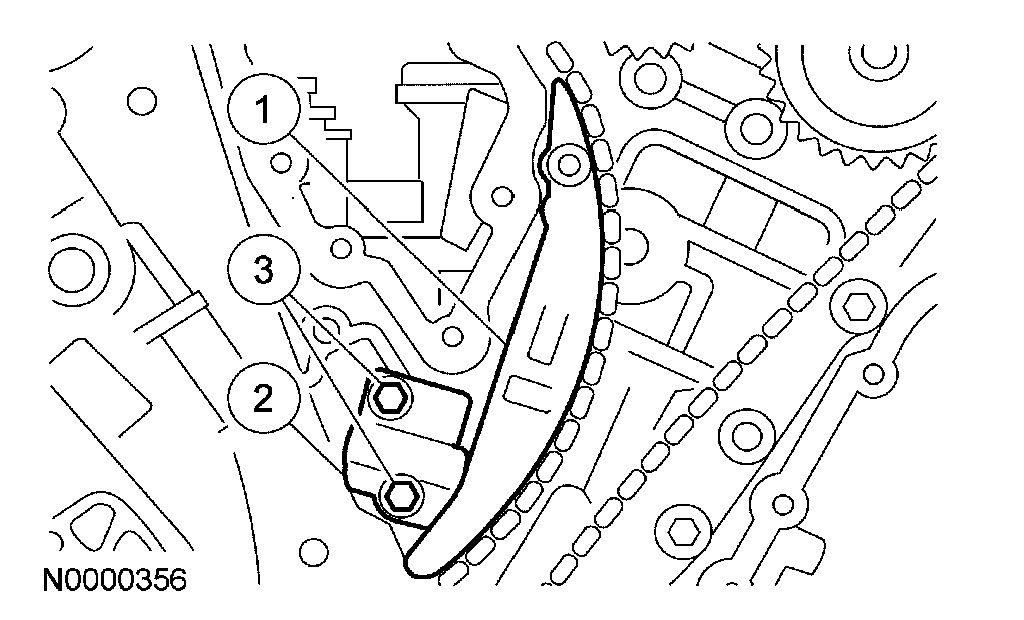
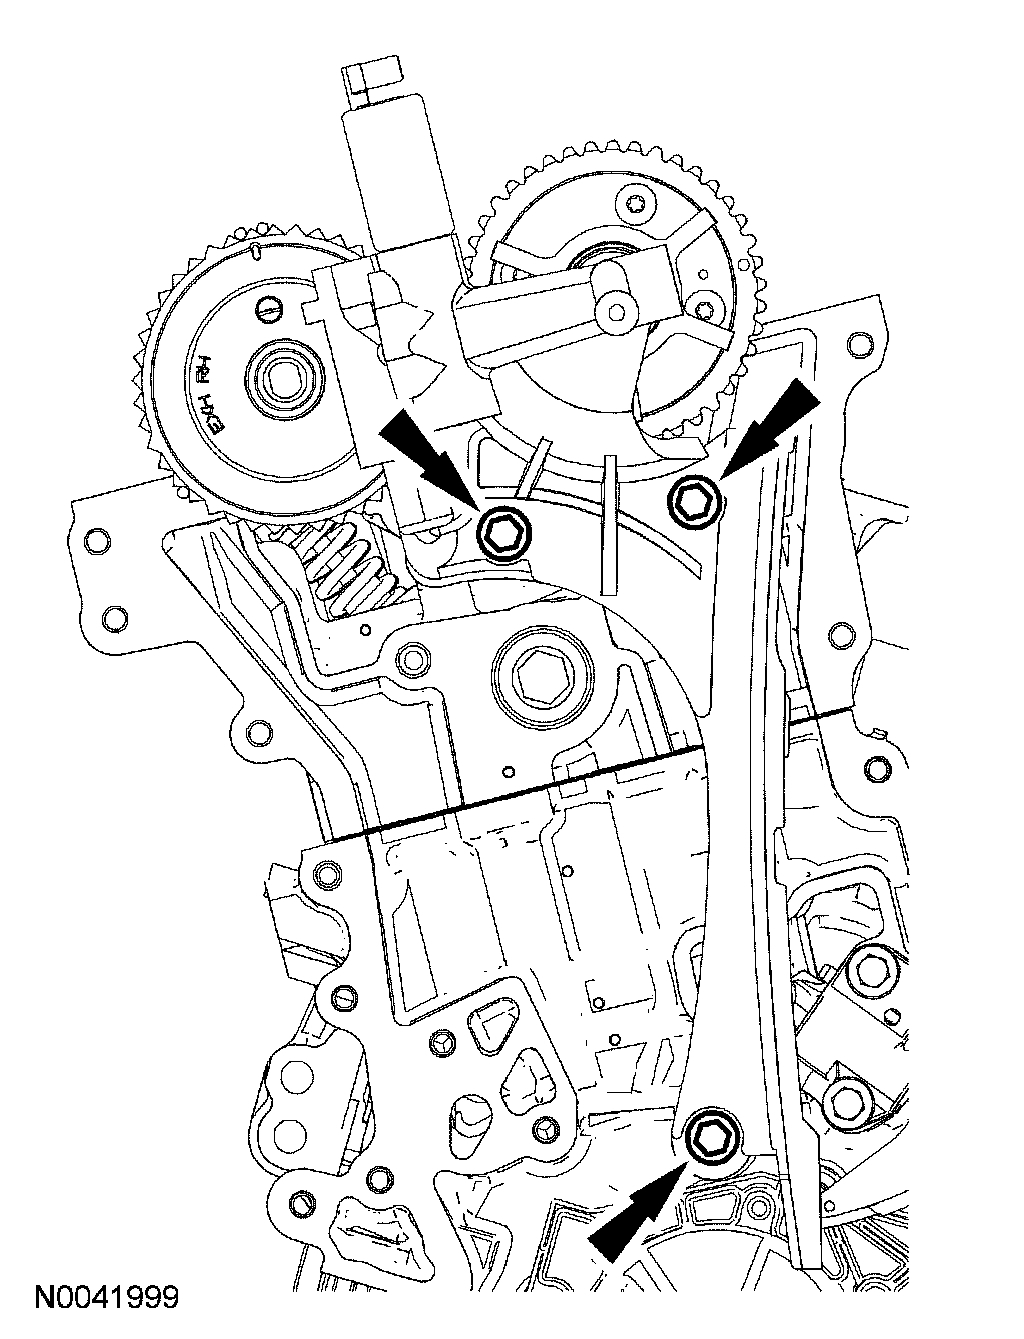
8. Remove the RH timing chain tensioner arm.
1 Remove the 2 bolts.
2 Remove the tensioner.
3 Remove the tensioner arm.
pic 8
9. Remove the RH timing chain.
pic 9
10. Remove the 3 bolts and the RH VCT assembly.
pic 10
11. Rotate the crankshaft clockwise 600 degrees (1-2/3 turns) to position the crankshaft keyway in the 11 o'clock position. This will position the LH camshafts in the neutral position.
pic 11
12. Verify the LH camshafts are in the neutral position.
pic 12
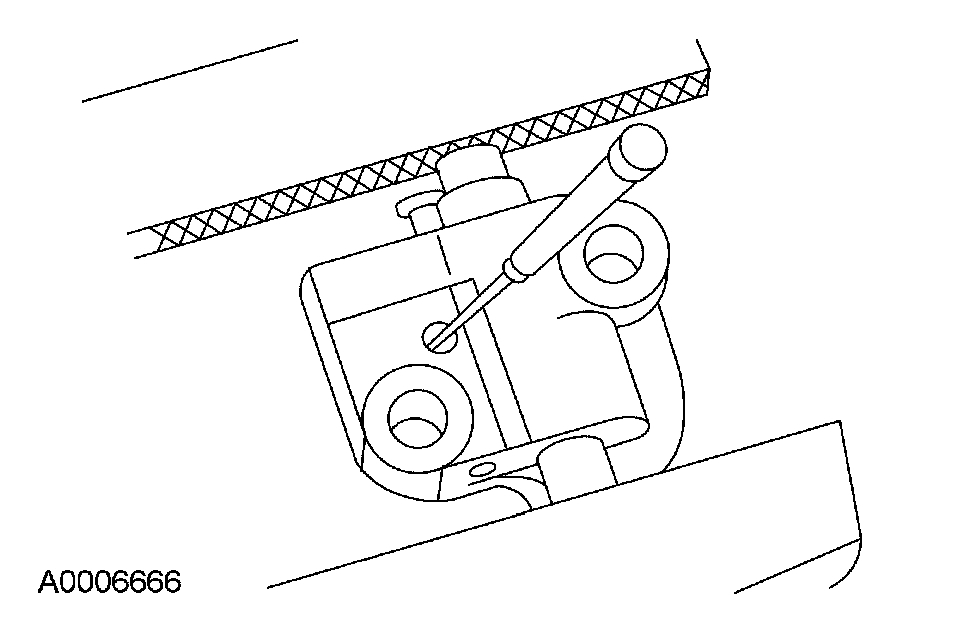
13. Remove the LH timing chain tensioner and tensioner arm.
1 Remove the 2 bolts.
2 Remove the tensioner.
3 Remove the tensioner arm.
pic 13
14. Remove the LH timing chain.
pic 14
15. Remove the 4 bolts and the LH VCT assembly.
pic 15
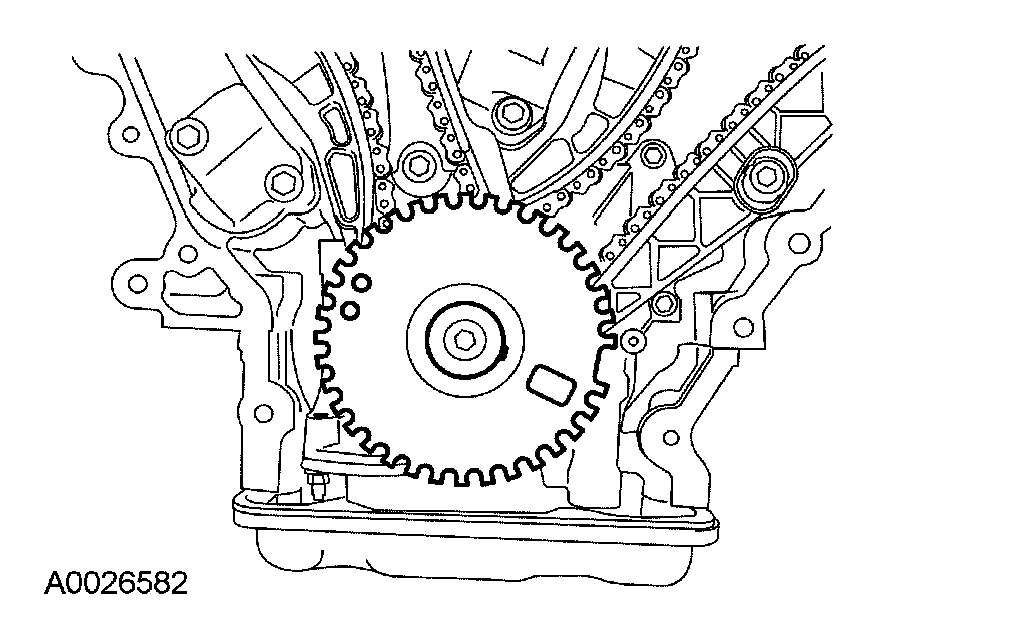
16. Remove the pulley bolt, washer and the crankshaft sprocket.
Installation
pic 16
1. NOTICE: Failure to verify correct timing drive component alignment will result in severe engine damage.
Install the crankshaft sprockets with the timing marks out.
pic 17
2. NOTE: LH shown, RH similar.
Position the chain tensioner in a soft-jawed vise.
pic 18
3. NOTE: LH shown, RH similar.
Hold the chain tensioner ratchet lock mechanism away from the ratchet stem with a small pick.
4. CAUTION: During tensioner compression, do not release the ratchet stem until the tensioner piston is fully bottomed in its bore or damage to the ratchet stem will result.
Slowly compress the timing chain tensioner.
pic 19
5. Retain the tensioner piston with a 1.5 mm (0.05 inch) wire or paper clip.
pic 20
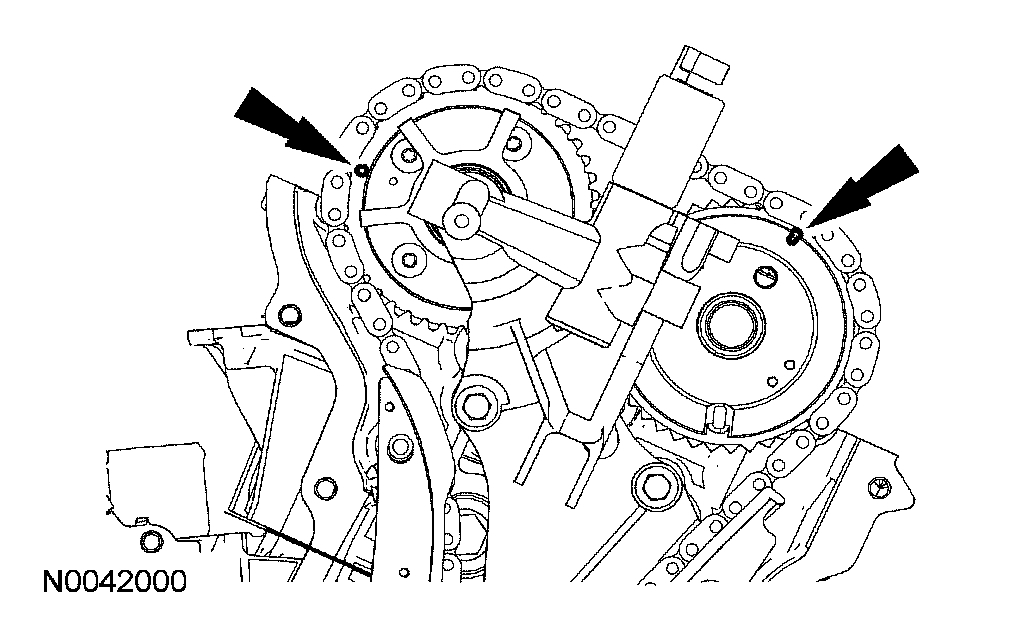
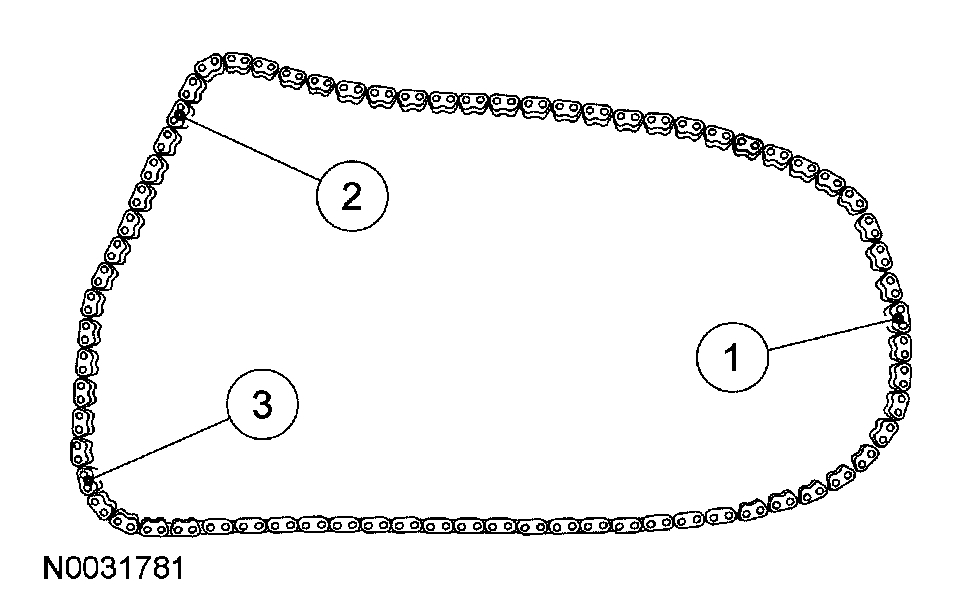
6. If timing marks in the timing chains are not evident, use a permanent-type marker to mark the crankshaft and camshaft timing marks on the LH and RH timing chains.
1 Mark any link to use as the crankshaft timing mark.
2 Starting with the crankshaft timing mark, count counterclockwise 29 links and mark the link.
3 Continue counting counterclockwise to link 42 and mark the link.
pic 21
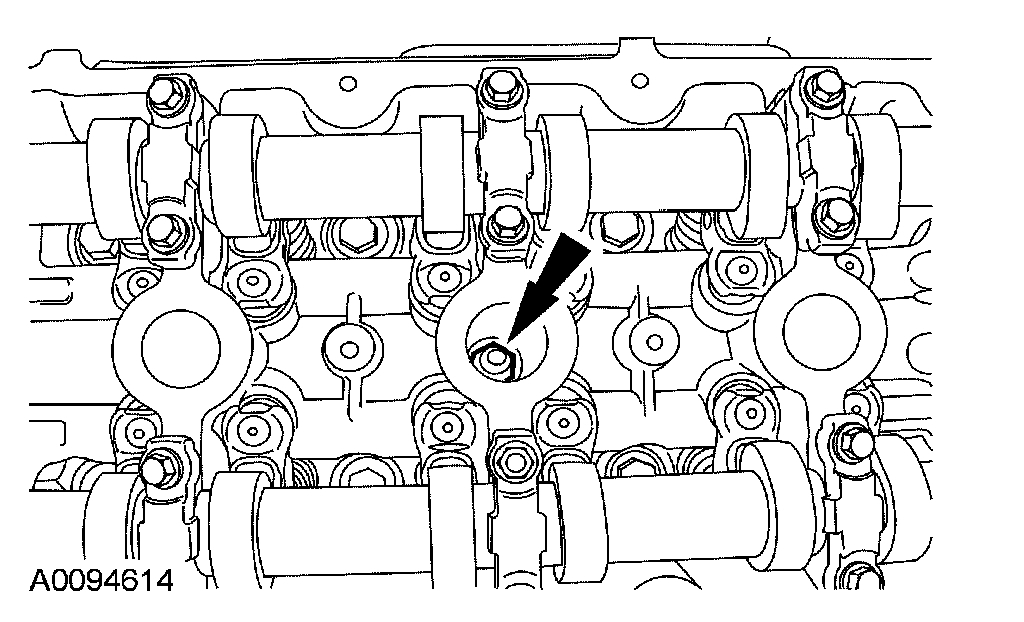
7. Verify that the LH camshafts are correctly positioned.
pic 22
8. Install the variable camshaft timing (VCT) assembly and the 4 bolts.
^ Tighten to 25 Nm (18 ft. lbs.).
pic 23
9. Install the LH timing chain.
^ Align the marks on the timing chain with the marks on the camshaft and crankshaft sprockets.
pic 24
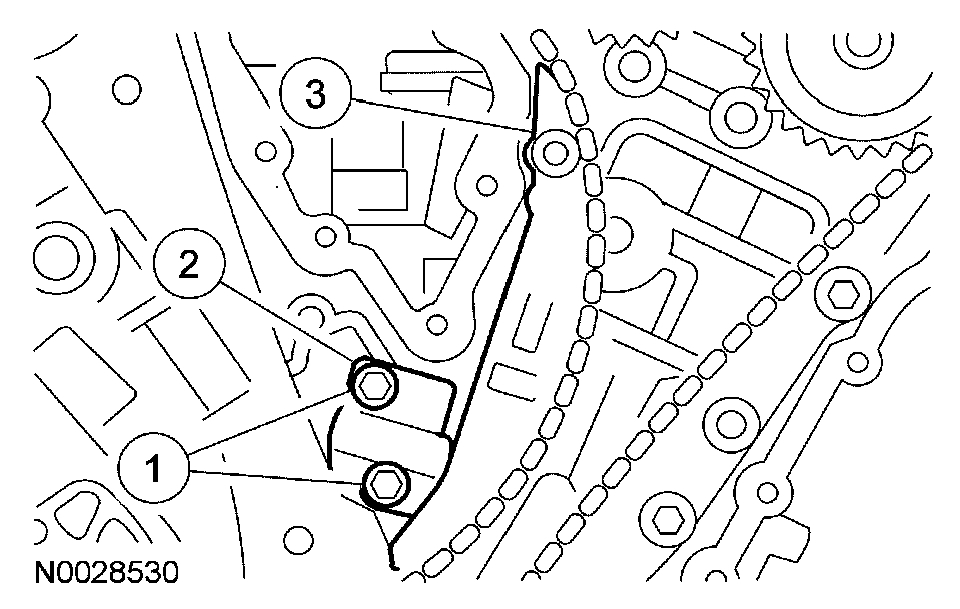
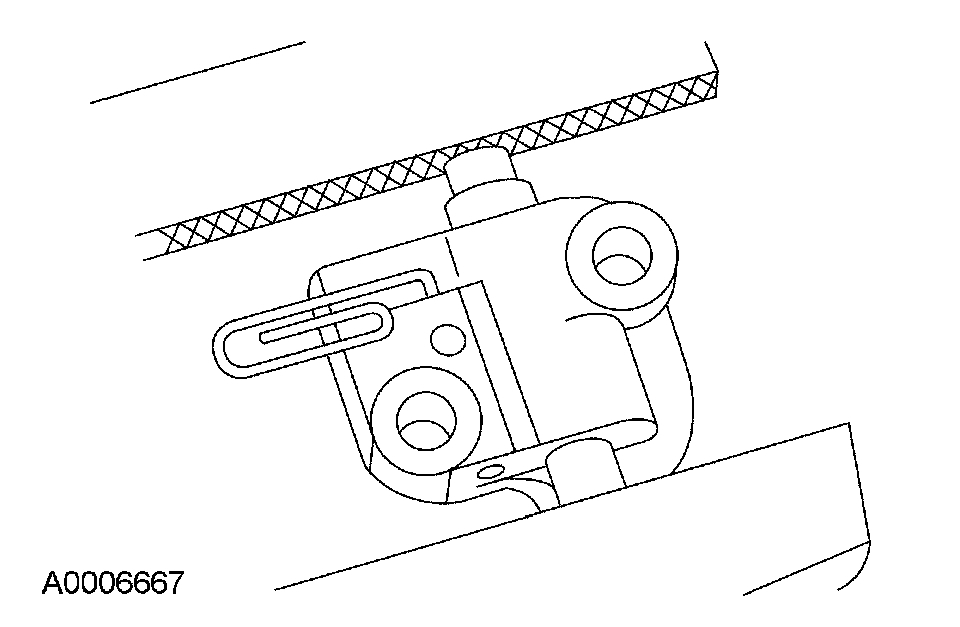
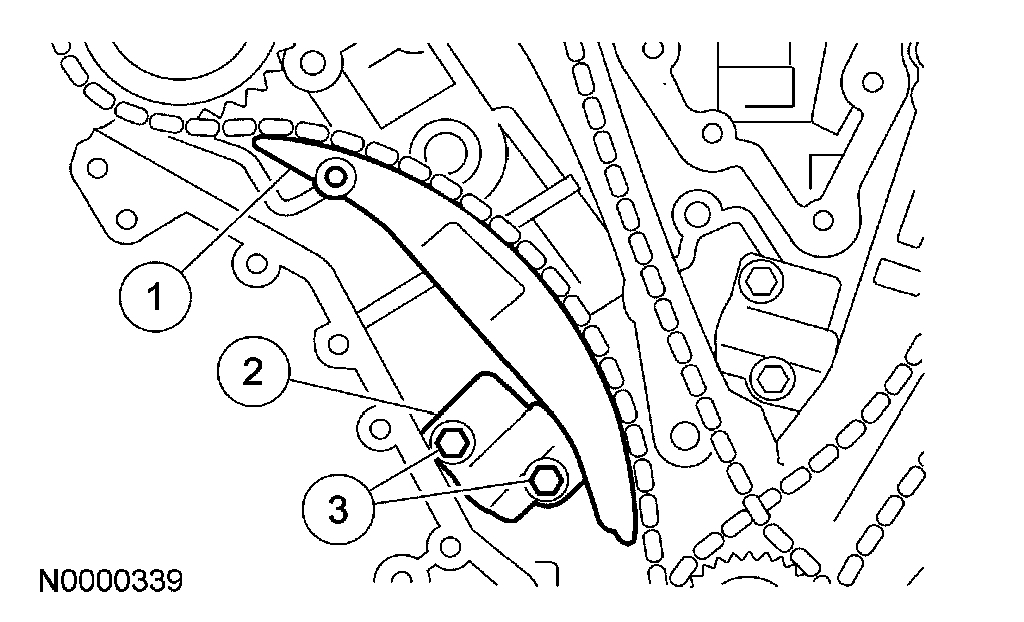
10. Install the LH timing chain tensioner arm and the LH timing chain tensioner.
1 Install the tensioner arm.
2 Position the tensioner.
3 Install the 2 bolts.
^ Tighten to 25 Nm (18 ft. lbs.).
pic 25
11. Install the crankshaft pulley bolt and washer and rotate the crankshaft clockwise 120 degrees until the crankshaft keyway is in the 3 o'clock position.
pic 26
12. Verify that the RH camshafts are correctly positioned.
pic 27
13. Install the RH VCT assembly and the 3 bolts.
^ Tighten to 25 Nm (18 ft. lbs.).
pic 28
14. Install the RH timing chain.
^ Align the marks on the timing chain with the marks on the camshaft and crankshaft sprockets.
pic 29
15. Install the RH timing chain tensioner and tensioner arm.
1 Install the tensioner arm.
2 Position the tensioner.
3 Install the 2 bolts.
^ Tighten to 25 Nm (18 ft. lbs.).
16. Remove the LH and RH timing chain tensioner piston retaining wires.
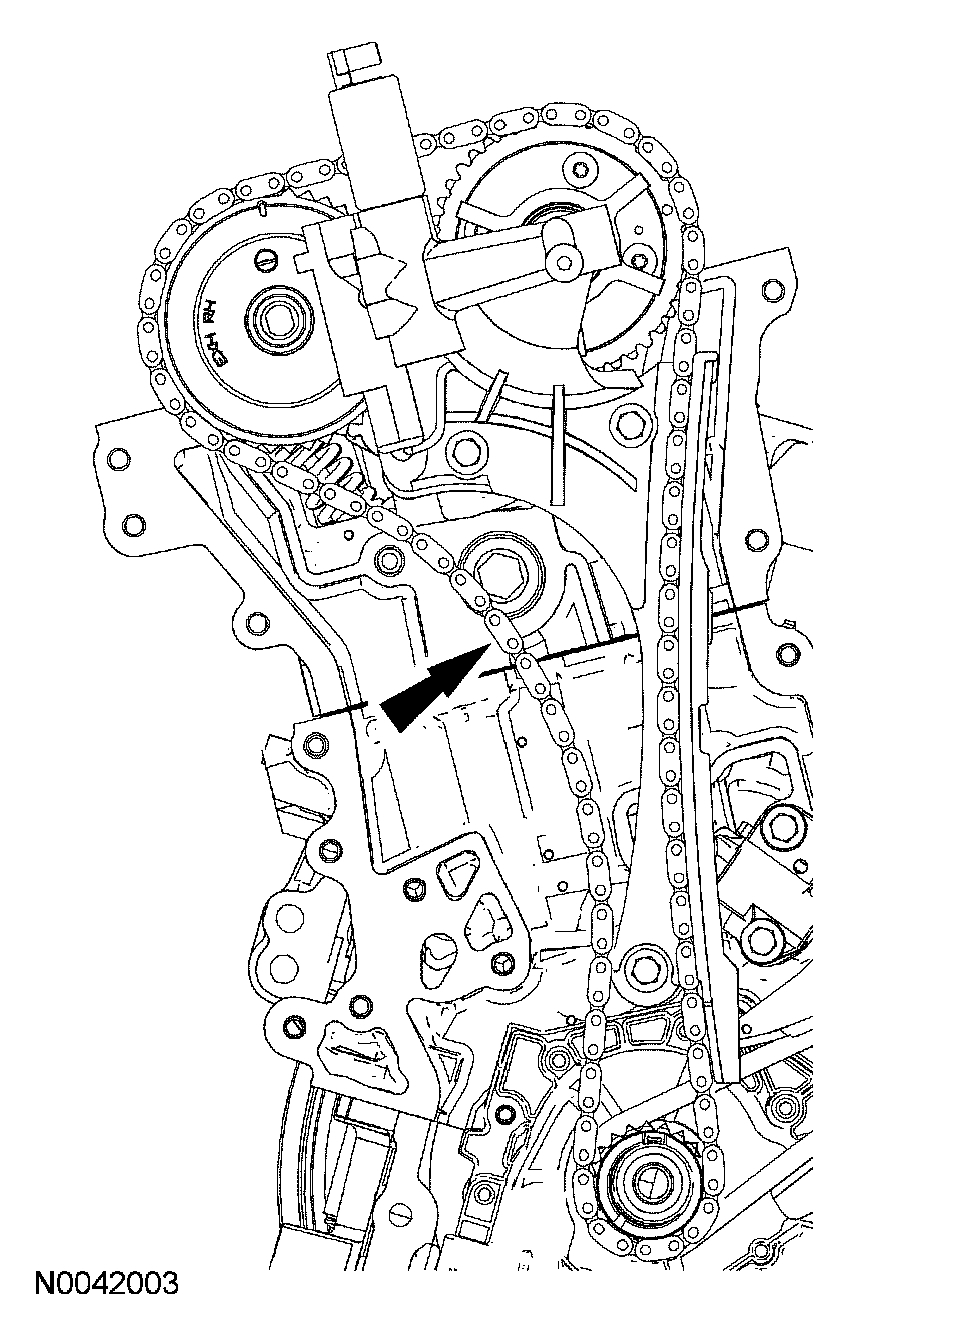
17. Rotate the crankshaft counterclockwise 120 degrees to top dead center (TDC).
pic 30
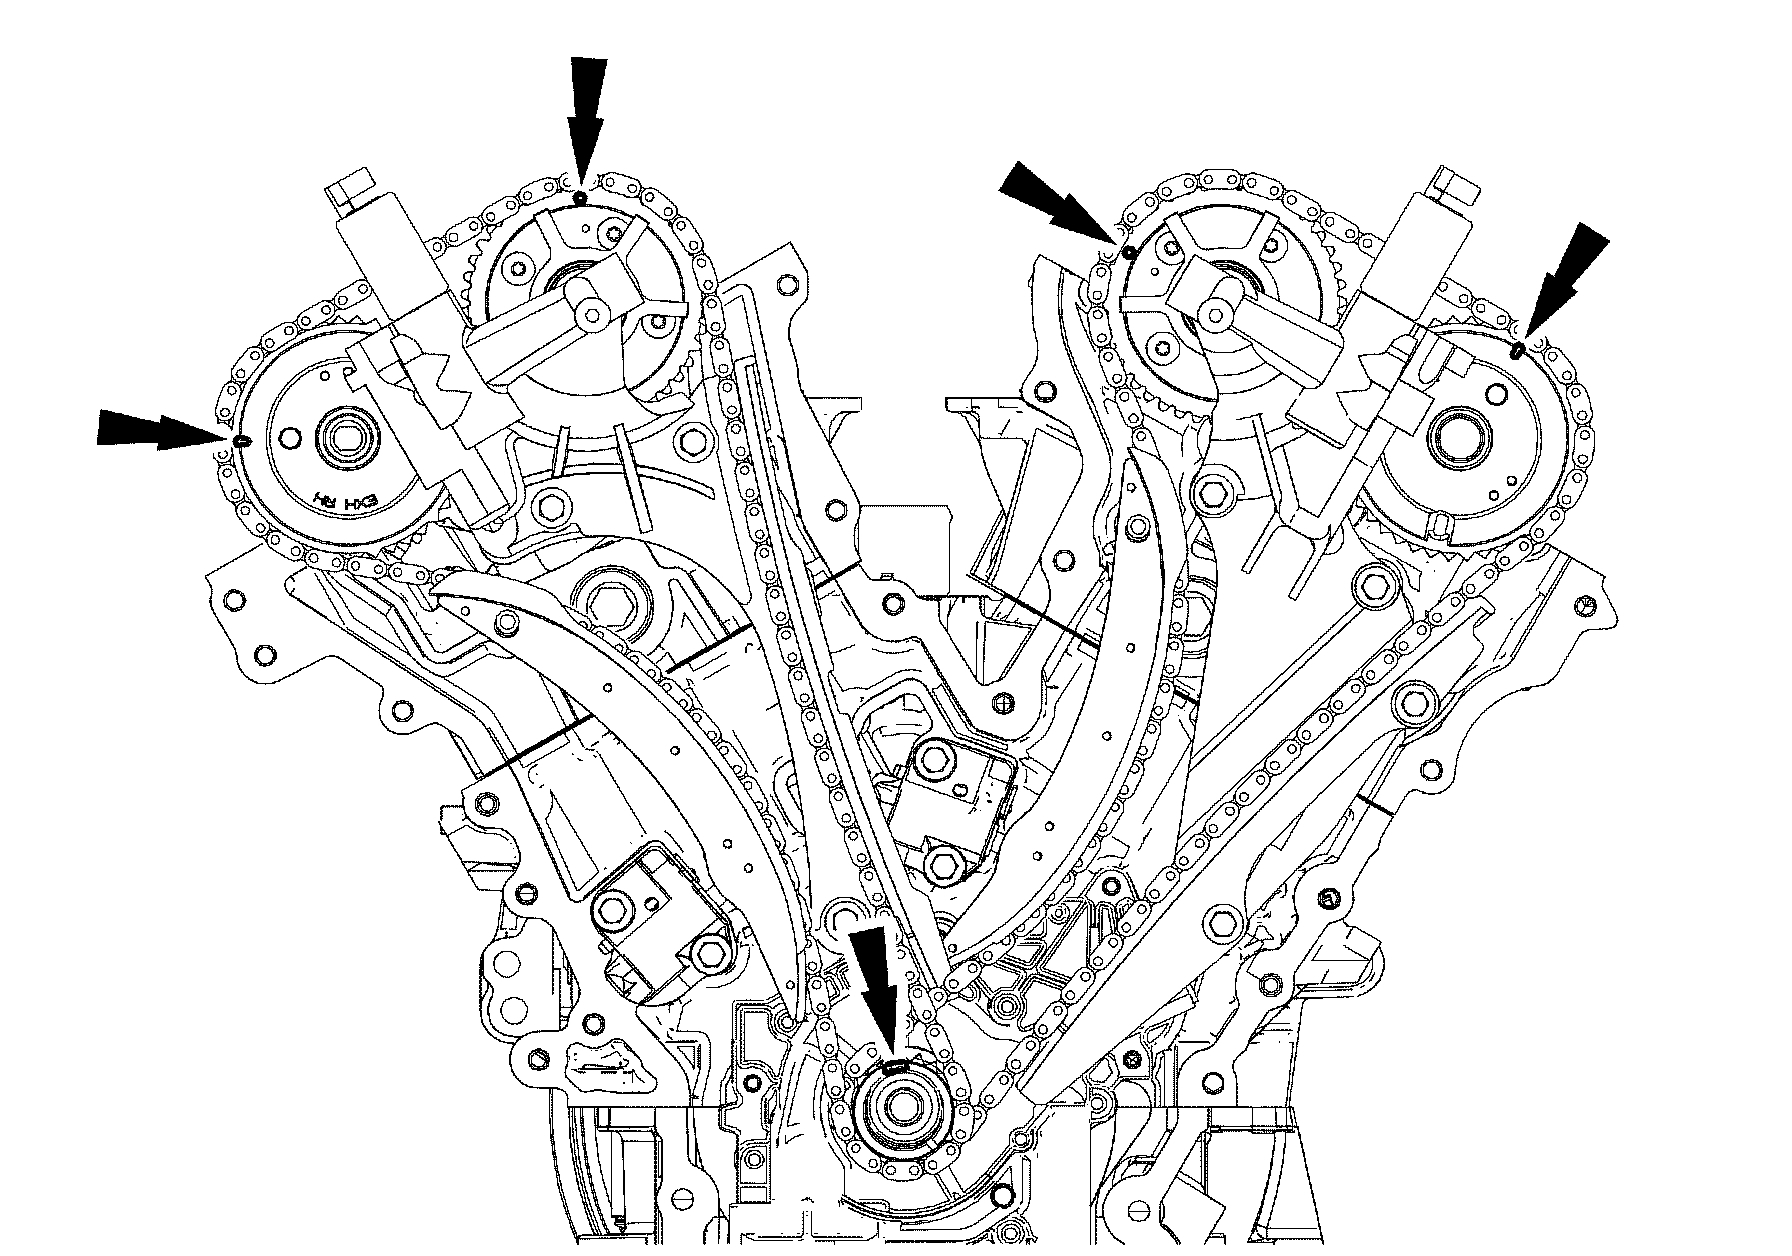
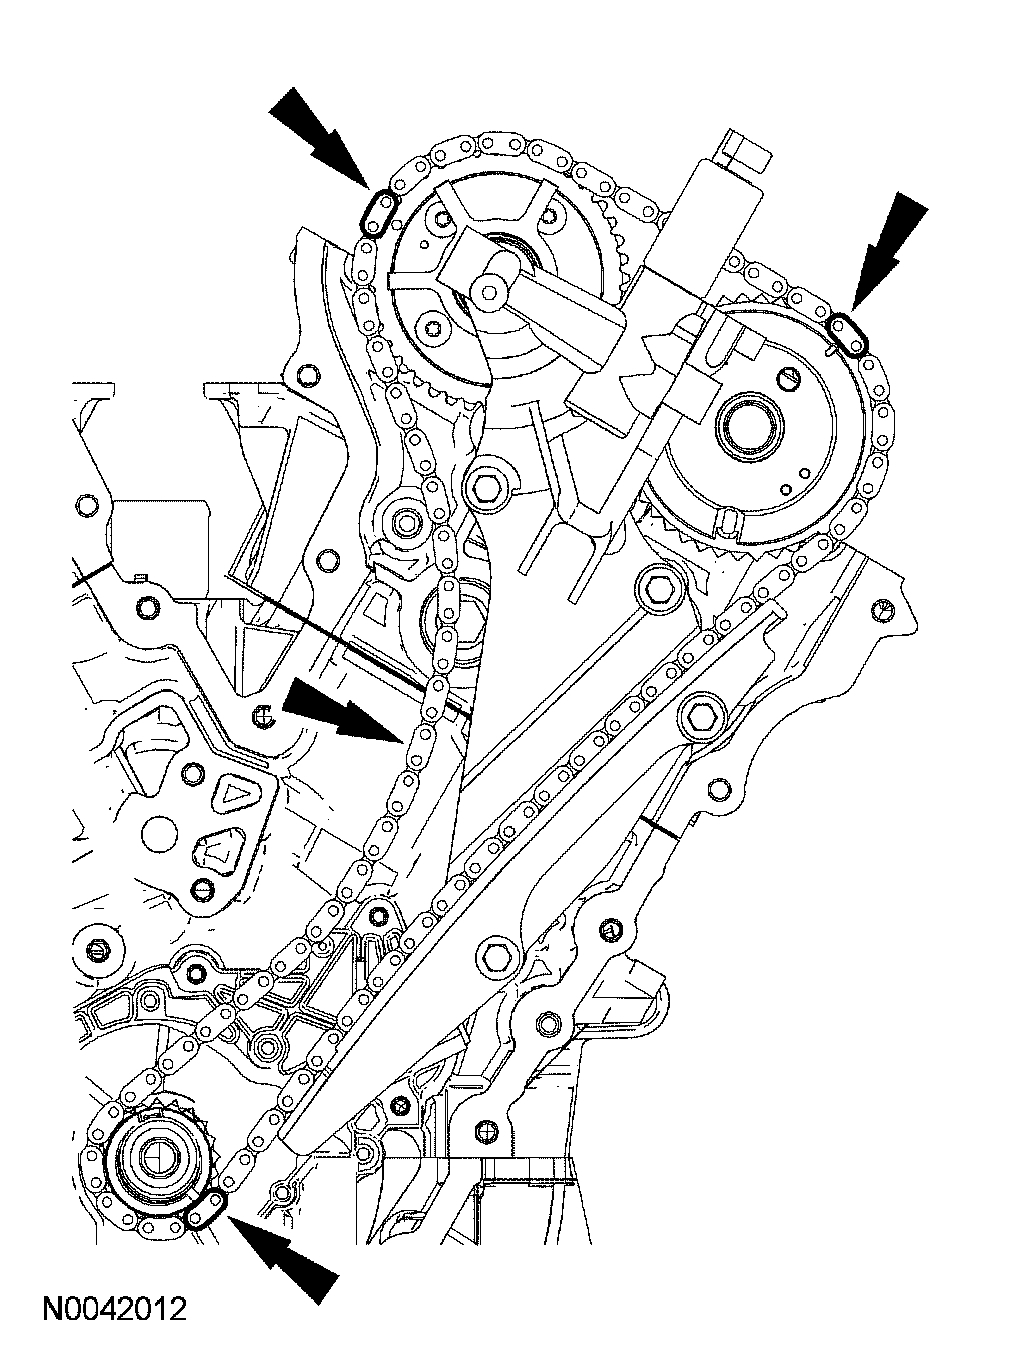
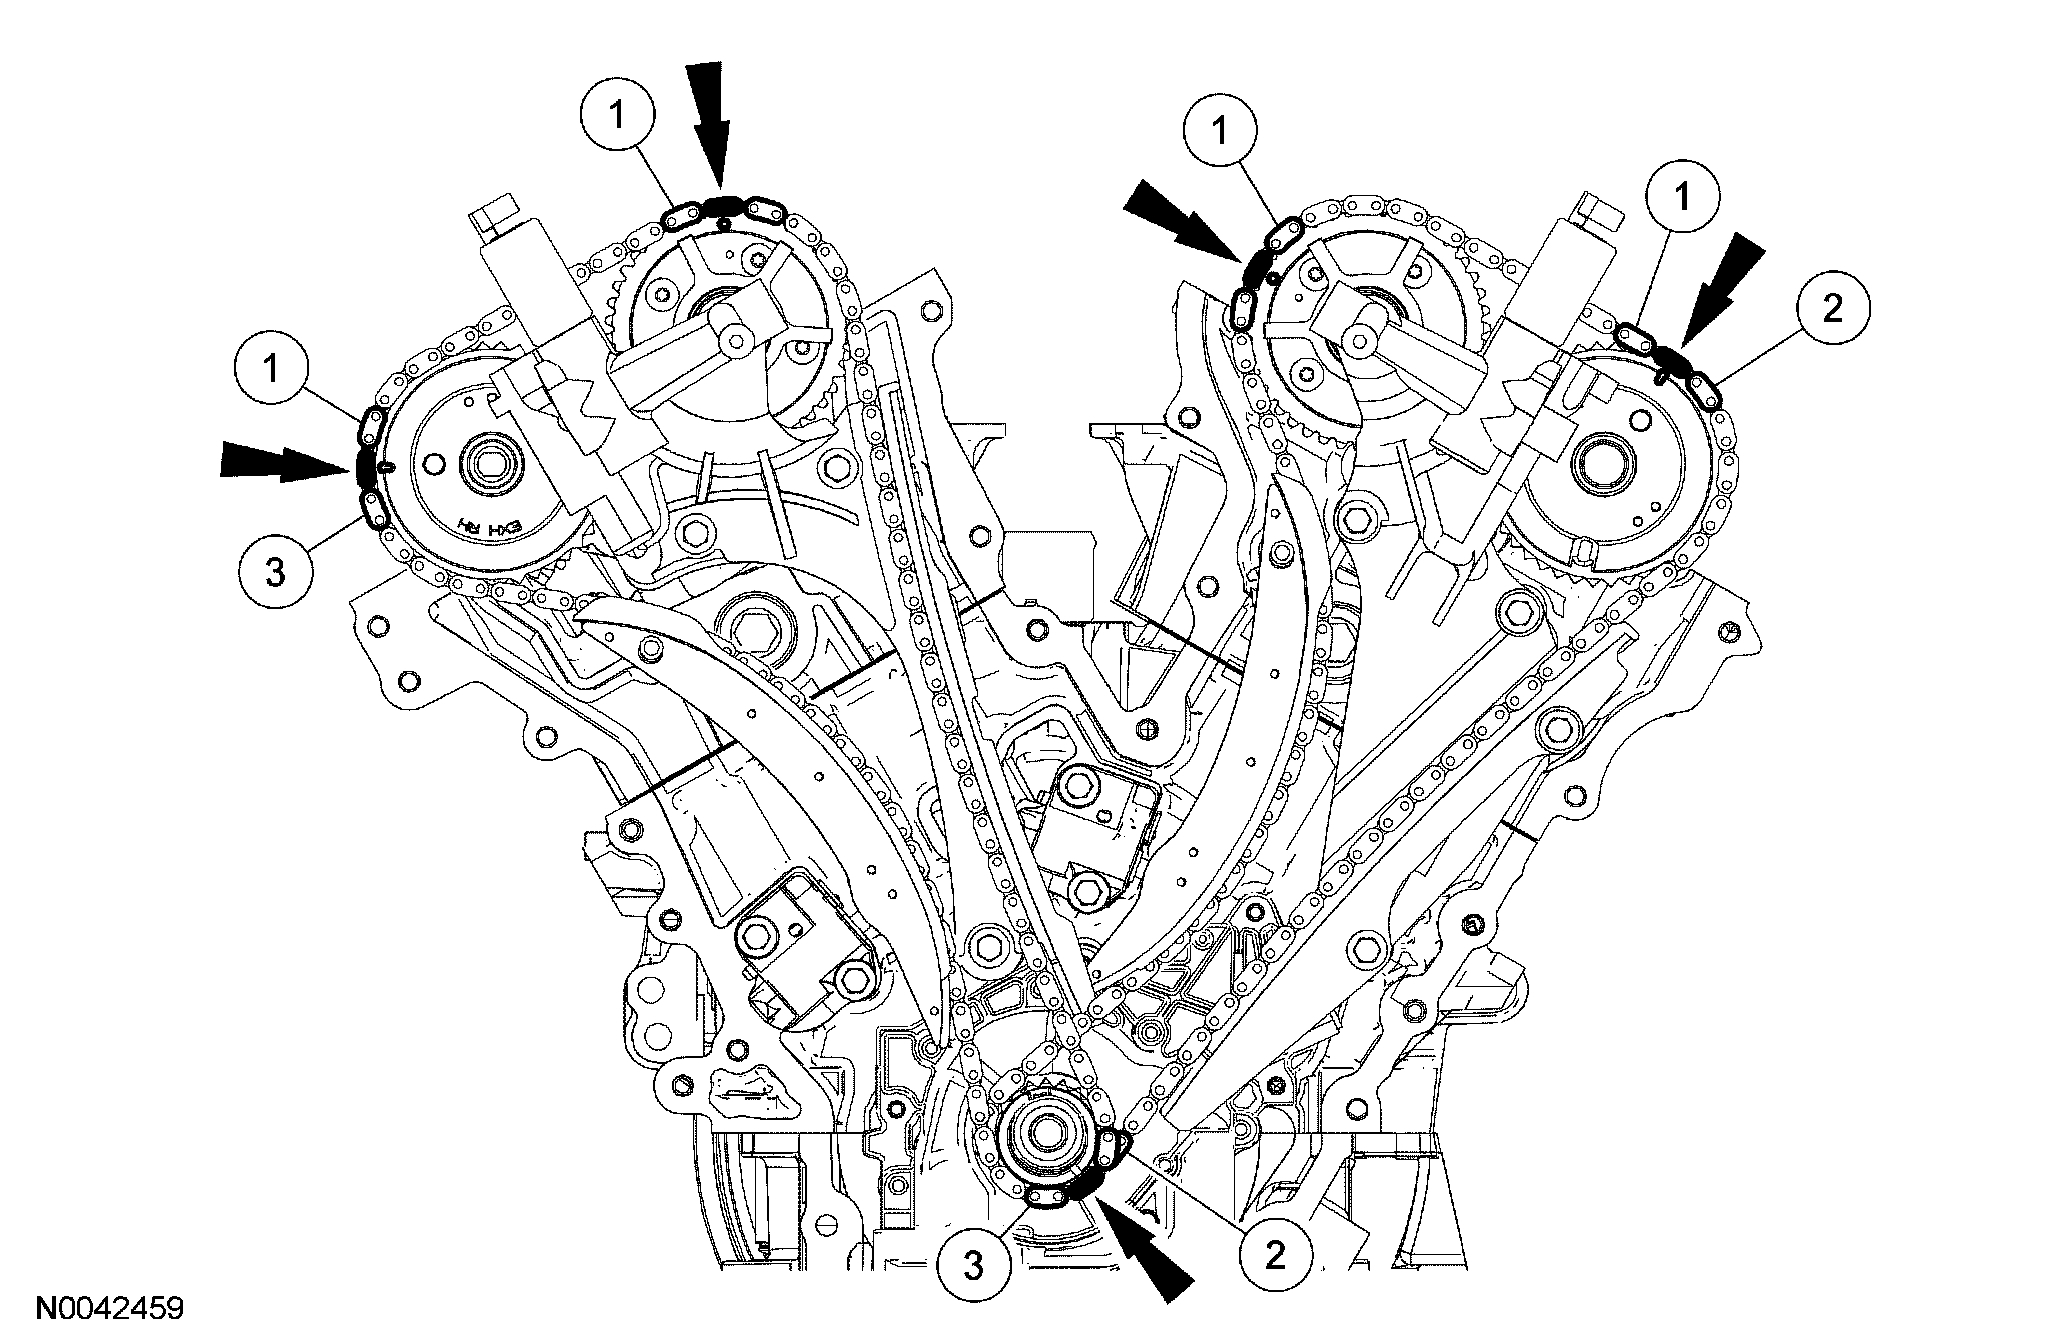
18. CAUTION: Failure to verify correct timing drive component alignment will result in severe engine damage.
Verify the timing with these steps.
1 There should be 12 chain links between the camshaft timing marks.
2 There should be 27 chain links between the camshaft and the crankshaft timing marks.
3 There should be 30 chain links between the camshaft and the crankshaft timing marks.
pic 31
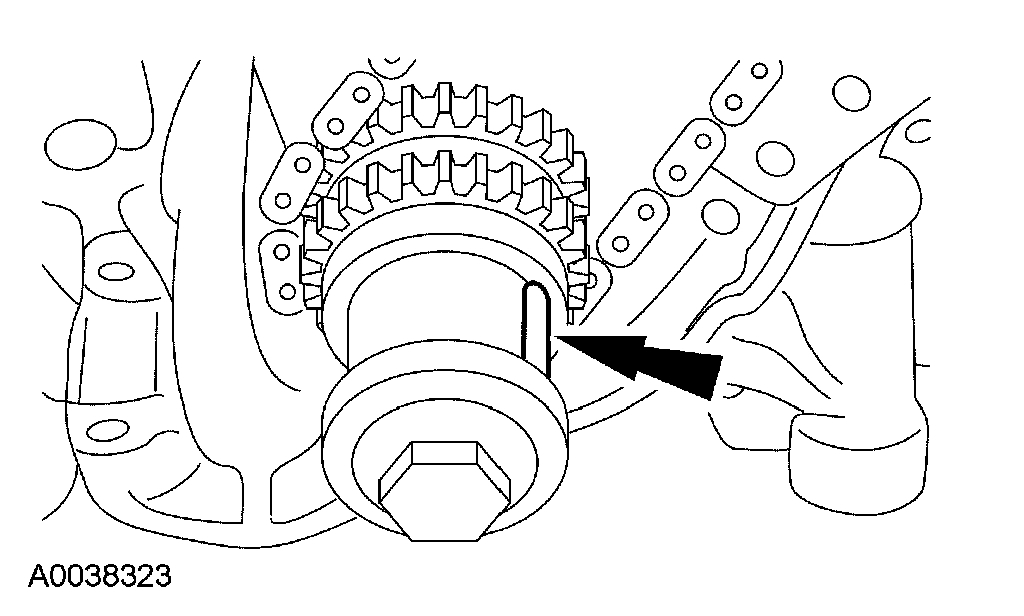
19. Remove the crankshaft pulley bolt and washer.
20. CAUTION: This pulse wheel is used in several different engines. Install the pulse wheel with the keyway in the slot stamped "30RFF" only (orange in color).
pic 32
Install the ignition pulse wheel.
pic 33
21. NOTICE: Only use hand tools when removing or installing the spark plugs or damage can occur to the cylinder head or spark plug,
Install the 6 spark plugs.
^ Tighten to 15 Nm (11 ft. lbs.).
22. Install the engine front cover.
_______________________________________________________________
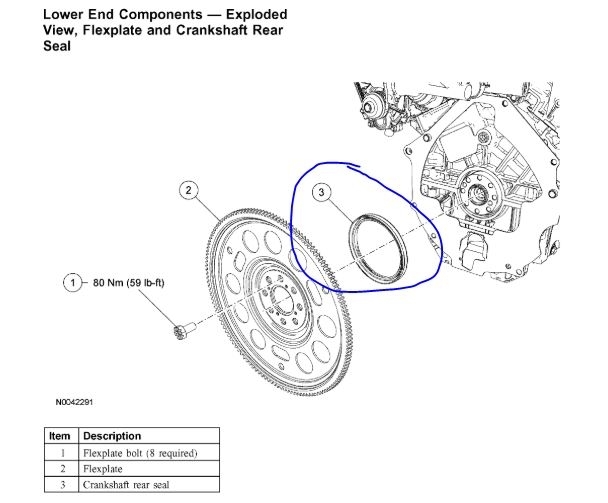
As far as the main seals, there is a lot involved. The rear main requires the engine and transmission to be separated and the torque converter and flywheel to be removed. If you look at pic 34, I attached an exploded view of the rear main seal. I circled it for you.
The front main seal will be easy to replace. It is located in the timing chain cover which you will already have removed. Here are the directions for replacement of the front crankshaft seal. The remaining pics correlate with these directions starting with picture 35.
______________________________________________________________
PROCEDURES
Crankshaft Front Seal
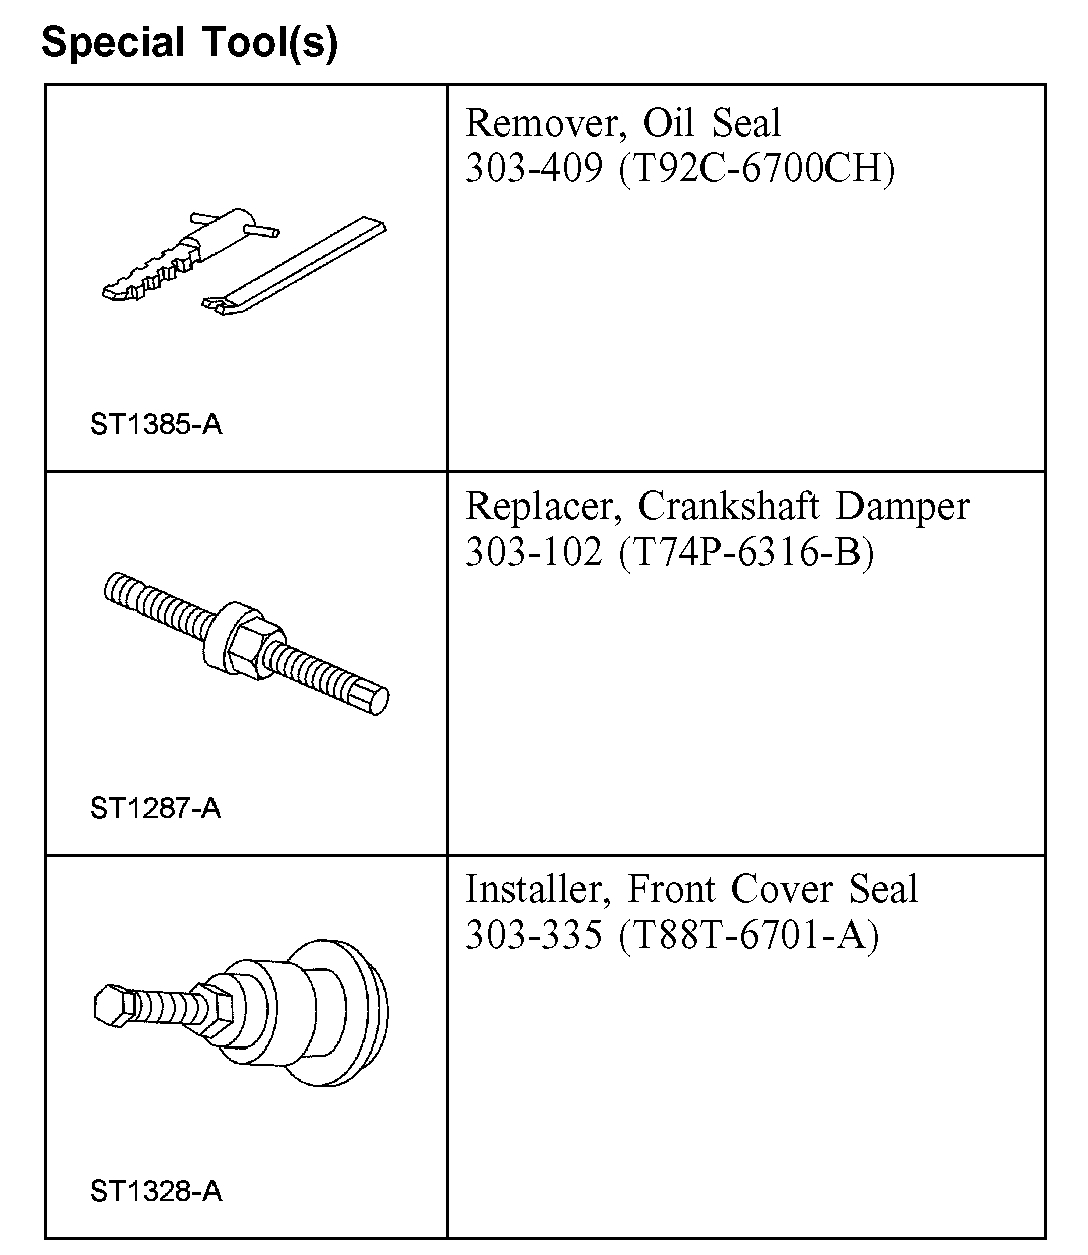
Special Tool(s)
pic 35
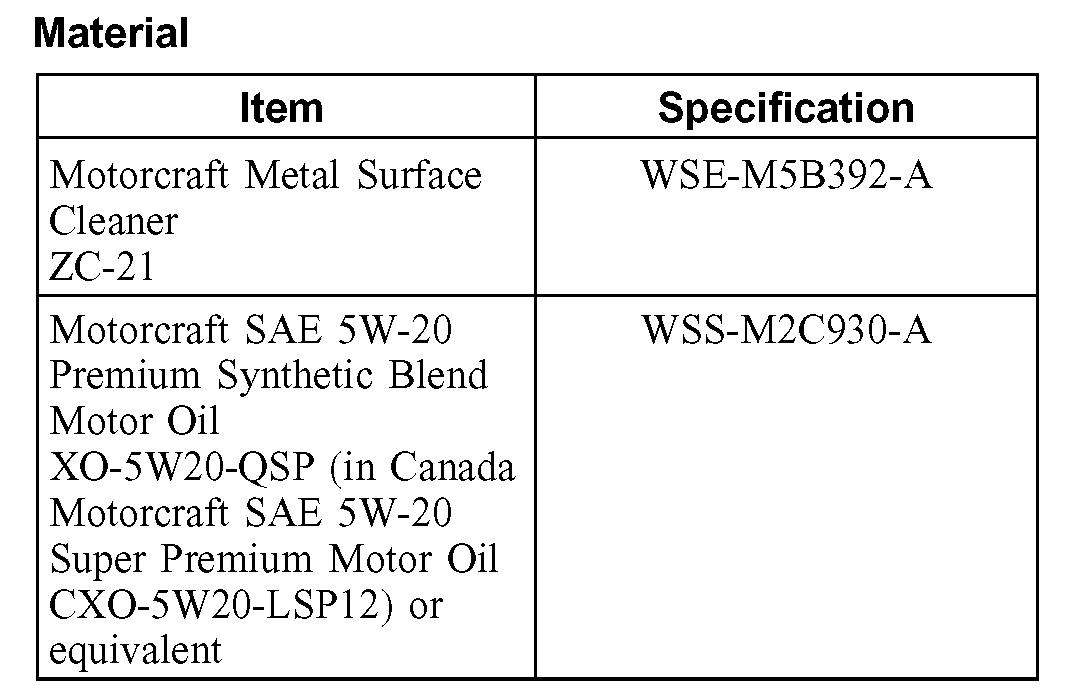
Material
pic 36
Removal
1. With the vehicle in NEUTRAL, position it on a hoist. For additional information, refer to Maintenance/Service and Repair.
2. Remove the crankshaft pulley.
pic 37
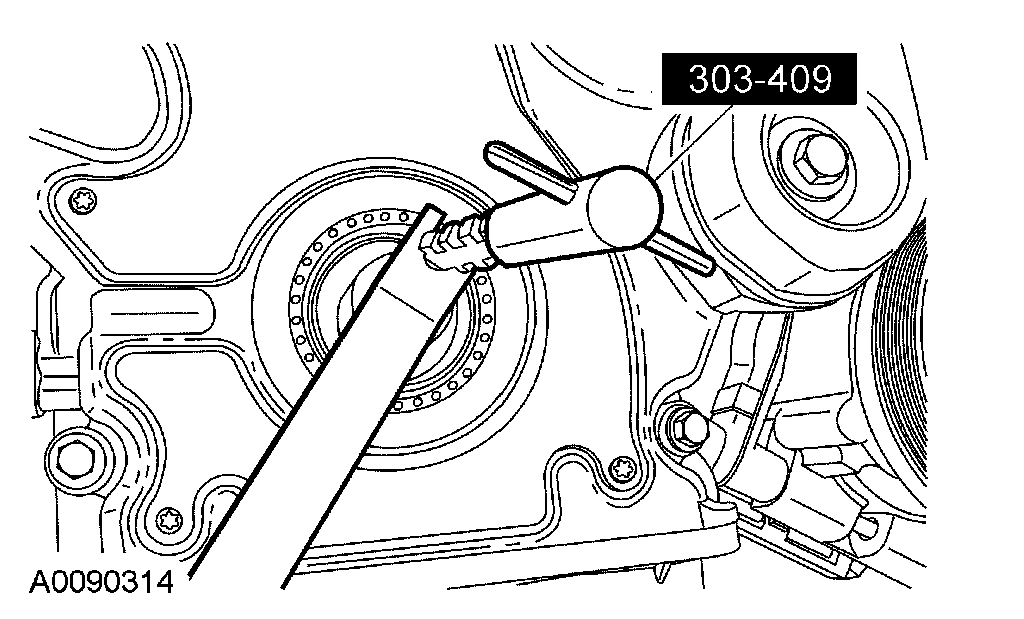
3. Using the special tool, remove and discard the crankshaft front seal.
Installation
1. NOTE: Clean all sealing surfaces with metal surface cleaner.
Apply clean engine oil to the seal lip and seal bore before installing the seal.
pic 38
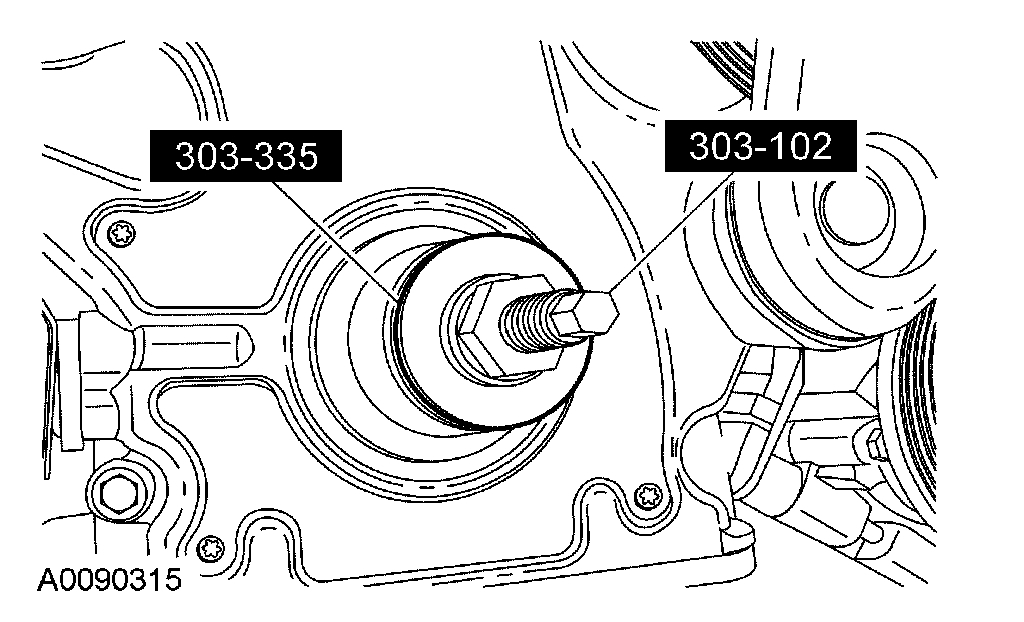
2. Using the special tools, install a new crankshaft front seal.
3. Install the crankshaft pulley.
___________________________________________________________
Let me know if this helps. Also, feel free to ask questions.
Take care,
Joe
Images (Click to enlarge)
May 17, 2019 at 9:45 PM