Welcome to 2CaroPros.
I looked up the OEM part numbers for you. Use them to cross reference chains from other manufacturer's.
As far as getting the part online, buyer beware. You don't want to get the wrong or a cheap duplicate of this one. I have a feeling you are seeing the timing chains for other engines that came in the vehicle.
Here are the OEM numbers:
12590920 is the primary
12589011 Is the secondary.
__________________________________________________
I don't know if you need it, but here are the directions for replacement. It is broken down to left and right secondary and primary. The attached pictures correlate with these directions.
I will separate each one to help avoid confusion.
_________________________________________________
SECONDARY CAMSHAFT INTERMEDIATE DRIVE CHAIN REPLACEMENT - LEFT
Removal Procedure
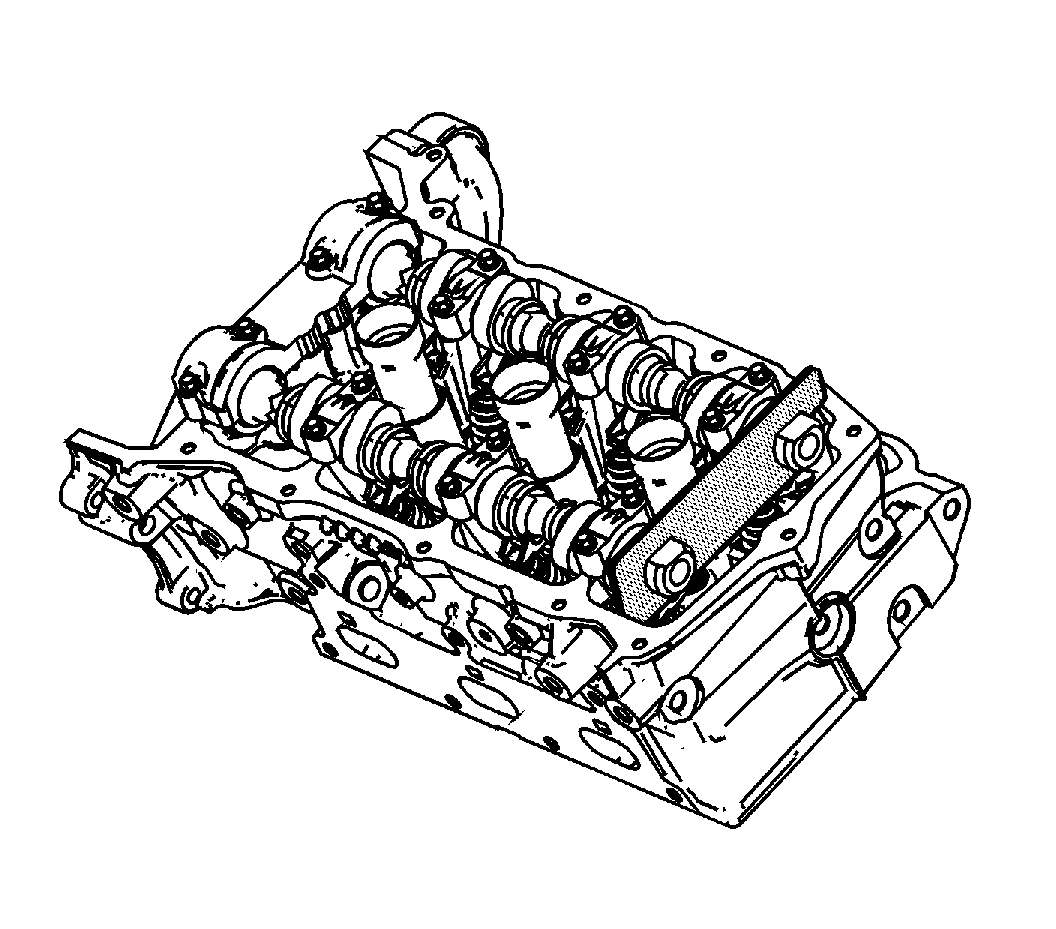
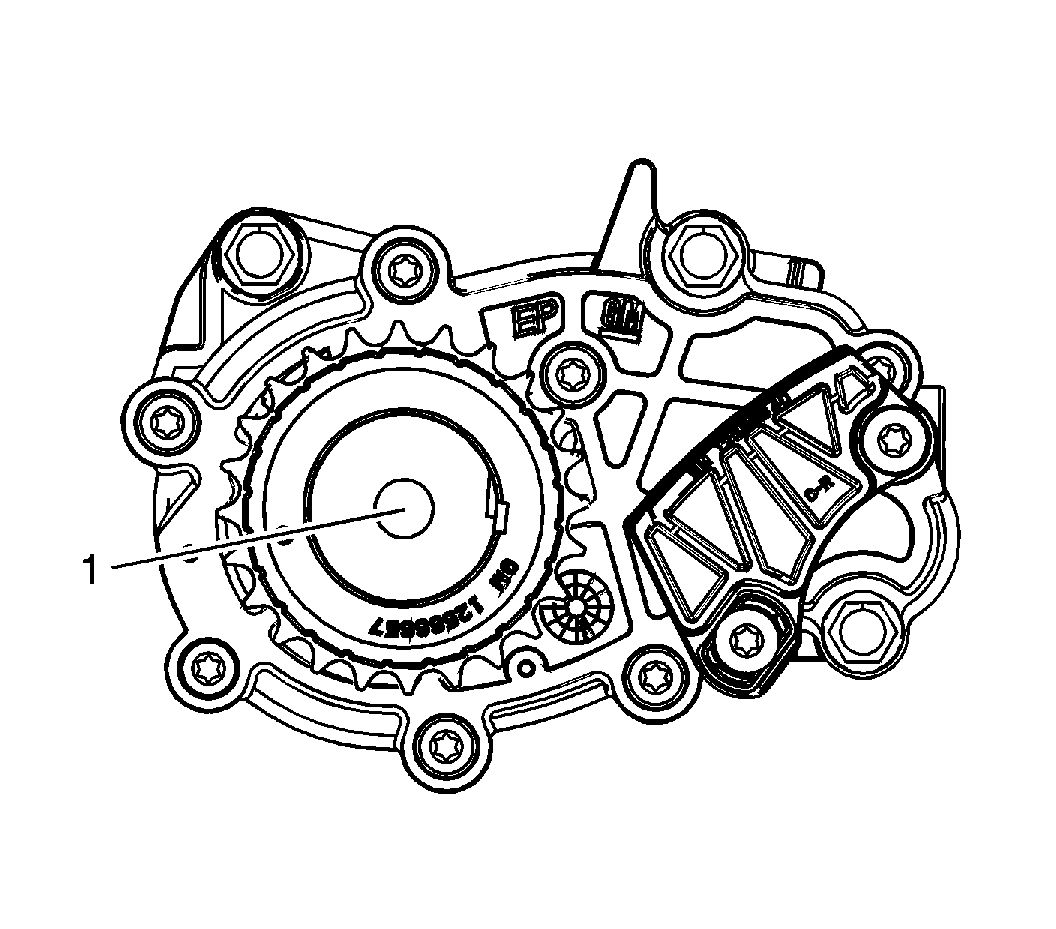
1. Remove the engine front cover. See: Timing Cover > Procedures > Engine Front Cover Replacement
2. Remove the right bank secondary camshaft drive chain tensioner. See: Engine > Overhaul > 23. Secondary Timing Chain Tensioner Removal - Right
3. Remove the right bank secondary camshaft drive chain shoe. See: Engine > Overhaul > 24. Secondary Camshaft Drive Chain Shoe Removal - Right
4. Remove the right bank secondary camshaft drive chain guide. See: Engine > Overhaul > 25. Secondary Timing Chain Guide Removal - Right
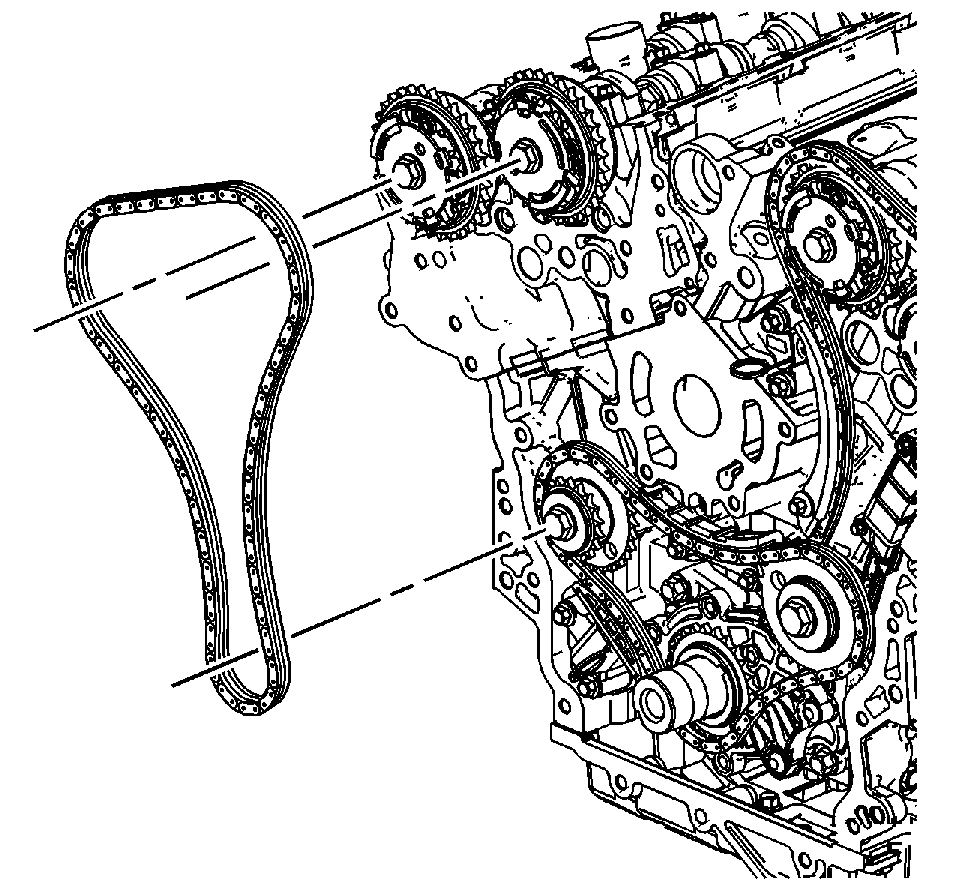
5. Remove the right bank secondary camshaft drive chain. See: Engine > Overhaul > 26. Secondary Camshaft Intermediate Drive Chain Removal - Right
6. Remove the primary camshaft drive chain tensioner. See: Engine > Overhaul > 27. Primary Camshaft Intermediate Drive Chain Tensioner Removal
7. Remove the primary upper camshaft drive chain guide. See: Engine > Overhaul > 28. Primary Timing Chain Guide Removal - Upper
8. Remove the primary camshaft drive chain. See: Engine > Overhaul > 30. Primary Camshaft Intermediate Drive Chain Removal
9. Remove the right bank camshaft intermediate drive chain idler. See: Engine > Overhaul > 31. Timing Chain Idler Sprocket Removal - Right
10. Remove the left bank secondary camshaft drive chain tensioner. See: Engine > Overhaul > 32. Secondary Timing Chain Tensioner Removal - Left
11. Remove the left bank secondary camshaft drive chain shoe. See: Engine > Overhaul > 33. Secondary Camshaft Drive Chain Shoe Removal - Left
12. Remove the left bank secondary camshaft drive chain guide. See: Engine > Overhaul > 34. Secondary Timing Chain Guide Removal - Left
13. Remove the left bank camshaft intermediate drive chain idler. See: Engine > Overhaul > 36. Timing Chain Idler Sprocket Removal - Left
See Picture 1
14. Remove the left bank secondary camshaft drive chain. See: Engine > Overhaul > 35. Secondary Camshaft Intermediate Drive Chain Removal - Left
15. Clean and inspect all of the camshaft timing drive components. Replace components as necessary. See: Engine > Overhaul > 71. Camshaft Timing Drive Components Clean and Inspect
Installation Procedure
See Picture 1
1. Install the left bank secondary camshaft drive chain. See: Engine > Overhaul > 116. Secondary Camshaft Intermediate Drive Chain Installation - Left
2. Install the left bank camshaft intermediate drive chain idler. See: Engine > Overhaul > 115. Timing Chain Idler Sprocket Installation - Left
3. Install the left bank secondary camshaft drive chain guide. See: Engine > Overhaul > 117. Secondary Timing Chain Guide Installation - Left
4. Install the left bank secondary camshaft drive chain shoe. See: Engine > Overhaul > 118. Secondary Camshaft Drive Chain Shoe Installation - Left
5. Install the left bank secondary camshaft drive chain tensioner. See: Engine > Overhaul > 119. Secondary Timing Chain Tensioner Installation - Left
6. Install the right bank camshaft intermediate drive chain idler. See: Engine > Overhaul > 120. Timing Chain Idler Sprocket Installation - Right
7. Install the primary camshaft drive chain. See: Engine > Overhaul > 121. Primary Camshaft Intermediate Drive Chain Installation
8. Install the primary upper camshaft drive chain guide. See: Engine > Overhaul > 123. Primary Timing Chain Guide Installation - Upper
9. Install the primary camshaft drive chain tensioner. See: Engine > Overhaul > 124. Primary Camshaft Intermediate Drive Chain Tensioner Installation
10. Install the right bank secondary camshaft drive chain. See: Engine > Overhaul > 125. Secondary Camshaft Intermediate Drive Chain Installation - Right
11. Install the right bank secondary camshaft drive chain guide. See: Engine > Overhaul > 126. Secondary Timing Chain Guide Installation - Right
12. Install the right bank secondary camshaft drive chain shoe. See: Engine > Overhaul > 127. Secondary Camshaft Drive Chain Shoe Installation - Right
13. Install the right bank secondary camshaft drive chain tensioner. See: Engine > Overhaul > 128. Secondary Timing Chain Tensioner Installation - Right
14. Install the engine front cover. See: Timing Cover > Procedures > Engine Front Cover Replacement
_______________________________________________________________________
SECONDARY CAMSHAFT INTERMEDIATE DRIVE CHAIN REPLACEMENT - RIGHT
Removal Procedure
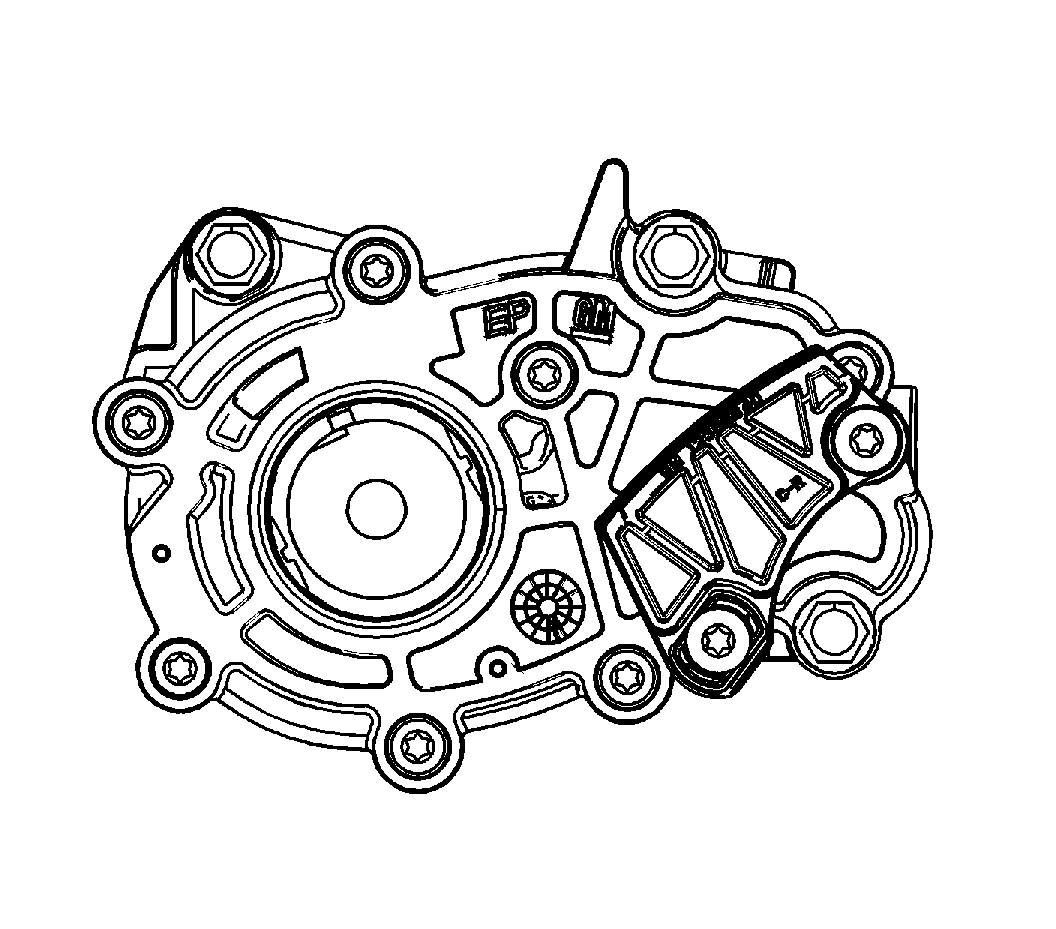
1. Remove the engine front cover. See: Timing Cover > Procedures > Engine Front Cover Replacement
2. Remove the right bank secondary camshaft drive chain tensioner. See: Engine > Overhaul > 23. Secondary Timing Chain Tensioner Removal - Right
3. Remove the right bank secondary camshaft drive chain shoe. See: Engine > Overhaul > 24. Secondary Camshaft Drive Chain Shoe Removal - Right
4. Remove the right bank secondary camshaft drive chain guide. See: Engine > Overhaul > 25. Secondary Timing Chain Guide Removal - Right
Picture 2
5. Remove the right bank secondary camshaft drive chain. See: Engine > Overhaul > 26. Secondary Camshaft Intermediate Drive Chain Removal - Right
Installation Procedure
Picture 2
1. Install the right bank secondary camshaft drive chain. See: Engine > Overhaul > 125. Secondary Camshaft Intermediate Drive Chain Installation - Right
2. Install the right bank secondary camshaft drive chain guide. See: Engine > Overhaul > 126. Secondary Timing Chain Guide Installation - Right
3. Install the right bank secondary camshaft drive chain shoe. See: Engine > Overhaul > 127. Secondary Camshaft Drive Chain Shoe Installation - Right
4. Install the right bank secondary camshaft drive chain tensioner. See: Engine > Overhaul > 128. Secondary Timing Chain Tensioner Installation - Right
5. Install the engine front cover. See: Timing Cover > Procedures > Engine Front Cover Replacement
___________________________________________________________________-
PRIMARY CAMSHAFT DRIVE CHAIN AND SPROCKETS REPLACEMENT
Removal Procedure
1. Remove the engine front cover. See: Timing Cover > Procedures > Engine Front Cover Replacement
2. Remove the right bank secondary camshaft drive chain tensioner. See: Engine > Overhaul > 23. Secondary Timing Chain Tensioner Removal - Right
3. Remove the right bank secondary camshaft drive chain shoe. See: Engine > Overhaul > 24. Secondary Camshaft Drive Chain Shoe Removal - Right
4. Remove the right bank secondary camshaft drive chain guide. See: Engine > Overhaul > 25. Secondary Timing Chain Guide Removal - Right
5. Remove the right bank secondary camshaft drive chain. See: Engine > Overhaul > 26. Secondary Camshaft Intermediate Drive Chain Removal - Right
6. Remove the primary camshaft drive chain tensioner. See: Engine > Overhaul > 27. Primary Camshaft Intermediate Drive Chain Tensioner Removal
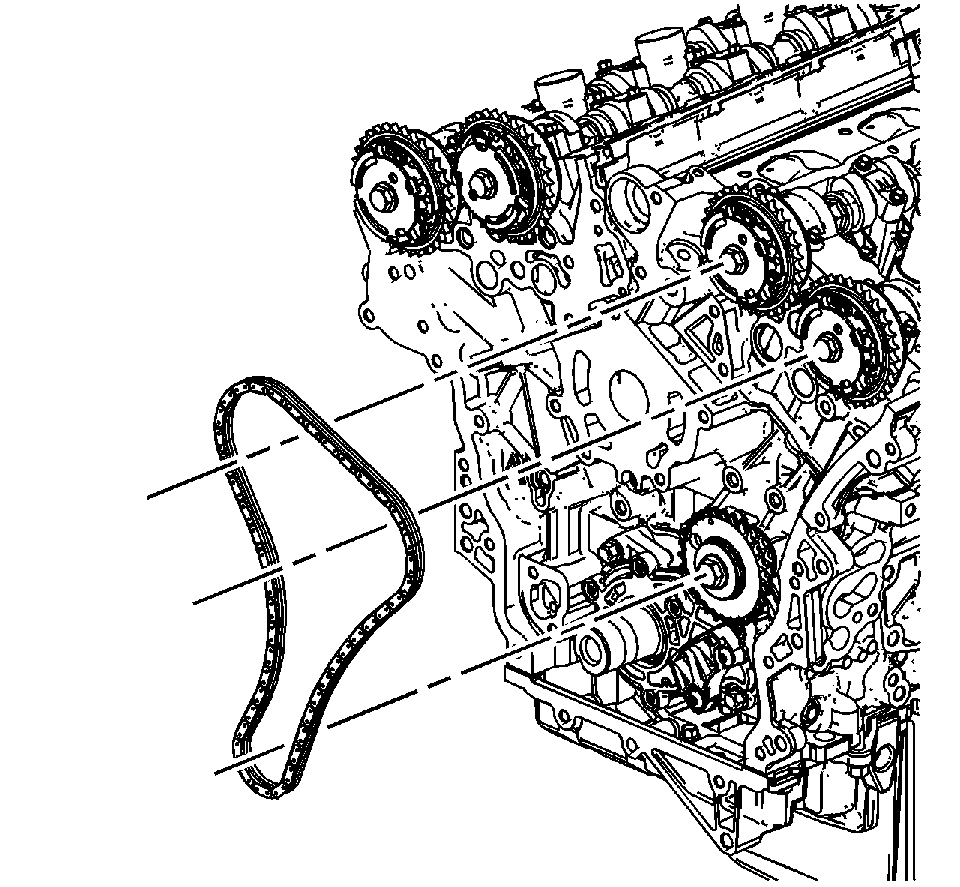
7. Remove the primary camshaft drive chain upper guide. See: Engine > Overhaul > 28. Primary Timing Chain Guide Removal - Upper
Picture 3
8. Remove the primary camshaft timing chain. See: Engine > Overhaul > 30. Primary Camshaft Intermediate Drive Chain Removal
Installation Procedure
Picture 3
1. Install the primary camshaft timing chain. See: Engine > Overhaul > 121. Primary Camshaft Intermediate Drive Chain Installation
2. Install the primary upper camshaft drive chain guide. See: Engine > Overhaul > 123. Primary Timing Chain Guide Installation - Upper
3. Install the primary camshaft drive chain tensioner. See: Engine > Overhaul > 124. Primary Camshaft Intermediate Drive Chain Tensioner Installation
4. Install the right bank secondary camshaft drive chain. See: Engine > Overhaul > 125. Secondary Camshaft Intermediate Drive Chain Installation - Right
5. Install the right bank secondary camshaft drive chain guide. See: Engine > Overhaul > 126. Secondary Timing Chain Guide Installation - Right
6. Install the right bank secondary camshaft drive chain shoe. See: Engine > Overhaul > 127. Secondary Camshaft Drive Chain Shoe Installation - Right
7. Install the right bank secondary camshaft drive chain tensioner. See: Engine > Overhaul > 128. Secondary Timing Chain Tensioner Installation - Right
8. Install the engine front cover. See: Timing Cover > Procedures > Engine Front Cover Replacement
________________________________________________________________
Pictures 4-7 show timing marks as a guide
_______________________________________________________________
Left cam timing procedure
116. SECONDARY CAMSHAFT INTERMEDIATE DRIVE CHAIN INSTALLATION - LEFT
Secondary Camshaft Intermediate Drive Chain Installation - Left
Tools Required
EN 46105 Camshaft Holding Tool
EN 46111 Crankshaft Rotation Socket
Picture 8
1. Important: There should be no need to rotate the camshaft more than 10 degrees. Using the hex cast into the camshaft rotate the camshaft in order to install the EN 46105.
Install the EN 46105-1 onto the rear of the left camshafts.
2. Important: All camshafts must be locked in place before installation of any camshaft drive chains.
Ensure that the EN 46105-1 is fully seated onto the camshafts.
Picture 9
3. Ensure that the crankshaft is in the stage one timing drive assembly position using the EN 46111. Refer to Camshaft Timing Drive Chain Alignment Diagram Stage One.
Picture 10
4. Install the left secondary camshaft drive chain.
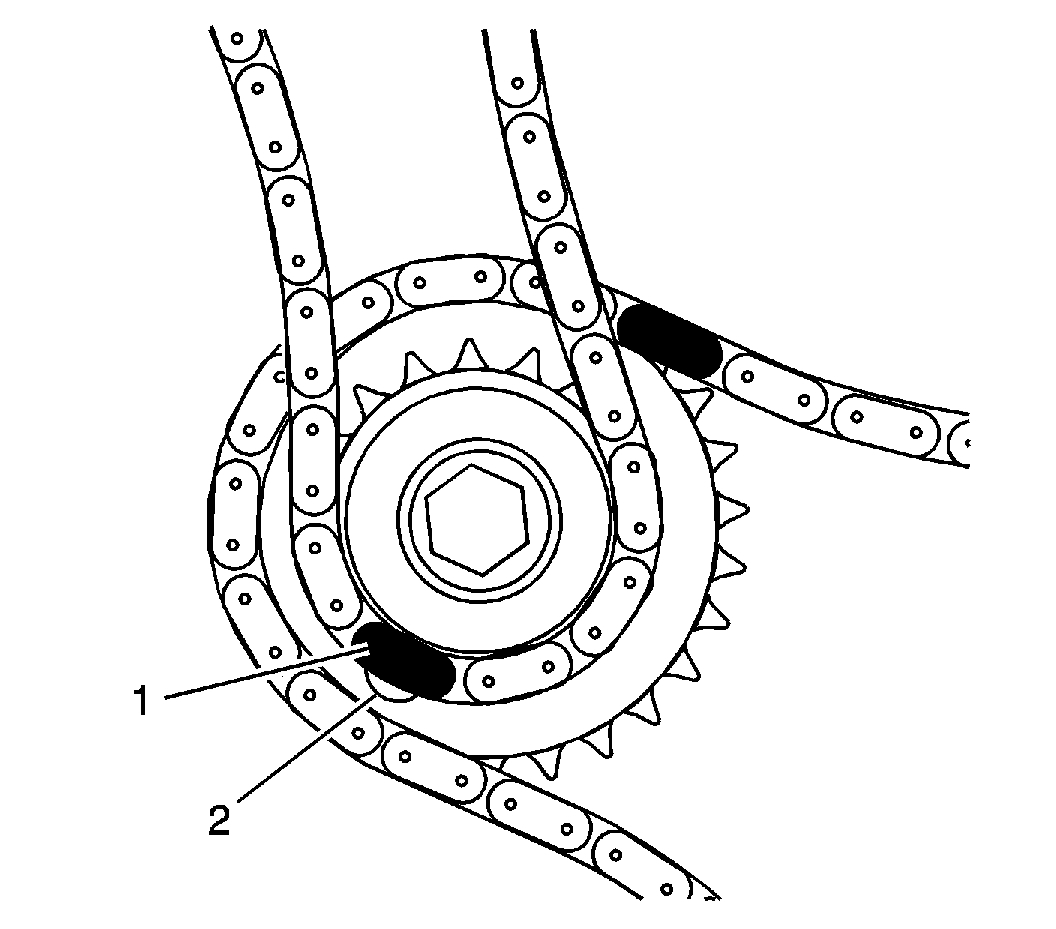
Picture 11
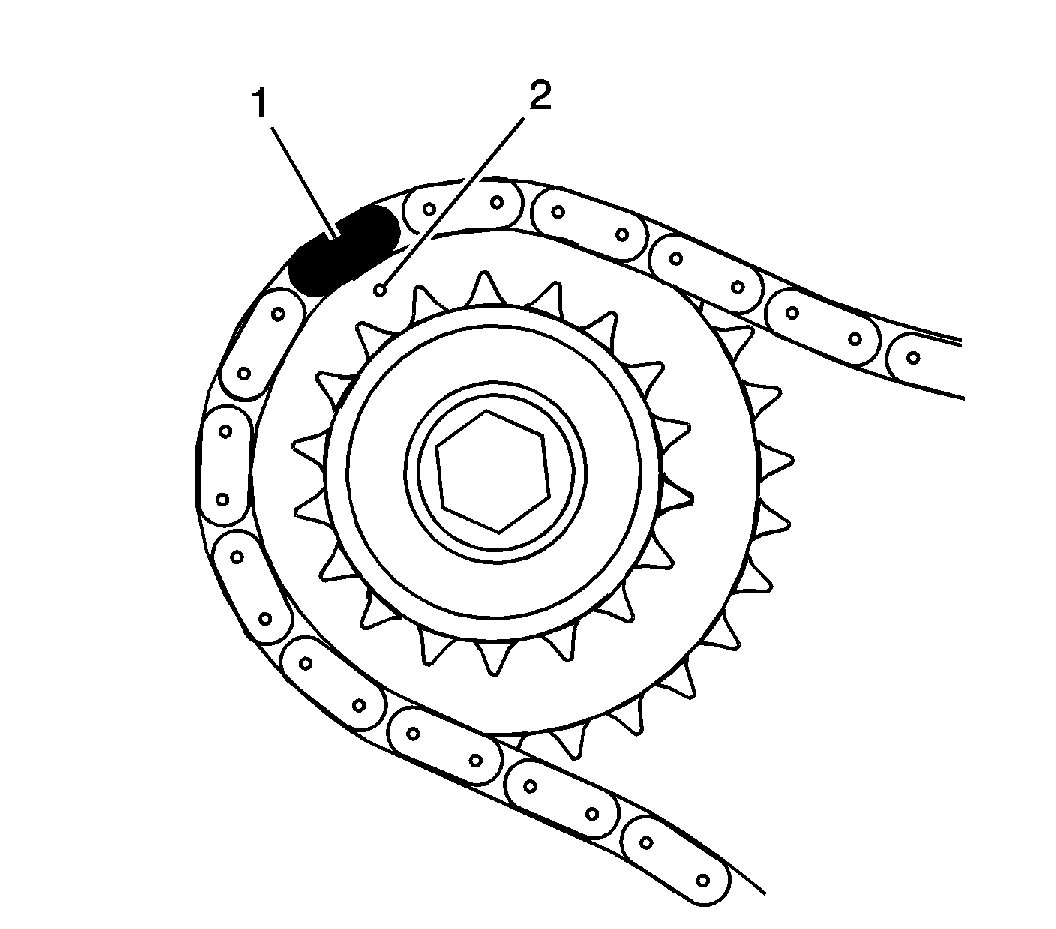
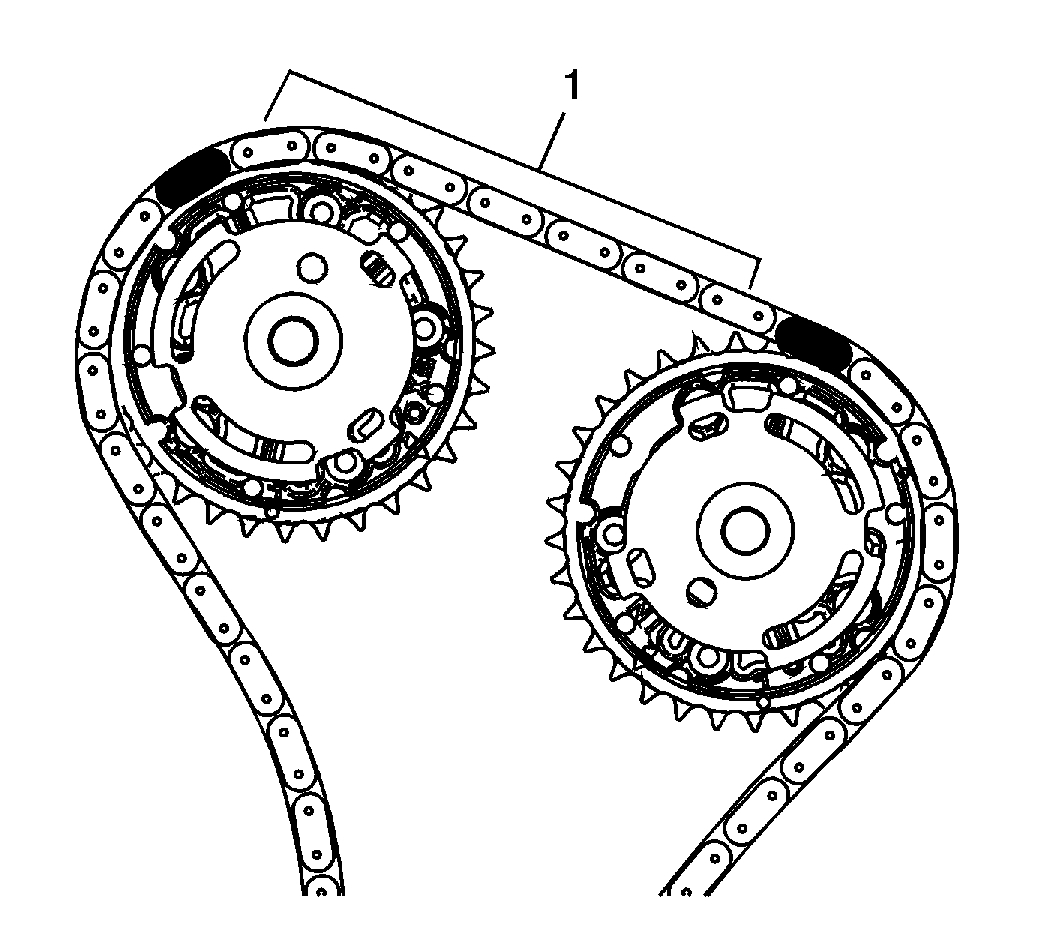
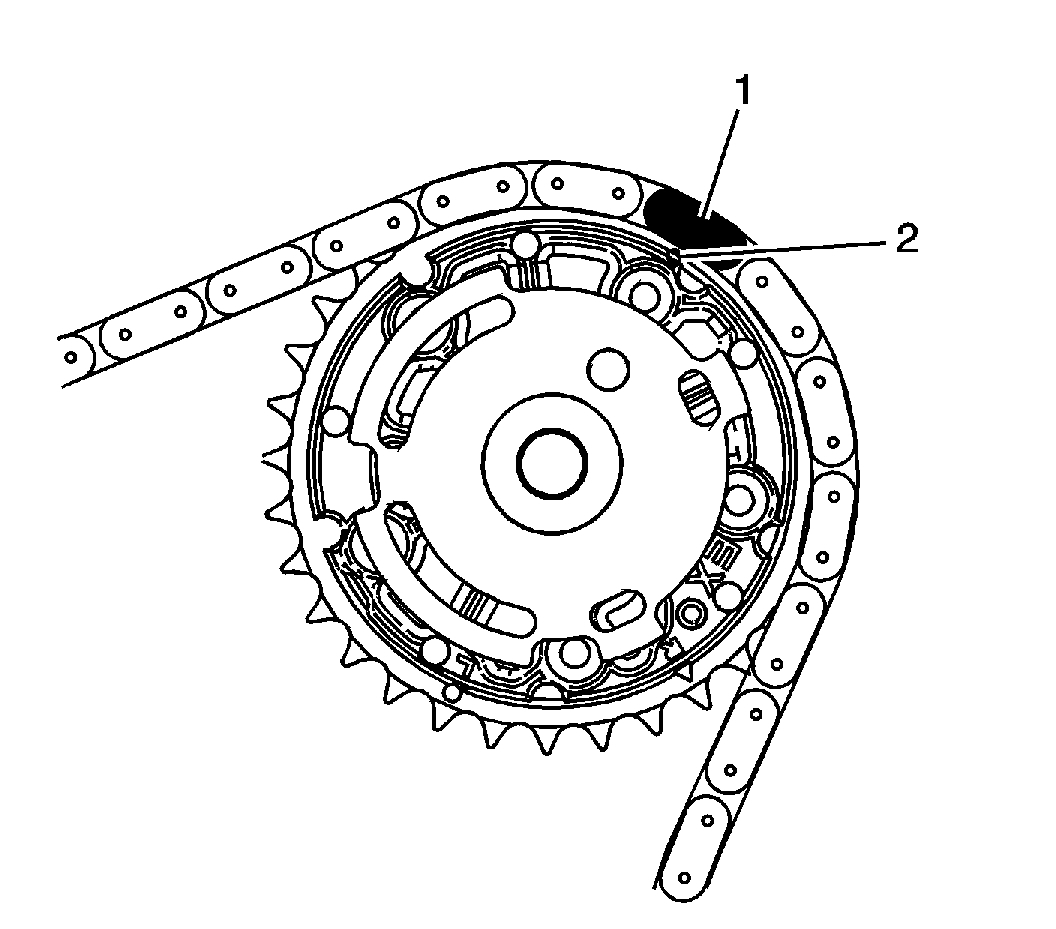
5. Place the left secondary camshaft drive chain around the inner sprocket of the left camshaft intermediate drive chain idler with the timing camshaft drive chain link (1) aligned to the alignment access hole (2) made in the left camshaft intermediate drive chain idler outer sprocket.
Picture 12
6. Wrap the secondary camshaft drive chain around both left actuator drive sprockets.
7. Ensure there are 7 links (1) between the timing camshaft drive chain links for the camshaft position actuator sprockets.
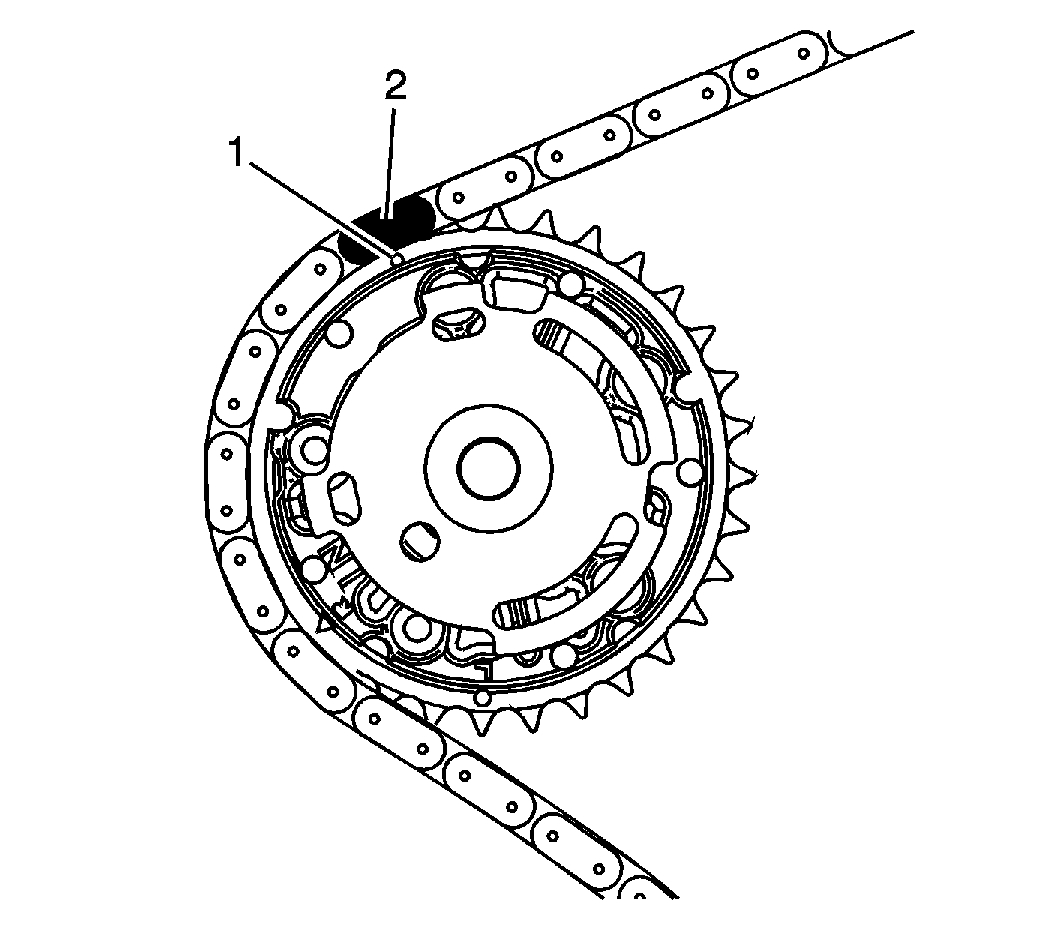
Picture 13
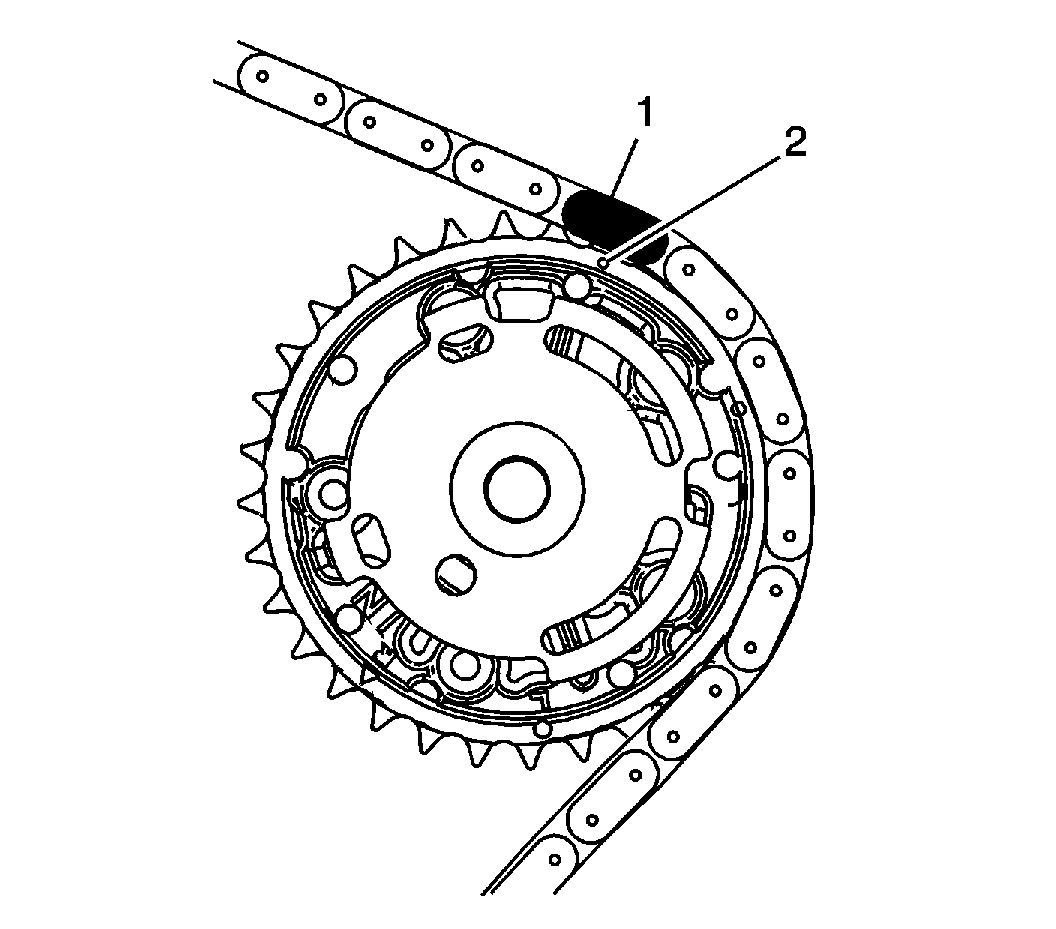
8. Align the left exhaust camshaft position actuator sprocket alignment circle mark (2) with the timing camshaft drive chain link (1).
Picture 14
9. Align the left intake camshaft position actuator sprocket alignment circle mark (1) with the timing camshaft drive chain link (2).
Picture 15
10. There will be 18 links (1) between the left camshaft intermediate drive chain idler timing secondary camshaft drive chain link and each left camshaft position actuator sprocket timing secondary camshaft drive chain link.
__________________________________________________________
Secondary Camshaft Intermediate Drive Chain Installation - Right
Picture 16
1. Ensure that the crankshaft is in the stage two timing drive assembly position (1).
Picture 17
2. Install the right secondary camshaft drive chain.
Picture 18
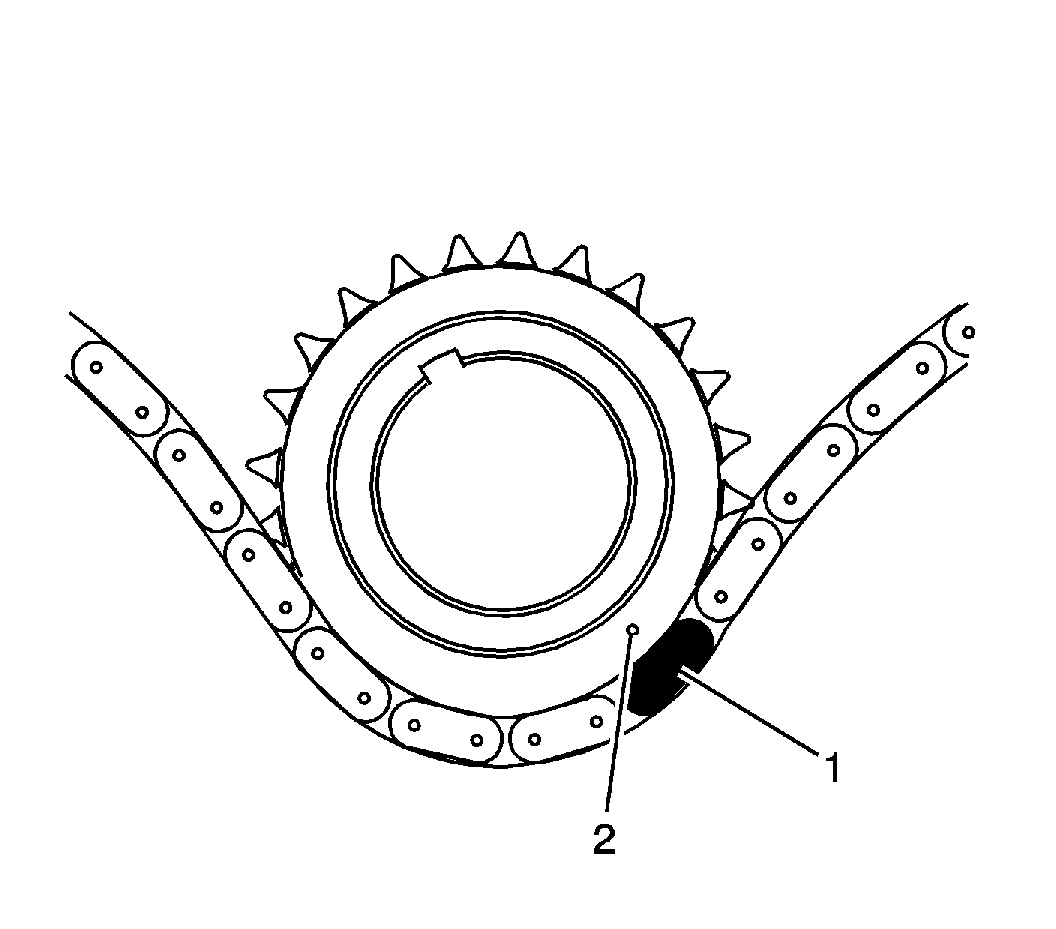
3. Place the secondary camshaft drive chain around the right camshaft intermediate drive chain idler outer sprocket, aligning the timing camshaft drive chain link (1) with the alignment access hole (2) made in the right camshaft intermediate drive chain idler inner sprocket.
Picture 19
4. Wrap the secondary camshaft drive chain around both right actuator drive sprockets.
5. Ensure there are 7 links (1) between the timing camshaft drive chain links for the camshaft position actuator sprockets.
Picture 20
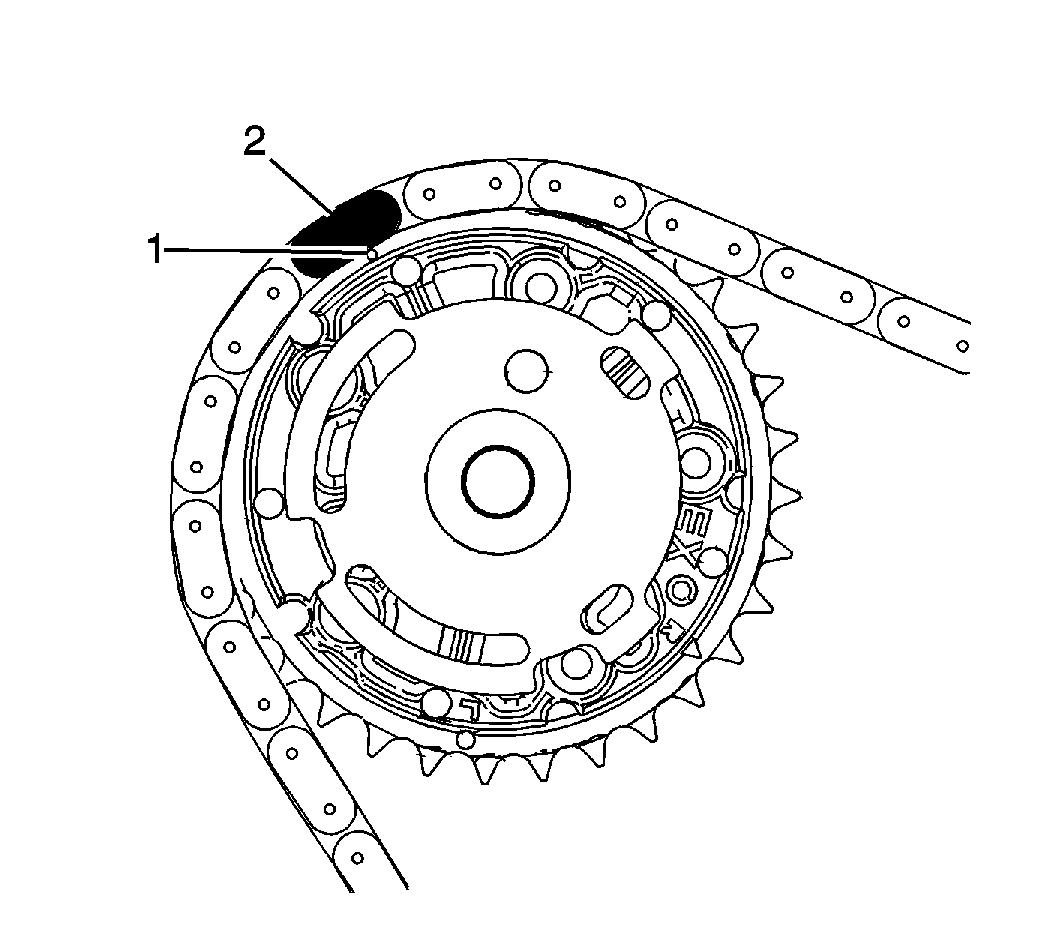
6. Align the right exhaust camshaft position actuator sprocket alignment triangle mark (1) with the timing camshaft drive chain link (2).
Picture 21
7. Align the right intake camshaft position actuator sprocket alignment triangle mark (2) with the timing camshaft drive chain link (1).
Picture 22
8. There will be 18 links (1) between the right camshaft intermediate drive chain idler timing camshaft drive chain link and each right camshaft position actuator sprocket timing camshaft drive chain link.
_________________________________________________________________________
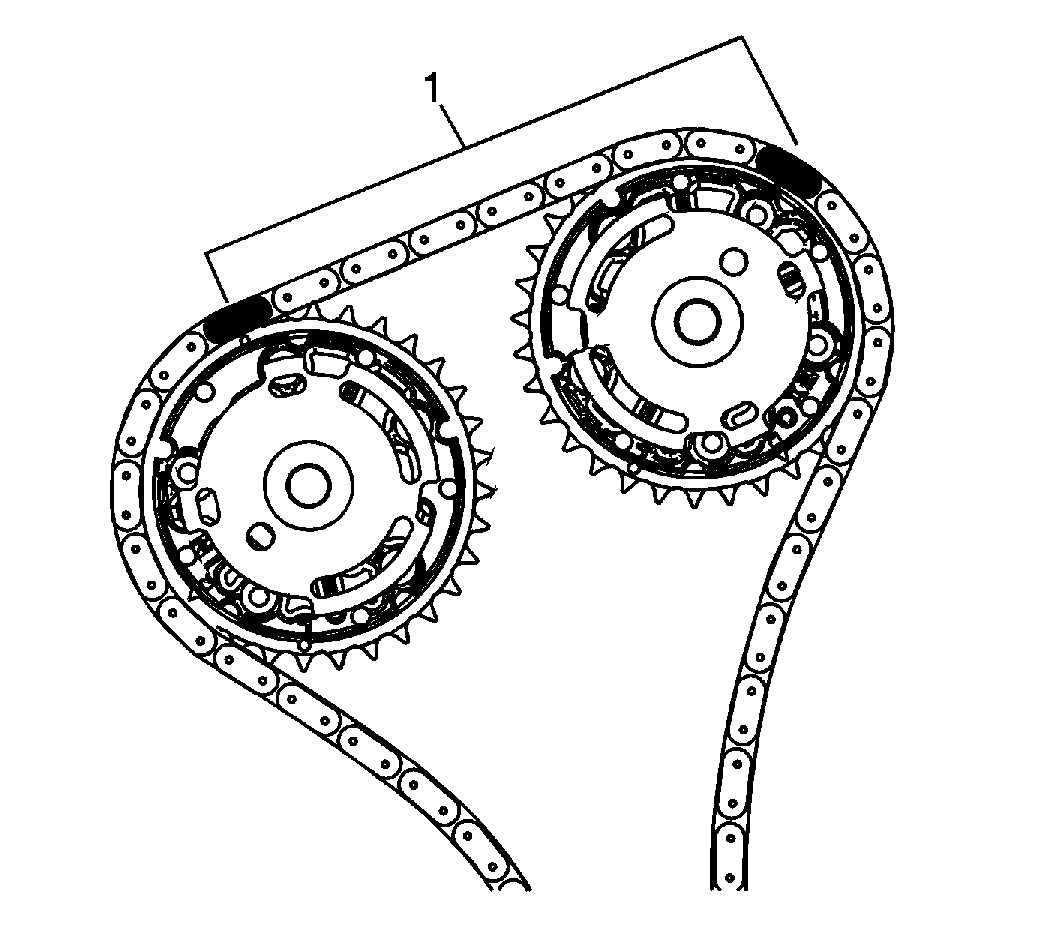
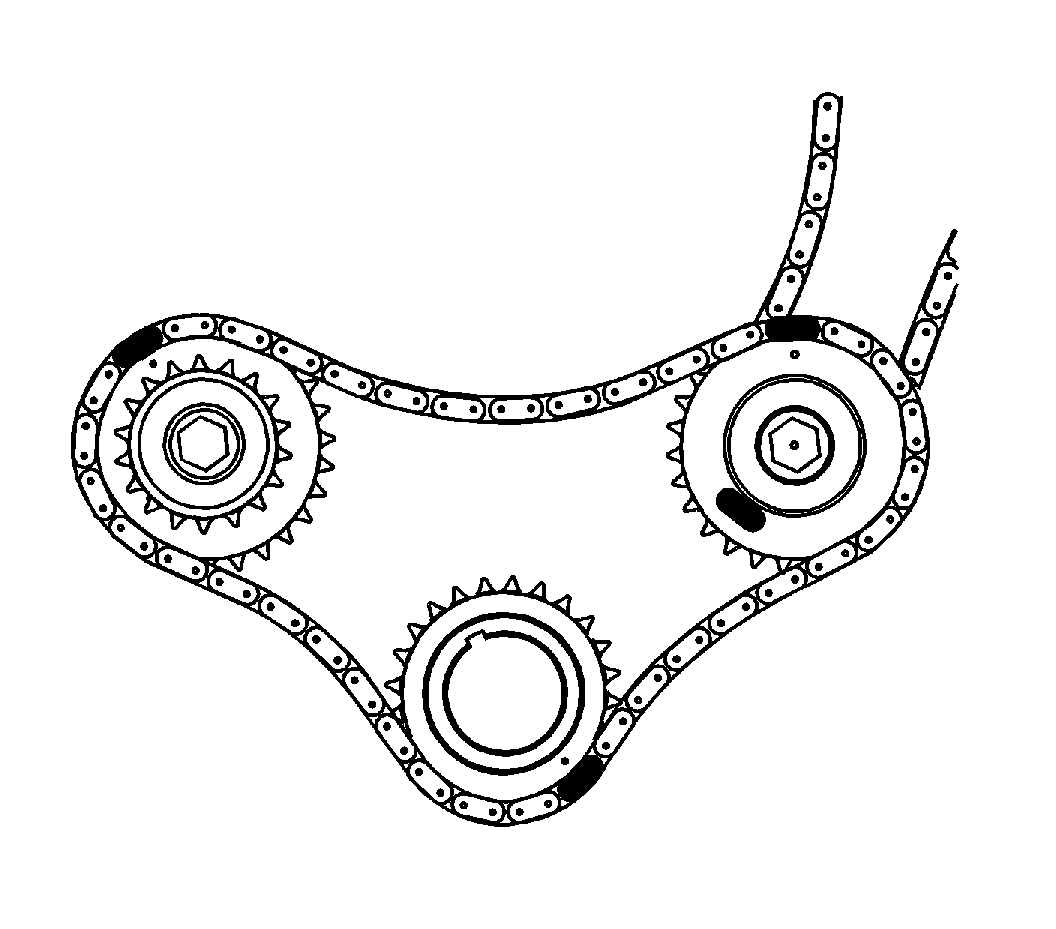
Primary Camshaft Intermediate Drive Chain Installation
Picture 23
1. Important: Ensure that the crankshaft is in the stage one timing drive assembly position.
Install the primary camshaft drive chain.
Picture 24
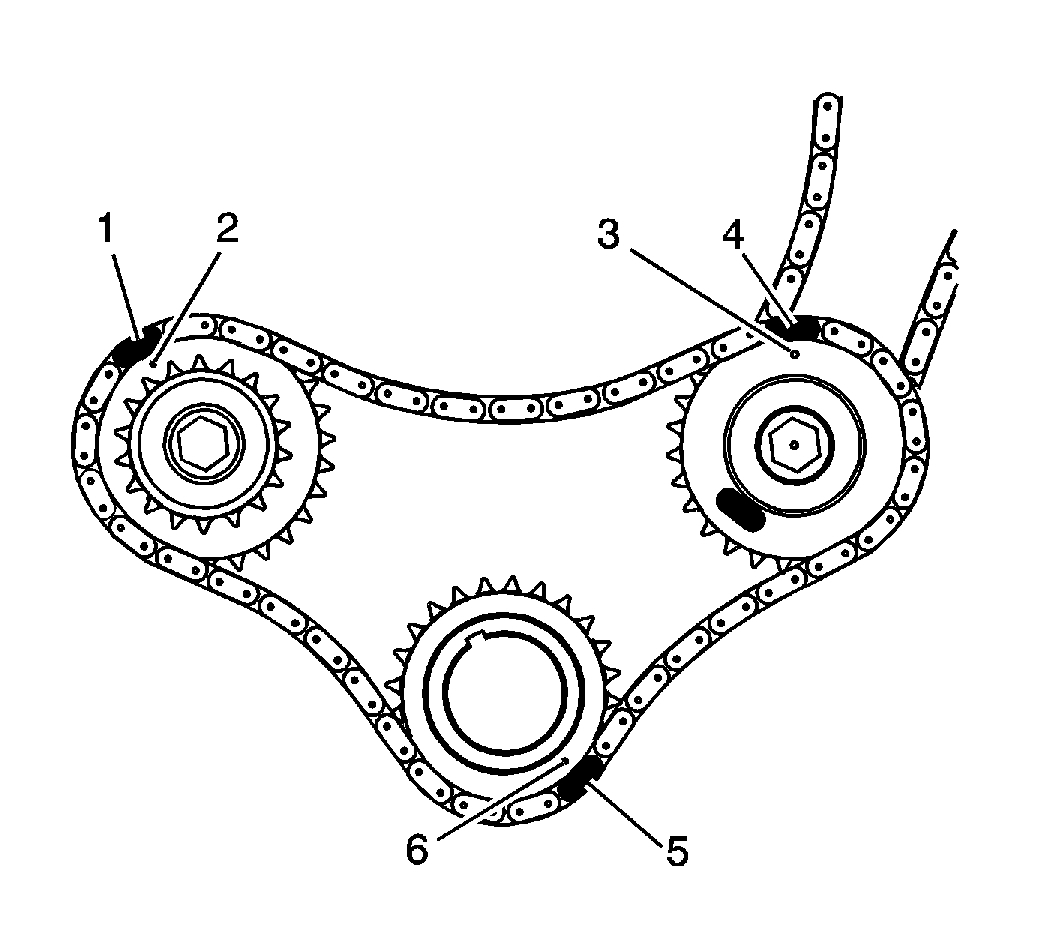
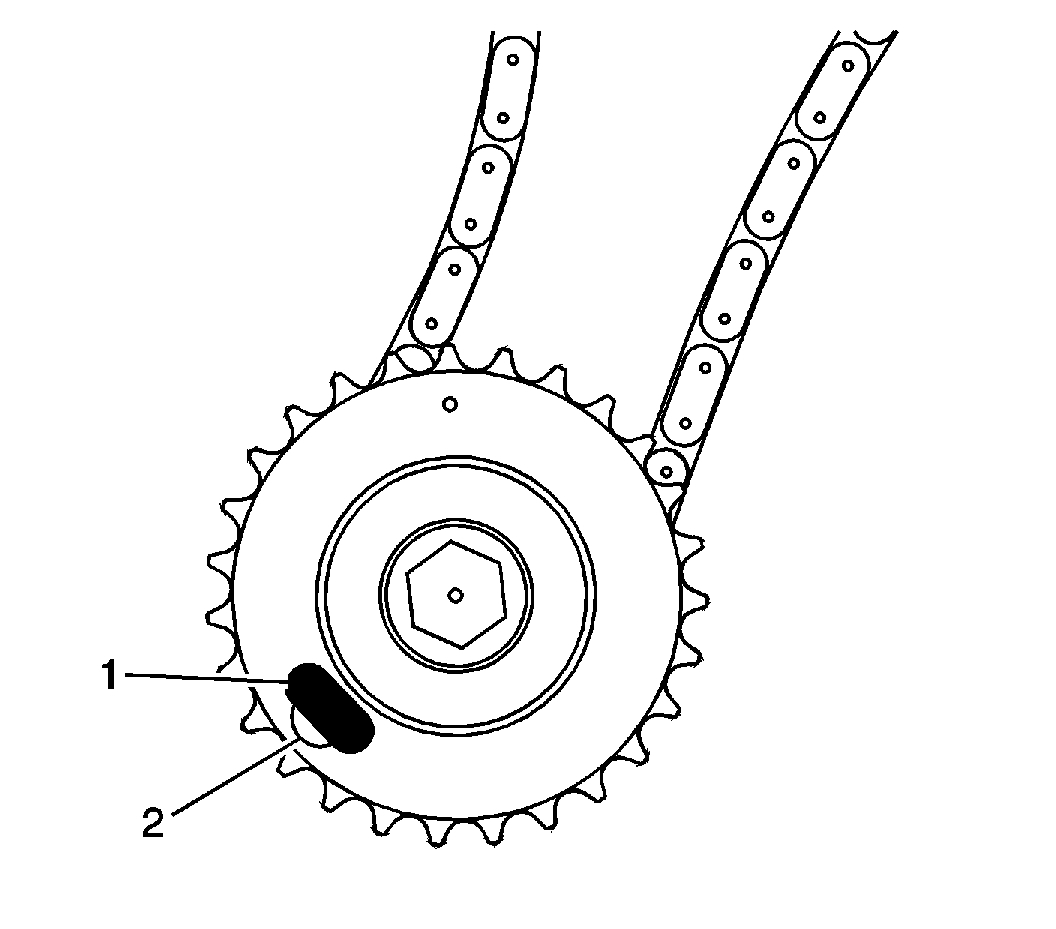
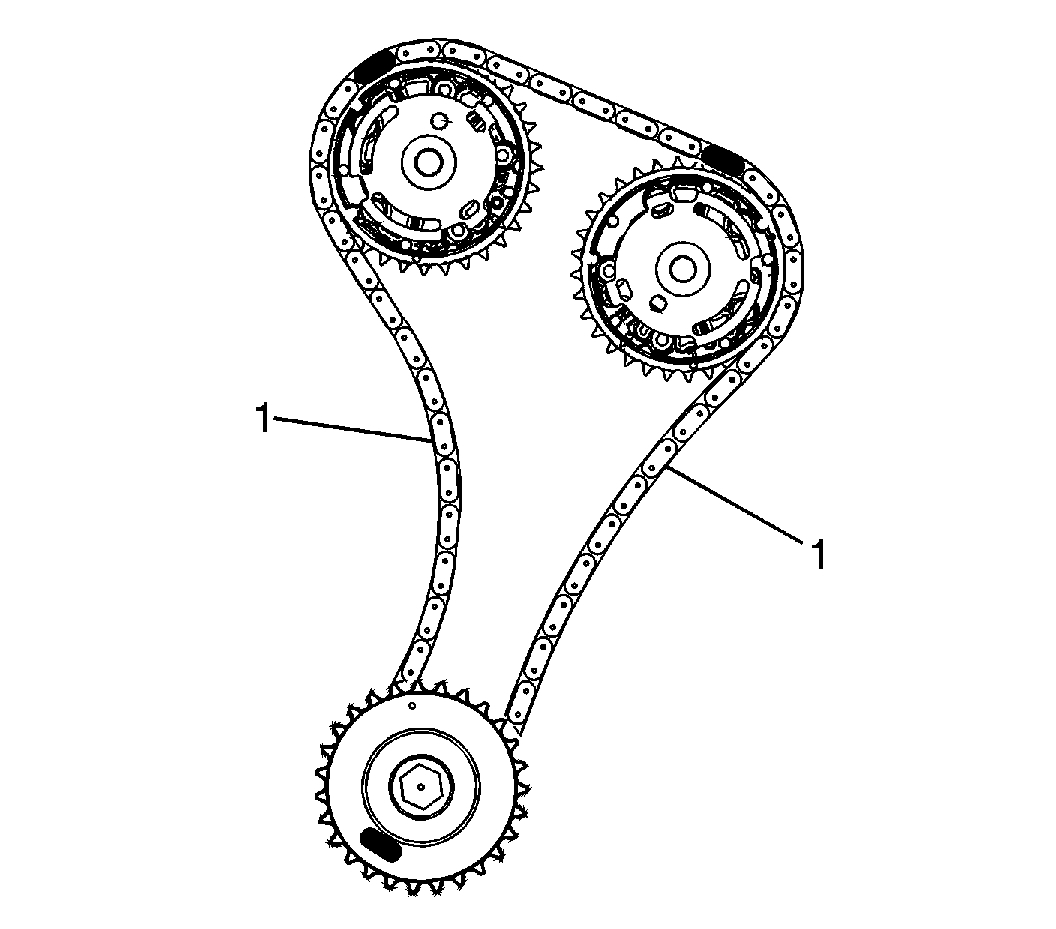
2. Wrap the primary camshaft drive chain around the large sprockets of each camshaft intermediate drive chain idler and the crankshaft sprocket.
Picture 25
3. The left camshaft intermediate drive chain idler timing mark (1) will align with a timing camshaft drive chain link (2).
Picture 26
4. The right camshaft intermediate drive chain idler timing mark (2) will align with a timing camshaft drive chain link (1).
Picture 27
5. The crankshaft sprocket timing mark (2) will align with a timing camshaft drive chain link (1).
Picture 28
6. Ensure all the timing marks (2, 3, 6) are properly aligned with the timing camshaft drive chain links (1, 4, 5).
_________________________________________
I hope this helps. Let me know if you have other questions.
Take care,
Joe
Images (Click to make bigger)
Monday, March 18th, 2019 AT 5:56 PM