Welcome back:
First, here are the directions for replacing the timing chain. This is the engine timing. The picture shows the timing marks for the crankshaft and camshaft.
__________________________
REMOVAL/INSTALLATION
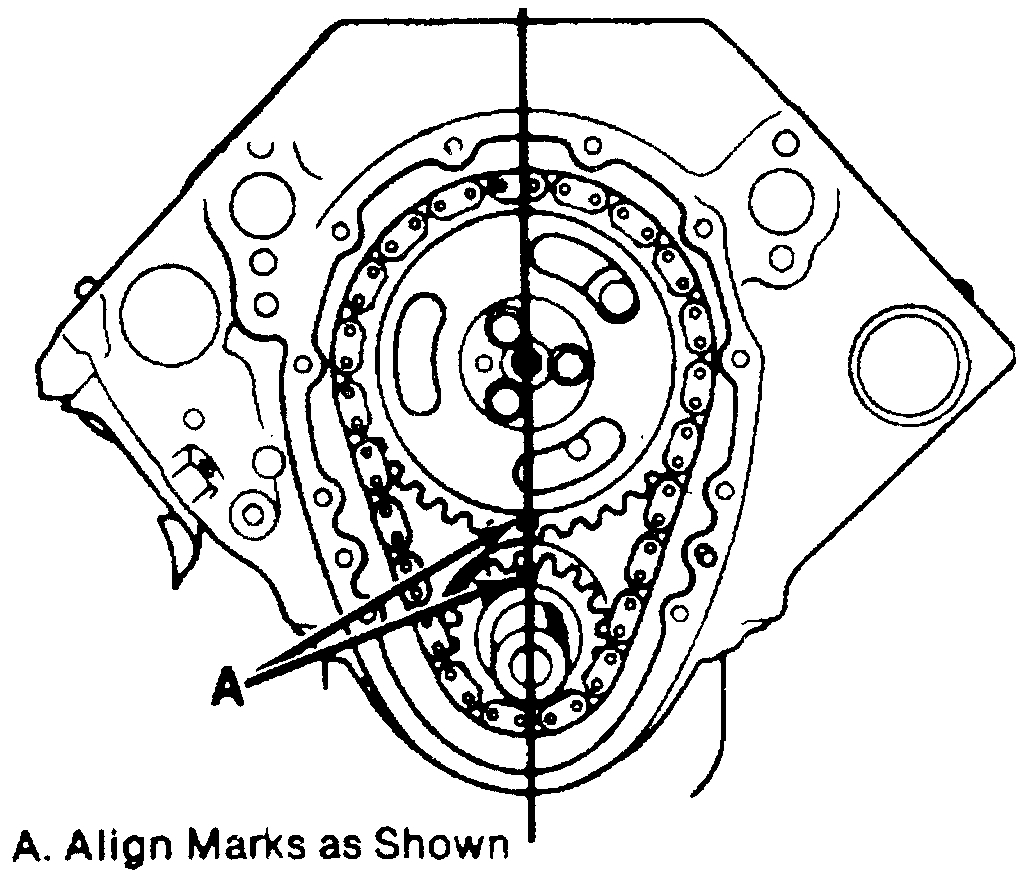
Fig. 8 Timing Mark Alignment
Pic 1
1. Remove Front Cover.
2. Remove crankshaft oil slinger.
3. Crank engine until 0.0 marks on sprockets are in alignment, Fig. 8.
4. Remove three camshaft to sprocket bolts.
5. Remove camshaft sprocket and timing chain together. Sprocket is a light press fit on camshaft for approximately 1/8 inch. If sprocket does not come off easily, a light blow with a plastic hammer on the lower edge of the sprocket should dislodge it.
6. If crankshaft sprocket is to be replaced, remove it with a gear puller. Install new sprocket, aligning key and keyway.
7. Install chain onto camshaft sprocket. Hold sprocket with chain hanging vertically, then align marks on sprockets as shown, Fig. 8. The valve timing marks shown in Fig. 8 do not indicate TDC compression stroke for No. 1 cylinder, which is used during distributor installation. If distributor was removed, install timing chain and sprockets, aligning timing marks, Fig. 8, then rotate engine until No. 1 cylinder is on compression and camshaft timing mark is 180 degrees from valve timing position shown in Fig. 8.
8. Align dowel in camshaft with dowel hole in sprocket and install sprocket on camshaft. Do not attempt to drive sprocket on camshaft, as welch plug at rear of engine can be dislodged.
9. Draw sprocket onto camshaft, using the three mounting bolts. Tighten to specifications.
10. Lubricate timing chain and install cover.
_________________________________________
Now for ignition timing. Here are the directions for removal and replacement of the distributor. I have to be honest, I'm not crazy about how they explain it. Make sure that the crankshaft pulley timing mark is pointing at TDC (top dead center). Then, when you install the distributor, make sure the rotor is pointing at the number 1 spark plug wire.
Here are there directions.
________________________________
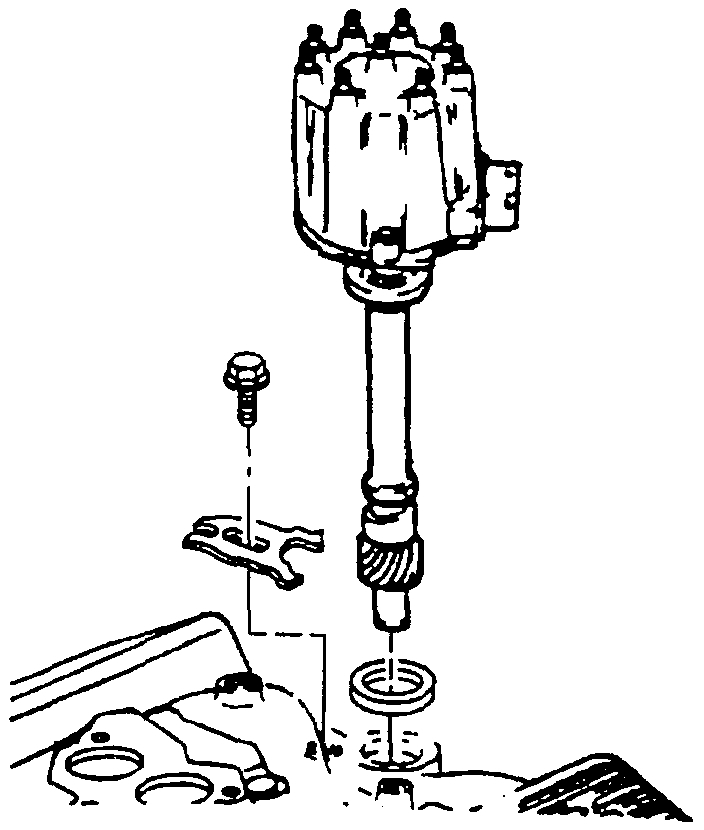
Preassembled replacement distributors are not available. Components are available to assemble a new distributor. Some components, such as the air cleaner, may need to be removed to reach the distributor. The distributor has a separate ignition coil that mounts to a bracket on the top of the engine.
REMOVE OR DISCONNECT
Pic 2
Make sure the ignition switch is "OFF."
1. Air cleaner and hoses.
2. Electrical connectors at the side of the distributor cap.
3. Two screws on the sides of the distributor cap.
4. Ignition coil wire and spark plug wires on either the left or right side of the distributor.
5. Distributor cap and move it aside.
A. Use chalk to note the position of the rotor in relation to the engine.
B. Use chalk to note the position of the distributor housing in relation to the engine.
6. Distributor bolt and hold-down clamp.
7. Distributor.
INSTALL OR CONNECT
1. Distributor.
A. To ensure correct timing of the distributor, it must be installed with the rotor correctly positioned as noted in step 5 of the removal procedure. Line up the rotor to the mark on the engine, and the mark on the housing to the engine.
B. If the distributor shaft won't drop into the engine, remove the distributor, insert a screwdriver into the hole for the distributor and rotate the oil pump driveshaft so it lines up with the distributor drive gear.
2. Hold-down clamp and bolt.
Tighten
Bolt to 27 Nm (20 lbs. In.).
3. Distributor cap with two screws.
4. Wiring harness connectors to the sealed ICM connectors at the side of the distributor.
5. Spark plug wires and coil wire.
6. Air cleaner and hoses.
Check the ignition base timing.
________________
Let me know if this is what you needed or if you have other questions.
Take care,
Joe
Images (Click to make bigger)
Friday, April 26th, 2019 AT 6:56 PM