Hi Mark,
I made a reply earlier and seems the post had gone MIA, not the first time it has happened though.
To replace the clockspring is not too difficult but there are a few precautions that you have to be aware of as it entails the air bag system.
COMBINATION SWITCH/CLOCKSPRING
Removal
1. Before proceeding, see AIR BAG SAFETY PRECAUTIONS . Disable air bag system. See DISABLING & ACTIVATING AIR BAG SYSTEM . Place front wheels in straight-ahead position. Disconnect lower clockspring connectors AB3 and AB8 at base of steering column.
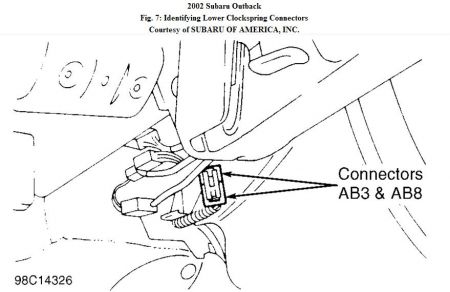
Remove driver-side air bag module. See DRIVER-SIDE AIR BAG MODULE .
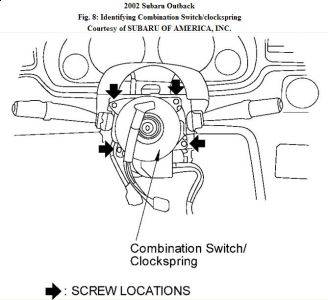
2. Mark steering wheel and steering shaft for installation reference. Using appropriate puller, remove steering wheel. Remove upper and lower steering column covers. Disconnect combination switch/clockspring connectors from body harness connector. Remove 4 retaining screws from combination switch/clockspring assembly and remove combination switch/clockspring steering shaft.
See Fig. 8 . Refer previous post.
Installation
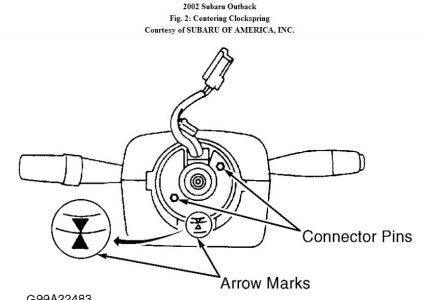
Ensure front wheels are positioned straight ahead. Install combination switch/clockspring assembly onto steering column. Center clockspring. See CLOCKSPRING under ADJUSTMENTS. When installing steering wheel, insert connector pins on clockspring into holes on steering wheel.
To complete installation, reverse removal procedure. Tighten steering wheel nut to specification. See TORQUE SPECIFICATIONS . After installation is complete, reactivate air bag system. Refer to See DISABLING & ACTIVATING AIR BAG SYSTEM . Verify system is functioning properly. See SYSTEM OPERATION CHECK .
AIR BAG SAFETY PRECAUTIONS
Observe following precautions when working with air bag system:
Disable air bag system before servicing any air bag system or steering column component. Failure to disable system could result in accidental air bag deployment and possible personal injury. See DISABLING & ACTIVATING AIR BAG SYSTEM .
Wait at least 20 seconds after disconnecting negative battery cable before servicing air bag system. See DISABLING & ACTIVATING AIR BAG SYSTEM . Back-up power supply maintains air bag system power for 20 seconds after battery is disconnected. Servicing air bag system before 20 seconds have elapsed may cause accidental air bag deployment and possible personal injury.
When trouble shooting air bag system, always check for diagnostic codes before disconnecting battery.
When working near, removing, or installing an undeployed air bag module, DO NOT position yourself directly in front of air bag.
In a minor collision in which air bag does not deploy, front air bag impact sensors and steering wheel pad should be inspected.
Seat belts with pretensioners should be replaced if involved in serious accident, even if damage is not evident.
DO NOT use air bag parts from another vehicle. Replace air bag parts with new parts.
Remove impact sensors if shocks are likely to be applied to sensors during repairs.
DO NOT repair damaged air bag system wiring harnesses. Manufacturer recommends replacement of any defective air bag system harness with a new part.
DO NOT disassemble or attempt to repair SRS components.
If SRS components are dropped, or if there are cracks, dents, or other defects in the case or connectors, replace with new parts.
DO NOT expose SRS components to temperatures greater than 199 °F (93 °C).
Use a digital volt-ohmmeter with high impedance (10 megohms minimum) for trouble shooting electrical circuit. Use of an analog circuit tester may activate air bags or pretensioners.
DO NOT apply tester probes directly to any air bag system harness connector terminal. Use specified test harness during circuit testing.
Information labels are attached to air bag components. Follow all notices on labels.
After work on air bag system is completed, verify system is functioning properly. See SYSTEM OPERATION CHECK .
Always wear safety glasses when servicing or handling an air bag.
DO NOT check for air bag module continuity with air bag removed from vehicle.
When placing a live air bag on a bench or other surface, always face air bag and trim cover up, away from surface. This will reduce motion of module if it is accidentally deployed.
After deployment, air bag surface may contain deposits of sodium hydroxide, a skin irritant. Always wear safety glasses, rubber gloves and long sleeved shirt during cleanup. Wash hands with mild soap and water.
When carrying a live air bag module, ensure that trim cover faces away from your body. Doing so minimizes the risk of injury in case of deployment.
If air bag system is not fully functional for any reason, vehicle should not be driven until system is fully repaired. DO NOT remove bulbs, modules, sensors, or other components or in any way disable system from operating normally. If air bag system is not functional, park vehicle until it is repaired and functions properly.
DISABLING & ACTIVATING AIR BAG SYSTEM
WARNING: Accidental air bag deployment is possible. Personal injury may result. Wait at least 20 seconds after disconnecting negative battery cable before servicing air bag system.
To disable air bag system, turn ignition off. Disconnect and shield negative battery cable. After battery cable has been disconnected, wait at least 20 seconds before servicing air bag system. To activate air bag system, reconnect negative battery cable. Observe AIR BAG warning light to verify system is functioning properly. See SYSTEM OPERATION CHECK .
DRIVER-SIDE AIR BAG MODULE
WARNING: Accidental air bag deployment is possible. Personal injury may result. Always place removed air bag module on clean, flat surface with trim cover facing upward, away from heat and strong light sources. Never place anything on top of the air bag module.
Removal & Installation
1. Before proceeding, see AIR BAG SAFETY PRECAUTIONS . Disable air bag system. See DISABLING & ACTIVATING AIR BAG SYSTEM . Place front wheels in straight-ahead position.
2. Remove bolts securing air bag module to steering wheel using Torx T30 bit. Disconnect air bag connector on back of air bag module. Remove air bag module.
3. To install, reverse removal procedure. Using NEW air bag module Torx bolts, tighten bolts to specification. See TORQUE SPECIFICATIONS . Activate air bag system. See DISABLING & ACTIVATING AIR BAG SYSTEM . Verify system is functioning properly. See SYSTEM OPERATION CHECK .
CLOCKSPRING
Any mistke made while installing the clockspring would result in damages so extra care must be taken while performing this step.
Verify front wheels are in straight ahead position. With clockspring mounted on steering shaft, rotate clockspring pin clockwise until it stops. Then rotate clockspring pin counterclockwise about 2 5/8 turns until arrow marks align. See Fig. 2 . Clockspring is now centered.
Aug 2, 2009 at 10:57 AM