Hi and thanks for using 2CarPros.com. First, keep in mind, there are different fluids that can cause smoke. Make sure the power steering fluid is full as well as the brake fluid. As far as the transmission fluid is concerned, you check the level from under the vehicle with it running. Here are the directions specific to your vehicle. I have also attached a picture of the transmission pan so you can identify where the drain and fill ports are located. The "overfill screw" is where you will add fluid as well as check to make sure it is full.
Here are the directions:
Before starting, add transmission fluid until it flows out over the overfill screw opening.
Let engine idle until a fluid temperature between 32°C (90°F) and 57°C (135°F) is reached.
Add transmission fluid until it flows out over the overfill screw opening, then close the overfill screw (1). Torque: 38 Nm (28 ft. lbs.)
The transmission level is full when the transmission is at the aforementioned temperatures and the fluid level is at the bottom of the threads of the overfill screw. Therefore, once it starts running out, stop.
That is where I would start. Additionally, check the exhaust system as well as the exhaust manifolds to determine if you can identify where the leak originated. It could be a valve cover leaking onto the exhaust manifold.
If you determine it is a valve cover leak, here are the directions for replacement. Note that alldata lists each side separately. I've attached both sets of directions. Additionally, pictures 2 through 6 are for the left side. Pictures 7 and 8 are the right side.
Removal Left Side
Disconnect battery ground cable.
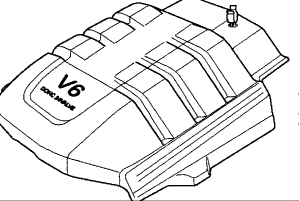
Remove engine cover from the dowels on the common chamber.
Disconnect positive crankcase ventilation hose.
Remove ground cable fixing bolt on cylinder head cover.
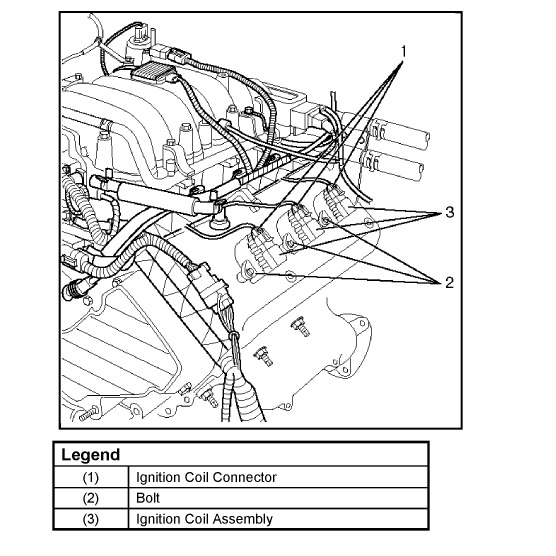
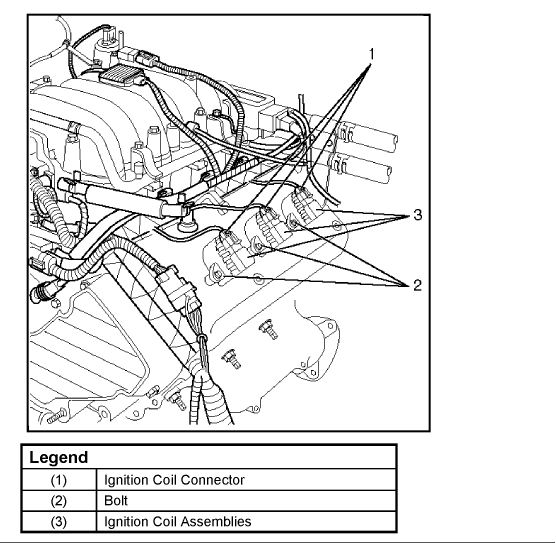
Ignition coil connector and ignition coil.
Disconnect the three connectors from the ignition coils.
Remove harness bracket bolt on cylinder head cover.
Remove fixing bolts on ignition coils.
Disconnect fuel injector harness connector then remove fuel injector harness bracket bolt.
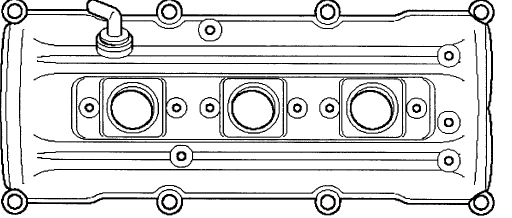
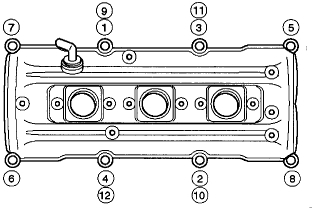
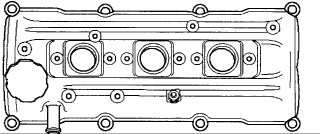
Remove eight fixing bolts, then the cylinder head cover.
Installation
Install cylinder head cover.
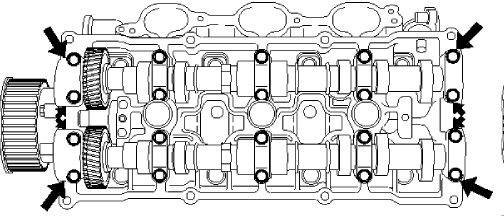
Clean the sealing surface of cylinder head and cylinder head cover to remove oil and sealing materials completely.
Apply sealant (TB-1 207B or equivalent) of bead diameter 2-3 mm at eight place of arched area of camshaft bracket on front and rear sides.
The cylinder head cover must be installed with in 5 minutes after sealant application to prevent hardening of sealant.
Tighten bolts to the specified torque. Torque: 9 Nm (78 inch lbs.)
Install fuel injection harness bracket and tighten bolt to the specified torque. Torque: 9 Nm (78 inch lbs.)
Connect ignition coil connector and ignition coil, then tighten bolt to the specified torque. Torque: 4 Nm (35 inch lbs.)
CAUTION: Ignition coil assembly #6 is different from ignition coil assembly from #1 to #5. Ignition coil assembly #6 is short type. So, note it when installing ignition coil assembly of #6.
Connect ground cable and tighten bolts to the specified torque. Torque: 9 Nm (78 inch lbs.)
Install positive crankcase ventilation hose.
Install engine cover mating with the dowels.
Cylinder Head Cover RH
Removal
Disconnect battery ground cable.
Remove engine cover from the dowel on the common chamber.
Disconnect ventilation hose from cylinder head cover.
Disconnect three ignition coil connectors from ignition coils and remove harness bracket bolts on cylinder head cover then remove ignition coil fixing bolts on ignition coils and remove ignition coils.
Disconnect fuel injector harness connector then remove fuel injector harness bracket bolt.
Remove eight fixing bolts then the cylinder head cover.
Installation
Install cylinder head cover.
Clean the sealing surface of cylinder head and cylinder head cover to remove oil and sealing materials completely. Apply sealant (TB-1 207B or equivalent) of bead (diameter 2-3 mm) at eight place of arched area of camshaft bracket on front and rear sides.
The cylinder head cover must be installed within 5 minutes after sealant application to prevent premature hardening of sealant.
Tighten bolts to the specified torque. Torque: 9 Nm (78 inch lbs.)
Tighten fuel injector harness bracket bolts to specified torque then reconnect fuel injector harness connector. Torque: 7.8 Nm (69 inch lbs.)
Connect ignition coil connector and tighten ignition coil fixing bolts to specified torque. Torque: 4 Nm (35 inch lbs.)
Connect ventilation hose to cylinder head.
Install engine cover mating with the dowels.
I hope this helps.
Take care,
Joe
Images (Click to enlarge)
May 9, 2018 at 7:55 PM