Hi,
It seems you are very knowledgeable. I am going to provide a diagnostic flow chart to help determine where the issue is coming from. All attached pics correlate with the directions, but it does require a scan tool.
_____________________________________________-
1999 Nissan-Datsun Altima GLE L4-2.4L (KA24DE)
P1402
Vehicle ALL Diagnostic Trouble Codes ( DTC ) Testing and Inspection P Code Charts P1402
P1402
pic 1
pic 2
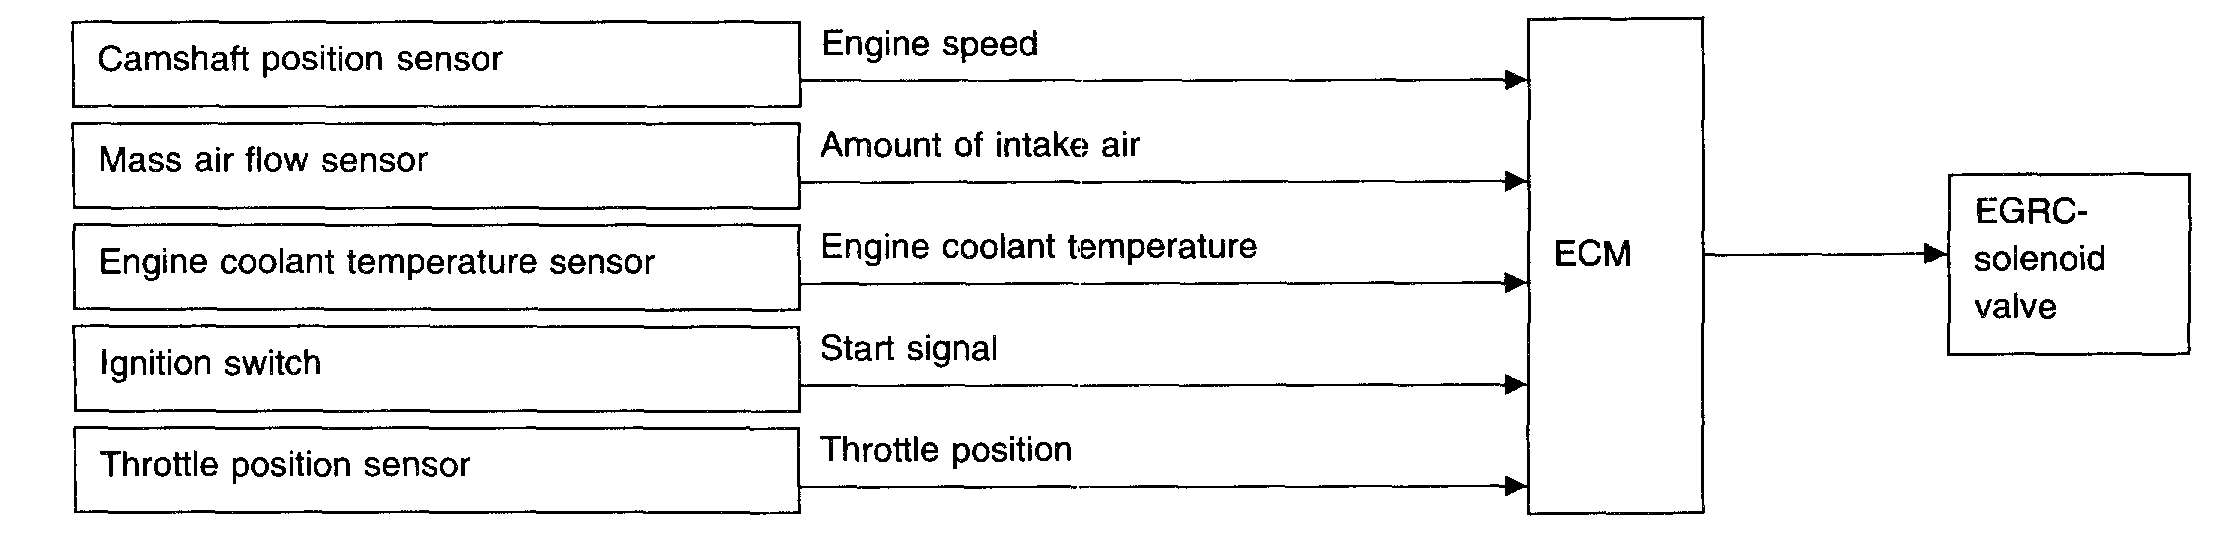
SYSTEM DESCRIPTION
This system cuts and controls vacuum applied to the EGR valve to suit engine operating conditions. This cut-and-control operation is accomplished through the ECM and the EGRC-solenoid valve. When the ECM detects any of the following conditions, it cuts the current for the solenoid valve. This causes the port vacuum to be discharged into the atmosphere. The EGR valve remains closed.
- Low engine coolant temperature
- Engine starting
- High-speed engine operation
- Engine idling
- Excessively high engine coolant temperature
- Mass air flow sensor malfunction
- Low ambient temperature
pic 3
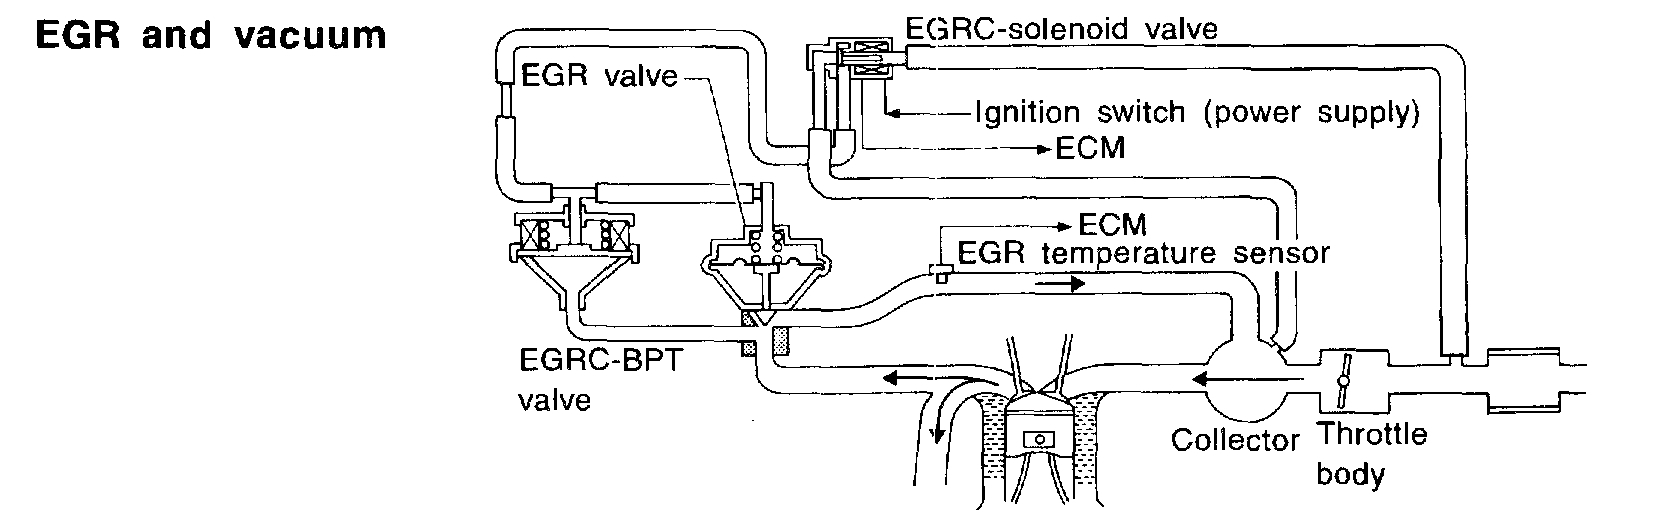
COMPONENT DESCRIPTION
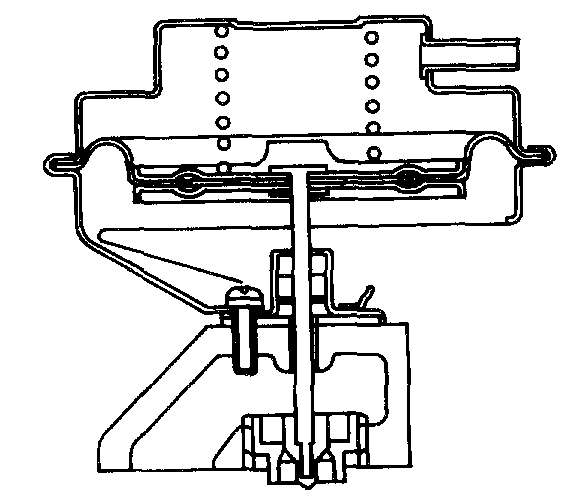
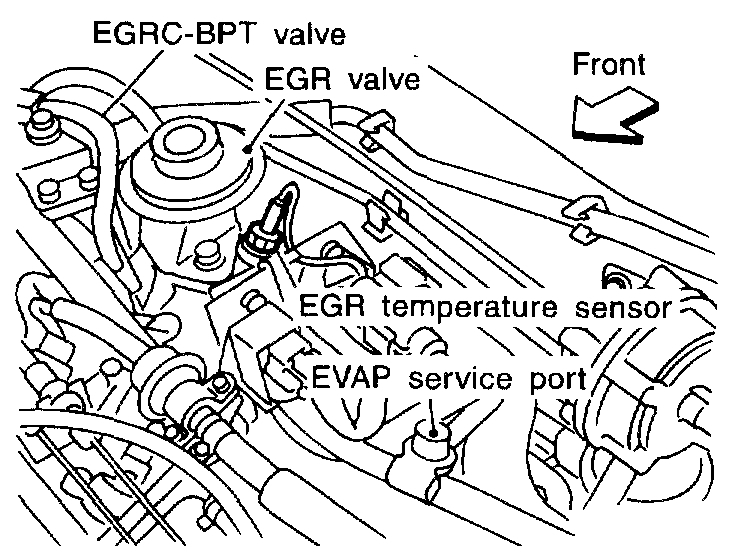
Exhaust gas recirculation (EGR) valve
The EGR valve controls the amount of exhaust gas routed to the intake manifold. Vacuum is applied to the EGR valve in response to throttle valve opening. The vacuum controls the movement of a taper valve connected to the vacuum diaphragm in the EGR valve.
pic 4
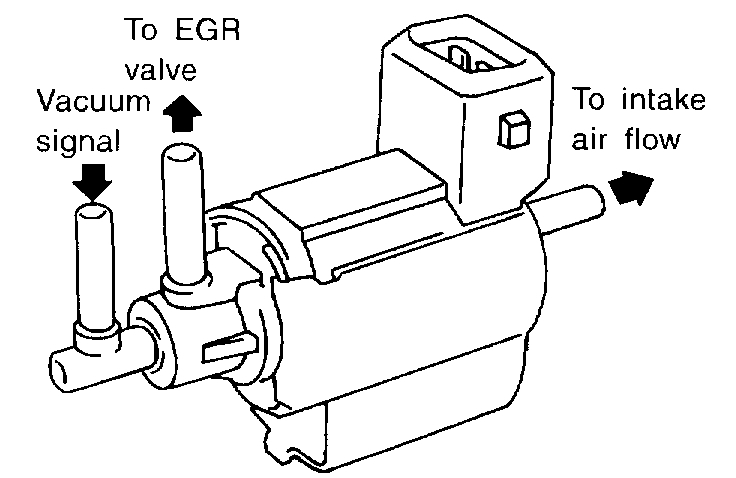
EGRC-solenoid valve
The EGRC-solenoid valve responds to signals from the ECM. When the ECM sends an ON (ground) signal, the coil in the solenoid valve is energized. The vacuum signal passes through the solenoid valve. The signal then reaches the EGR valve.
When the ECM sends an OFF signal, a plunger will then move to cut the vacuum signal from the intake manifold to the EGR valve.
pic 5
pic 6
ON BOARD DIAGNOSIS LOGIC
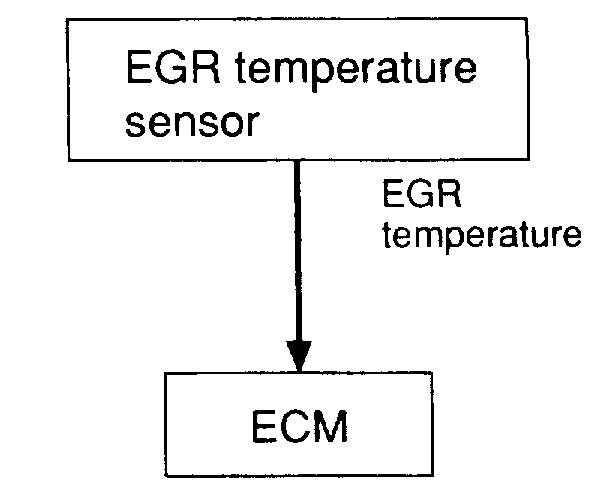
If EGR temperature sensor detects EGR flow under the condition that does not call for EGR, a high-flow malfunction is diagnosed.
NOTE: Diagnosis for this DTC will end when engine coolant temperature is approx. 50-60 °C (120-140 °F). Ignition switch must be turned "ON" (engine running) with engine coolant temperature below 40 °C (104 °F) when starting DTC confirmation procedure.
pic 7
pic 8
DIAGNOSTIC TROUBLE CODE CONFIRMATION PROCEDURE
NOTE: If "DIAGNOSTIC TROUBLE CODE CONFIRMATION PROCEDURE" has been previously conducted, always turn ignition switch "OFF" and wait at least 5 seconds before conducting the next test.
TESTING CONDITION:
- Always perform the test at a temperature of -10 °C (14 °F) or higher.
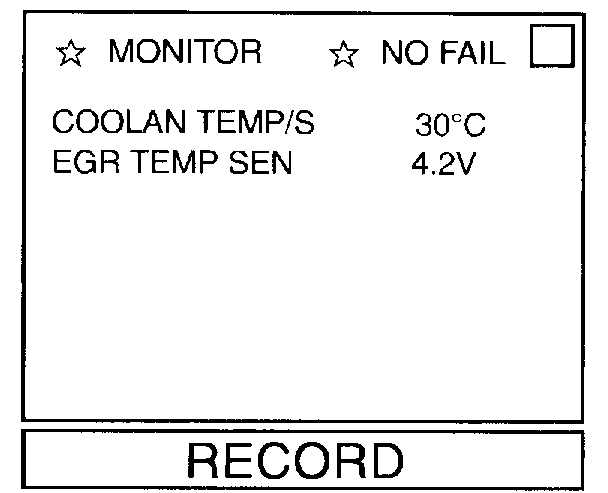
- Engine coolant temperature and EGR temperature must be verified in "DATA MONITOR" mode with CONSULT before starting DTC WORK SUPPORT test. If it is out of range below, the test cannot be conducted.
COOLAN TEMP/S: -10 to 40 °C (14 to 104 °F)
EGR TEMP SEN: Less than 4.8 V
If the values are out of the ranges indicated above, park the vehicle in a cool place and allow the engine temperature to stabilize. Do not attempt to reduce the coolant or EGR temperature with a fan or means other than ambient air. Doing so may produce an inaccurate diagnostic result.
pic 9
pic 10
With Consult
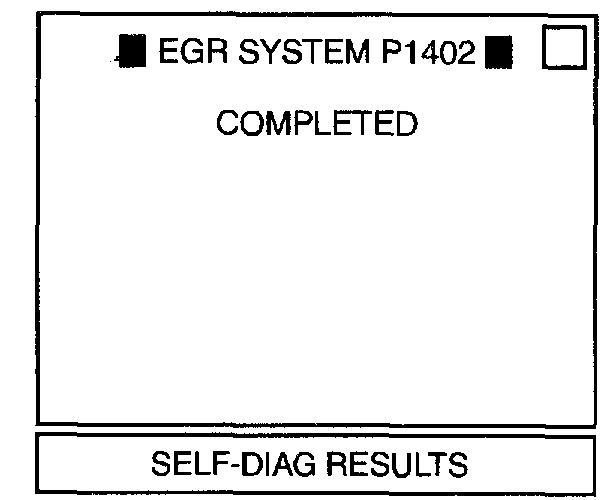
1. Turn ignition switch OFF and wait at least 5 seconds. Then turn ignition switch "ON".
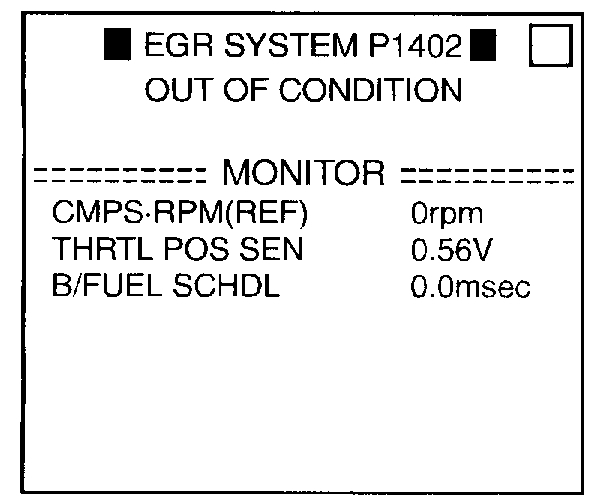
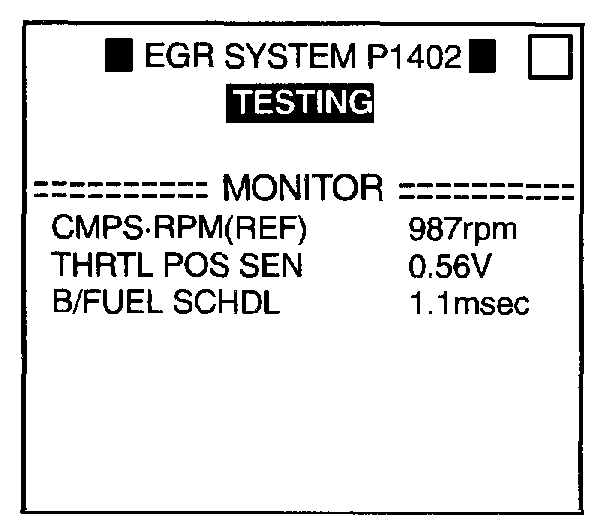
2. Select "EGR SYSTEM P1402" of "EGR SYSTEM" in "DTC WORK SUPPORT" mode with CONSULT.
3. Follow the instruction of CONSULT.
4. Start engine and let it idle until "TESTING" on CONSULT screen is turned to "COMPLETED". (It will take 70 seconds or more.)
If "TESTING" is not displayed after 5 minutes, turn ignition "OFF" and cool the engine coolant temperature to the range of -10 to 40 °C (14 to 104 °F). Retry from step 1).
5. Make sure that "OK" is displayed after touching "SELF-DIAG RESULTS". If "NG" is displayed, refer to "DIAGNOSTIC PROCEDURE".
OR
pic 11
With Generic Scan Tools
1. Turn ignition switch "ON" and select "MODE 1" with GST.
2. Check that engine coolant temperature is within the range of -10 to 40 °C (14 to 104 °F).
3. Check that voltage between ECM terminal (62) (EGR temperature) and ground is less than 4.8 V.
4. Start engine and let it idle for at least 70 seconds.
5. Stop engine.
6. Perform from step 1) to 4).
7. Select "MODE 3" with GST.
If DTC is detected, go to "DIAGNOSTIC PROCEDURE".
OR
pic 12
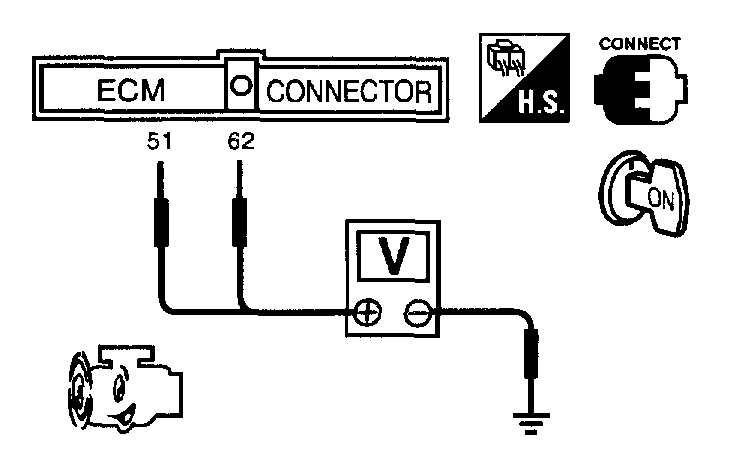
Without Scan Tools
1. Turn ignition switch "ON".
2. Check the following voltages.
ECM terminal (51) (engine coolant temperature) and ground: 2.7 - 4.4 V
ECM terminal (62) (EGR temperature) and ground: Less than 4.8 V
3. Start engine and let it idle for at least 70 seconds.
4. Turn ignition switch "OFF", wait at least 5 seconds and then turn "ON".
5. Perform "Diagnostic Test Mode II (Self-diagnostic results)" with ECM.
6. If 1st trip DTC is detected, go to "DIAGNOSTIC PROCEDURE".
- When using GST, "DIAGNOSTIC TROUBLE CODE CONFIRMATION PROCEDURE" should be performed twice as much as when using CONSULT or ECM (Diagnostic Test Mode II) because GST cannot display MODE 7 (1st trip DTC) concerning this diagnosis. Therefore, using CONSULT or ECM (Diagnostic Test Mode II) is recommended.
pic 13
pic 14
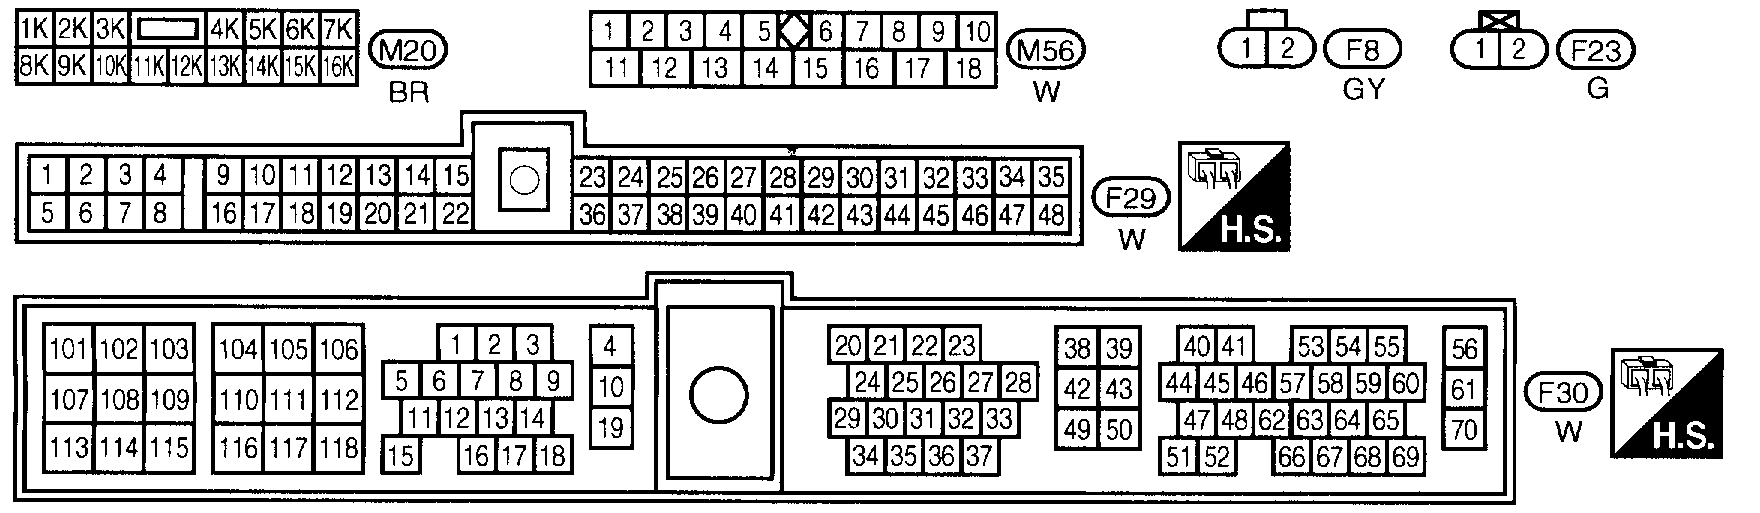
WIRING DIAGRAM
pic 15
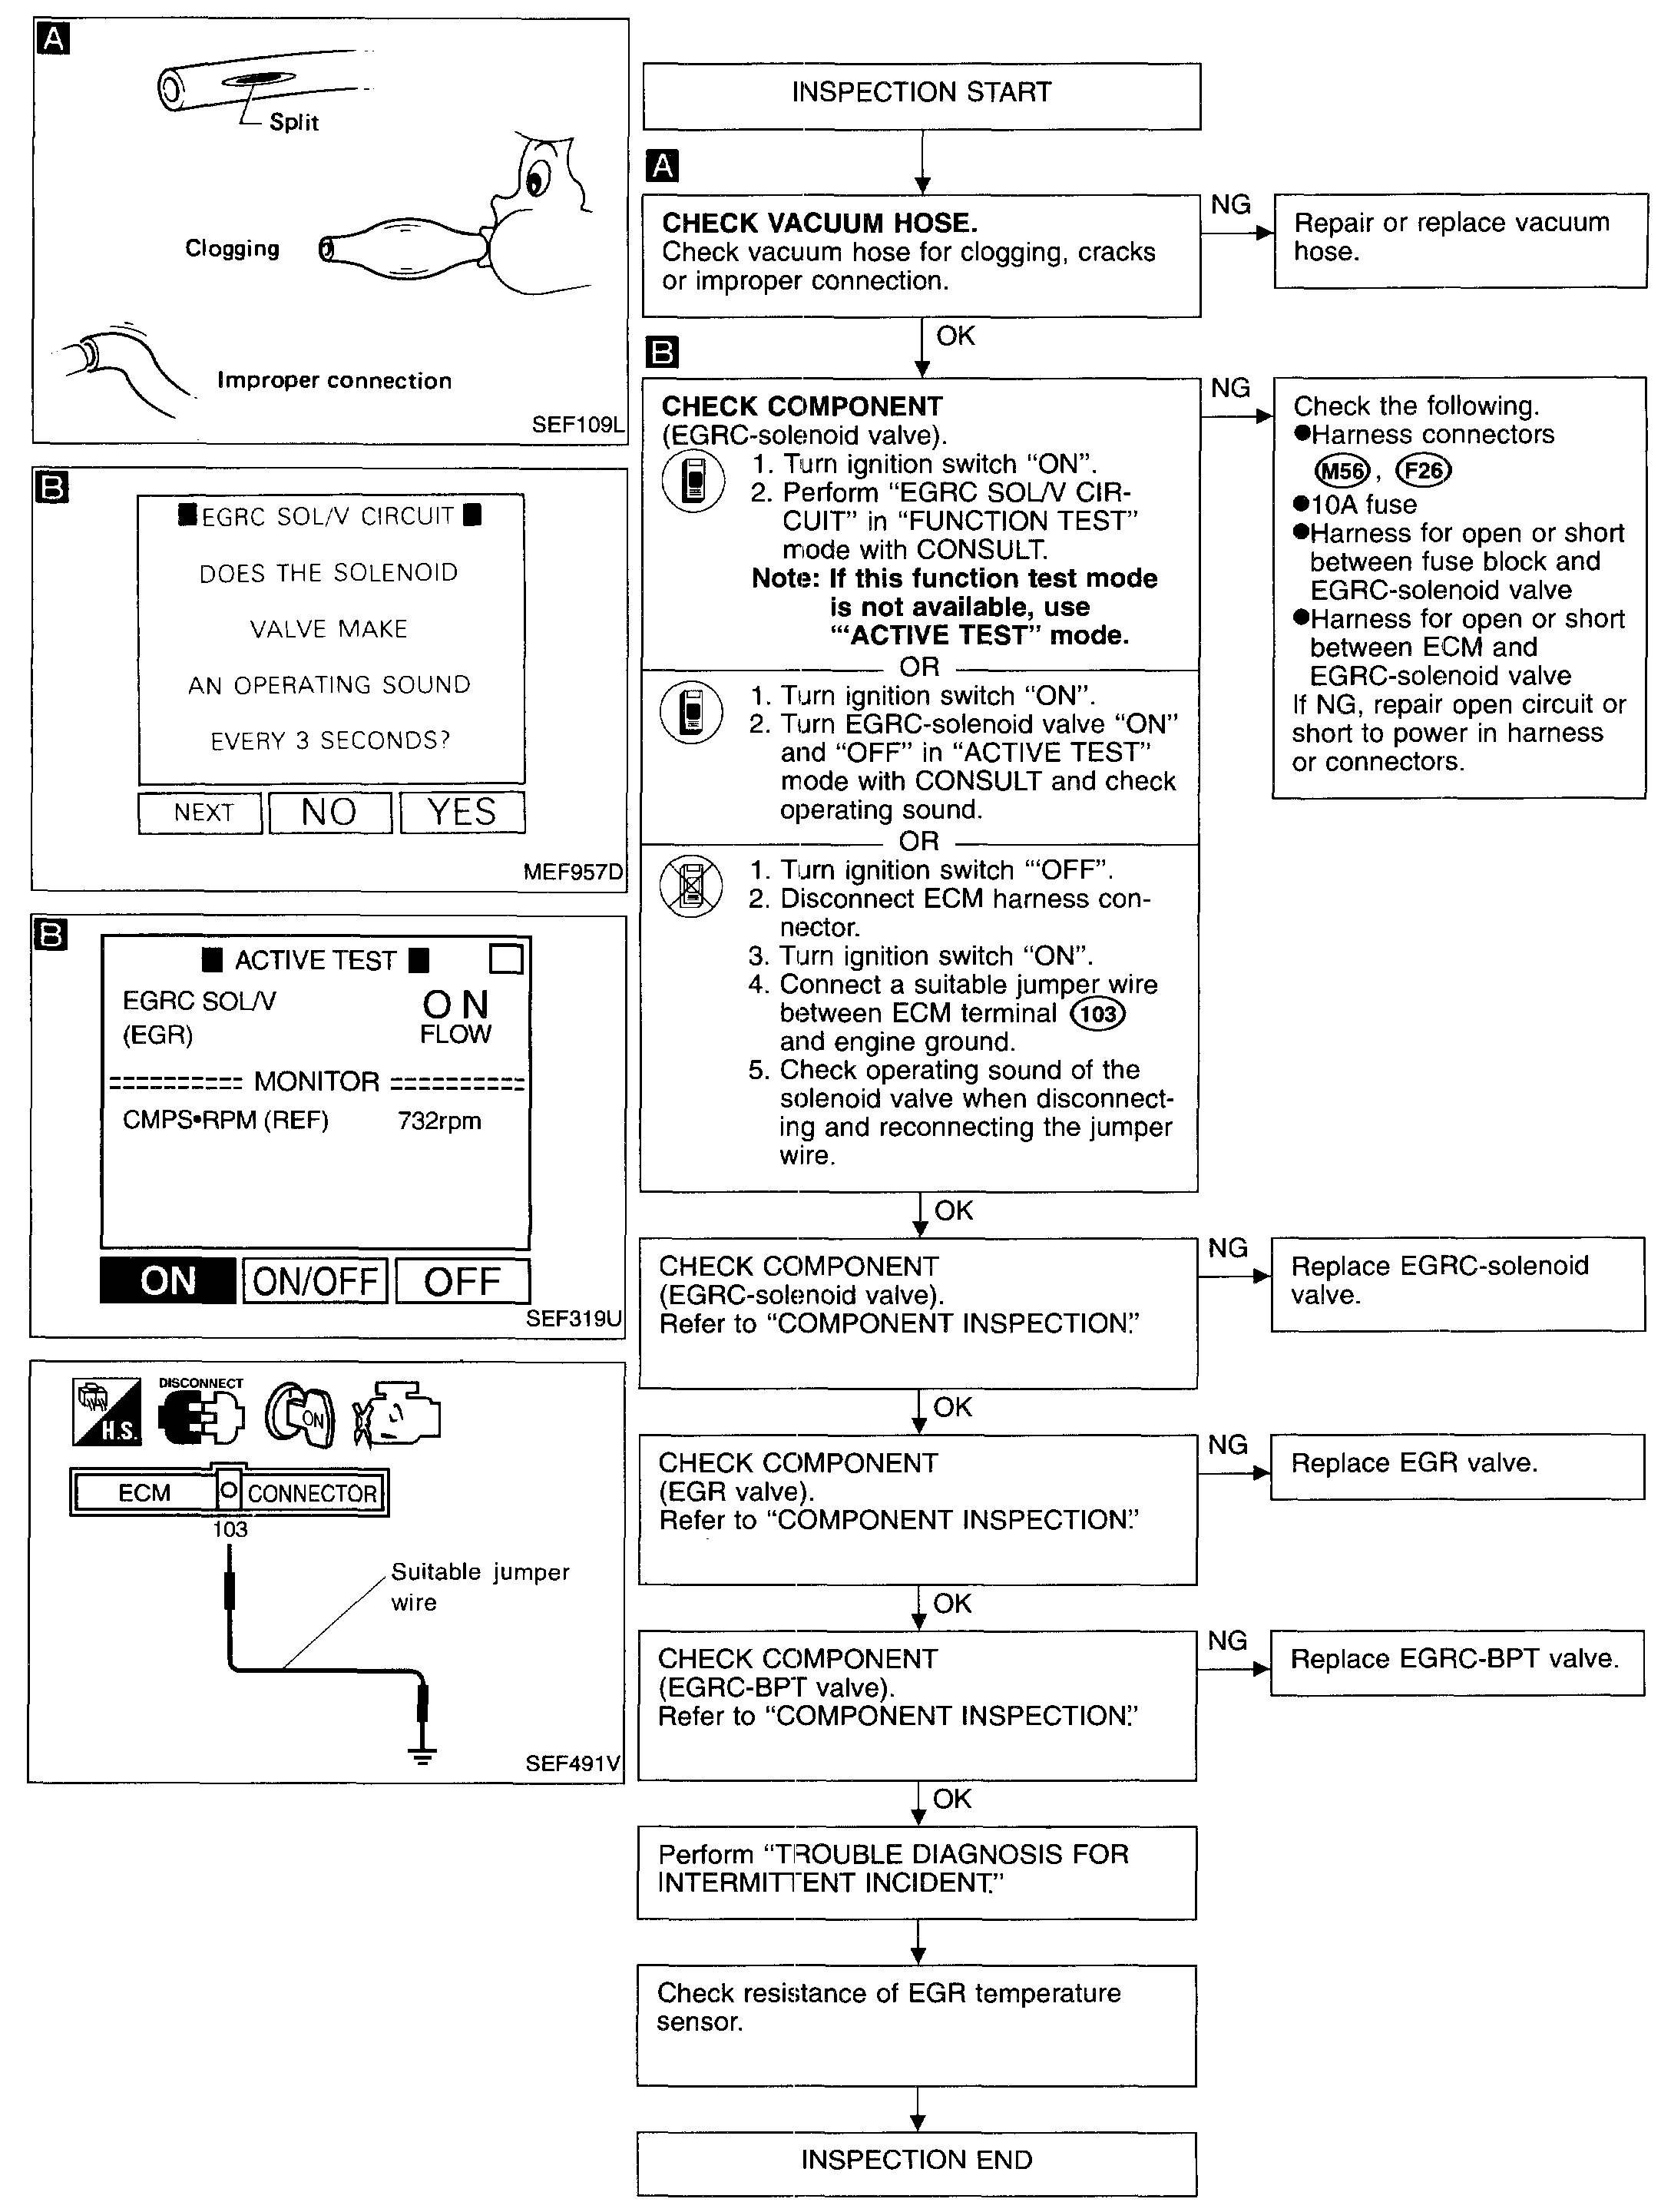
DIAGNOSTIC PROCEDURE
COMPONENT INSPECTION
pic 16
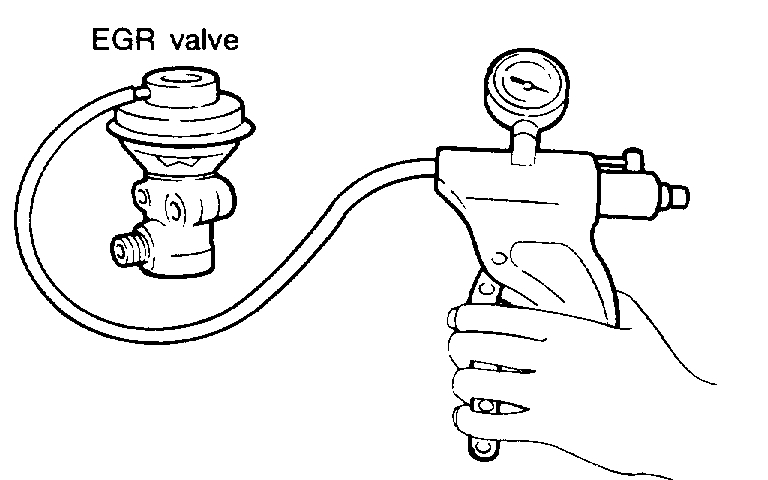
EGR VALVE
- Apply vacuum to EGR vacuum port with a hand vacuum pump.
EGR VALVE SPRING SHOULD LIFT
- Check for sticking
If NG, repair or replace EGR valve.
pic 17
pic 18
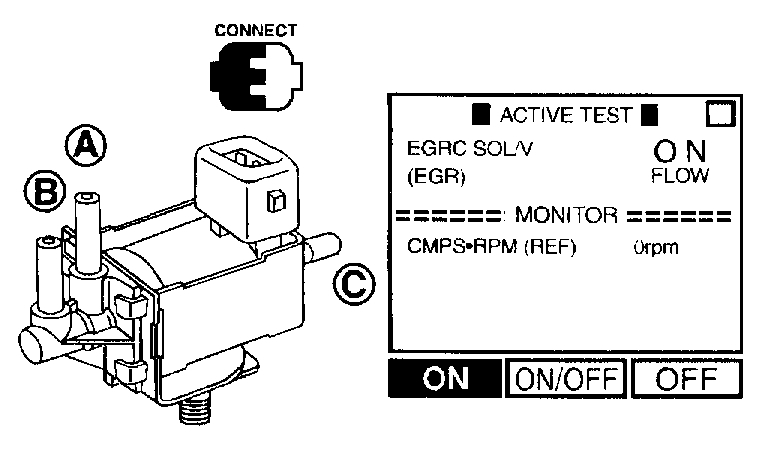
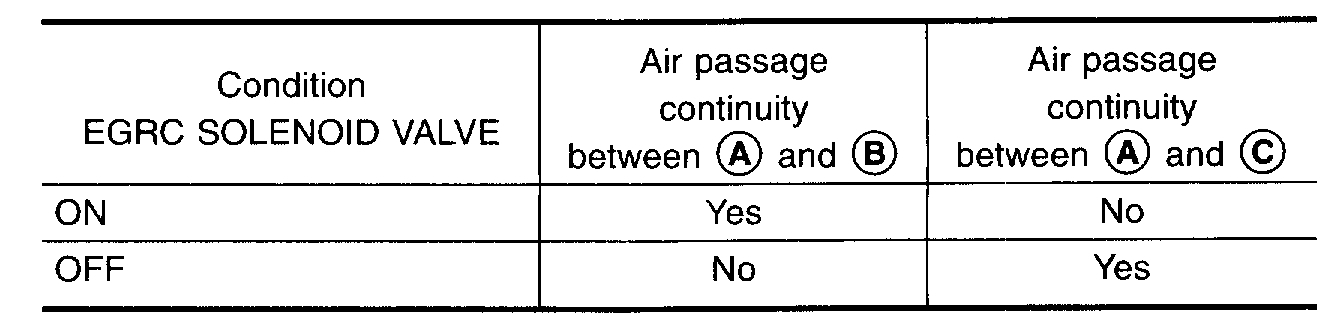
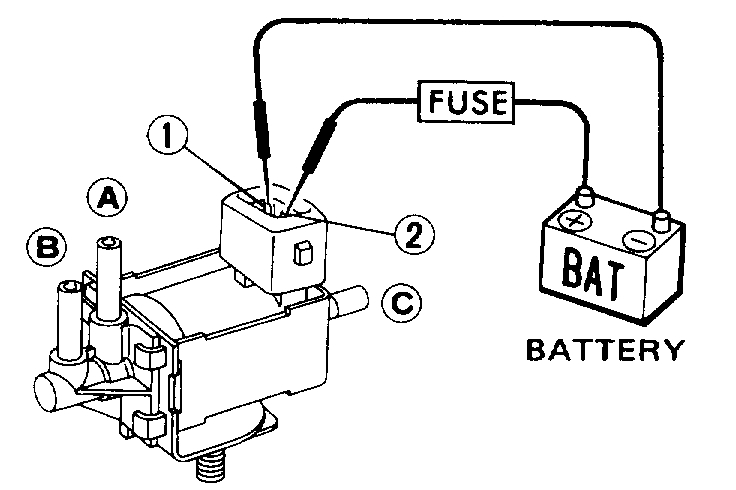
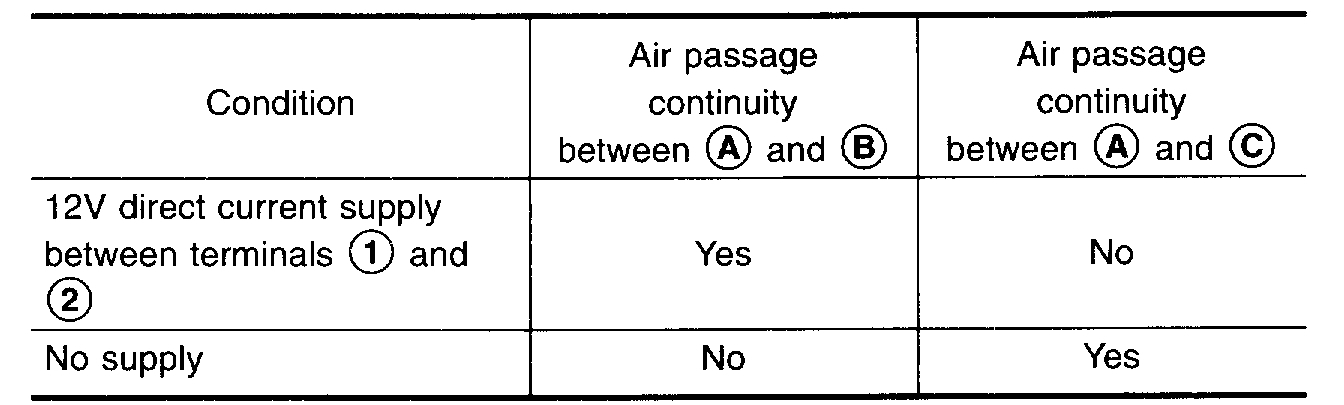
EGRC-SOLENOID VALVE
Check air passage continuity.
With Consult
Perform "EGRC SOLENOID VALVE" in "ACTIVE TEST" mode.
OR
pic 19
pic 20
Without Consult
If NG or operation takes more than 1 second, replace EGRC-solenoid valve.
pic 21
pic 22
pic 23
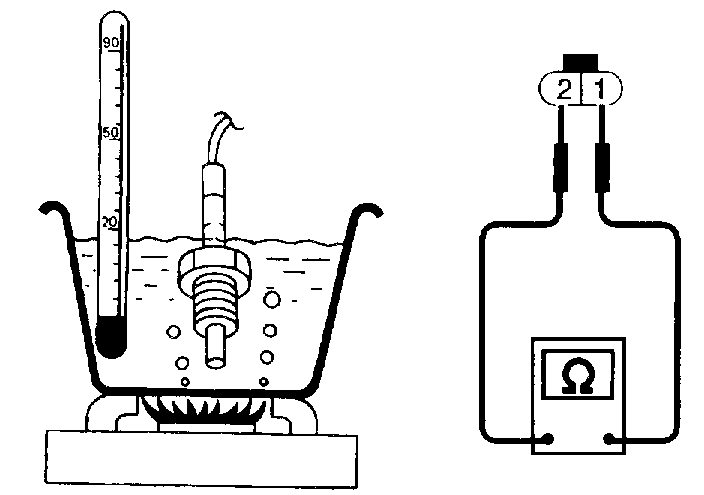
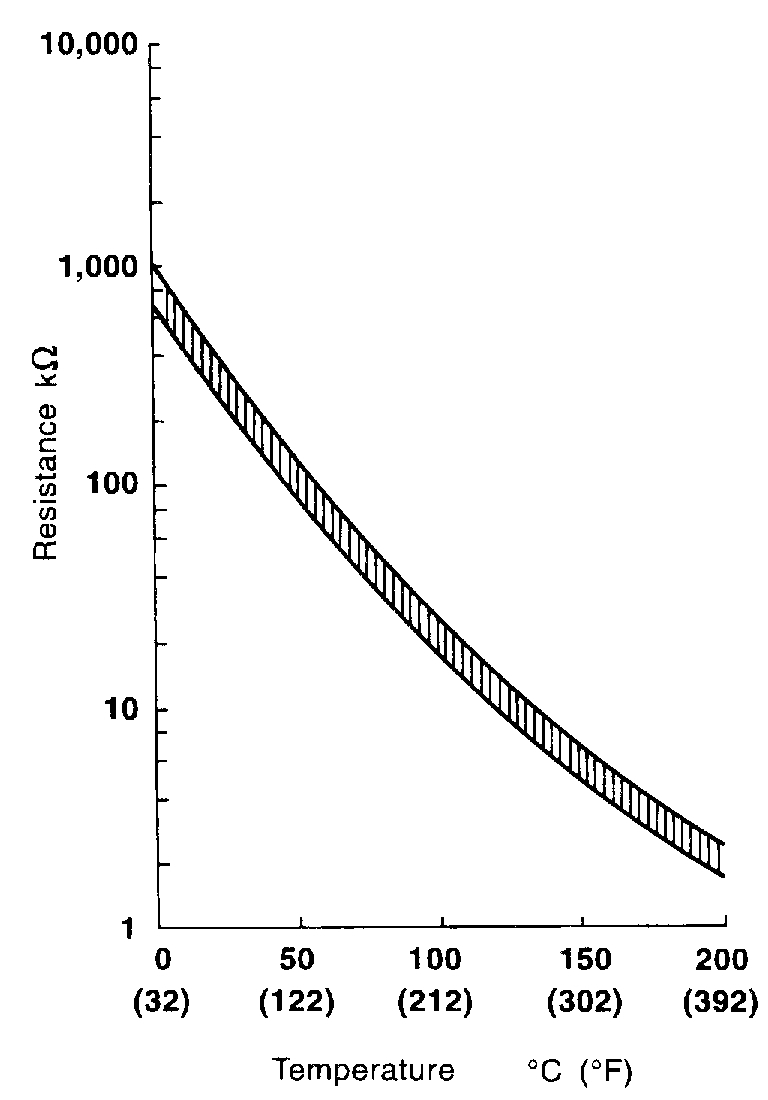
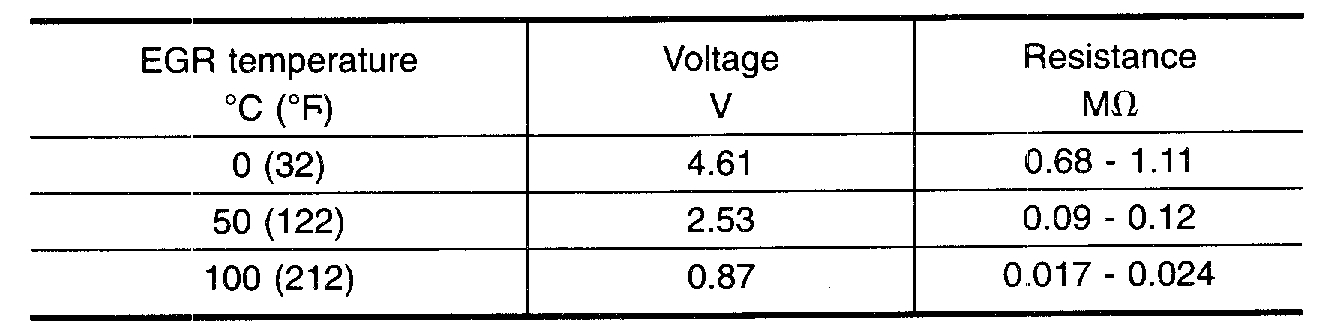
EGR TEMPERATURE SENSOR
Check resistance change and resistance value.
If NG, replace EGR temperature sensor.
pic 24
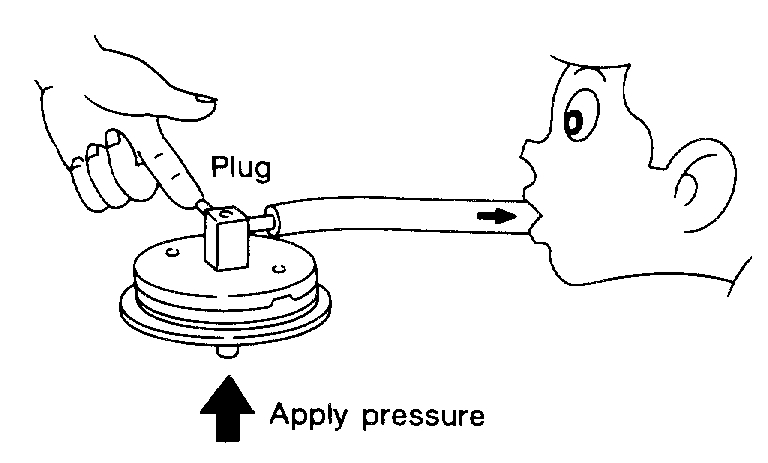
EGRC-BPT VALVE
1. Plug one of two ports of EGRC-BPT valve.
2. Vacuum from the other port and check for leakage while applying a pressure above 0.981 kPa (100 mmH2O, 3.94 inH2O) from under EGRC-BPT valve.
3. If a leakage is noted, replace the valve.
____________________
Let me know if this helps.
Joe
Images (Click to enlarge)
Jan 10, 2020 at 4:42 PM