Serpentine belt slipped, A/C pulley mangled

Tiny
SCOOBY6920
  • MEMBER
  • 1997 PLYMOUTH GRAND VOYAGER
  • 3.3L
  • V6
  • AUTOMATIC
  • 220,000 MILES
Recently purchased 7 voyager to turn into a camper. While driving, it sounded like a vacuum sucking up nuts and bolts and power steering went out. Opened up the hood and the serpentine belt was off and mangled in the A/C pulley. When I bought it, the guy did tell me to keep checking the tensioner pulley so it's a known issue. Im looking at replacement parts and it seems expensive to replace the A/C pulley, I see a bunch of info on bypassing that pulley. Is it more removing the compressor, and adding a stand alone pulley than same size belt or just rerouting a smaller belt? Trying to find cheapest fix to get it running.
Tuesday, April 27th, 2021 AT 3:08 PM

3 Replies

Tiny
CARADIODOC
  • MECHANIC
  • 33,760 POSTS
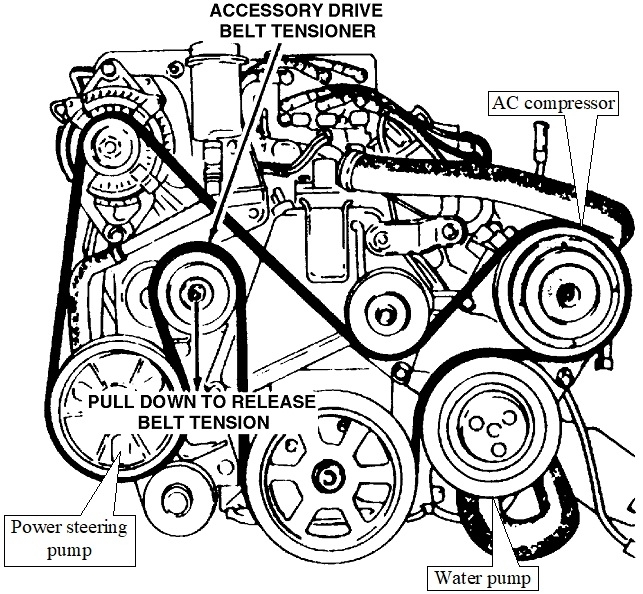
There's no practical way to bypass the compressor because that would also eliminate the water pump. You would have to design and build some type of substitute pulley and mounting bracket, but I wouldn't trust that any further than you're willing to walk back home.

The only way the AC pulley will cause the belt to be thrown off is if the bearings inside it are worn or broken apart. You'll see that as severe wobbling when you spin it by hand. If those bearings were to lock up, that would simply cause the compressor to run all the time the engine is running. It would never cycle off periodically. If the compressor itself is locked up, you'll hear horrendous screeching when the clutch cycles on. The belt might slip over that pulley, but more likely the clutch will slip and get real hot. That would only occur when the AC or defrost functions are selected. To prevent the clutch from engaging a locked-up compressor, just unplug the two-wire connector behind the clutch / pulley assembly. You could also unplug the compressor relay in the under-hood fuse box, but the Engine Computer will see that and set a diagnostic fault code. That should not be an emissions-related problem, so it shouldn't turn on the Check Engine light, but if it does, since it will always be on, you'll never know if a potentially more serious defect is detected. Often minor defects turn into expensive problems if they're unwittingly ignored by a Check Engine light that's always on.

By far the more common suspect is the belt tensioner, as your seller suggested. They rarely lose their tension on the belt. It's more common for the pivot to wear, then the arm and pulley sits at an angle. It's no longer perfectly parallel to the belt and the other pulleys. When that is not too severe yet, that will set up a belt squeal because the belt is sliding across that pulley as it goes around it or the next one in line.

The way to identify a worn tensioner assembly is with the new belt installed and the engine running, sight down from on top, through all of the pulleys. You should not see the belt peeking out to one side on any of the lower pulleys. When the tensioner is worn, you'll typically see as much as 1/8" of the belt, or about one groove worth, out further compared to where it has just left the top of the alternator pulley. That is proof of the wear, and that will allow the assembly to vibrate at certain engine speeds. That's what throws the belt off, then it can get tangled in any of the other pulleys.

There's another bigger problem with disabling the AC system in any way. If you replace or just disconnect the battery for any other service, the HVAC Computer will lose its memory and will have to be recalibrated. Until that is done, the six yellow LEDs in the switches will flash continuously and you'll have limited control over the functions.

There's two parts to the recalibration. The first part involves pressing two of the switches at the same time until two of the lights flash alternately. At that time, the computer runs the mode and temperature doors through their ranges, and takes readings from all of the position sensors and puts them in memory. That test is real easy to pass on the first try.

It's the second test, the "cool-down" test that can be very frustrating. If you follow the instructions in the service manual, this test will fail every time. I can post the instructions that worked for me, if necessary, but part of it requires the evaporator in the dash to drop by at least 80 degrees within 20 seconds to calibrate the temperature sensor. That can never happen if the AC system isn't working properly.

Once you know about this need to recalibrate, this can all be avoided if you use a memory saver device before disconnecting the battery. This is becoming more and more necessary on newer models, especially with VWs, GMs, BMWs, Hondas, and Audis. On many of those, the engines won't even start after simply disconnecting the battery. It's also common for the radios to lock up, requiring a trip to the dealership to unlock them.
Was this
answer
helpful?
Yes
No
+1
Tuesday, April 27th, 2021 AT 3:54 PM
Tiny
SCOOBY6920
  • MEMBER
  • 2 POSTS
The A/C pulley is mangled from the belt getting wrapped in a side. I have to replace that and it seems to be an expensive pulley. I need to replace the tensioner and because it has the rounded edge and I think that's where it slipped off and in the process got caught in the other pulley. Will replace with one with lips to help prevent that a bit.

There's nothing wrong with the compressor itself. Just seen the bypass pulley was way cheaper and thought maybe I could get a work around and deal with no ac. But seems not to be the case here.

Thank you for all the extra info. Looks like I just got to do some savings to pay for parts I didn't want to. Thanks again!
Was this
answer
helpful?
Yes
No
Wednesday, April 28th, 2021 AT 7:34 PM
Tiny
CARADIODOC
  • MECHANIC
  • 33,760 POSTS
The belt didn't damage the compressor pulley. If that pulley is wobbling or falling apart, that happened on its own and is the likely cause of the belt coming off. The tensioner assembly is still something to inspect carefully as both of those items have been somewhat common failure items.

Another clue to a tensioner failure is to look at the paint on the pulley. They're painted black from the factory. That paint will wear off where the belt runs over it. If you see any of that silver area peeking out once the new belt is installed, that means the belt is running off center from where it originally was running. That only happens if that pulley is tipped or turned.

You won't find a tensioner pulley with lips on the side. The belt is held centered by the ribs on the ribbed pulleys. Some other engines do use smooth pulleys with lips, but if something happens to cause those belts to run off center, the lip will cut into the belt like a pizza cutter, or it will slowly carve the side of the belt away.

There's two ways for the tensioner to fail, but you don't have to figure out which failure occurred. You can only buy this as an assembly. Most commonly the pivot wears out, then the arm is not held straight. Belt tension pulls it out of parallel to the other pulleys.

The bearings can wear inside the pulley allowing that pulley to wobble and tip. That will let the belt slip off too.

A third, much less common failure is for the pivot to bind due to rust build-up. It will become tight and not pull enough tension on the belt, allowing it to slip around the grooved pulleys. That sets up a loud belt squeal.

There's no instructions listed for just the compressor pulley. I did find these for the clutch coil. You may be able to use the pertinent parts of this. If you need special tools, you can often find them at auto parts stores that rent or borrow tools. In my city they make you buy the tool, then you get a full refund when you take it back. If you choose to keep a tool, you still return it, then they give or order you a brand new one.

If you need to replace the tensioner, it will make more sense if you have the new one to look at first. It's held on with a stud with a 15mm nut on the back side of the mounting bracket. I do know that on my Dynasty with a 3.3L engine, that nut can be accessed from over the top of the bracket while leaning over the right fender. You may need to get at yours from underneath because the engine sits back further. Also, you may need two different wrenches. There's a limited amount of room to swing the wrench. You might not get it to turn far enough to get another bite on it with the same wrench. To do these at the dealership, I used a Craftsman box wrench and a borrowed Snapon box wrench. They were different enough to turn the nut about one turn to loosen it, then it can be spin off with your fingers.

You'll see a tab on the backing plate on the assembly that must sit in a hole on the mounting bracket. Be sure that drops into place so the assembly sits flat on the bracket. This is actually a much easier job than first appears, but getting to the nut might be difficult if the van isn't up on a hoist.
Was this
answer
helpful?
Yes
No
Wednesday, April 28th, 2021 AT 9:06 PM

Please login or register to post a reply.

Sponsored links