But I'm pasting the outline of my blog here below:
Car was sputtering when I had to accelerate after a quick deceleration on the highway. Also had sputtering occur when I was accelerating uphill to get back on expressway.
After much investigation online I decided the easiest/cheapest fix to try first would be spark plug replacement but that costs around $300 to have an auto mechanic to do. So as usual I did much investigating online, looking for what other owners wrote and suggested during their by hand fix; only to realize there were no VERY GOOD "how to's" out there on this task for the saturn vue 2003 3.0 liter v6. Normally spark plug replacement is simple, but not on the 2003 saturn vue. The plugs are hidden underneath the intake manifold. So in order to save some of you some very precious time and frustration I'm writing this blog to help.
First off a list of "unusual" tools you'll need:
1) quantity=1 - Male end Torx wrench sockets (I needed 2 of them) a T25 AND T27 head (I paid $23 for a set of them)... ALSO MAKE SURE THE DIAMETER OF THE SOCKET IS NOT LARGER THAN 1/4inch... I read that the 3/8 inch won't fit
2) quantity=1 - quick connect fuel line dis-connector (for a 3/8 inch hose).... ($4 at auto store)
3) quantity=1 - 6-point FEMALE-ENDED star socket wrench fitting - size E10 (~$5)
4) quantity=6 - spark plugs (~$5 each)... Recommended brand by manufacturer is Bosch FGR8KQEO... though I went with the Autolite brand for (~5 bucks each)
5) quantity=1 - 1 packet anti-seize compound (need enough for the 6 spark plugs)
6) quantity=1 - 6 inch extension for socket wrench (~$5)
7) quantity 1 - spark plug socket wrench (I can't recall the size of the socket but you'll be able to verify its size at the store before you buy the spark plugs)
I dont have ALL the pictures you'll need for the job, but what I do have is infinitely better than what is online now if you're a "noobie" like me when I did this. All in all it took me about 5 hours to do, since I wasted quite a bit of time taking pictures and fooling around since I had never before disassembled an intake manifold on any car.
A) First disconnect the negative terminal (RED wire) of your car battery. Also open the cover for your fuses and disconnect the 2nd (10 Amp) red fuse from the left as shown in the picture (it has already been extracted but the blue arrow points to its location)
B) lift off the black air intake housing/duct by removing the 2 bolts on top
C) remove the support bar from the top of the manifold by unscrewing the 2 nuts holding it to the top of the intake manifold.
D) "pop" off the black plastic cover on top of the intake manifold which is covering the 5 holes which lead to the torx screws holding the intake manifold housing to the engine. (the red arrow in the picture from Step A).. it should relatively easily pull up off the surface of the intake manifold.
E) Pull off and disconnect from the throttle body the large black hose (circled in red on passenger's side of engine) reaching across the intake manifold and connecting into the throttle body (shown in the picture):
F) Unscrew the 3 bolts holding the Throttle Body (on the passenger's side of the engine) in place. Use the male-ended torx screw (T25 for me). The three screws are in an upside-down triangular pattern with the bottom one hidden in between some hoses. Be careful as you pull the throttle body off the intake manifold... the gasket on mine was old and fragile & it cracked. I had to replace it (luckily there was 1 in stock near by, but these gaskets are generally dealership items or specialty order items).
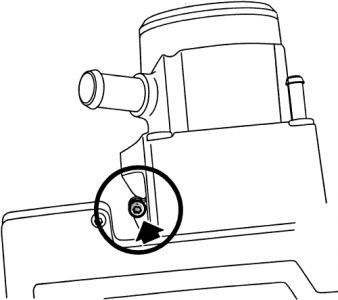
G) Now we need to deal with all the wires & hoses...Only some of the wires/hoses had to be disconnected (as I'll describe below), the others I was able to work with and leave attached... Starting on the right side (driver's side) of the engine, disconnect the thick black hose shown in the picture below. There is a tight circular clamp that must be squeezed and slid down along the length of the hose away from where it attaches to the intake manifold (I used pliers to pinch the clamp and slide it). It will be hard to slide off of the nozzle (even after removing the clamp) I had to use a flat-head screw driver to help push it off.
H) Stay on the driver's side and also disconnect the two electrical connections shown in the next picture. The one on the left side of the picture has a metal clamp (circled in red) which is "bear hugging" the harness and you'll have to pry that beast off of the connector in order to get it to disconnect (I did this with my fingers... no tool necessary). The connector on the right has a push in plastic clamping connection which might require a screw-driver to push in if you don't have the finger nails for it. (NOTE: if you're finding it hard to get your hand down in these crevasses then you can skip down to step O and undo the 6 bolts holding the intake manifold onto the engine and that will allow you to lift up the intake manifold and create bigger spaces making it easier access to these tight spots.)
I) While you're working on the driver side, you should disconnect the large red electrical connector shown in the picture. In order to release the connector you'll have to pry the red (maroon) tab out from the connector. I used a flat head and pryed it towards the driver side door so that it "opens up" a bit, the red "cover" pops up like bread popping out of a toaster.
J) next while still on the driver's side of the engine, undo the green and black connector closest to the windshield driver's side. Just pull them apart and the green side will release from the black female end, as shown below.
K) the Last of the hoses and wires to disconnect is the fuel line at the quick-disconnector site located to the back&right side of the engine, (closest to the windshield and on the driver side). To disconnect it simply pull the thin-metal clamp off of the connection site by sliding it out of the hole (slide it out of the female end). Next, in order to severe the connection you'll have to use a special fuel line quick-disconnector tool shown in the side picture, mine required a 3/8 inch
L) Now that we've disconnected the necessary hoses/wires, there is a black bracket which causes a lot of trouble and must be unscrewed on the left rear side of the intake manifold (passenger side nearest windshield). There are 2 screws which must be undone in order to dismount it from the intake manifold and make space for you to lift the throttle body away from the intake manifold. You'll also want to dismount the two hoses attached to that bracket first and then set the bracket aside after it comes off.
M) with the bracket off you'll need to trace the hose lines down towards the driver's side along the rear of the manifold and unscrew the next bracket you see (shown in the pic below)
N) There is one last bracket (I don't have a picture for) that you'll want to unscrew and it holds the fuel line to the intake manifold, I don't have a picture for it but it is about half way down the back side (closest to windshield) of the intake manifold and it is a metal piece which holds the fuel line (from step K) closer to the drivers side along the rear. I believe it was the torx T25 screw you'll need for this again. It's not hard to unscrew just in an awkard position. Unscrew that and then the intake manifold should be ready to be free and lift right off after the next step... once you've undone the hoses connecting to the throttle body you might want to bungee cord that thing out of the way.... I attached it to my windshield wiper just out of the way of the intake manifold.
O) With the black plastic cover popped off the top of the intake manifold, you'll immediately notice the five ~6 inch deep "channels" which each have a torx screw at the bottom that is screwed into the chassis and these hold the intake manifold in place. Note also that there is 1 extra arrow on the left... this is the 6th screw (same kind) which you'll need to unscrew with your torx wrench to free the intake manifold. I highly suggest that if your 6 inch extension on your ratchet isn't EXTREMELY snug to your ratchet, that you tape half of the torx T27 (or T30) socket-screw (male end) to your 6 inch extender, so you don't lose the head down the hole and have a hard time getting it out like I did. (half of tape on the screw the other half on the extension)
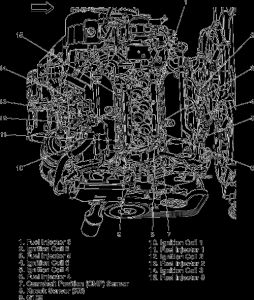
P) Once these 6 screws are loosed from the intake manifold you should be able to lift off the intake manifold (set it somewhere but be EXTREMELY CAREFUL TO NOT DROP CRUD DOWN YOU'RE ENGINE - I placed a rag over top of the cylinders in order to keep them clean from debris) and get at the 2 spark plug coil packs (one towards the front bumper and one near the windshield). There are only two screws holding each coil pack onto the engine and 1 electrical connection... undo these three and pull off the coil pack squarely (try not to teeter-totter it too much so you don't break the gasket) The two coils look like this:
P) there are 3 spark plugs underneath each coil pack (6 spark plugs total) You'll need a spark plug socket for your wrench in order to unscrew these and get them out... I believe mine was a 3/8 inch socket... you should be able to verify the diameter of the necessary socket at the store when you buy your 6 spark plugs.
Q) remember to gap the plugs correctly (0.040 inch) and preferably use anti-seize when you screw them back in.... I didn't use a torque wrench but the plugs I bought came with an aluminum "washer" so that I didn't damage the threading on the aluminum-tapped engine with the steel-threaded spark plug.... I've read that at this stage is a good time to replace the thermostat and your manifold gasket... I didn't do this
Now follow the steps in reverse to put it back together and you should be golden... P.S this fixed my engine "stuttering" problem which I had when accelerating after a quick stop and accelerating uphill.
Good luck.
Nov 28, 2012 at 4:22 AM