Question for CJ MEDEVAC

Tiny
7D9CJ7
  • MEMBER
  • 1979 JEEP CJ7
  • 4.2L
  • 6 CYL
  • 4WD
  • MANUAL
  • 46,000 MILES
I am creating a bug out vehicle and part of it is making the Jeep EMP proof. Can the ignition module be removed and not replaced? If so, can you describe the steps to achieve this objective. Thank you for your time and thank you for your service.
Joel
Friday, May 19th, 2017 AT 6:20 AM

5 Replies

Tiny
CJ MEDEVAC
  • MECHANIC
  • 11,004 POSTS
Drop back into the early 1970's

Minor wiring changes will allow you to use an early distributor with points inside.

May be able to use it either way with just changing the distributors and using the appropriate harness to it (that you pre-assemble)

I kind of sold on using a small Faraday Cage (even homemade) with a new ignition module stored inside (or 2!)

My 1946 Willy's can easily go back to its original point system in minutes, I keep its original goodies on board.

I kind of figure if suddenly everybody's rig dies on the road. I would wait a given number of hours before I install my (hopefully good module). This would maybe allow for EMPs from later 'occurrences' to finally cease. Maybe the 'walking, beggars, and possible problem personnel' will have dissipated from the scene as well.

What do you think?

The Medic
Was this
answer
helpful?
Yes
No
+1
Friday, May 19th, 2017 AT 4:49 PM
Tiny
7D9CJ7
  • MEMBER
  • 3 POSTS
Yes, I would even wait maybe a week or so. There maybe more than one just to get the ones that "were" prepared. Keeping a new ignition module in a cage is a good idea. I will do that. What year model distributor would work and can you describe the harness change to make it work. TIA
Joel
Was this
answer
helpful?
Yes
No
Saturday, May 20th, 2017 AT 5:27 PM
Tiny
CJ MEDEVAC
  • MECHANIC
  • 11,004 POSTS
OK,

It might be possible to use some of the stuff you already have in a bind

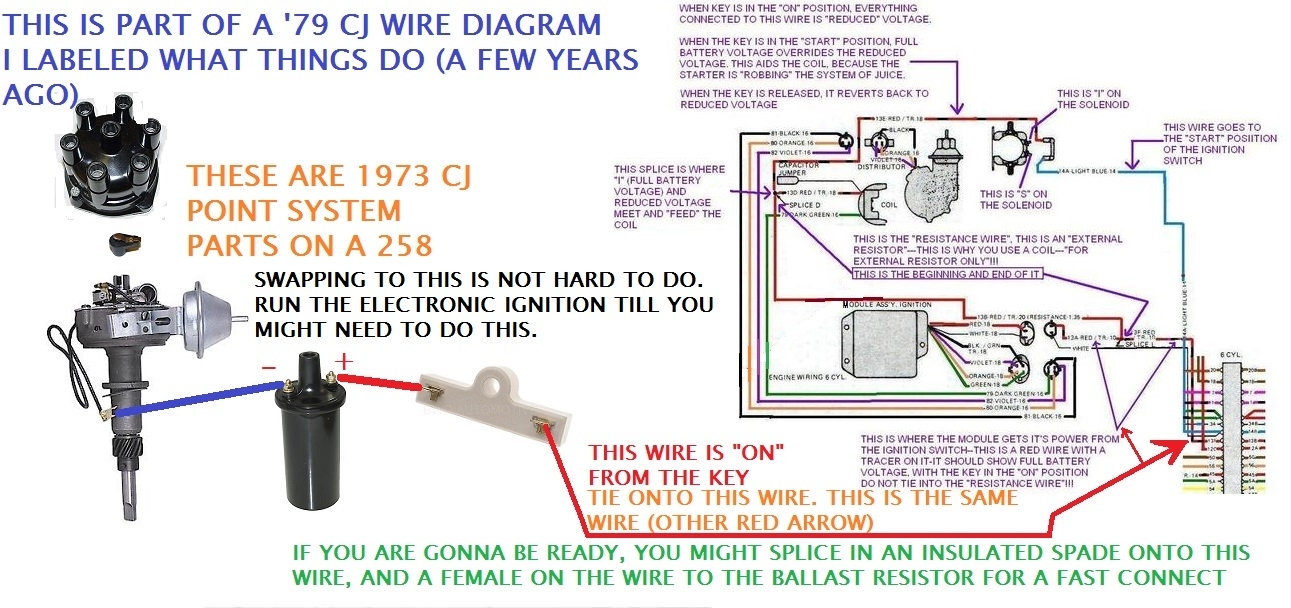
To make this simple and all for sure compatible (already proven to work together, as they are for a 1973 258 application)

You are gonna need one of these:

https://shop.advanceautoparts.com/p/cardone-distributor-point-type-domestic-reman-30-1646/3850072-P?navigationPath=L1*14923%7CL2*15034%7CL3*16062#

Looks like it has a points and condenser set in it!

This goes with the above item

https://shop.advanceautoparts.com/p/bwd-distributor-cap-c168p/5201306-P?navigationPath=L1*14923%7CL2*15034%7CL3*16061#

This too is needed for the 1st item

https://shop.advanceautoparts.com/p/omix-ada-distributor-rotor-17246.07/10178897-P?navigationPath=L1*14923%7CL2*15034%7CL3*16061

One of these

https://shop.advanceautoparts.com/p/bwd-ignition-coil-resistor-ru12/20972203-P?searchTerm=ballast+resistor#

I like this particular one because the resistor coil is sealed inside the ceramic, some are exposed and will flop around and break.

And one of these

https://shop.advanceautoparts.com/p/driveworks-ignition-coil-26189/10703783-P?navigationPath=L1*14923%7CL2*15034%7CL3*16064

Now then, the hardest part!

Swapping the distributor.

Your plug wires will move to the new cap, do this in the same positions, in the same firing order sequence.

I'm sending a link (2) on replacing a distributor.

There are 2 ways to do this.

1) recording the rotor button position and the position of the 'dist. body', basically pull it out and put the other one in with everything positioned the same. DO NOT MOVE THE ENGINE while this is performed!

2) finding TDC, installing the distributor, when finished, the rotor button is pointing towards #1 wire on the distributor cap. THIS METHOD IS FOOL-PROOF, YOU DO THIS WHEN YOU HAVE SCREWED UP THE OTHER WAY, OR IF YOU ARE STARTING FROM SCRATCH.

With a 258 (and others) insure the distributor sits all of the way down. If it doesn't, the drive for the oil pump is most likely not lined up. Your distributor may be in right, you may have to lift it out of it's hole and "TWEAK" the oil pump shaft (deep in the hole) just a little bit with a long screwdriver. Then attempt to seat the distributor again. It may take a few "TWEAKS' to move it so the distributor shaft drops into it.

I made you a pic below using pics from the links I sent from Advance Auto Parts. This is just how EZ it is!

I'M SENDING "DAVID AND CHAD" TO GIVE YOU A HAND.....LET THEM EXPLAIN THIS A FEW TIMES BEFORE YOU "JUMP IN".....THEY DON'T MIND AT ALL!

CLASS 1

http://www.youtube.com/watch?v=5a2X9mSSlQY

CLASS 2

http://www.youtube.com/watch?NR=1&v=FHX1yXVyIMg&feature=endscreen

More questions? How's all of this a looking? Can you complete the mission?

The Medic

Was this
answer
helpful?
Yes
No
Sunday, May 21st, 2017 AT 5:41 PM
Tiny
7D9CJ7
  • MEMBER
  • 3 POSTS
Mission completed, all parts secured. Wiring changes made (not tested yet, but will soon) thank you for the detailed answer! Good instructions and diagrams. Thank you for using common sense answers. Those I understand.
Was this
answer
helpful?
Yes
No
Thursday, June 1st, 2017 AT 6:49 PM
Tiny
CJ MEDEVAC
  • MECHANIC
  • 11,004 POSTS
INCREDIWONDERFUL!

Thanks for the compliments!

Send pics of your rig, we like to see what comes in our garage!

Google "2carpros" "CJ MEDEVAC" then hit Images, I post pics with 99% of my answering. A lot are with other vehicle types. I feel sure you will be able to distinguish Jeep CJ pics/ diagrams. Maybe some of those CJ answers might aid you also.

Let me know if you run into a snag, I'm here most every evening Eastern Time.

The Medic
Was this
answer
helpful?
Yes
No
Thursday, June 1st, 2017 AT 8:14 PM

Please login or register to post a reply.

Sponsored links