Do a pressure and flow rate test, could be a hose, or some typr of restriction.
PRESSURE TEST 1. Disconnect high pressure line from power steering pump. Connect power steering pressure tester gauge between high pressure line and power steering pump, using appropriate adapters. Completely open tester valve. 2. Run engine until fluid reaches operating temperature. Stop engine. Check fluid level. Add fluid if necessary. Start engine. With valve open and engine idling, pressure should be less than 200 psi (14 kg/cm 2 ). If pressure exceeds specification, stop engine and check for restriction in hose (s). 3. While observing pressure gauge, fully close valve for less than 5 seconds and then open it. Repeat process 2 more times, and record highest pressure displayed each time valve is closed. If readings are more than 1500 psi (105 kg/cm 2 ) and within 50 psi (3.5 kg/cm 2 ) of each other, go to step 6). If readings are as specified but not within 50 psi (3.5 kg/cm 2 ) of each other, go to next step. If readings are not as specified but within 50 psi (3.5 kg/cm 2 ) of each other, go to step 5). 4. Check for sticking flow control valve. Remove valve but DO NOT disassemble. Clean valve using crocus cloth or fine hone. Flush system, if dirty. Install valve and retest system. If readings are now as specified, go to step 6). If reading are not as specified, go to next step. 5. Replace flow control valve and retest system. If pressure readings are still low, check pump rotor and vanes for wear. Replace complete pump assembly if worn and flush power steering system. If pressure readings are as specified, go to step 7). 6. With valve open, turn steering wheel from stop to stop. Record highest pressure with wheels at both stops. If highest pressure is not equal to highest pressure recorded in step 3), rack and pinion assembly is leaking internally. Repair or replace assembly. If pressures are equal, no problem exists. Go to next step. 7. Turn engine off. Remove tester. Reconnect high pressure hose to pump. Check fluid level. Bleed hydraulic system. See HYDRAULIC SYSTEM BLEEDING under LUBRICATION. FLOW RATE TEST 1. Connect Power Steering Analyzer (J-25323) into system. Fully open analyzer valve. Run engine until fluid reaches normal operating temperature. Check fluid level. Add fluid if necessary. Record pressure and flow rate. 2. Close valve partially until pressure is 700 psi (49.2 kg/cm 2 ), and then record flow rate. Subtract flow rate from that measured in step 1). If flow rate drops more than one gallon (3.8L) per minute, replace ring, rotor and vanes in pump. If flow rate does not drop one gallon (3.8L) per minute, go to next step. 3. Increase engine speed to 1500 RPM, and record flow rate. Subtract flow rate from that measured in step 1). If difference between flow rates is more than one gallon (3.8L) per minute, remove and clean flow control valve. If not, go to next step. 4. Turn steering wheel from stop to stop. Flow rate should be less than one gallon (3.8L) per CAUTION: To prevent pump damage, DO NOT hold gauge valve closed for more than 5 seconds.minute at each stop. If flow rate is not as specified, check rack and pinion assembly for leakage. 5. Turn engine off. Remove tester. Reconnect high pressure hose to pump. Check fluid level. Bleed hydraulic system. See HYDRAULIC SYSTEM BLEEDING under LUBRICATION.
10/19/2009 ...
And the Rack Preload adjustment.
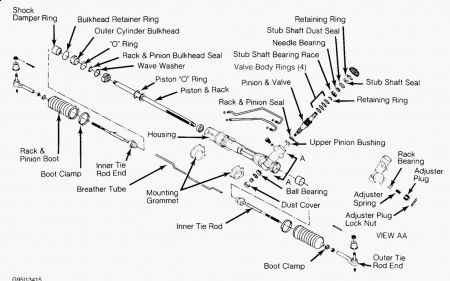
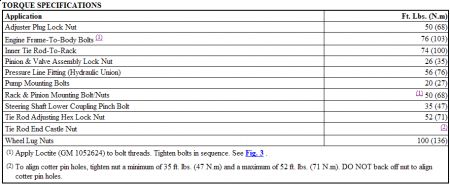
RACK BEARING PRELOAD 1. Raise and support vehicle. Turn front wheels to straight-ahead position. Loosen adjuster plug lock nut. See Fig. 1 . Turn adjuster plug clockwise until it bottoms in housing. Back off adjuster plug 50-70 degrees (about one flat). 2. While holding adjuster plug stationary, tighten adjuster plug lock nut to specification. See TORQUE SPECIFICATIONS . Test drive vehicle, ensuring steering wheel returns to center after turning.
Oct 19, 2009 at 4:23 PM