This is one of those electrical problems that defies diagnosis, that is, until a genius like me comes along! There's three things that can cause this, and you already checked two of them. The first would be a break in the sensor's ground circuit. That will make 5,0 volts appear on the signal wire all the time, regardless of fuel pressure. You'd get code 193.
The second is what most people head for next, a defective computer. There would have to be a bad connection inside the computer, which isn't real common, but the clue is the computer would be seeing a different voltage than what you'd be measuring at the sensor. For the third cause of this type of code, that broken connection can be outside the computer, in the signal wire.
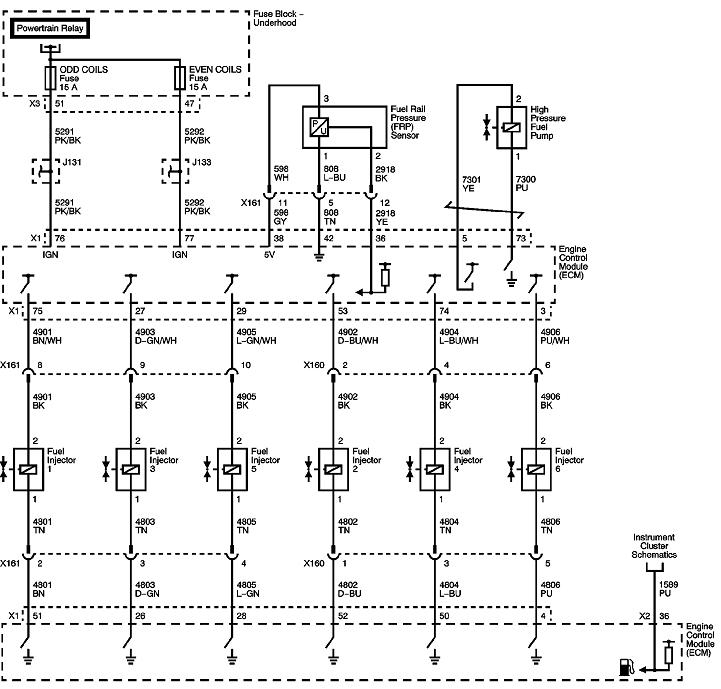
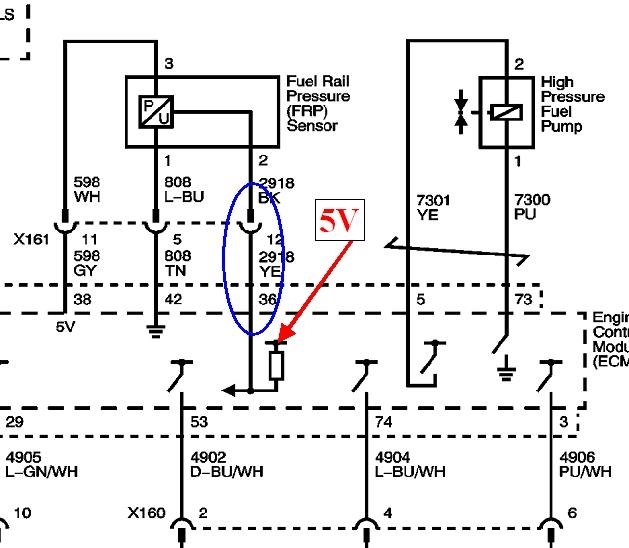
The diagram below is one of the power train management diagrams, and since it's so hard to read, I enlarged that part of it with the fuel pressure sensor. The secret to setting fault codes is the use of a "pull-up" or "pull-down" resistor. When you have a break in the signal wire, in this case, the part in the blue circle, who knows what voltage the computer will see? Due to all the interconnected circuitry inside the computer, the voltage on the signal terminal is going to "float" to some random value. If that happens to be something between about 0.5 and 4.5 volts, the computer will accept it as a normal reading, and will try to run on that. Since the break in that wire is a defective condition, the engineers added, (in this case), a pull-up resistor inside the computer. It's tied to the 5.0 volt source internally. The value of this resistor is so extremely high that under normal conditions it has no effect on circuit operation. It's when the signal wire circuit has a break that the 5.0 volts is applied to the signal terminal, through that pull-up resistor, to force it to go to a defective condition and get detected. That's where your fault code is coming from.
When you used the fuse to try to force the signal circuit to go to 0.0 volts, you were adding a "pull-down" resistor. That's one that's tied to ground instead of 5.0 volts. This is what's used on many other sensor circuits on various other car brands. It works the same way, but it forces 0.0 volts to be detected as the defective condition. You'd get a fault code for "signal voltage too low".
To prove this is what's happening, you'll see if you measure right at the sensor's signal terminal by back-probing through the rubber seal, you'll get quite a different reading than what is shown on your scanner. By the way, that pull-up resistor comes into play when you unplug the sensor. That's why for sensor voltage readings to be valid, they must always be taken with the sensor plugged in.
You don't need a fuse for this typed of test. These are always very low-current circuits, and they're well-protected in the computer. My experience is with Chrysler products, but I'm pretty sure they're all the same in regards to the 5.0-volt supply for the sensors. If you were to ground that line, the computer will shut it down to protect it, then you just need to turn the ignition switch off and back on to reset it. There's very little chance of doing damage to these circuits.
The tricky part now is locating the break in the signal wire. If you checked continuity from the sensor's plug all the way to the computer's plug, and you found 0 ohms, suspect that terminal right in the computer's plug. The best way to find this is with voltage readings. Start at the sensor by back-probing the signal terminal to see what the correct voltage reading is, then work your way back toward the computer. In this case, look at both sides of the connector in the blue circle, then back-probe at the computer. Somewhere along that line your reading has to go from "normal" to 4.97 volts. The point where it switches is the point of the break.
Images (Click to enlarge)
Aug 26, 2019 at 8:32 PM