1998 Plymouth Voyager remove headlight switch

Tiny
MELEPHANT
  • MEMBER
  • 1998 PLYMOUTH VOYAGER
  • 6 CYL
  • 2WD
  • AUTOMATIC
  • 72,000 MILES
Hi, it looks like the whole dashboard needs to come out to get to headlight switch. Is there an easier way to get switch out? If dash has to come off, I have removed screws around bottom at a lot of locations, it is loose at the bottom. I ran a curved object around the top, but it still does not come loose. Do I say Abraa Cadabraaa, or what else might work?

Thanks, Marc
Saturday, October 25th, 2008 AT 2:08 PM

2 Replies

Tiny
JNOVACK
  • MECHANIC
  • 723 POSTS
I hope this will help

REMOVAL & INSTALLATION

See Figure 1

Fig. 1: The headlight switch is mounted on the instrument cluster bezel


https://www.2carpros.com/forum/automotive_pictures/52960_0900c1528003c651_1.jpg


1.Disconnect the negative battery cable.
2.Remove the instrument cluster bezel.
3.Disconnect the electrical connectors from the headlight switch and the power mirror switch.
4.Remove the mounting screws securing the headlight switch bezel to the instrument cluster bezel.
5.Remove the headlight switch bezel from the instrument cluster bezel.
To install:

6.Install the headlight switch bezel to the instrument cluster bezel and install the mounting screws.
7.Reconnect the electrical connectors to the power mirror switch and the headlight switch.
8.Install the instrument cluster bezel and headlight switch bezel to the instrument panel.
9.Reconnect the negative battery cable. Test the headlight switch for proper operation.
Was this
answer
helpful?
Yes
No
+1
Saturday, October 25th, 2008 AT 5:27 PM
Tiny
STEVEGLENNON
  • MEMBER
  • 1 POST
While this was useful, it only told half the story for me. More details from a 1998 Plymount Grand Voyager:

1) Disconnect the battery
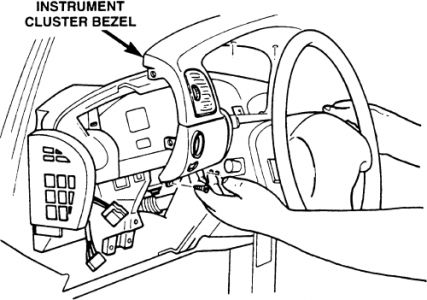
2) Remove the bezel under the steering wheel. This will be 5 screws total:
a) One to the left of the panel
b) Two along the bottom of the panel (by the diagnostic port)
c) Two behind the parking break release (make sure you have the wheels chocked)
3) Remove the side vent panel. This is one screw and a gentle squeeze out (not to break any pins)
4) Remove the center part of the instrument panel bezel (above the steering wheel). This is two screws at the bottom of the bezel.
5) Unscrew the main instrument cluster bezel. This is three screws
a) One to the left of the panel, by the side air vent bezel
b) Two in the center area, revealed when you removed the center lower bezel.

Look for any other screws that might be different from the model I took apart.

Now gently pry the instrument cluster panel up and away from the dash. This worked best for me starting to the lower right of the panel pulling gently up and away. That set free the center air vents. I was then able to gently pull across the top until it popped out and up.

At this point the panel is free, only attached by the headlight and mirror switch cables.

I was only replacing the mirror switch, which I was able to do without further removing the headlight switch piece of the dash. The mirror switch is held in by two plastic catches (top and bottom) which you can reach around and gently pry open without having to disconnect the headlight switch from the main bezel.
Was this
answer
helpful?
Yes
No
+3
Saturday, January 29th, 2011 AT 9:38 PM

Please login or register to post a reply.

Sponsored links