Hello -
Gabe
Thanks for getting back with me.
I believe your rear blower motor is defective.
Let's check a couple of things first to make sure.
First check fuses 10 and 11 with an ohm meter to make sure they are good.
If they are good - check to see if the front blower relay is the same as the rear. . .. . .if they are - swap them and see if it works. . .. . ...if not. . ...replace the relay. . ...if it still doesn't work. . ..you need to get to the rear blower.
The relay for the front blower is located in the Fuse and Fusible Link Block located at the left front of the engine compartment.
The rear blower relay is located in the fuse block behind the left side of the dash.
If the blower still doesn't work. . .. . .. . ...I would remove the electrical connector from the rear blower motor and put 12V on the connection that the Blue/Red wire would connect and ground the other connection point.
If the blower doesn't move it is defective.
If it does move. . ..then check for voltage at the connector. . .. . ..make sure you have it turned on when you check for it. . .. . .. . .
Oh - also I would change my cabin filter. . .. . .. . .. . .. . .. . .
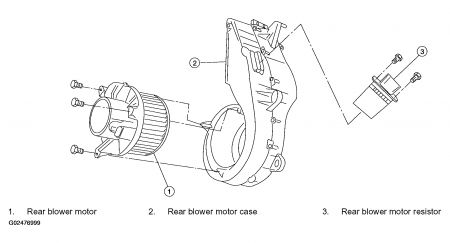
REAR BLOWER MOTOR
Fig. 192: Identifying Rear Blower Motor
Courtesy of NISSAN MOTOR CO., U.S.A.
Removal
1. Remove the rear RH interior trim panel. Refer to "RIGHT SIDE AND REAR ".
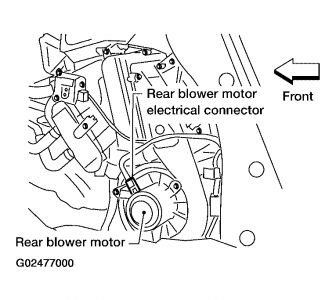
2. Disconnect the blower motor electrical connector.
3. Remove the three screws and remove the blower motor.
Fig. 193: Disconnecting Blower Motor Electrical Connector
Courtesy of NISSAN MOTOR CO., U.S.A.
Installation
Installation is in the reverse order of removal.
IN-CABIN MICROFILTER
REMOVAL AND INSTALLATION
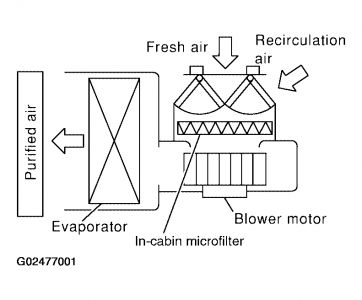
FUNCTION
The air inside the passenger compartment is filtered by the in-cabin microfilters when the heater or A/C controls are set on either the recirculation or fresh mode. The two in-cabin microfilters are located in the front heater and cooling unit assembly. The rear heater and cooling unit assembly only draws in air from the passenger compartment to recirculate into the passenger compartment, so the rear heater and cooling unit assembly is not equipped with in-cabin microfilters.
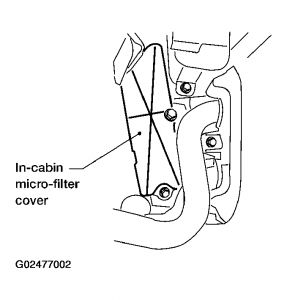
Fig. 194: Identifying In-Cabin Microfilter
Courtesy of NISSAN MOTOR CO., U.S.A.
REPLACEMENT TIMING
Replacement of the two in-cabin microfilters is recommended on a regular interval depending on the driving conditions. Refer to "PERIODIC MAINTENANCE ". It may also be necessary to replace the two in-cabin microfilters as part of a component replacement if the in-cabin microfilters are damaged.
REPLACEMENT PROCEDURES
1. Remove the glove box assembly. Refer to "INSTRUMENT LOWER PANEL RH AND GLOVE BOX ".
2. Remove the three screws and remove the in-cabin microfilter cover.
3. Remove the in-cabin microfilters from the front heater and cooling unit assembly.
4. Install the in-cabin microfilters, replacing the two in-cabin micro-filters with new filters, into the front heater and cooling unit assembly.
CAUTION: When installing the two new in-cabin microfilters make sure that the filters are facing in the direction indicated by the direction arrow for the air flow. The direction arrow is printed on the side of the in-cabin microfilters.
5. Fig. 195: Installing In-Cabin Microfilter
Courtesy of NISSAN MOTOR CO., U.S.A.
6. Install the in-cabin microfilter cover.
7. Install the glove box assembly. Refer to "INSTRUMENT LOWER PANEL RH AND GLOVE BOX ".
Thursday, February 26th, 2009 AT 6:36 PM
