1993 Lincoln Town Car traction control staying on

Tiny
TOWNCAR_RIDER
  • MEMBER
  • 1993 LINCOLN TOWN CAR
  • V8
  • 2WD
  • AUTOMATIC
  • 134,000 MILES
I just did a rear break job on my car. I went ahead and replaced the rotors and pads on both sides. I put everything back together and test drove. After a few min I could hear this "humming" noise from the front of the car. I slowed down and could tell it would go away as I gradually touched the brake pedal. If I released the pedal the noise would come pack. I got it back to garage and raised the rear end off the ground and started the car and put car in drive and as wheels turned the noise was back and the rear wheels were stopping and starting like the abs or traction control was pulsing the wheels. Any assistance would be greatly appreciated. I am in a bind. Thanks
Do you
have the same problem?
Yes
No
Saturday, May 29th, 2010 AT 8:15 AM

8 Replies

Tiny
MERLIN2021
  • MECHANIC
  • 17,250 POSTS
Did you shut off the air suspension switch when you jacked it up? Any lights on, on the dash?
Was this
answer
helpful?
Yes
No
Saturday, May 29th, 2010 AT 8:29 AM
Tiny
TOWNCAR_RIDER
  • MEMBER
  • 4 POSTS
Yes the air suspension switch was off. I actually had to remove the air bags and replace with springs because air pump went and also bags were leaking. I was wondering if it might be "air" in the abs system. When I drove this am, when hum started from the abs system and as I pushed the brake pedal to stop it made the pitch of the noise change to a higher pitch and then the hum stopped. Do you have a procedure to bleed that abs system. Thanks for response.
Was this
answer
helpful?
Yes
No
Sunday, May 30th, 2010 AT 7:41 AM
Tiny
MERLIN2021
  • MECHANIC
  • 17,250 POSTS
BLEEDING BRAKE SYSTEM 1. Unplug ECU 55-pin connector. ECU is located in engine compartment, under upper radiator support. Install Breakout Box (014-00322) and ABS Adapter (T90P-50-ALA). Set BLEEDER/HARNESS switch to BLEED position. Set ignition switch to ON position. Red OFF indicator light will glow. 2. Press MOTOR button on adapter. Pump motor will run. Red indicator light will go out, and Green ON indicator will glow. Pump will run for 60 seconds. If pump motor is to be turned off before 60 seconds has elapsed, press ABORT button. 3. After pump motor runs for 20 seconds, press and hold VALVE button for 20 seconds, then release. Pump will continue to run for an additional 20 seconds. The brakes may now be bled in the conventional manner using the following sequence: right rear, left front, left rear, and right front. CAUTION: The anti-lock brake system must be bled using the following procedure. If this procedure is not followed, air will be trapped in the Hydraulic Control Unit (HCU), resulting in a spongy pedal.
First thing you need to do is have the codes read, it will pinpoint the problem, but, check the wheel speed sensor wires for damage that might have occurred during air spring removal, these the wires, use an ohm meter, reading at sensor connector is 800-1400 omhs.
Was this
answer
helpful?
Yes
No
Sunday, May 30th, 2010 AT 8:52 AM
Tiny
MERLIN2021
  • MECHANIC
  • 17,250 POSTS
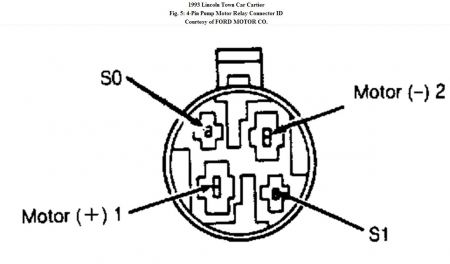
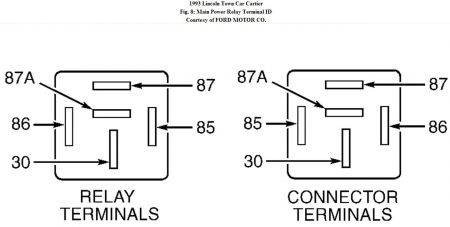
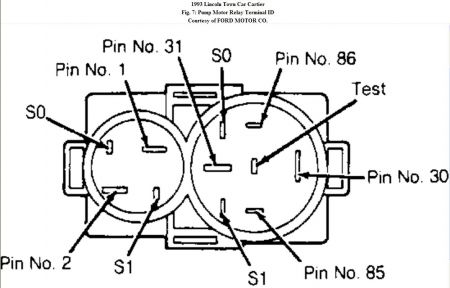
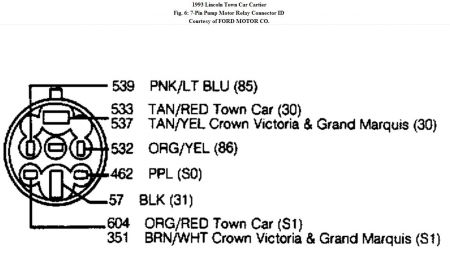
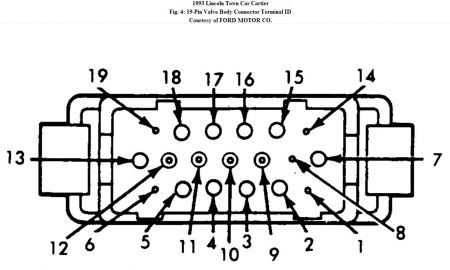
PINPOINT TEST BB - SOLENOID VALVE DIAGNOSIS 1. Code 17 Or 22 Unplug ECU 55-pin connector. Connect breakout box and adapter. Connect jumper wire between breakout box pins No. 19 and No. 34. Measure voltage between pins No. 3 and No. 60. If voltage is at least 10 volts, go to step 2). If voltage is less than 10 volts, repair circuit No. 532 (Orange/Yellow wire), No. 533 (Tan/Red wire) or No. 603 (Dark Green wire) on Town Car, or circuit No. 532 (Orange/Yellow wire), No. 537 (Tan/Yellow wire) or No. 603 (Dark Green wire) on Crown Victoria and Grand Marquis. 2. Measure resistance between breakout box pins No. 3 and No. 20. If resistance is 5-8 ohms, read service codes again. If other codes exist, disregard Code 17 or 22, and service other code (s). If resistance is not 5-8 ohms, go to next step. 3. Unplug valve body 19-pin connector. Measure resistance between pins No. 7 and No. 17. See Fig. 4 . If resistance is 5-8 ohms, repair circuit No. 495 (Tan wire). If resistance is not 5-8 ohms, replace valve body.


https://www.2carpros.com/forum/automotive_pictures/62217_ABS1_1.jpg


https://www.2carpros.com/forum/automotive_pictures/62217_motor_2.jpg


https://www.2carpros.com/forum/automotive_pictures/62217_power_3.jpg


https://www.2carpros.com/forum/automotive_pictures/62217_relay2_2.jpg


https://www.2carpros.com/forum/automotive_pictures/62217_relay_6.jpg

Was this
answer
helpful?
Yes
No
Sunday, May 30th, 2010 AT 9:09 AM
Tiny
TOWNCAR_RIDER
  • MEMBER
  • 4 POSTS
Also ment to add before that I verified there are no ABS lights on at the dash. Bleed procedure looks complicated. Do you believe I am on the "right track"? Also everything was working correctly before rear brake job. And the spring replacement was 6mo ago. Thanks
Was this
answer
helpful?
Yes
No
Sunday, May 30th, 2010 AT 10:04 AM
Tiny
MERLIN2021
  • MECHANIC
  • 17,250 POSTS
Any hydraulics replaced during the brake job? If not have a look at the reluctor ring and sensor for any debris stuck in there.
Was this
answer
helpful?
Yes
No
Monday, May 31st, 2010 AT 1:42 PM
Tiny
TOWNCAR_RIDER
  • MEMBER
  • 4 POSTS
Just rotors and pads replaced, nothing hydraulic. I looked at the "ring and sensors". Can the sensor be cleaned with something? I did use air hose to blow sensor clean.
Was this
answer
helpful?
Yes
No
Monday, May 31st, 2010 AT 7:08 PM
Tiny
MERLIN2021
  • MECHANIC
  • 17,250 POSTS
If ABS light is off, brakes should be OK, Is your trac control switch turned on? Next step to avoid replacing good parts is a scan to retrieve "C" and "U" codes.
Was this
answer
helpful?
Yes
No
-1
Friday, June 4th, 2010 AT 2:33 AM

Please login or register to post a reply.

Sponsored links