AIR BAG RESTRAINT SYSTEM -1993 Lincoln Town Car Cartier
Page 1 of 1
NOTE: Before proceeding, see SERVICE PRECAUTIONS . After servicing has been performed, recheck AIR BAG warning light for codes with Air Bag Simulator (105-00010) still in place of air bag module. If system is okay, install air bag module and reactivate air bag system.
CODE 52, BACK-UP POWER SUPPLY FAULT
Description
Back-up power supply is contained within diagnostic monitor. Power supply consists of a capacitor and a voltage boost circuit. Voltage boost circuit charges capacitors 23-25 volts when ignition is on. Back-up power supply is connected through a diode to diagnostic monitor terminal No. 15 (circuit No. 611). Resistance of circuit No. 611 should be infinite (open) resistance to ground. This open circuit allows capacitor to maintain its higher voltage because there is no discharge path for capacitor. If voltage on capacitor does not reach and maintain at least 23 volts after about 45 seconds, Code 52 will set.
Possible Causes
Code 52 will set if there is high resistance to ground on circuit No. 611 or 612. Code 52 will also set if voltage boost circuit located within diagnostic monitor is faulty.
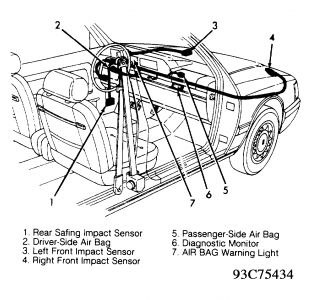
1. Verify Condition - Turn ignition on. Check for fault codes. If Code 52 is flashing, go to step 2). If Code 52 is not flashing, check connectors, wiring and crimps for intermittent problem. DO NOT proceed with diagnostic test until code is flashing. Failure to do so will result in needless replacement of diagnostic monitor. 2. Deactivate System - Deactivate air bag system. See COMPLETE SYSTEM DEACTIVATION under DISABLING & ACTIVATING AIR BAG SYSTEM. Turn ignition on and wait 30 seconds. Using terminal No. 3 (Black wire) as ground, measure voltage between terminals No. 3 and 15 (White/Orange wire) at diagnostic monitor connector. If it is 23-25 volts, replace diagnostic monitor. If it is not 23-25 volts, go to step 3). 3. Check For Open Circuit - Turn ignition off. Disconnect diagnostic monitor located behind glove box. Set ohmmeter to AUTO or 200-k/ohm scale. Measure resistance between diagnostic monitor connector terminals No. 3 (Black wire) and No. 15 (White/Orange wire). If resistance is more than 100,000 ohms, replace diagnostic monitor. If resistance is less than 100,000 ohms, go to step 4). 4. Check Circuit No. 611 - Disconnect safing sensor. See Fig. 1 . Measure resistance between terminals No. 3 (Black wire) and No. 15 (White/Orange wire) of diagnostic monitor connector. If resistance is more than 100,000 ohms, go to step 5). If resistance is less than 100,000 ohms, locate and repair short to ground in circuit No. 611 (White/Orange wire). 5. Check For Short In Sensor - Measure resistance between ground and White/Orange wire in safing sensor connector. If resistance is more than 100,000 ohms, locate and repair short to ground in circuit No. 612 (Purple/Orange wire). If resistance is less than 100,000 ohms, replace safing sensor.
9/2/2008
Tuesday, September 2nd, 2008 AT 12:35 PM