90,000 miles is when the timing belt needs replaced on your vehicle.
REMOVAL:
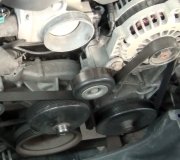
Remove all necessary components for access to the upper timing belt cover. Remove the 8 bolts and lift off the upper (No. 2) cover.
Paint matchmarks on the timing belt at all points where it meshes with the pulleys and the lower timing cover.
Set the No. 1 cylinder to Top Dead Center (TDC) of the compression stroke and check that the timing marks on the camshaft timing pulleys are aligned with those on the No. 3 timing cover. If not, turn the engine 1 complete revolution (360 degrees) and check again.
Remove or disconnect the following:
Timing belt tensioner and the dust boot
Turn the right camshaft pulley clockwise slightly to release tension, then remove the timing belt from the pulleys.
Upper (No. 3) and lower (No. 1) timing belt covers
Timing belt guide
Timing belt from the engine
NOTE
If the timing belt is to be reused, draw a directional arrow on the timing belt in the direction of engine rotation (clockwise) and place matchmarks on the timing belt and crankshaft gear to match the drilled mark on the pulley.
NOTE
If the old timing belt is being reinstalled, be sure the directional arrow is facing in the original direction and that the belt and crankshaft gear matchmarks are properly aligned.
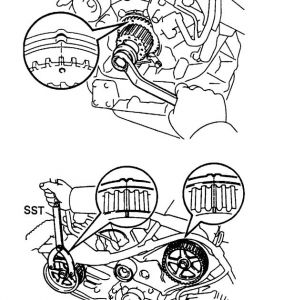
(((Camshaft and crankshaft pulley positioning for timing belt installation-3.0L)))
INSTALLATION:
Install the lower (No. 1) timing cover and tighten the bolts.
Set the No. 1 cylinder to TDC again. Turn the right camshaft until the knock pin hole is aligned with the timing mark on the No. 3 belt cover. Turn the left pulley until the marks on the pulley are aligned with the mark on the No. 3 timing cover.
Check that the mark on the belt matches with the edge of the lower cover. If not, shift it on the crank pulley until it does. Turn the left pulley clockwise a bit and align the mark on the timing belt with the timing mark on the pulley. Slide the belt over the left pulley. Now move the pulley until the marks on it align with the one on the No. 3 cover. There should be tension on the belt between the crankshaft pulley and the left camshaft pulley.
Align the installation mark on the timing belt with the mark on the right side camshaft pulley. Hang the belt over the pulley with the flange facing inward. Align the timing marks on the right pulley with the one on the No. 3 cover and slide the pulley onto the end of the camshaft. Move the pulley until the camshaft knock pin hole is aligned with the groove in the pulley, then install the knock pin. Tighten the bolt to 55 ft. lbs. (75 Nm).
Position a plate washer between the timing belt tensioner and the block, then press in the pushrod until the holes are aligned between it and the housing. Slide a 0.05 in. Allen wrench through the hole to keep the pushrod set. Install the dust boot, and then install the tensioner. Tighten the bolts to 20 ft. lbs. (26 Nm). Don't forget to pull out the Allen wrench.
Turn the crankshaft clockwise 2 complete revolutions and check that all marks are still in alignment. If they aren't, remove the timing belt and start over again.
Install the remaining components.
Thanks for using 2CarPros.com!
Monday, March 2nd, 2009 AT 1:26 AM