Welcome back:
Have you done anything with either of the sensors related to the codes? For example, have you checked connections and wiring for damage or corrosion?
I see you have a scanner. I will provide the directions for trouble shooting the trouble codes. If you need help, let me know. You indicate you have a lot of knowledge, but if you need anything, let me know. The attached pics correlate with the directions. Also, If I was doing this, I would most likely start with the IMRC (intake manifold runner controller).
Also, if you can provide the short and long term fuel trims, it would be helpful.
__________________________________
Code
P1166
Vehicle ALL Diagnostic Trouble Codes ( DTC ) Testing and Inspection P Code Charts P1166
P1166
DTC P1166: A/F Sensor (Sensor 1) Heater Circuit Malfunction
1. Reset the ECM/PCM.
2. Start the engine.
Is DTC P1166 indicated?
YES - Go to step 3.
NO - Intermittent failure, system is OK at this time. Check for poor connections or loose terminals at the A/F sensor (Sensor 1) and the ECM/PCM.
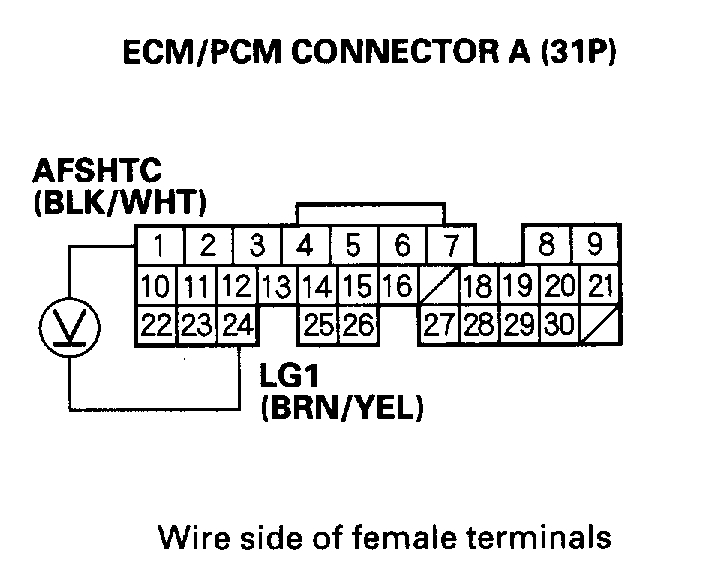
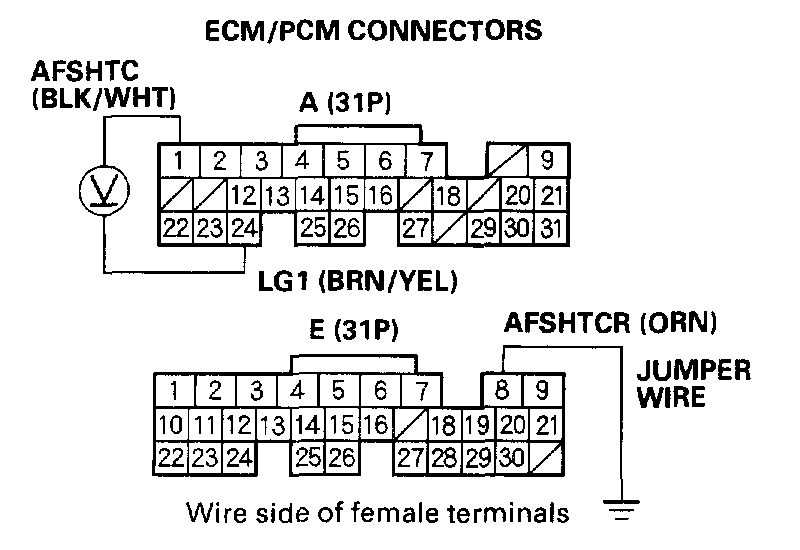
Pic 1
3. Measure voltage between ECM/PCM connector terminals A1 and A24, 30 seconds after the ignition switch is turned ON (II).
Is there battery voltage?
YES - Update the ECM/PCM if it does not have the latest software, or substitute a known-good ECM/PCM, then recheck. If the symptom/indication goes away with a known-good ECM/PCM, replace the original ECM/PCM.
NO - Go to step 4.
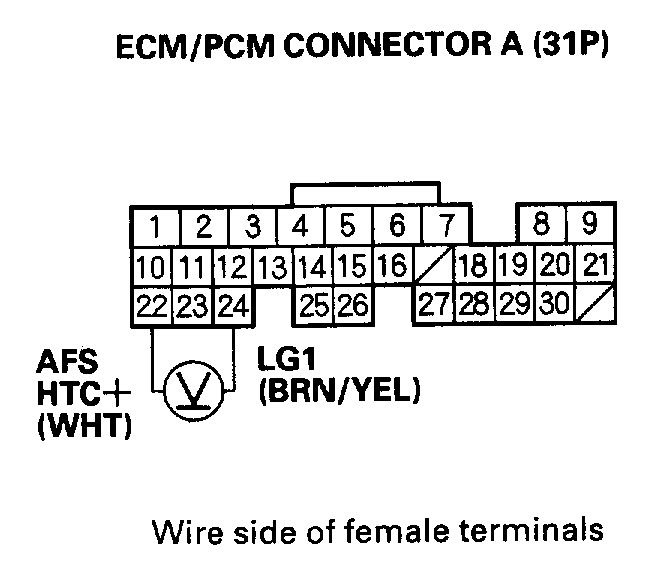
Pic 2
4. Measure voltage between ECM/PCM connector terminals A22 and A24.
Is there battery voltage?
YES - Go to step 5.
NO - Go to step 9.
5. Turn the ignition switch OFF.
6. Disconnect ECM/PCM connector A (31P).
7. Turn the ignition switch ON (II).
Pic 3
8. Connect ECM/PCM connector terminal E8 to body ground with a jumper wire, then measure voltage between ECM/PCM connector terminals A1 andA24.
Is there battery voltage?
YES - Update the ECM/PCM if it does not have the latest software, or substitute a known-good ECM/PCM. Then recheck. If the symptom/indication goes away with a known-good ECM/PCM, replace the original ECM/PCM.
NO - Repair open or short in the wire between the A/F sensor (Sensor 1) and the ECM/PCM (A1).
9. Turn the ignition switch OFF.
10. Disconnect ECM/PCM connector A (31P) and the A/F sensor (sensor 1) 4P connector.
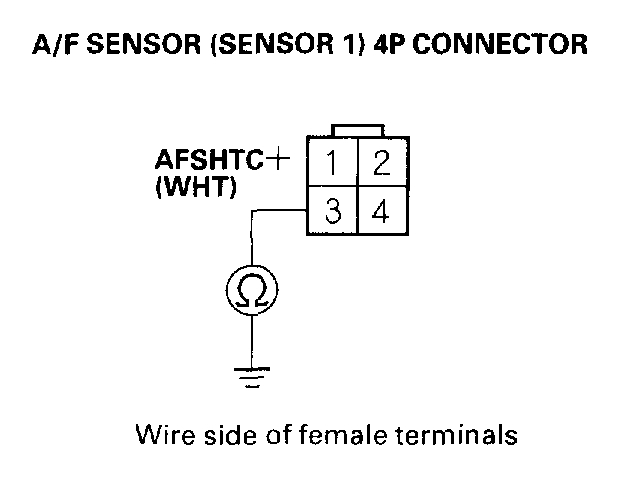
Pic 4
11. Check for continuity between A/F sensor (Sensor 1) 4P connector terminal No. 3 and body ground.
Is there continuity?
YES - Repair short in the wire between the A/F sensor relay, A/F sensor (Sensor 1), and the ECM/PCM (A22).
NO - Go to step 12.
12. Turn the ignition switch ON (II).
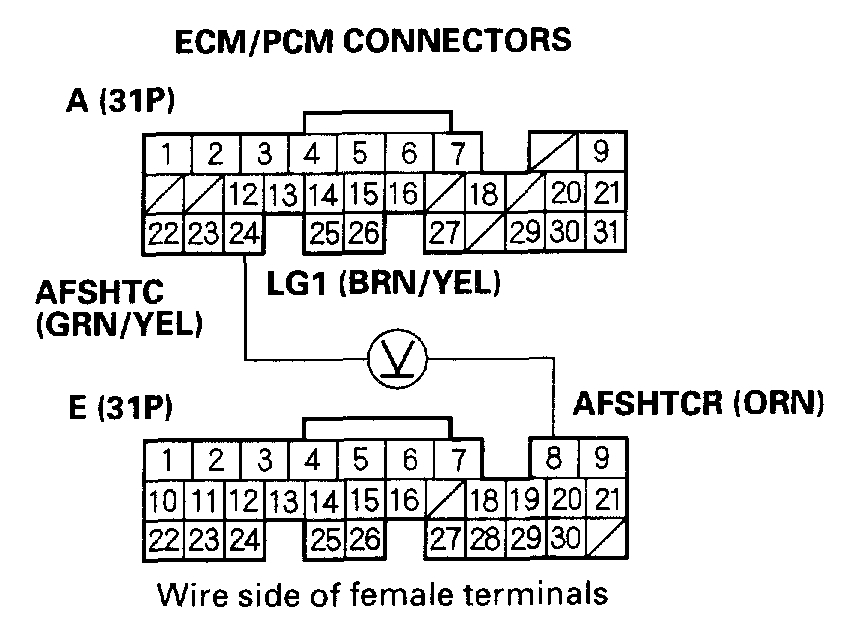
Pic 5
13. Measure voltage between ECM/PCM connector terminals E8 and A24.
Is there battery voltage?
YES - Repair open in the wire between the ECM/PCM (A22) and the A/F sensor (Sensor 1) or A/F sensor relay.
NO - Go to step 14.
14. Check the following fuses:
- No. 14 OPTION (40 A) fuse in the under-hood fuse/relay box.
- No. 4 ACG (10 A) fuse in the under-dash fuse/relay box.
- No. 15 + B LAF (A/F) HEATER (20 A) in the under-dash fuse/relay box.
Are any of the fuses blown?
YES - Repair short in the wire between the A/F sensor relay and the fuses.
NO - Go to step 15.
15. Check for continuity in the wires between the A/F sensor relay and the fuses.
Is there continuity?
YES - The wires are OK, replace the A/F sensor relay.
NO - Repair open in the wire between the A/F sensor relay and the fuses.
_______________________________________________________________
IMRC = Intake manifold runner control. I have a feeling this is the root of the problem.
Code
P0661
Vehicle ALL Diagnostic Trouble Codes ( DTC ) Testing and Inspection P Code Charts P0661
P0661
DTC P0661: IMRC Valve Position Sensor Circuit Low Voltage
1. Reset the ECM/PCM.
2. Turn the ignition switch ON (II).
Is DTC P0661 indicated?
YES - Go to step 3.
NO - Intermittent failure, system is OK at this time. Check for poor connections or loose terminals at the IMRC valve position sensor and at the ECM/PCM.
3. Turn the ignition switch OFF.
4. Disconnect the IMRC valve position sensor 3P connector.
5. Turn the ignition switch ON (II).
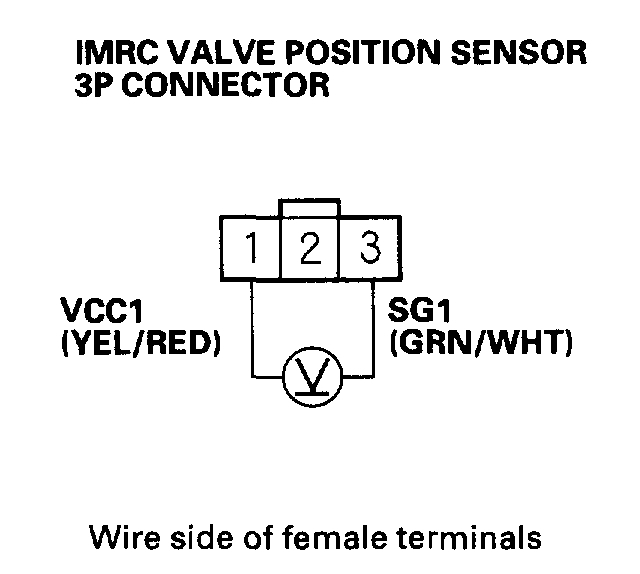
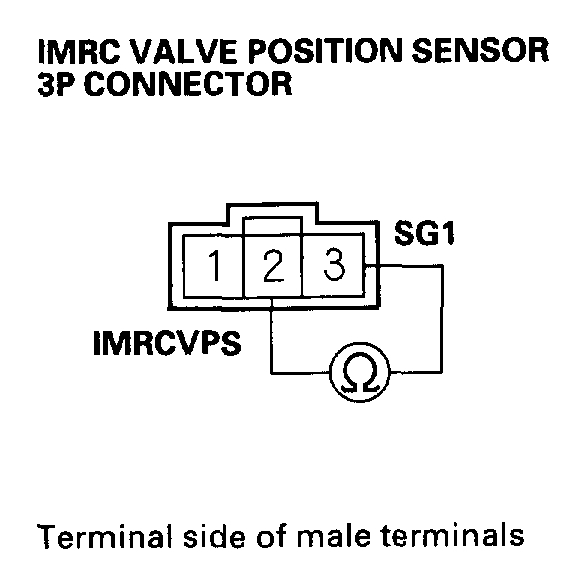
Pic 6
6. Measure voltage between IMRC valve position sensor 3P connector terminals No. 1 and No. 3.
Is there about 5 V?
YES - Go to step7.
NO - Go to step 14.
7. Turn the ignition switch OFF.
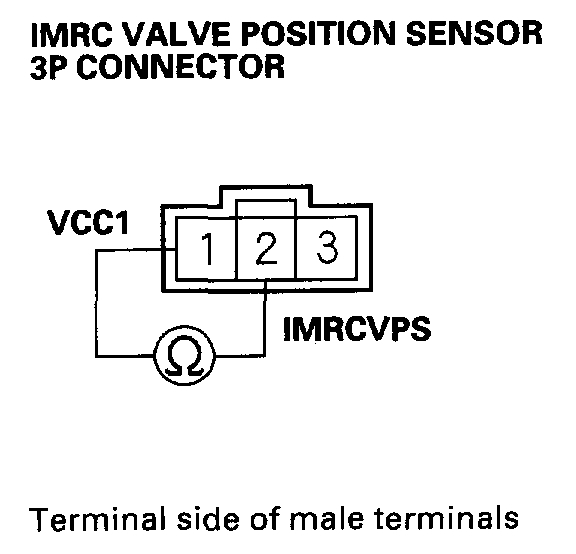
Pic 7
8. At the sensor side, measure resistance between IMRC valve position sensor 3P connector terminals No. 2 and No. 3.
Is there about 3.2 kOhm?
YES - Go to step 9.
NO - Replace the IMRC valve position sensor.
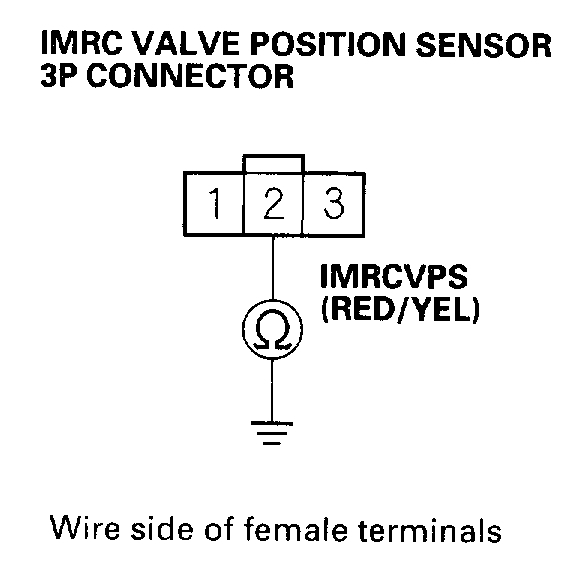
Pic 8
9. Measure resistance between IMRC valve position sensor 3P connector terminals No. 1 and No. 2.
Is there about 9.5 kOhm?
YES - Go to step 10.
NO - Replace the IMRC valve position sensor.
10. Disconnect ECM/PCM connector A (31P).
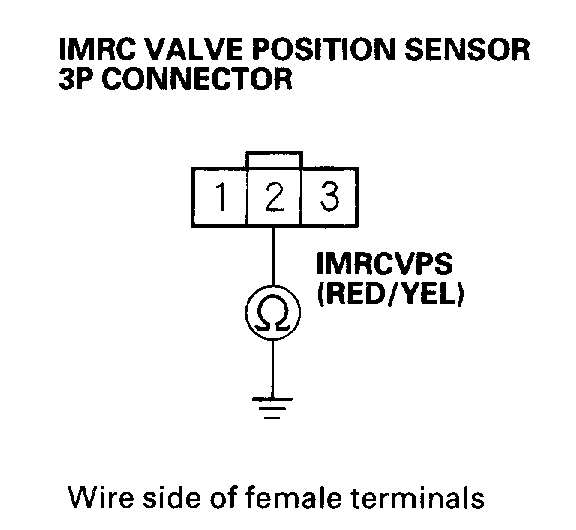
Pic 9
11. At the wire harness side, check for continuity between IMRC valve position sensor 3P connector terminal No. 2 and body ground.
Is there continuity?
YES - Repair short in the wire between the ECM/PCM (A8) and the IMRC valve position sensor.
NO - Go to step 12.
Pic 10
12. Connect ECM/PCM connector terminal A8 to body ground with a jumper wire.
Pic 11
13. At the wire harness side, check for continuity between IMRC valve position sensor 3P connector terminal No. 2 and body ground.
Is there continuity?
YES - Update the ECM/PCM if it does not have the latest software, or substitute a known-good ECM/PCM, then recheck. If the symptom/indication goes away with a known-good ECM/PCM, replace the original ECM/PCM.
NO - Repair open in the wire between the ECM/PCM (A8) and the IMRC valve position sensor.
Pic 12
14. Measure voltage between ECM/PCM connector terminals A11 and A21.
Is there about 5 V?
YES - Repair open in the wire between the ECM/PCM (A21) and the IMRC valve position sensor.
NO - Update the ECM/PCM if it does not have the latest software, or substitute a known-good ECM/PCM, then recheck. If the symptom/indication goes away with a known-good ECM/PCM, replace the original ECM/PCM.
_________________________________________
DTC P0141: Secondary HO2S (Sensor 2) Heater Circuit Malfunction
1. Reset the ECM/PCM.
2. Start the engine.
Is DTC P0141 indicated?
YES - Go to step 3.
NO - Intermittent failure, system is OK at this time. Check for poor connections or loose terminals at the secondary HO2S (Sensor 2) and at the ECM/PCM.
3. Check the No.4 ACG (10 A) fuse in the under-dash fuse/relay box.
Is the fuse OK?
YES - Go to step 4.
NO - Replace the fuse and retest.
4. Turn the ignition switch OFF.
5. Disconnect the secondary HO2S (Sensor 2) 4P connector.
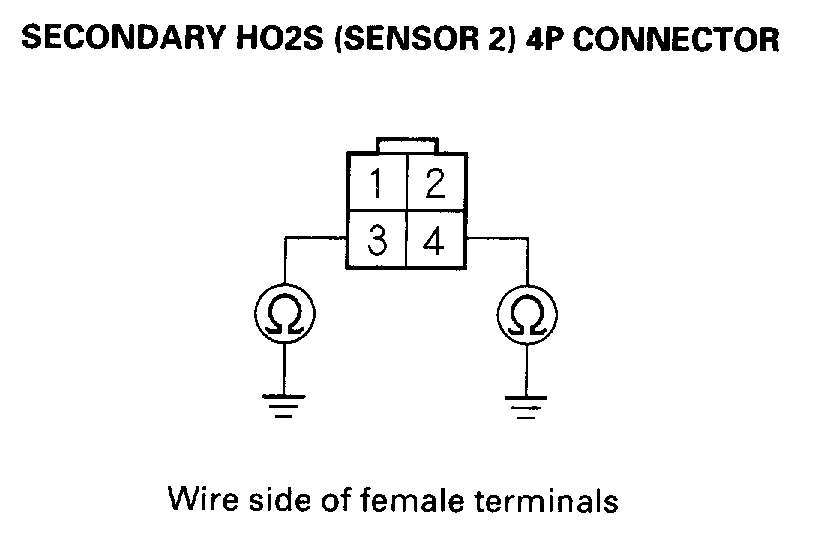
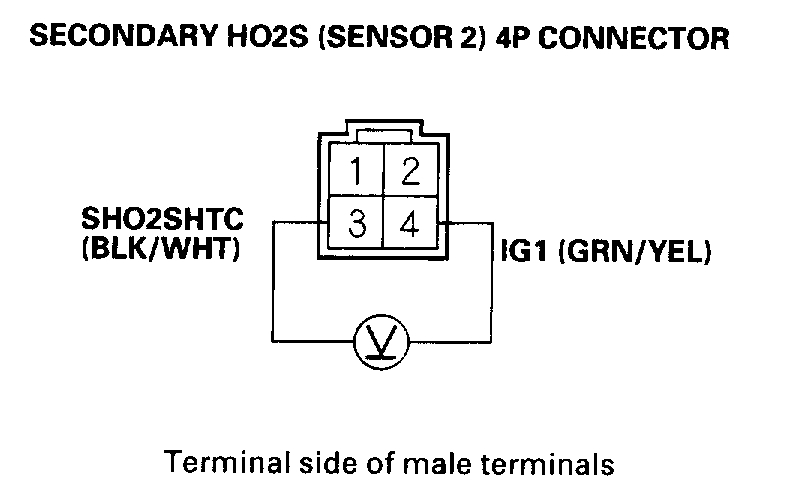
Pic 13
6. At the secondary HO2S (Sensor 2) side, measure resistance between HO2S 4P connector terminals;
Is there about 3.3 Ohm at room temperature?
YES - Go to step 7.
NO - Replace the secondary HO2S (Sensor 2).
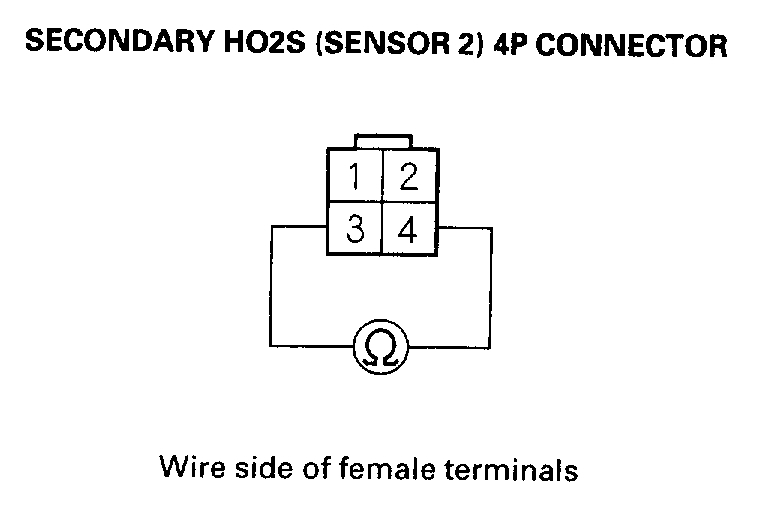
Pic 14
7. Check for continuity between body ground and secondary HO2S (Sensor 2) 4P connector terminals No. 3 and No. 4 individually.
Is there continuity?
YES - Replace the secondary HO2S (Sensor 2).
NO - Go to step 8.
8. Turn the ignition switch ON (II).
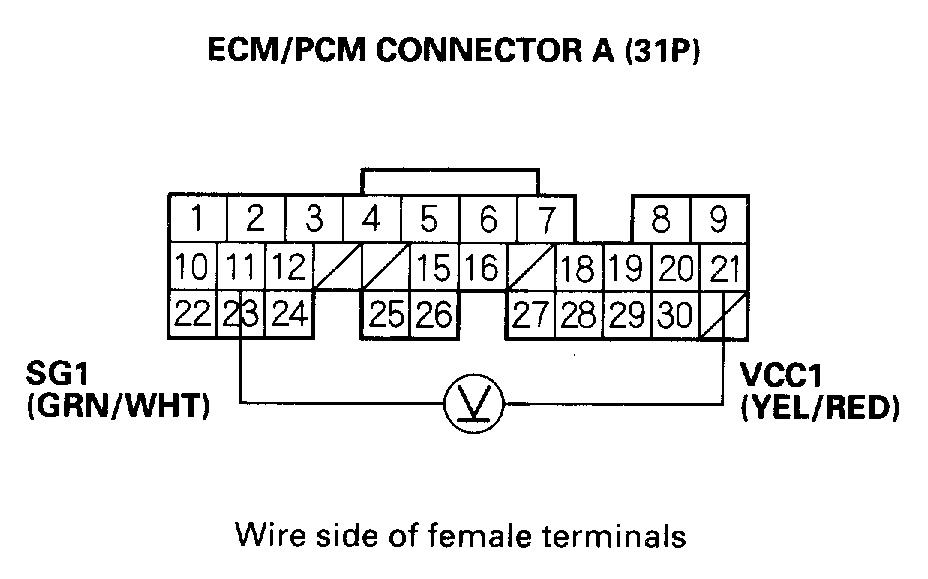
Pic 15
9. Measure voltage between secondary HO2S 4P connector terminals No. 3 and No. 4.
Is there battery voltage?
YES - Go to step 10.
NO Go to step 13.
10. Turn the ignition switch OFF.
11. Disconnect ECM/PCM connector E (31P).
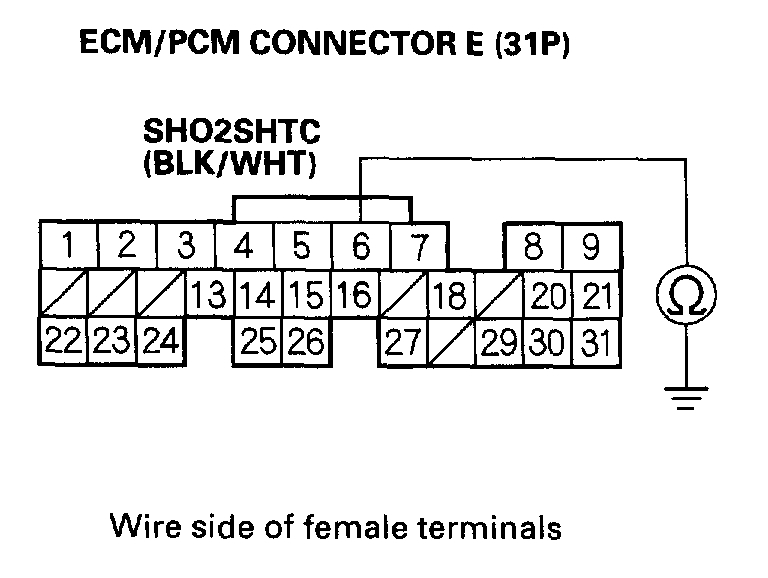
Pic 16
12. Check for continuity between ECM/PCM connector terminal E6 and body ground.
Is there continuity?
YES - Repair short in the wire between the ECM/PCM (E6) and the secondary HO2S (Sensor 2).
NO - Update the ECM/PCM if it does not have the latest software, or substitute a known-good ECM/PCM, then recheck. If the symptom/indication goes away with a known-good ECM/PCM, replace the original ECM/PCM.
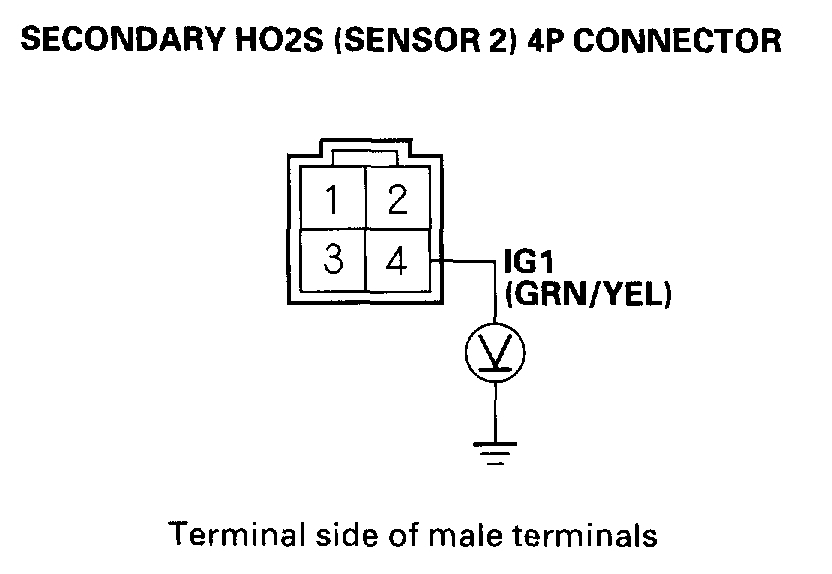
Pic 17
13. Measure voltage between secondary HO2S (Sensor 2) 4P connector terminal No. 4 and body ground.
Is there battery voltage?
YES - Go to step 14.
NO - Check the No. 4 ACG (10 A)fuse in the under-dash fuse/relay box. If the fuse is OK, repair open in the wire between the secondary HO2S (Sensor 2) and No.4 ACG (10 A)fuse.
14. Turn the ignition switch OFF.
15. Reconnect the secondary HO2S (Sensor 2) 4P connector.
16. Disconnect ECM/PCM connector E (31P).
17. Turn the ignition switch ON (II).
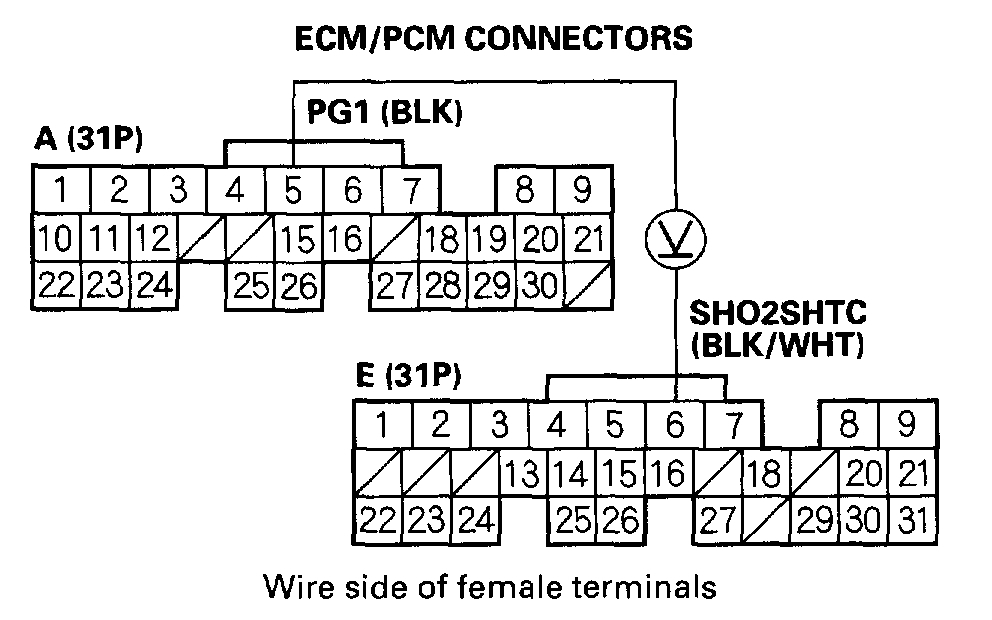
Pic 18
18. Measure voltage between ECM/PCM connector terminal A5 and E6.
Is there 0.1 V or less?
YES - Repair open in the wire between the ECM/PCM (E6) and the secondary HO2S (Sensor 2).
NO - Update the ECM/PCM if it does not have the latest software, or substitute a known-good ECM/PCM, then recheck. If the symptom/indication goes away with a known-good ECM/PCM, replace the original ECM/PCM.
____________________________________
I realize this is a lot of testing, but it needs done to determine the cause of the problem. Let me know if you need help.
Joe
Images (Click to make bigger)
Sunday, June 16th, 2019 AT 7:45 PM