Welcome to 2CarPros.
The water pump is a major issue on this vehicle. Unlike traditional engines which require the accessory belt (belt that drives the alternator, power steering pump) to be removed and then simply unbolt the pump and replace it, this vehicle needs to have the timing belt removed. As far as the pulley, it should be permanently affixed to the pump, so they have to be removed at the same time.
It is a big job, but I will provide the directions for you. As far as a "water pump pulley", take a look at the attached directions to see it. The first set of directions will simply be removing and replacing the pump itself. It's not hard once the belt is off. The second set of directions will be the ones involving the removal / replacement of the belt. All attached pictures correlate with these directions. If you plan to do this and the timing belt has never been replaced, do it now. You don't want to do this twice. LOL
_______________________
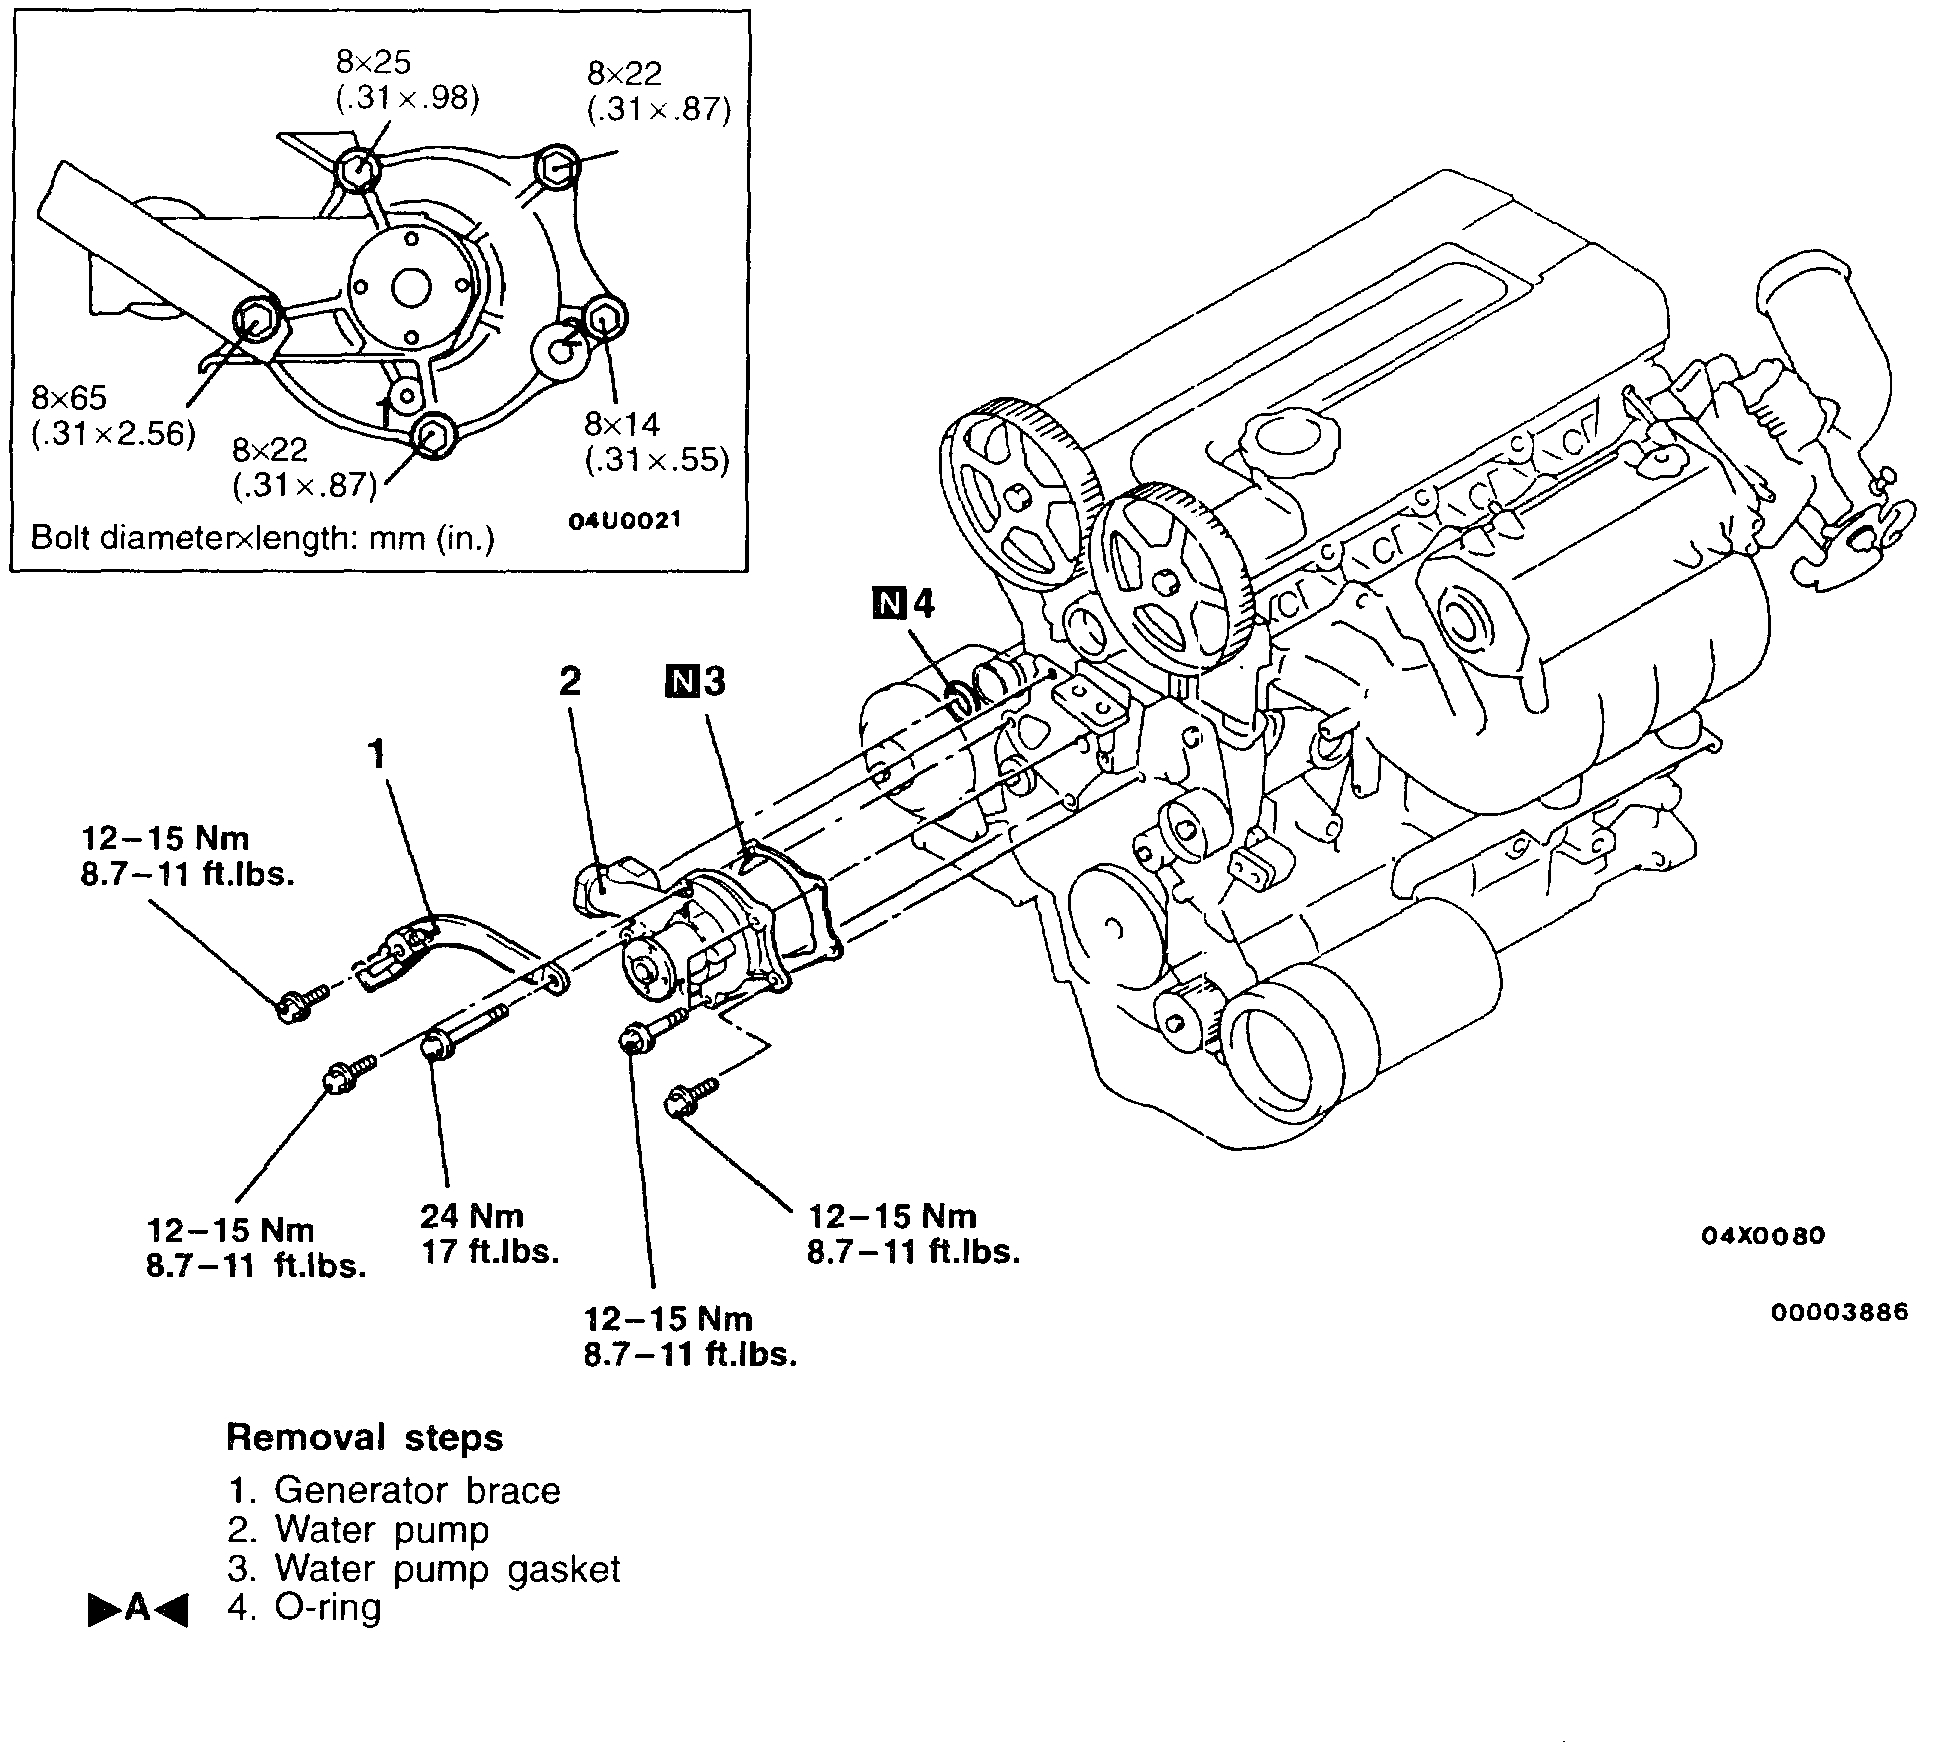
WATER PUMP
picture 1
Removal
Pre-removal Operation:
- Engine Coolant Draining and Supplying.
- Timing Belt Removal.
Follow removal steps outlined in illustration.
Installation
Installation in reverse order as removal.
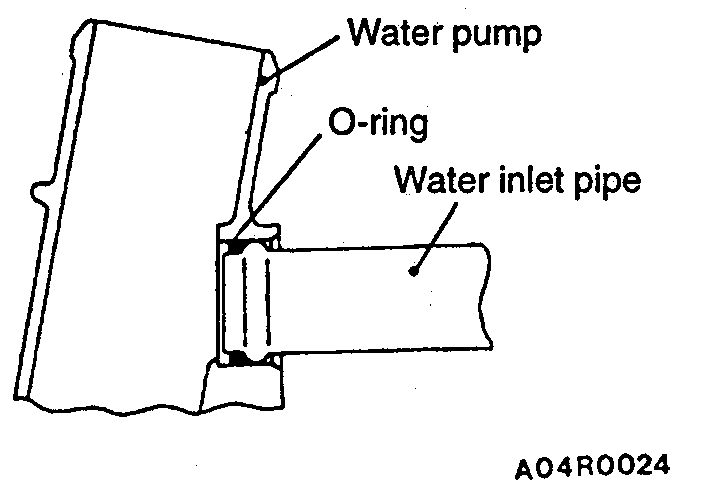
picture 2
]A[ O-Ring Installation.
Insert the O-ring to the water inlet pipe, and coat the outer circumference of the O-ring with water or engine coolant. By coating with water or engine coolant, the insertion to the water pump will become easier.
CAUTION:
1. Do not allow engine oil or other grease to adhere to the O-ring.
2. When inserting the pipe, check that there is no sand, dirt, etc, on its inner surface.
Post-installation Operation:
- Engine Coolant Draining and Supplying.
- Timing Belt Installation.
_________________________________________________
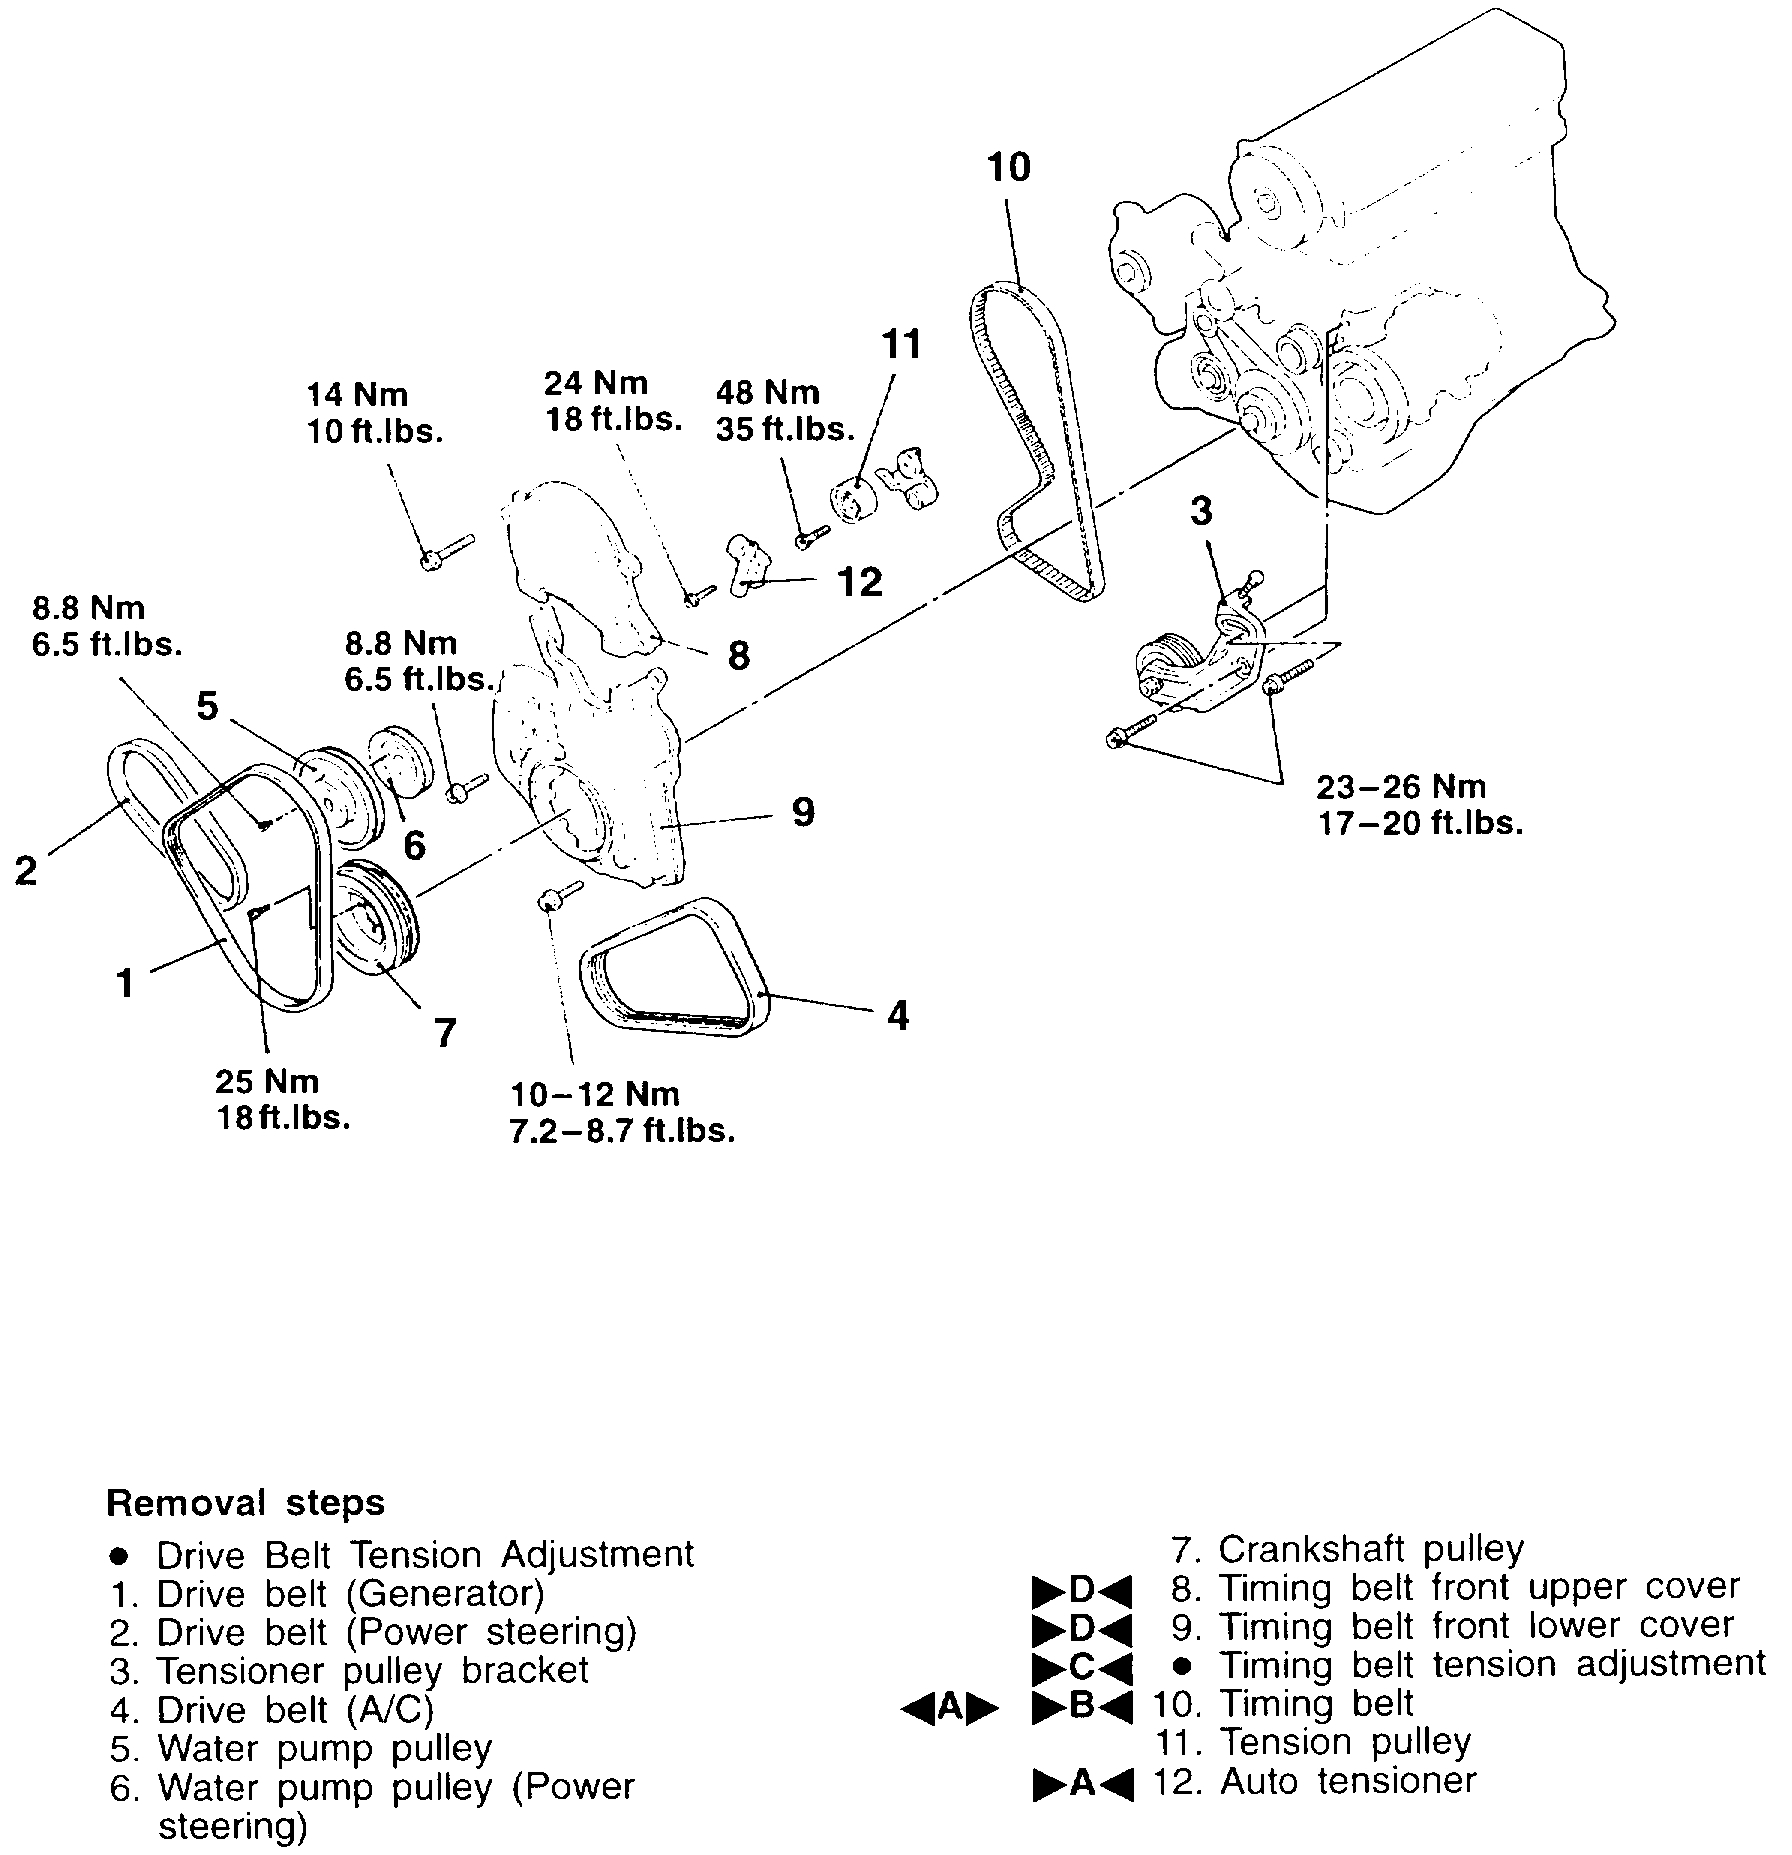
Here are the directions for the timing belt. If the belt is original, you may want to consider replacing it while things are apart.
Timing belt removal and installation
REMOVAL AND REPLACEMENT
TIMING BELT
picture 3
Removal
Pre-removal Operation:
- Under Cover Removal.
- Engine Mount Bracket Removal.
Follow removal steps outlined in illustration.
Removal Service Point
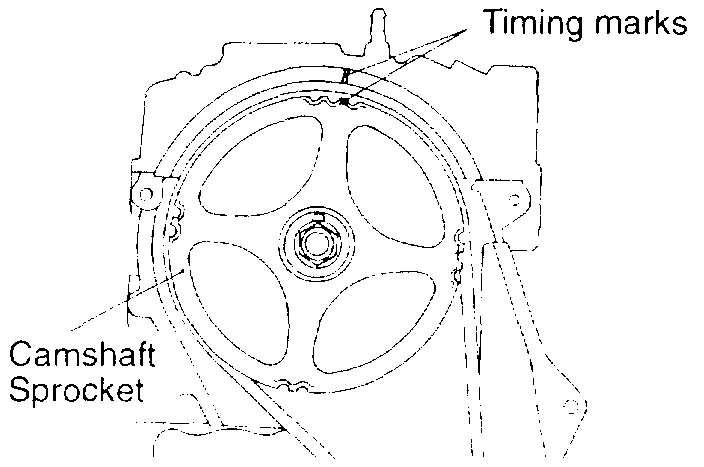
picture 4
[A] Timing Belt Removal.
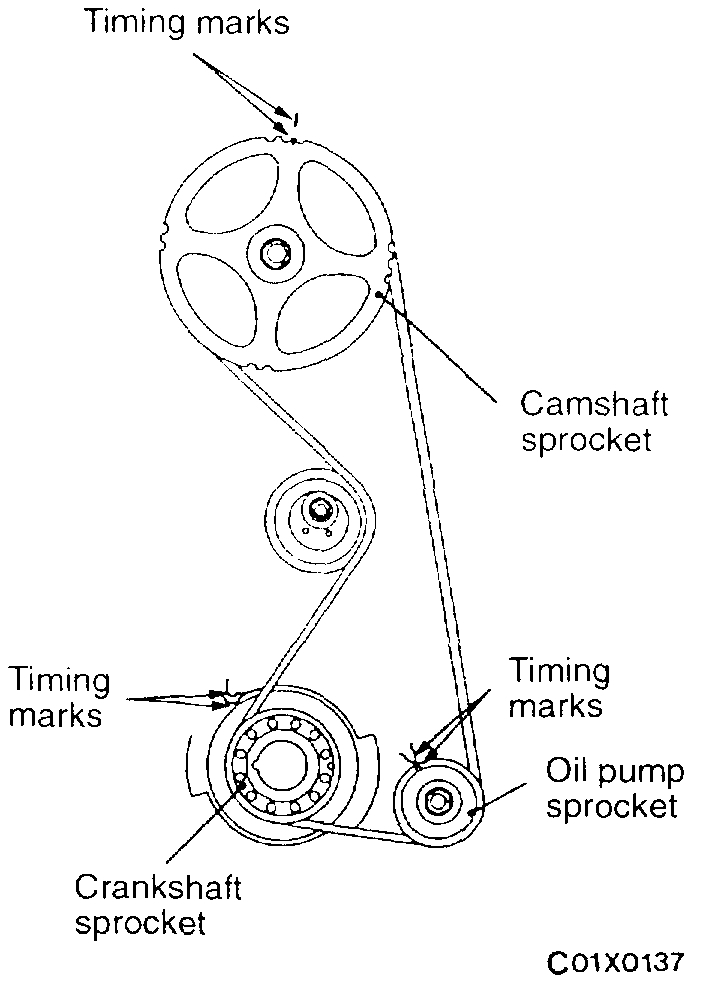
1. Turn the crankshaft in the forward direction (to the right) to align the camshaft sprocket timing marks.
CAUTION: Always turn the crankshaft in the forward direction only.
picture 5
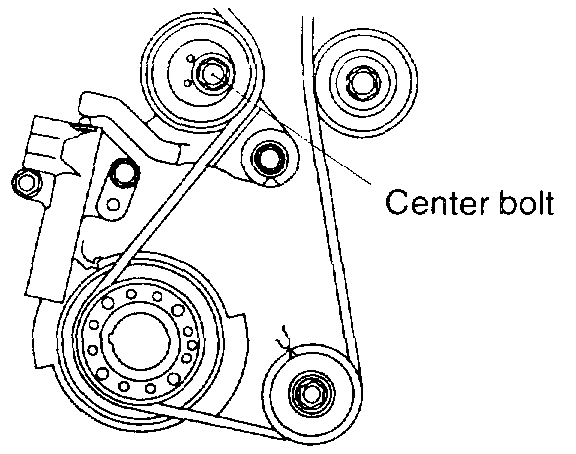
2. Loosen the tension pulley center bolt.
3. Move the tension pulley to the water pump side, and then remove the timing belt.
CAUTION: If the timing belt is to be re-used, use chalk to mark (on its flat side) an arrow indicating the clock-wise direction.
Installation
Installation in reverse order as removal.
Installation Service Points
picture 6
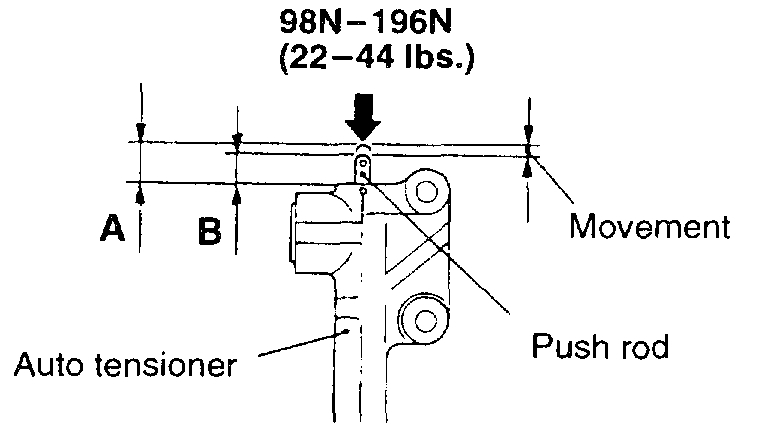
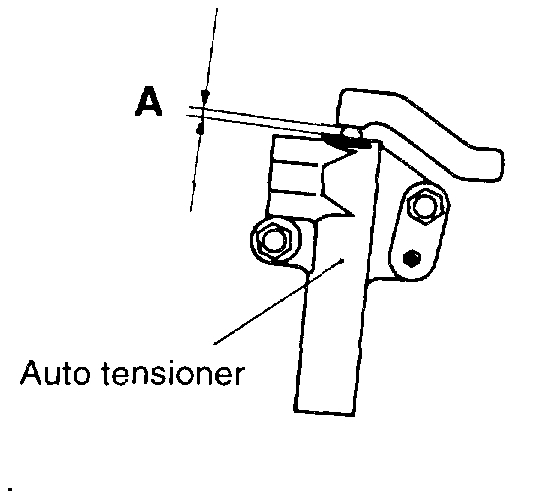
]A[ Auto Tensioner Installation.
1. Apply 98 - 196 N (22 - 44 lbs.) force to the push rod to the auto tensioner by pressing it against a metal (cylinder, block, etc.), and measure the movement of the push rod.
Standard value: Within 1 mm (0.04 inch)
A: Length when it is free (not pressed)
B: Length when it is pressed
A - B: Movement
picture 7
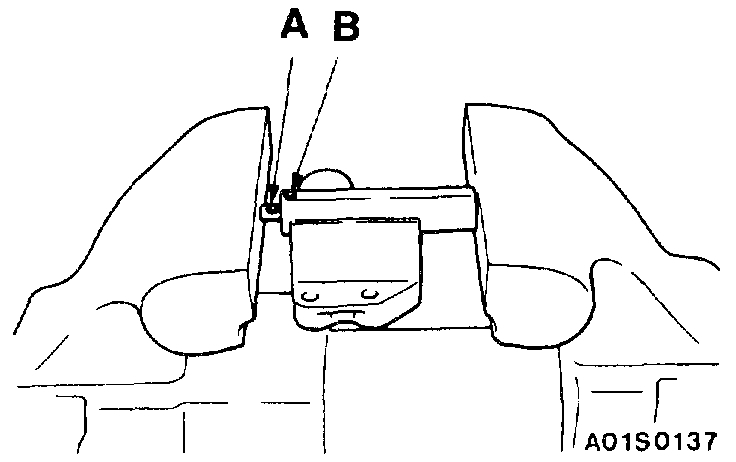
2. If it is out of the standard value, replace the auto tensioner.
3. Use a press or vise to gently compress the auto tensioner push rod until pin hole A of the push rod and pin hole B of the tensioner cylinder are aligned.
CAUTION: If the compression speed is too fast, the rod may become damaged, so be sure to carry out this operation slowly.
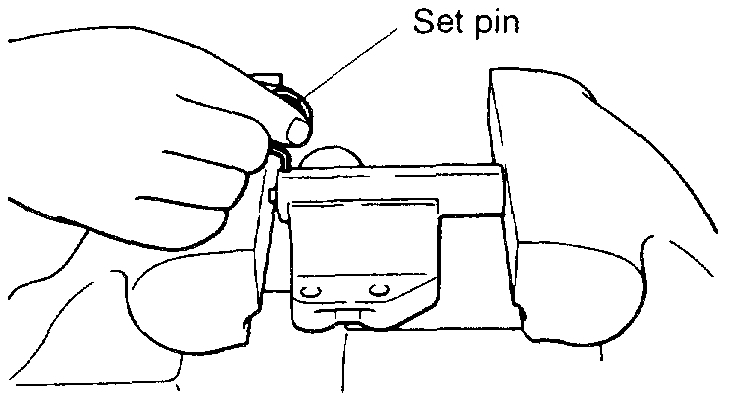
picture 8
4. Once the holes are aligned, insert the set pin.
NOTE: When replacing the auto tensioner with a new part, the pin will be in the auto tensioner.
5. Install the auto tensioner to the engine.
pic 9
]B[ Timing Belt Installation.
1. Align the timing marks on the camshaft sprocket, crankshaft sprocket and oil pump sprocket.
picture 10
picture 11
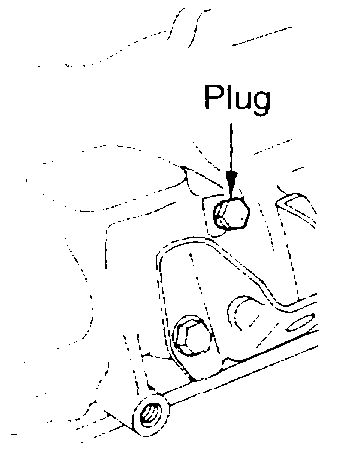
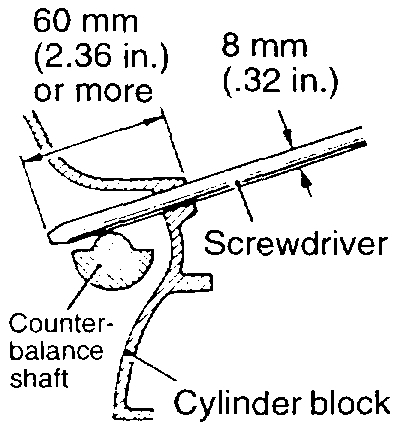
2. After aligning the timing mark on the oil pump sprocket, remove the cylinder block plug and insert a Phillips screwdriver with a diameter of 8 mm (0.32 inch) , and check to be sure that the screwdriver goes in 60 mm (2.36 inch) or more. If the screwdriver will only go in 20 - 25 mm (0.79 - 0.98 inch) before striking the counterbalance shaft, turn the sprocket once, realign the timing mark and check that the screwdriver goes in 60 mm (2.36 inch) or more. Do not take out the screwdriver until the timing belt is installed.
3. Install the timing belt so as not to be loosened among the sprockets, by the following procedure.
CAUTION: If the timing belt is to be reused, install it so that the mark indicates the clockwise direction.
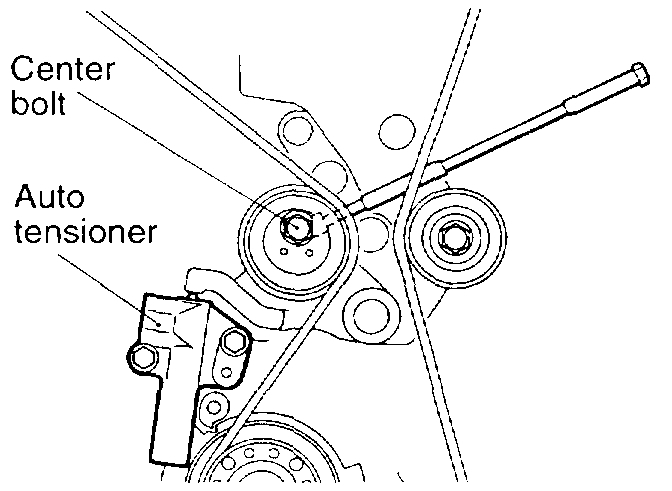
4. Set the tension pulley so that the pin holes are at the bottom, press the tension pulley lightly against the timing belt.
picture 12
5. Screw the tool into the engine left support bracket until its end makes contact with the tensioner arm. At that point, screw the tool in some more and then remove the set wire attached to the auto tensioner.
6. Remove the tool.
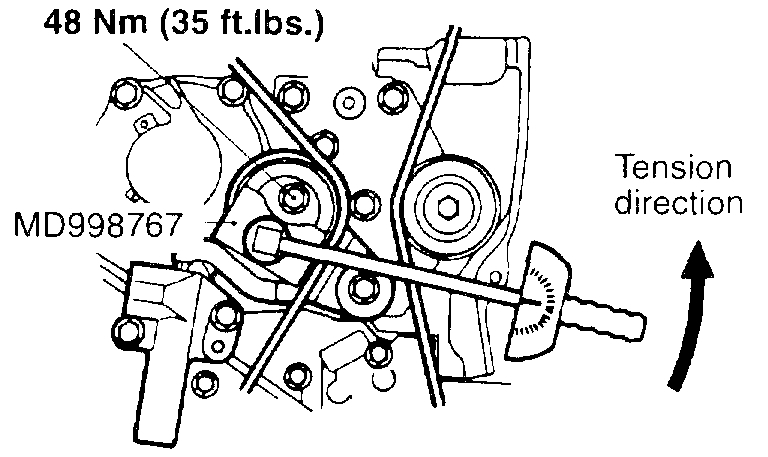
7. Tighten the center bolt to the specified torque.
Specified torque: 48 Nm (35 ft. lbs.)
picture13
]C[ Timing Belt Tension Adjustment.
1. After turning the crankshaft 1/4 of a revolution counterclockwise, turn it clockwise until the timing marks are aligned.
2. Loosen the tension pulley fixing bolt, and then use the special tool and a torque wrench to tighten the fixing bolt to the specified torque while applying tension to the timing belt.
Standard value:
3.5 Nm (2.6 ft. lbs.)
[Timing belt tension torque]
CAUTION: When tightening the fixing bolt, do not let the tension pulley turn with the bolt.
picture 14
3. Turn the crankshaft two revolutions clockwise so that the timing marks are aligned. After leaving it for 15 minutes, measure the amount of protrusion of the auto tensioner.
Standard value (A): 3.8 - 4.5 mm (0.150 - 0.177 inch)
4. If the amount of protrusion is outside the standard value, repeat the operation in steps (1) to (3).
5. Check again that the timing marks of each sprocket are aligned.
picture 15
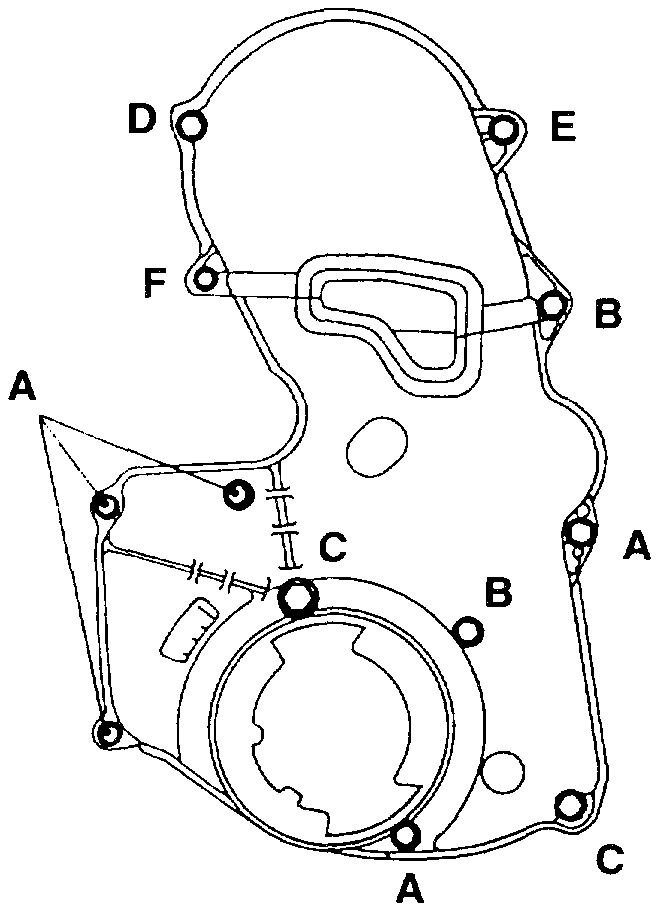
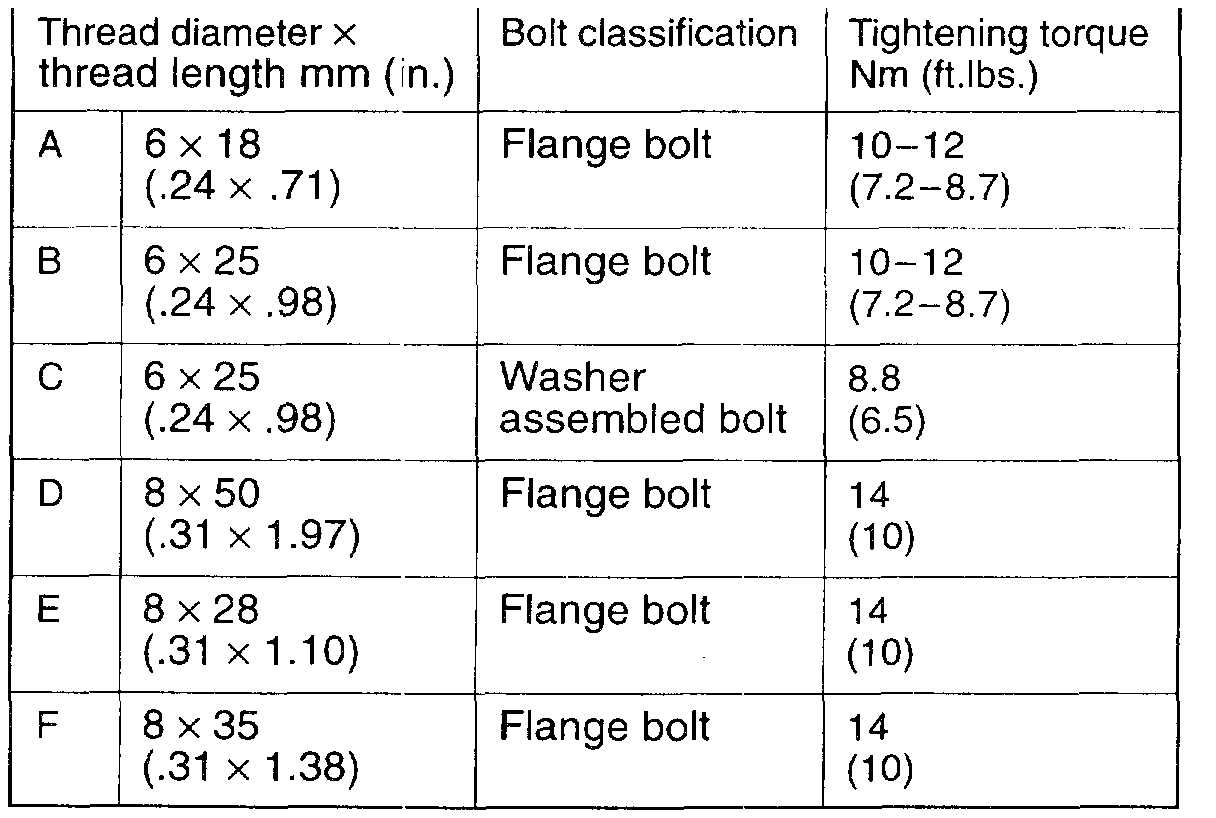
]D[ Timing Belt Front Lower Cover/timing Belt Front Upper Cover Installation.
picture 16
Install the bolts, being careful not to mistake the bolt sizes.
Post-installation Operation:
- Under Cover Installation.
- Engine Adjustment.
- Engine Mount Bracket Installation.
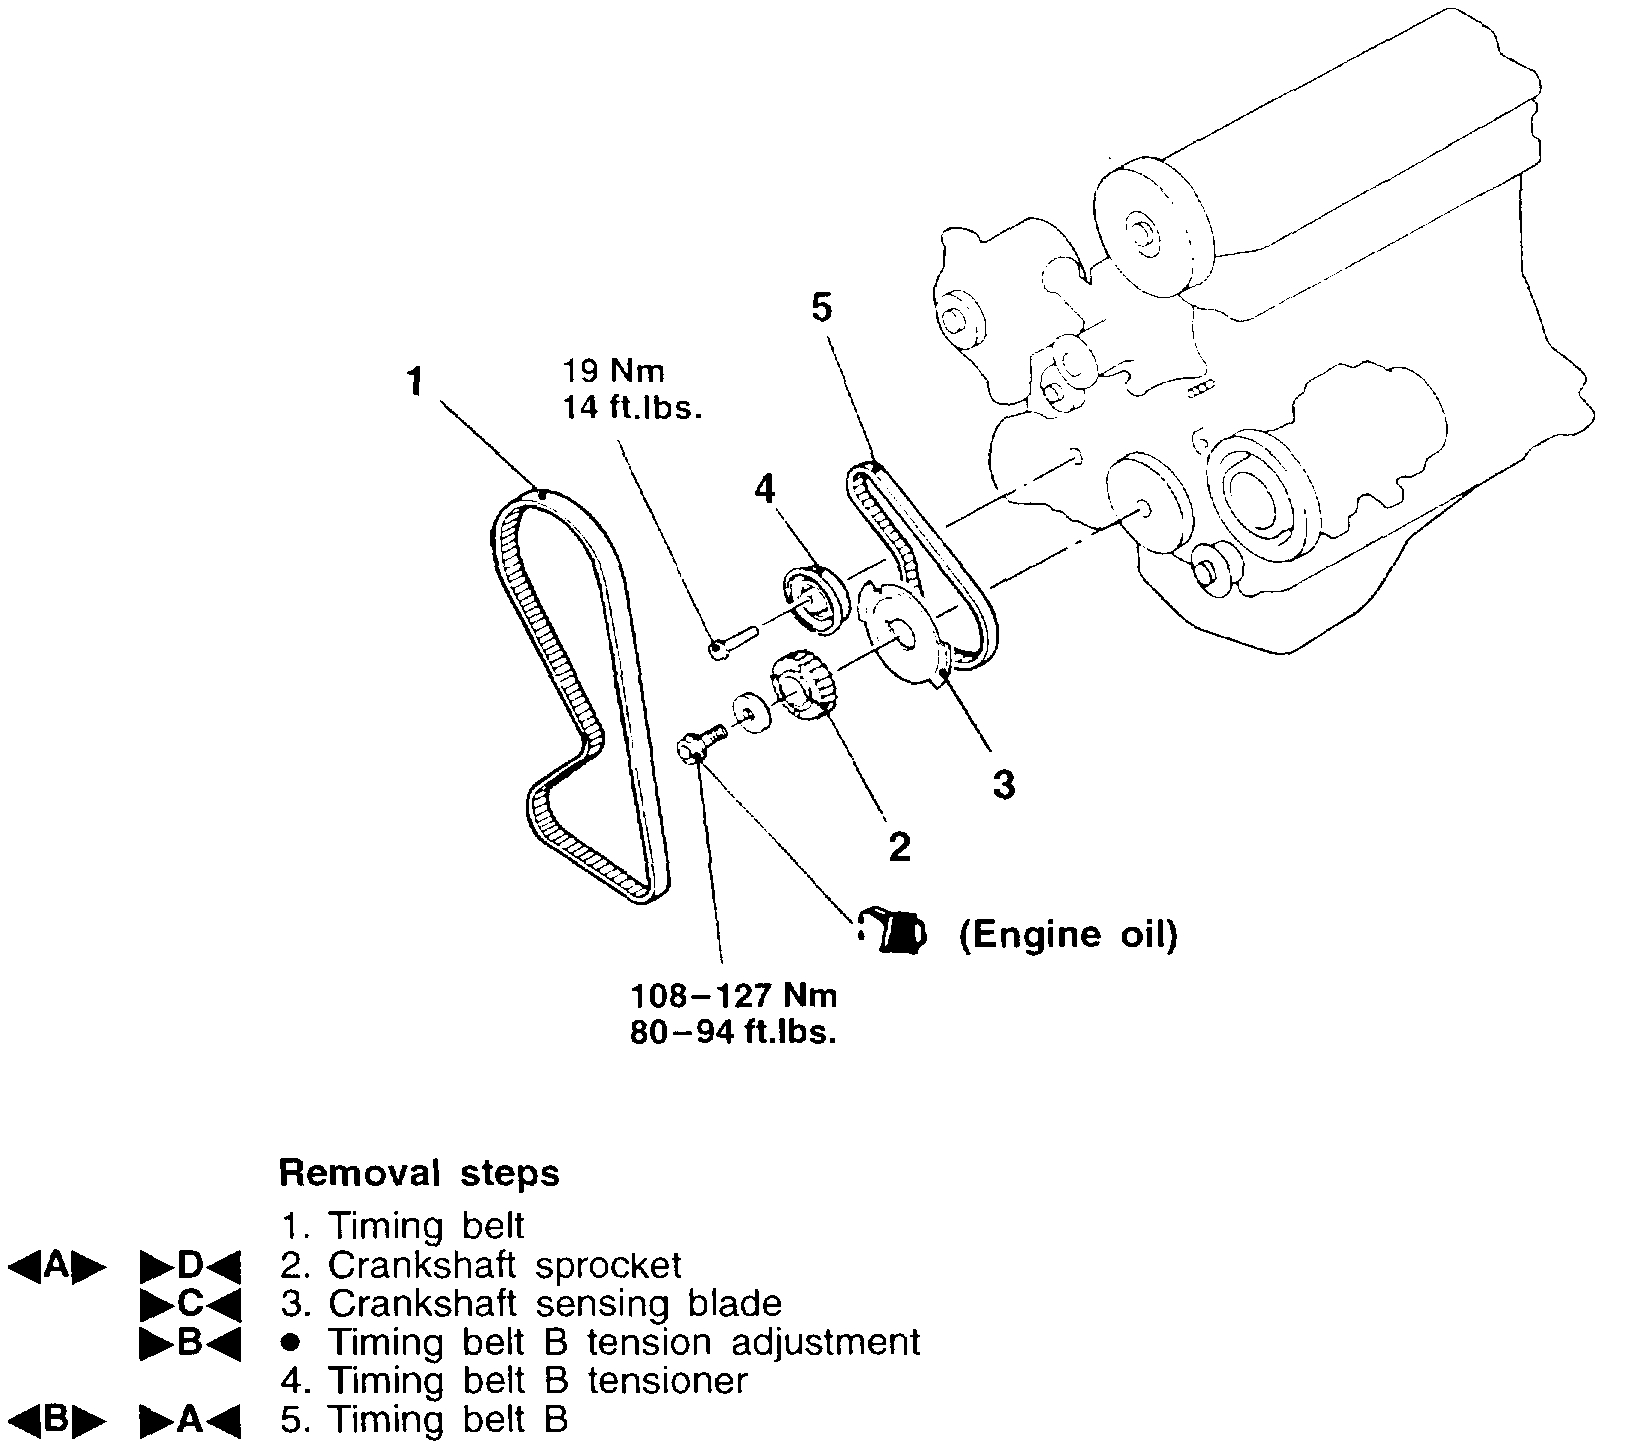
TIMING BELT B
picture 17
Removal
Follow removal steps outlined in illustration.
Removal Service Points
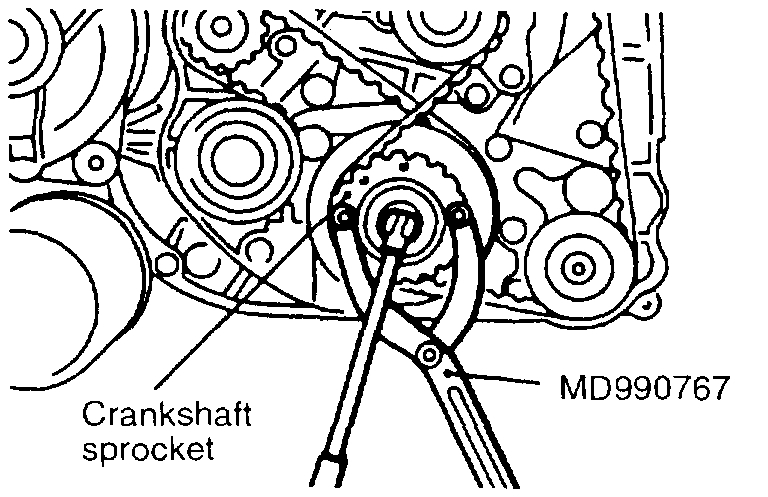
picture 18
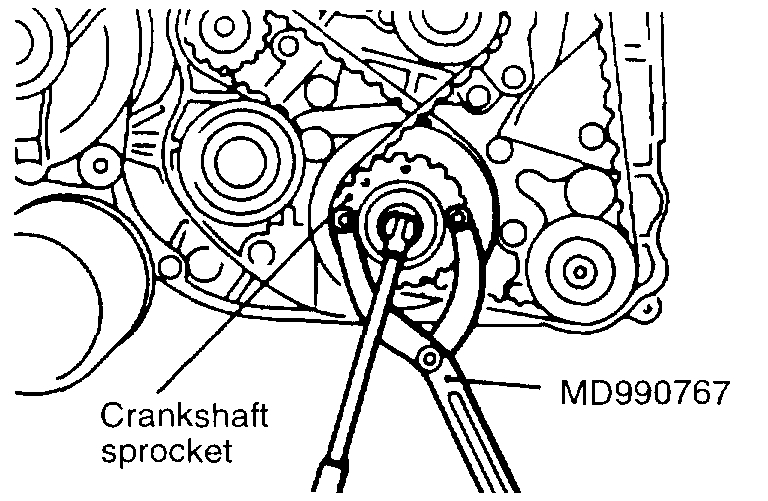
[A] Crankshaft Sprocket Removal.
1. Use the special tool to remove the bolt.
picture 19
2. Use the special tool to remove the crankshaft sprocket.
[B] Timing Belt B Removal.
CAUTION: If timing belt "B" is to be re-used, use chalk to mark it with an arrow on its flat side indicating the turning direction (to the right).
Installation
Installation in reverse order as removal.
Installation Service Points
picture 20
]A[ Timing Belt B Installation.
Install timing belt "B" by the following procedure.
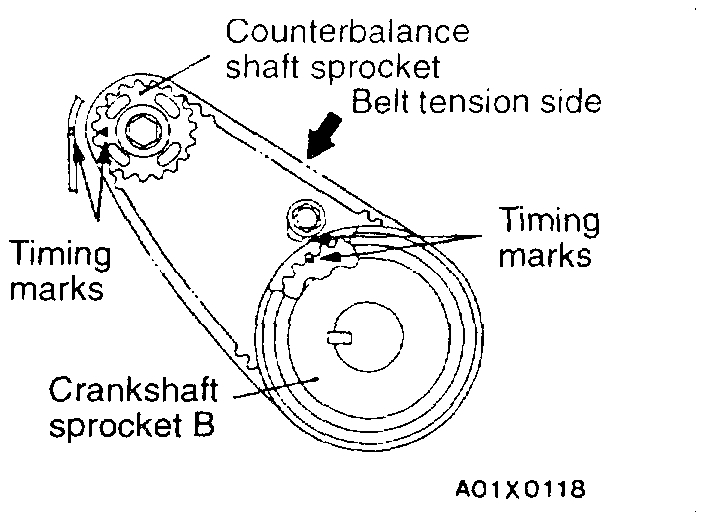
1. Ensure that crankshaft sprocket SIB" timing mark and the counterbalance shaft sprocket timing mark are aligned.
2. Fit timing belt "B" over crankshaft sprocket "B" and the silent shaft sprocket. Ensure that there is no slack in the belt.
pic 21
]B[ Timing Belt B Tension Adjustment.
Adjust the tension of timing belt "B" by the following procedure.
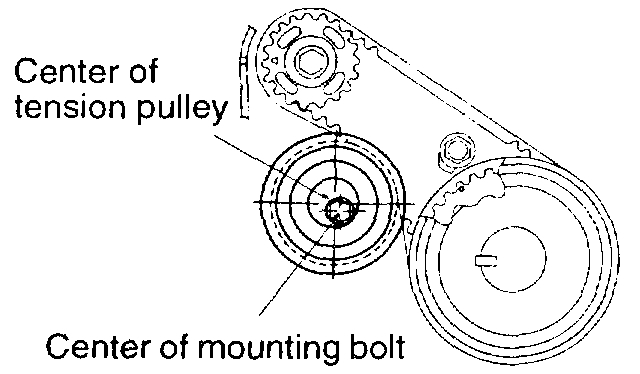
1. Temporarily fix the timing belt "B" tensioner such that the center of the tensioner pulley is to the left and above the center of the installation bolt, and temporarily attach the tensioner pulley so that the flange is toward the front of the engine.
picture 22
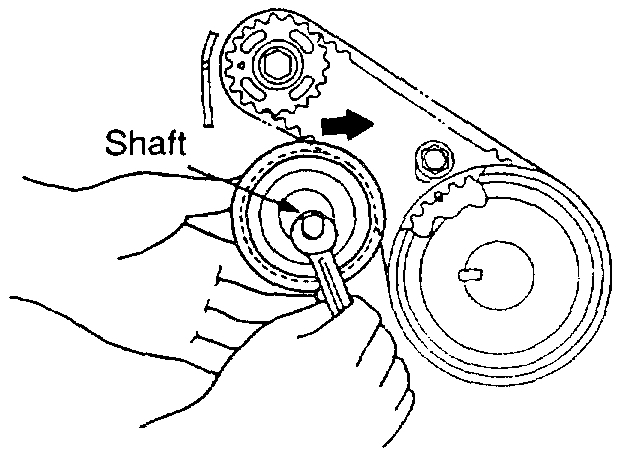
2. Holding the timing belt "B" tensioner up with your finger in the direction of the arrow, place pressure on the timing belt so that the tension side of the belt is taut. Now tighten the bolt to fix the tensioner.
CAUTION: When tightening the bolt, ensure that the tensioner pulley shaft does not rotate with the bolt. Allowing it to rotate with the bolt can cause excessive tension on the belt.
picture 23
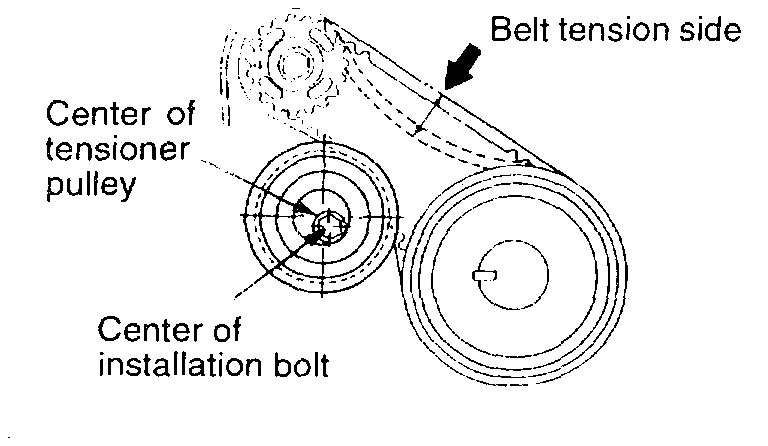
3. Press the belt at the shown point by a finger to check belt tension. If not, adjust.
Standard value: 5 - 7 mm (0.20 - 0.28 inch)
picture 24
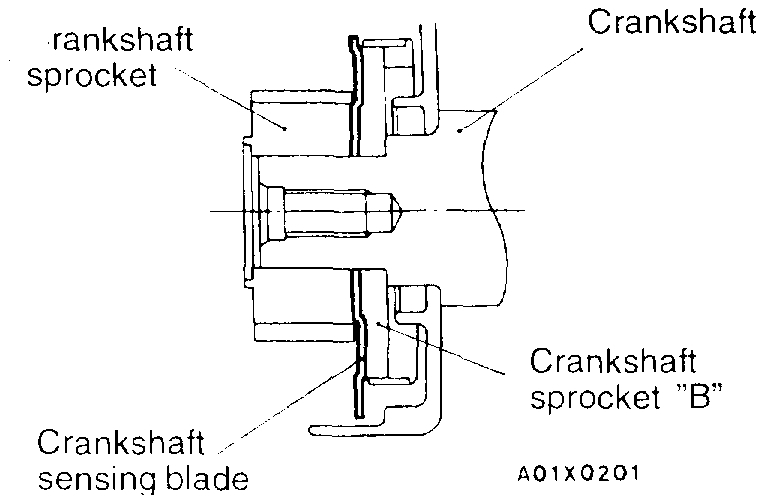
]C[ Crankshaft Sensing Blade Installation.
When installing, make sure the direction is correct.
picture 25
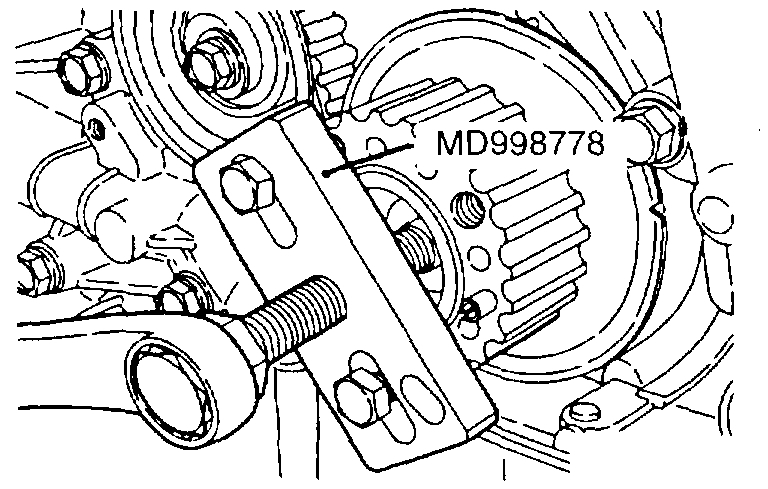
]D[ Crankshaft Sprocket Installation.
Use the special tool to install the crankshaft sprocket and bolt.
NOTE: Apply the minimum amount of engine oil to the bearing surface and thread of the crankshaft bolt.
______________________________________
Let me know if this is what you needed or if you have other questions.
Take care,
Joe
Images (Click to enlarge)
Apr 16, 2019 at 9:25 AM