REMOVAL:
Be sure the engine is cold to avoid warping the cylinder head (wait until the coolant temperature drops below 100 °F (38 °C) before loosening the retaining bolts). Disconnect the negative battery cable. Drain the cooling system and relieve the system fuel pressure.
Remove the brake booster vacuum hose from the brake master cylinder power booster. Remove the engine secondary ground cable from the valve cover.
Remove the air intake hose and the air chamber. Relieve the fuel pressure. Disconnect the fuel feed hose and evaporative emission control canister (EVAP control) hose from the intake manifold.
Remove the throttle cable at the throttle body (A/T only).
Do not bend the throttle cable when removing it. If it gets kinked, replace with a new one.
Remove the fuel return hose and brake booster vacuum hose.
Disconnect the charcoal canister hose at the throttle valve.
Disconnect the following engine wire connectors from the cylinder head and the intake manifold:
Four injector connectors
Intake air temperature (IAT) sensor connector
Throttle position sensor connector
Manifold absolute pressure (MAP) sensor connector
Ground terminal (at thermostat cover)
Heated oxygen sensor (HO2s) connector
Engine coolant temperature (ECT) sensor connector
ECT switch connector
ECT gauge sending unit connector
VTEC solenoid valve connector (D16Z6, D15Z1 engines)
VTEC pressure switch connector (D16Z6, D15Z1 engines)
Exhaust gas recirculation (EGR) valve lift sensor connector (D15Z1 engine)
TDC/CKP/CYP sensor connector
Remove and tag the spark plug wires and remove the distributor assembly. Remove the engine ground cable on the cylinder head cover.
Remove the power steering (P/S) belt and pump but do not disconect the P/S hose. Remove the P/S bracket.
Remove the emission vacuum hoses and water bypass hoses from the intake manifold assembly.
Remove the upper radiator hose and heater hose from the cylinder head and the water bypass hose from the thermostat housing.
Remove the intake manifold bracket.
Remove self-locking nuts and disconnect the the exhaust manifold bracket, then remove exhaust pipe A (formerly known as the "header pipe"). Then remove the exhaust manifold bracket.
Remove the PCV hose, remove the cylinder head cover, then remove the upper cover.
Loosen the adjusting bolt 1/2 turn.
Push the tensioner to release tension from the timing belt, then re-tighten the adjusting bolt.
Remove the timing belt.
Do not crimp or bend the timing belt more than 90 degrees or smaller than 1 inch (25mm) in diameter.
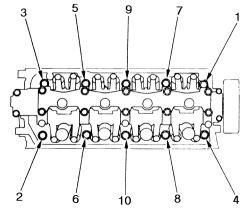
Remove the cylinder head bolts in sequence as shown in accompanying drawing. Once the bolts are all removed, gently pry the cylinder head with a suitable tool and remove it along with the intake manifold from the engine. Remove the intake manifold from the cylinder head.
INSTALLATION:
Scrape any remaining gasket material from the mating surfaces and install a new head gasket. Be sure to pay attention to the following points:
The No. 1 cylinder must be at top dead center with the camshaft pulley UP mark (if applicable, see further along in this section for timing belt replacement) on top before positioning the head in place.
Make sure the oil control orifice is not clogged (D15B7, D15B8 engines).
Install the intake manifold using a new gasket and clean or new hardware and tighten the nuts in a crisscross pattern in two or three steps beginning with the inner nuts. Final tightening should be to 17 ft. lbs. (23 Nm).
Install the exhaust manifold using a new gasket and clean or new hardware and tighten the nuts in a crisscross pattern in two or three steps beginning with the inner nuts. Final tightening should be to 16 ft. lbs. (22 Nm).
Install the three-way catalytic converter using all new hardware and gaskets on the exhaust manifold, then install the exhaust manifold assembly
Install two dowel pins, a new head gasket and the cylinder head using clean or new oil-dipped bolts. Do not tighten fully yet.
Install the bolts that secure the intake manifold to its bracket, but do not tighten yet.
Now tighten the cylinder head bolts in the proper sequence in two steps:
1st step: initially tighten to 22 ft. lbs. (30 Nm)
2nd step for D16Z6,D15Z1 engines: fully tighten to 53 ft. lbs (73 Nm), or
2nd step for D15B7, D15B8 engines: fully tighten to 47 ft. lbs. (65 Nm)
Install exhaust pipe A on the exhaust manifold.
Tighten the bolts for the intake manifold bracket and install exhaust pipe A on its bracket.
Replace the power steering (P/S) bracket and P/S pump tightening the bracket bolts to 33 ft. lbs. (45 Nm).
Reconnect all hoses, tubes and wire connectors as they were before removal.
If you took photographs before starting, now compare the instalation with the "before" pictures; correct any unintended discrepancies.
Install the timing belt.
Apply liquid gasket to the head mating surface of the No. 1 and No. 5 or No. 6 camshaft holders, then install the cylinder head cover and the spark plug wires.
Reconnect battery negative terminal and enter the 5-digit security code to re-activate the original radio (if so equipped).
Thanks for using 2CarPros.com!
Tuesday, April 14th, 2009 AT 12:47 PM