Hi and thanks for using 2CarPros.
Here are the directions. They are extensive. You will need to remove the timing belt in addition to the cylinder heads. The first set of directions are for cylinder head removal.
Cylinder Head Removal
Vehicle Engine, Cooling and Exhaust Engine Cylinder Head Assembly Service and Repair Procedures Cylinder Head Removal
CYLINDER HEAD REMOVAL
Cylinder Head Removal
NOTE:
Use fender covers to avoid damaging painted surfaces.
To avoid damage, unplug the wiring connectors carefully while holding the connector portion.
To avoid damaging the cylinder head, wait until the engine coolant temperature drops below 100°F (38°C) before loosening the cylinder head bolts.
Mark all wiring and hoses to avoid misconnection. Also, be sure that they do not contact other wiring or hoses, or interfere with other parts.
1. Make sure you have the anti-theft code for the radio, then write down the frequencies for the radio's preset buttons.
2. Disconnect the negative cable from the battery.
3. Drain the engine coolant.
4. Remove the alternator belt.
See picture 1
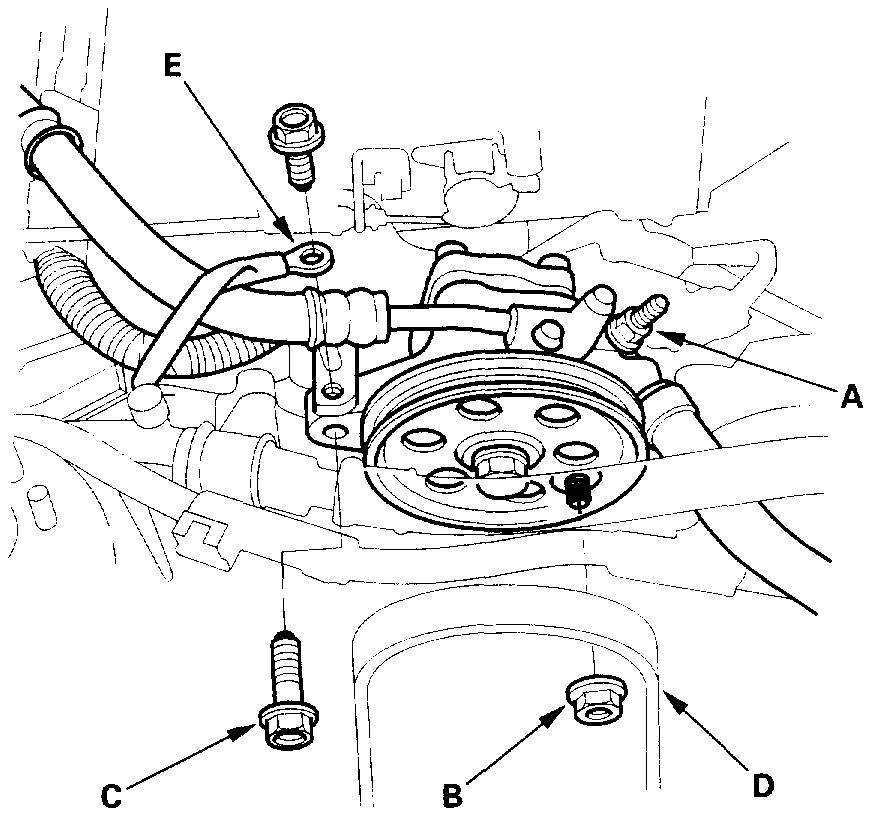
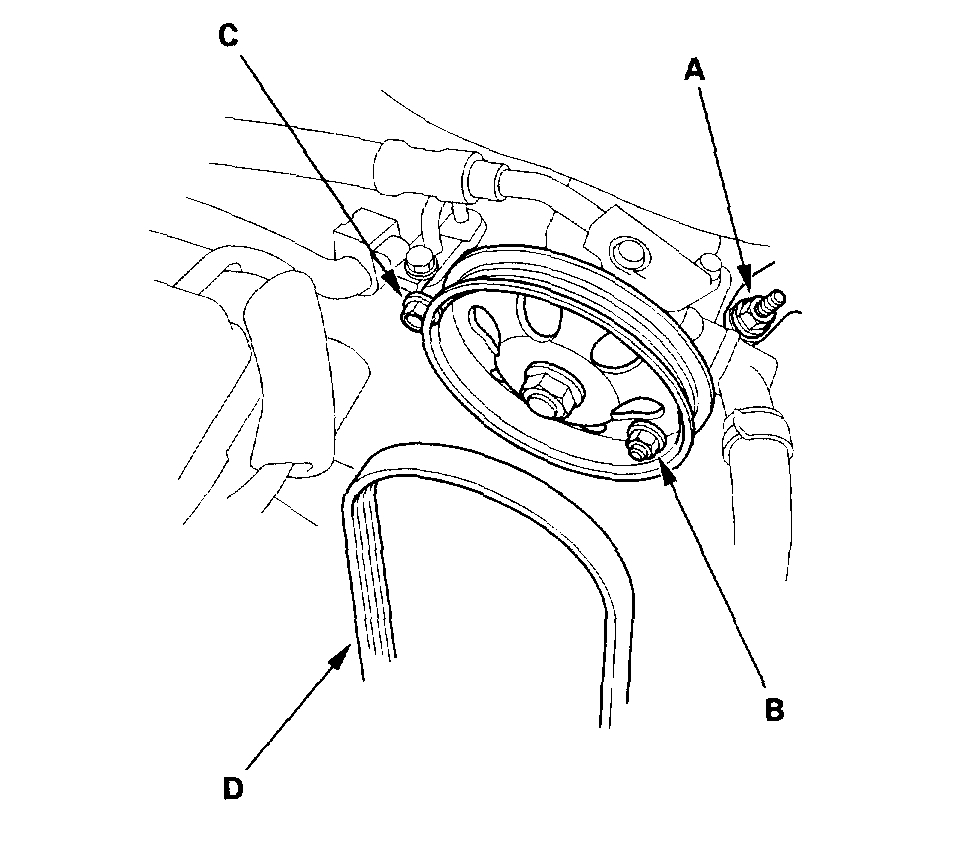
5. Loosen the adjusting nut (A), and remove the locknut (B) and mounting bolt (C), then remove the Power Steering (P/S) pump belt (D) and pump without disconnecting the P/S hoses.
6. Remove the ground cable (E) ('00-03 models).
7. Remove the alternator.
8. Relieve fuel pressure.
See picture 2
See picture 3
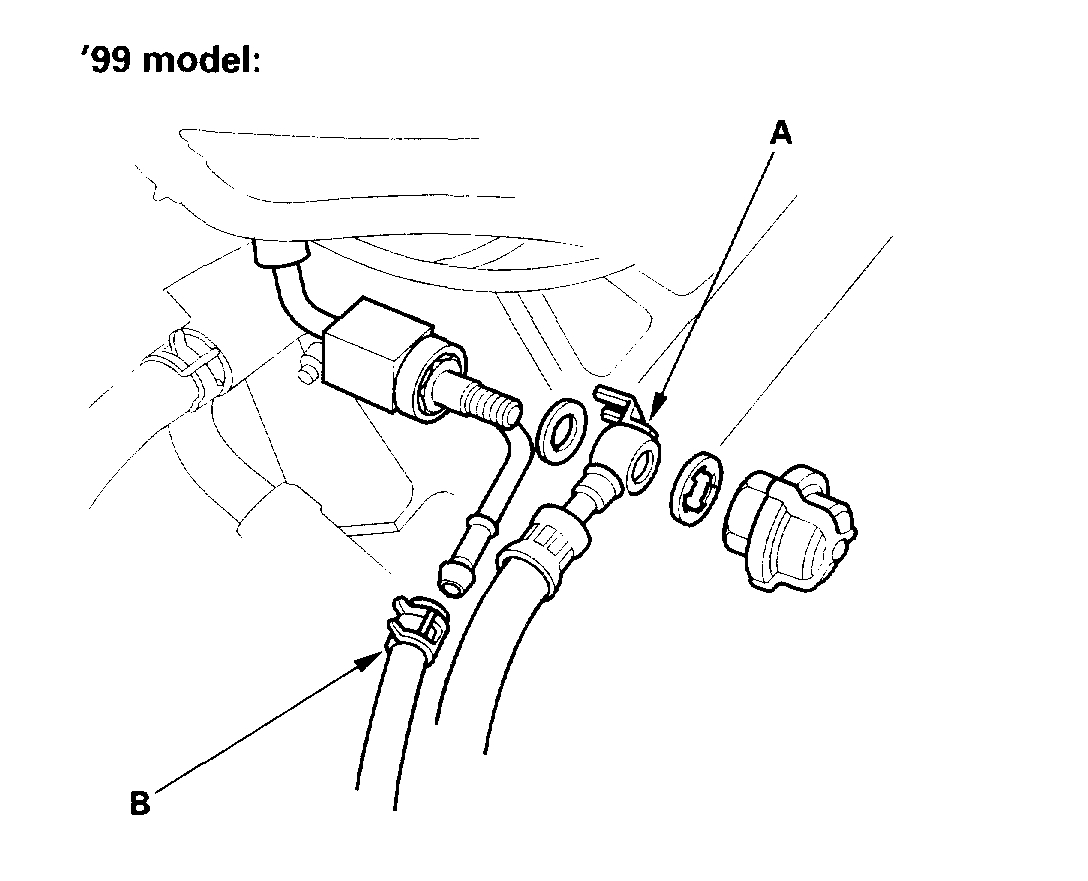
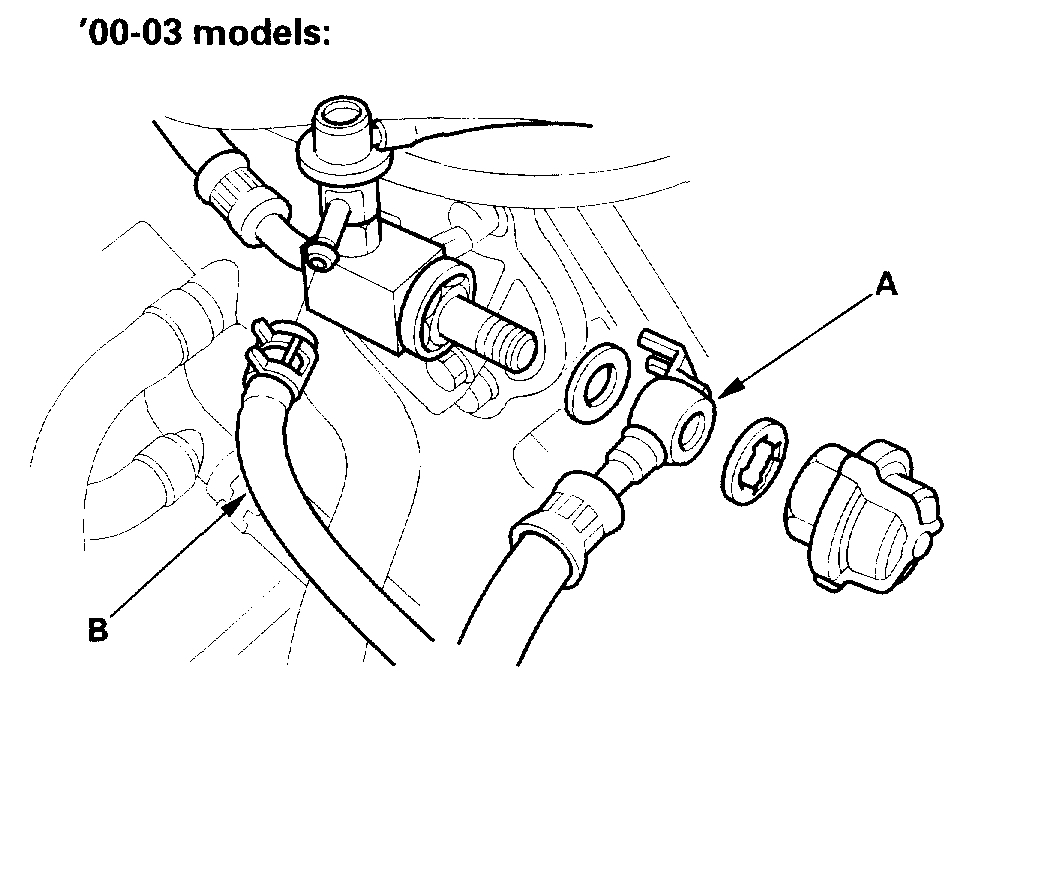
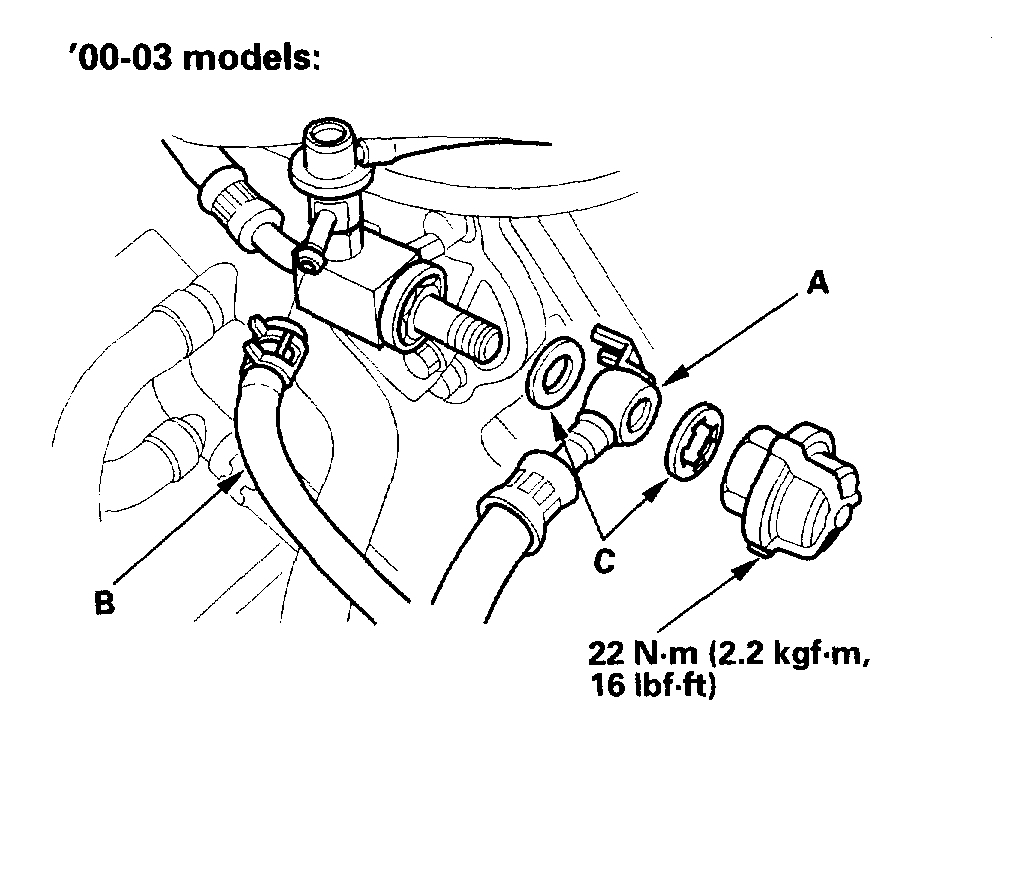
9. Remove the fuel feed hose (A) and fuel return hose (B).
10. Remove the intake manifold.
11. Remove the timing belt.
12. Remove the engine wire harness connectors and wire harness clamps from the cylinder head.
Six injector connectors
Engine Coolant Temperature (ECT) sensor connector
Radiator fan switch A connector
Radiator fan switch B connector Coolant temperature gauge sending unit connector ('99 model) Crankshaft Position (CKP) sensor connector Camshaft Position (CMP) (Top Dead Center (TDC)) sensor connector Exhaust Gas Recirculation (EGR) valve connector
VTEC solenoid valve connector VTEC oil pressure switch connector Oil pressure switch connector
See picture 4
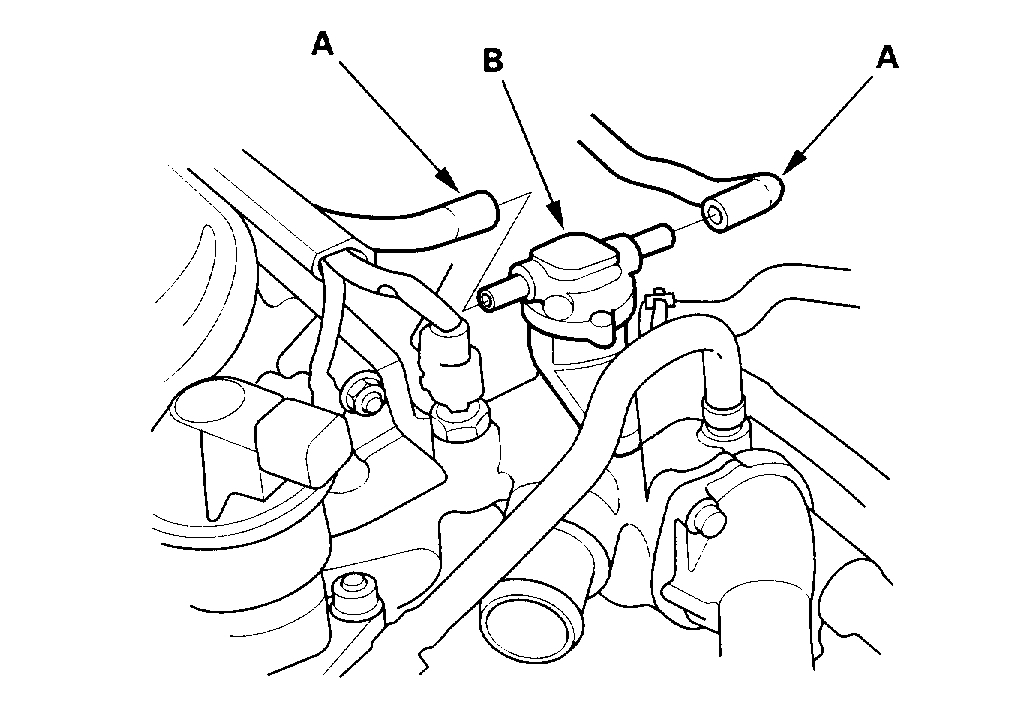
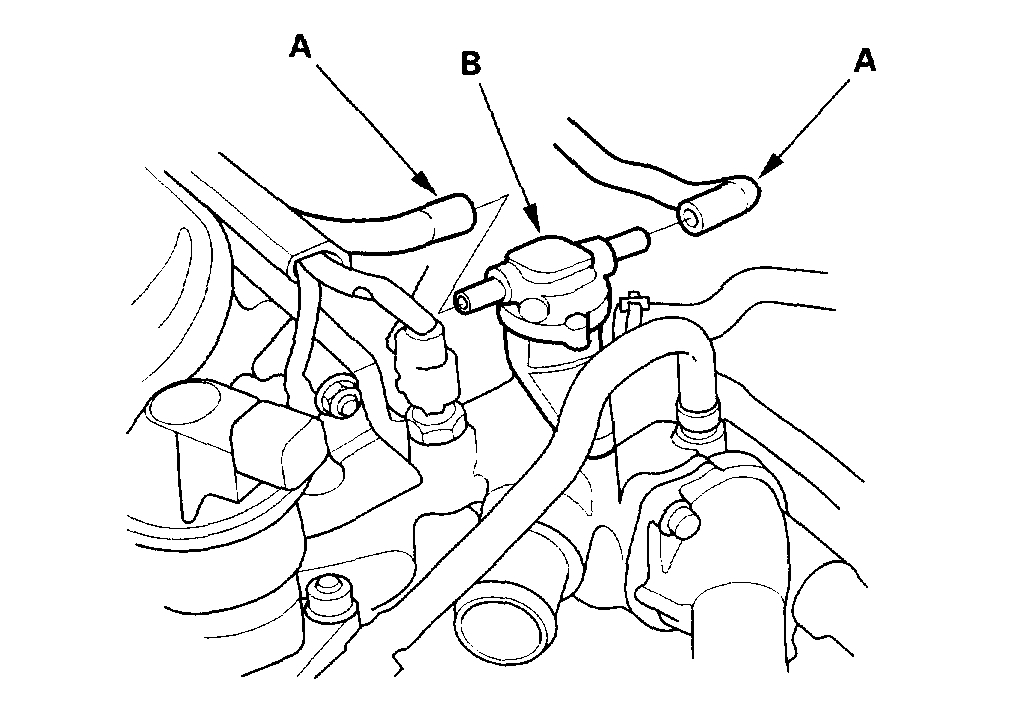
13. Remove the vacuum hoses (A) from the intake air bypass control valve (B).
See picture 5
See picture 6
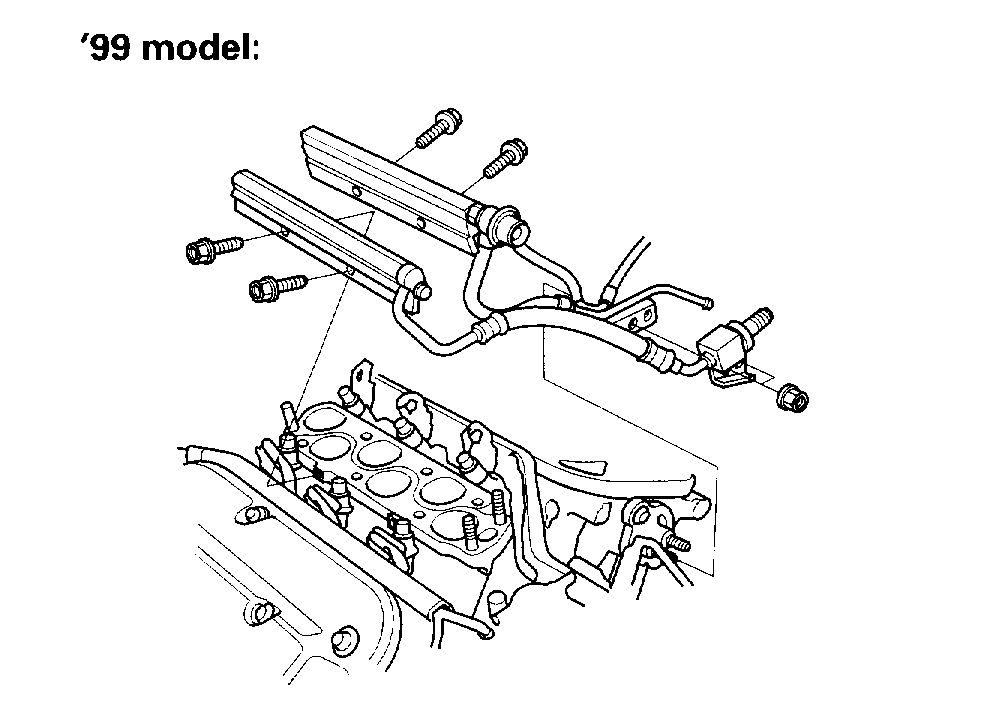
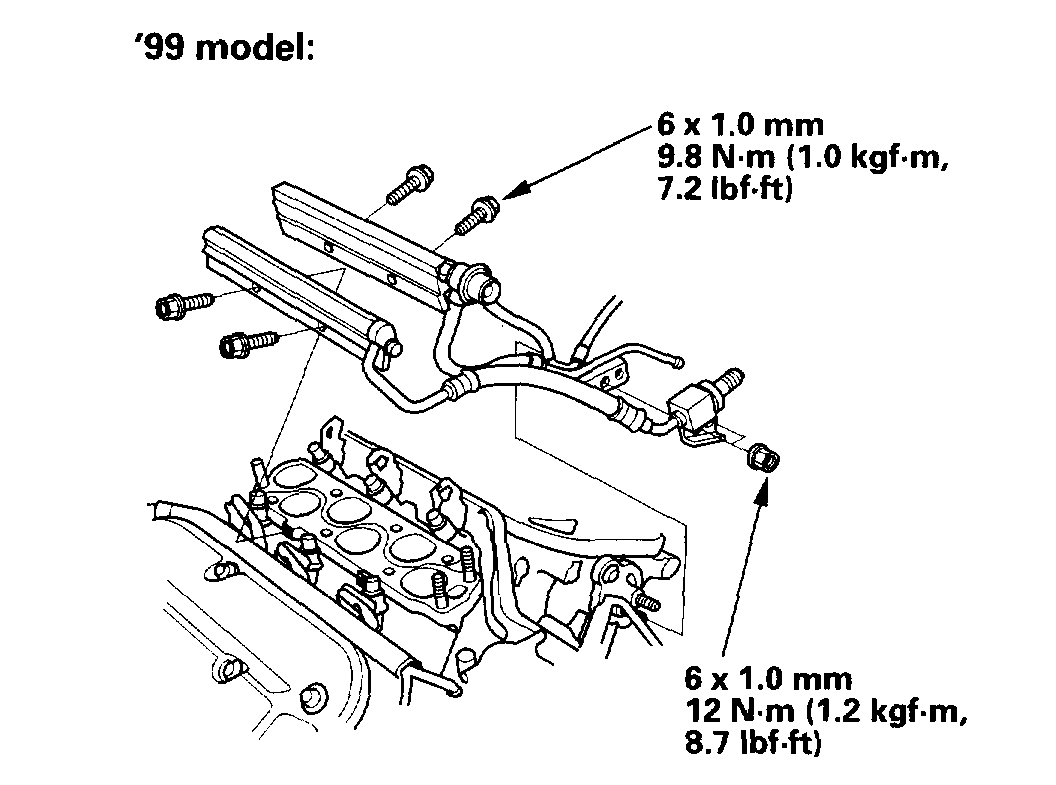
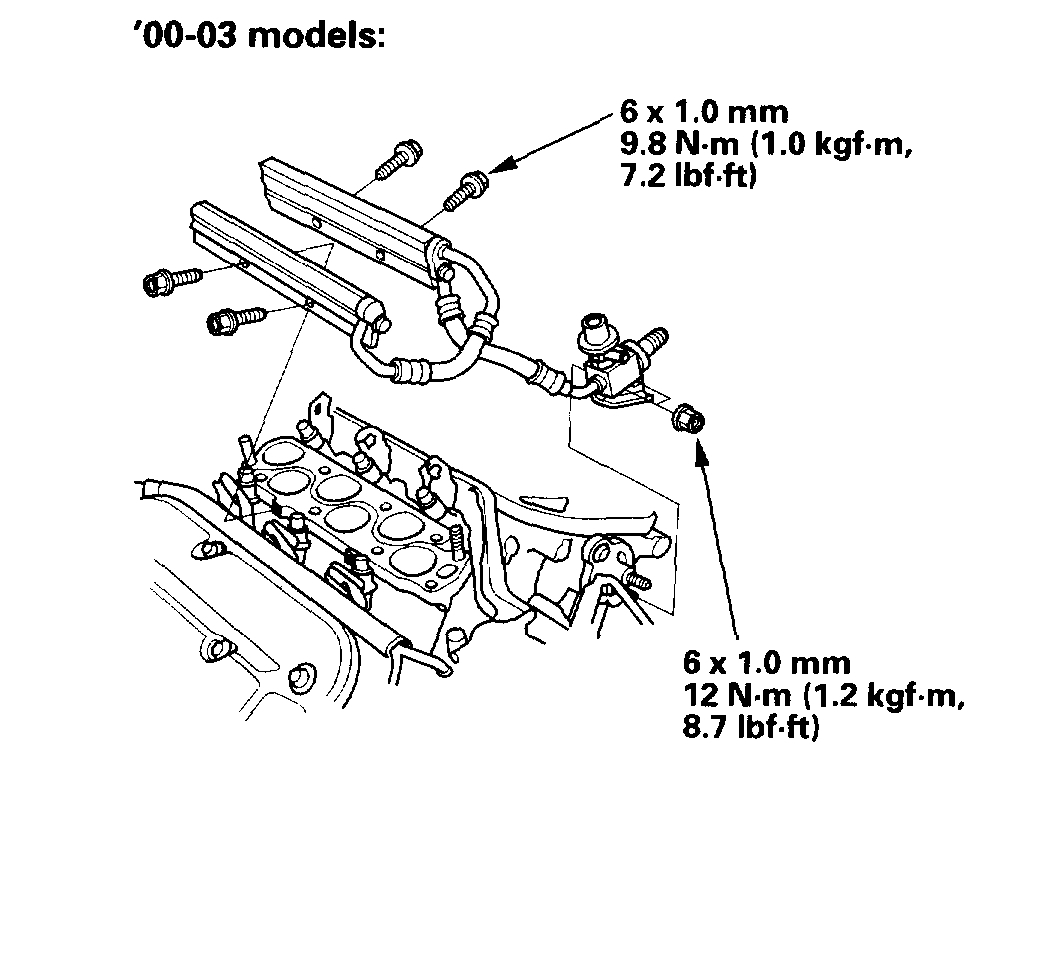
14. Remove the fuel rails.
See picture 7
See picture 8
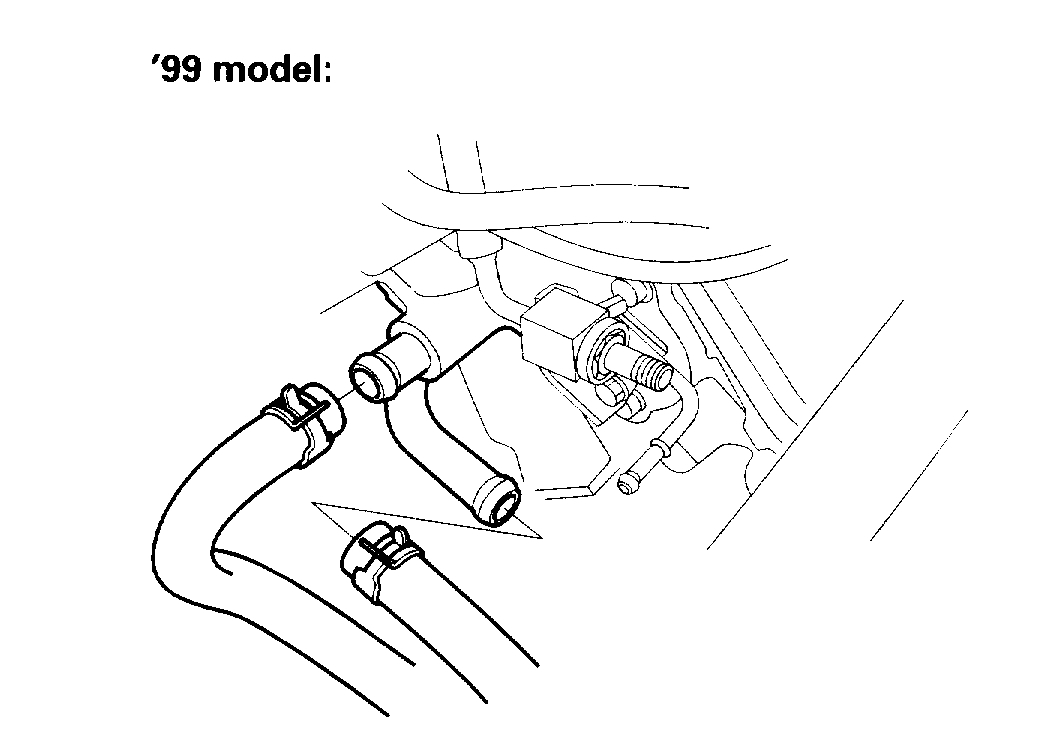
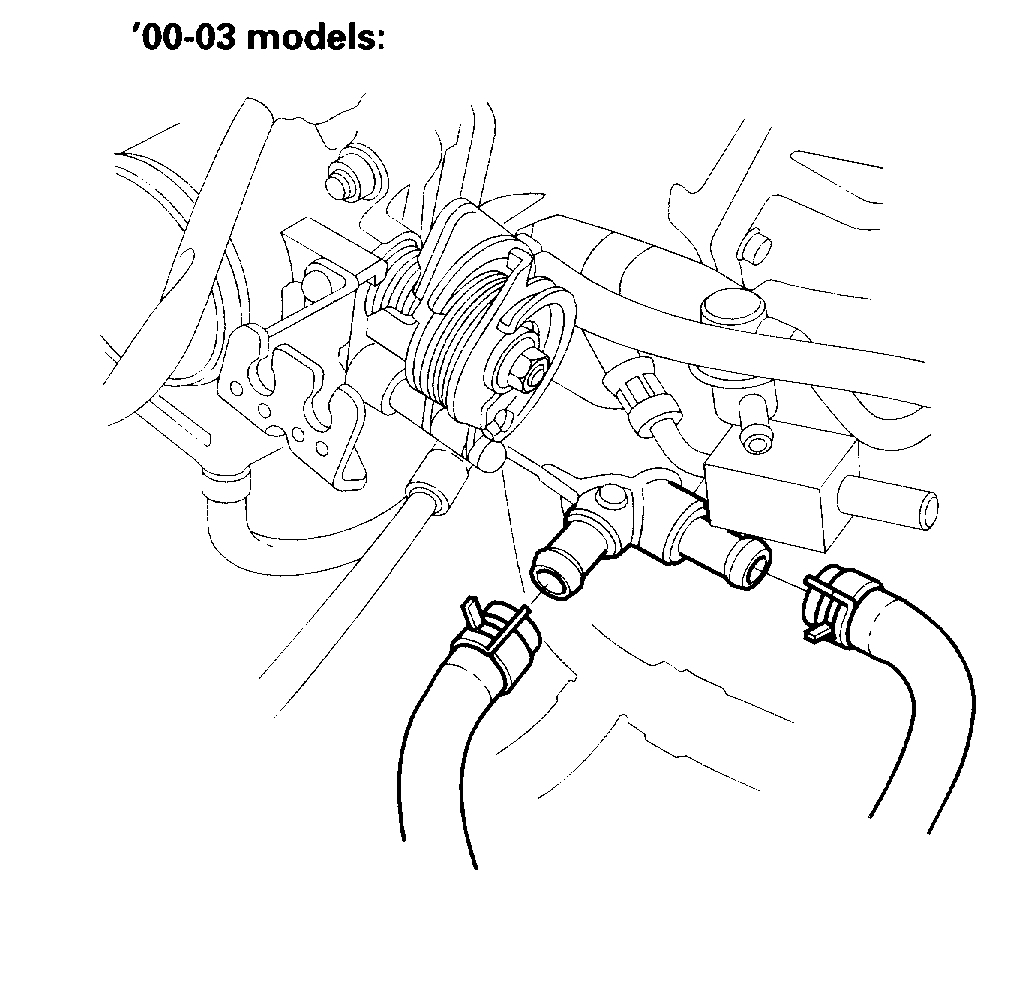
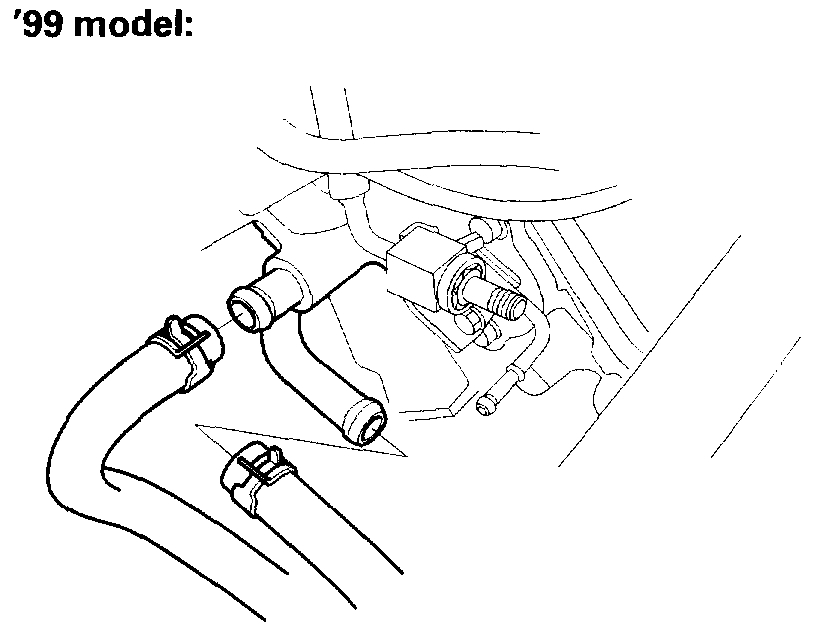
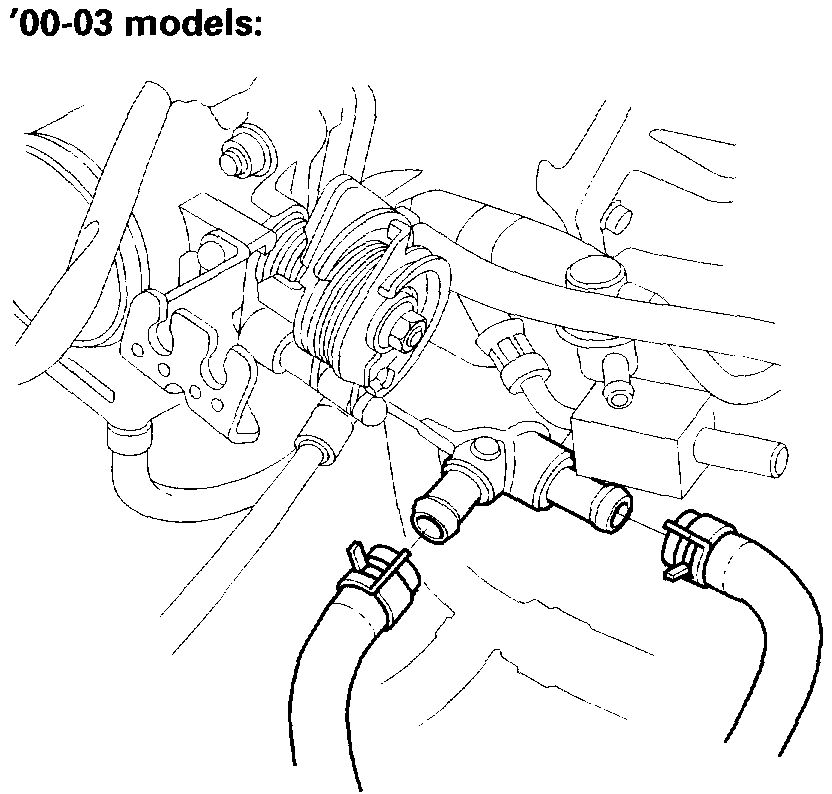
15. Remove the heater hoses.
See picture 9
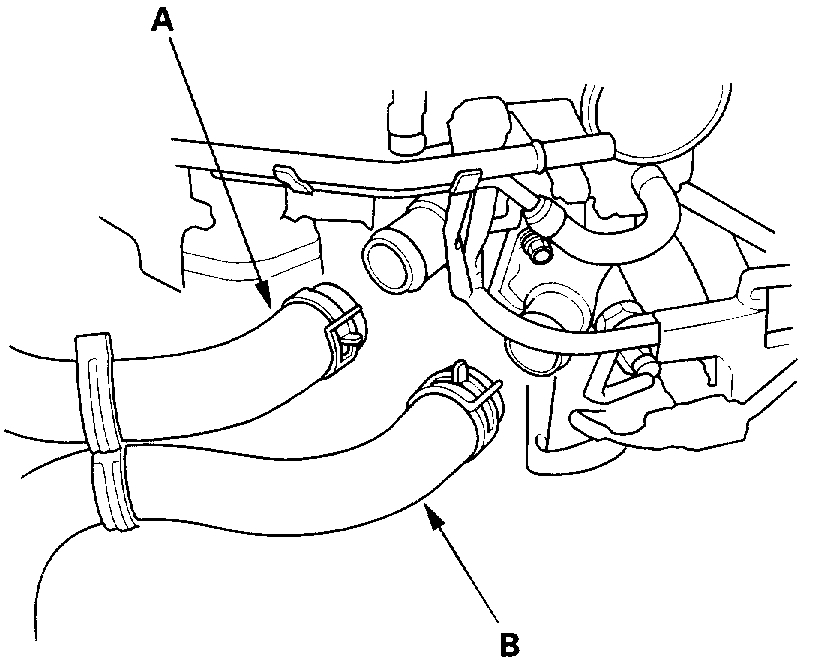
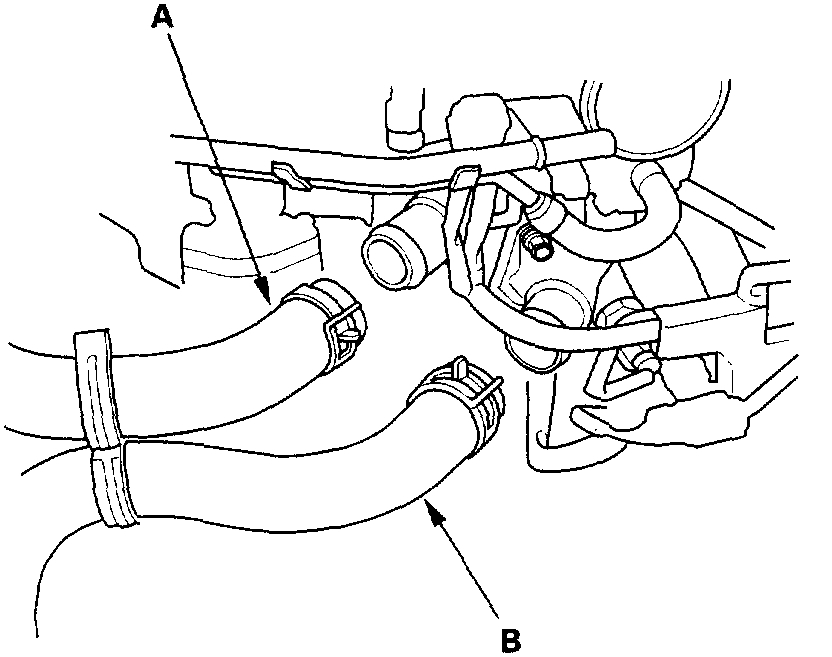
16. Remove the upper radiator hose (A) and lower radiator hose (B).
17. Remove the front and rear exhaust manifolds.
See picture 10
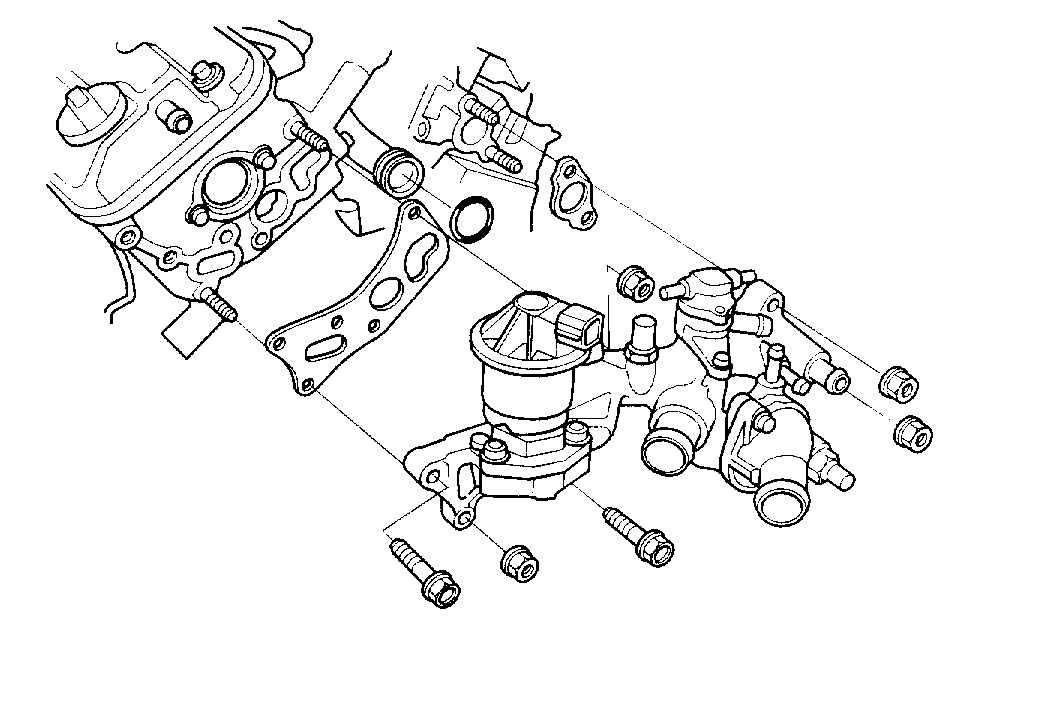
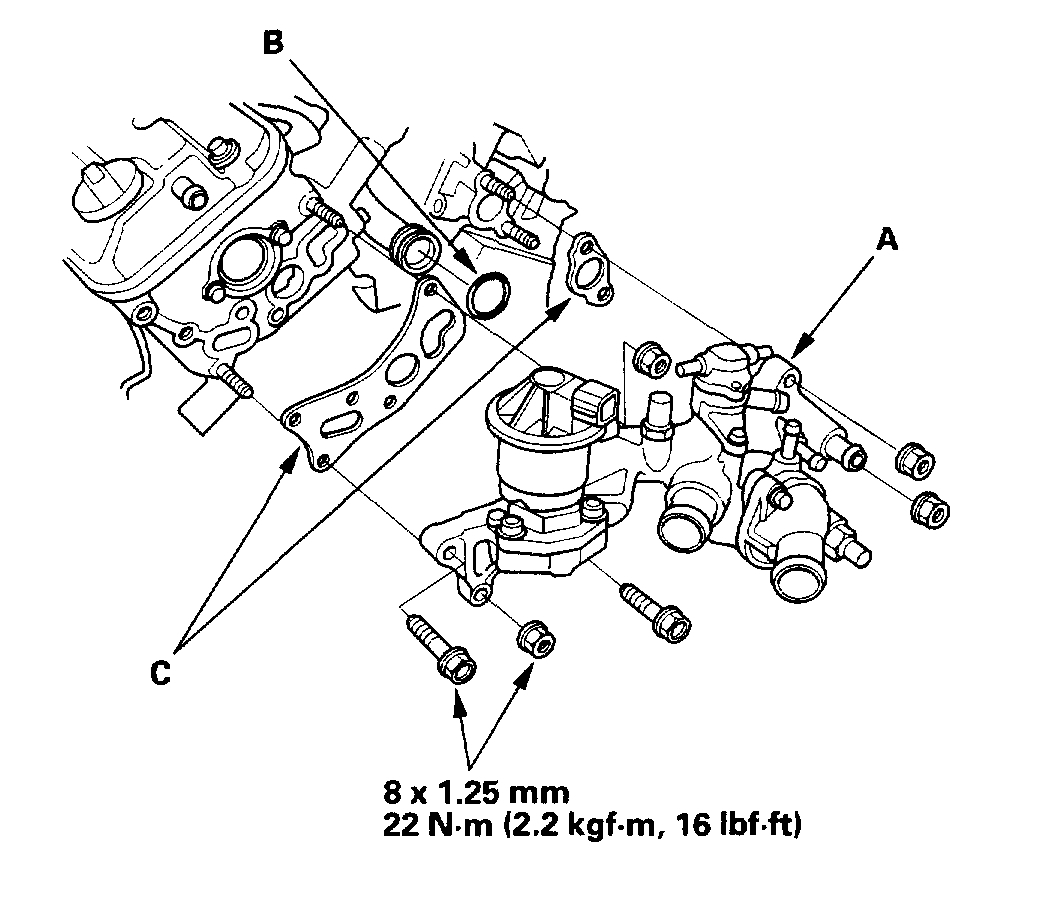
18. Remove the water passage.
See picture 11
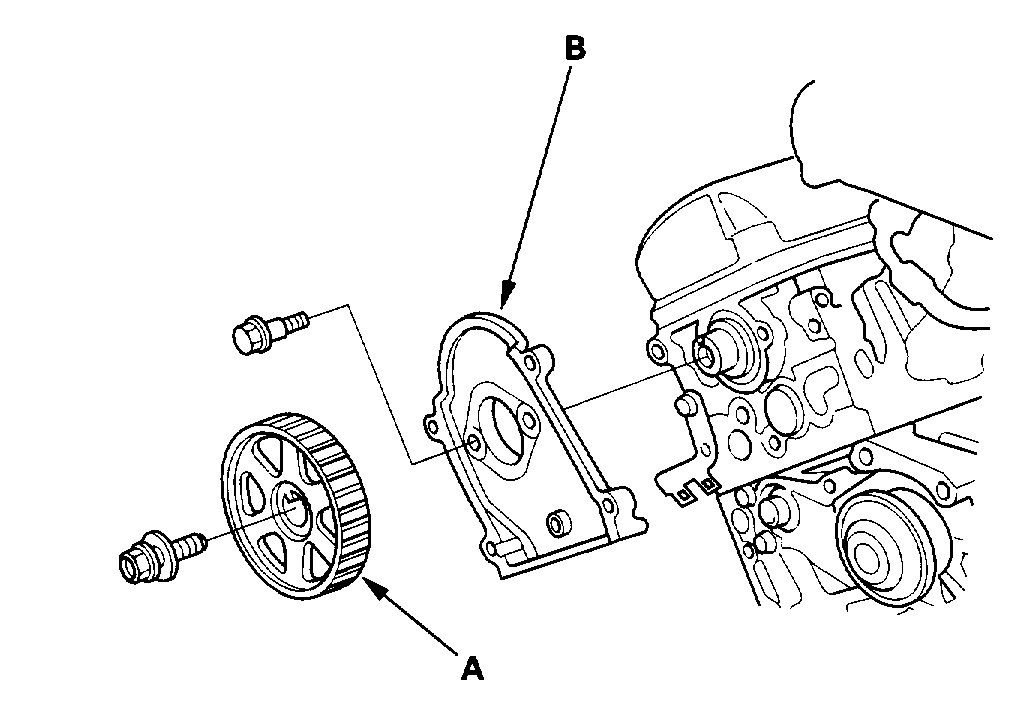
19. Remove the camshaft pulleys (A) and back covers (B).
20. Remove the cylinder head covers.
See picture 12
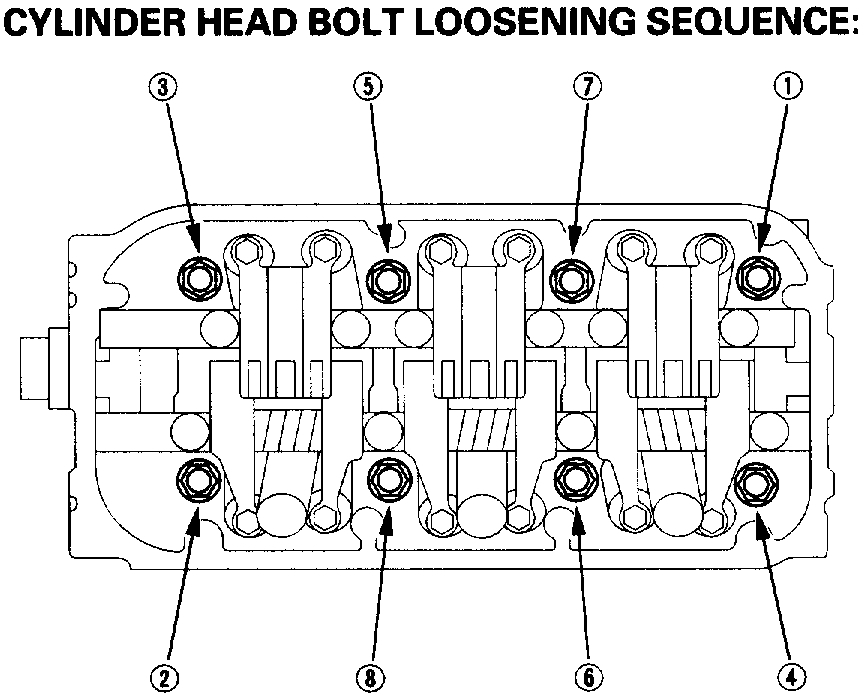
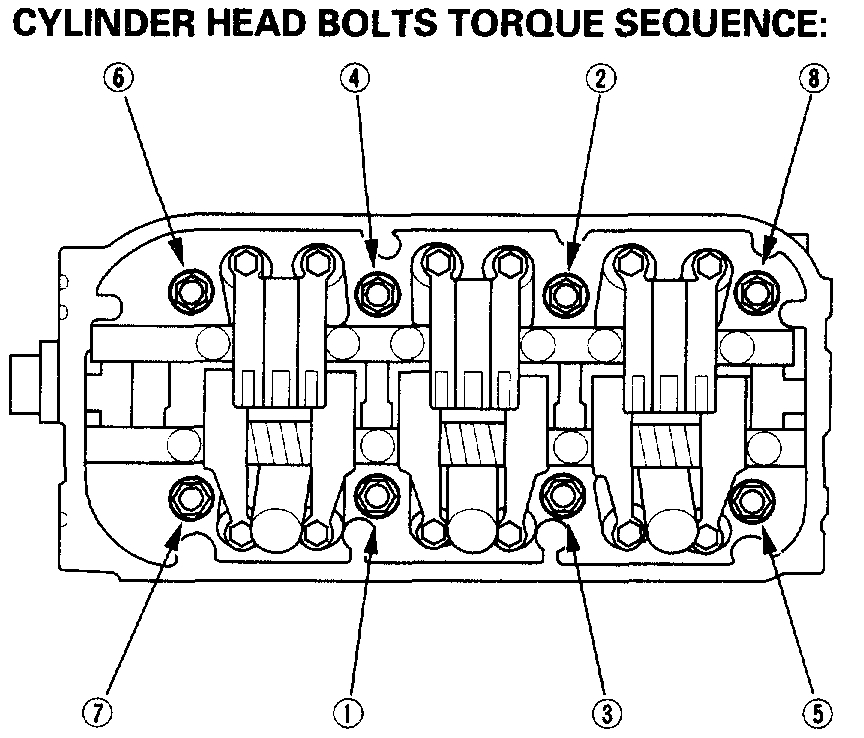
21. Remove the cylinder head bolts. To prevent warpage, unscrew the bolts in sequence 1/3 turn at a time; repeat the sequence until all bolts are loosened.
22. Remove the cylinder heads.
___________________________________________________
Cylinder head replacement
Cylinder Head Installation
Install the cylinder head in the reverse order of removal:
1. Clean the cylinder head and block surface.
See picture 13
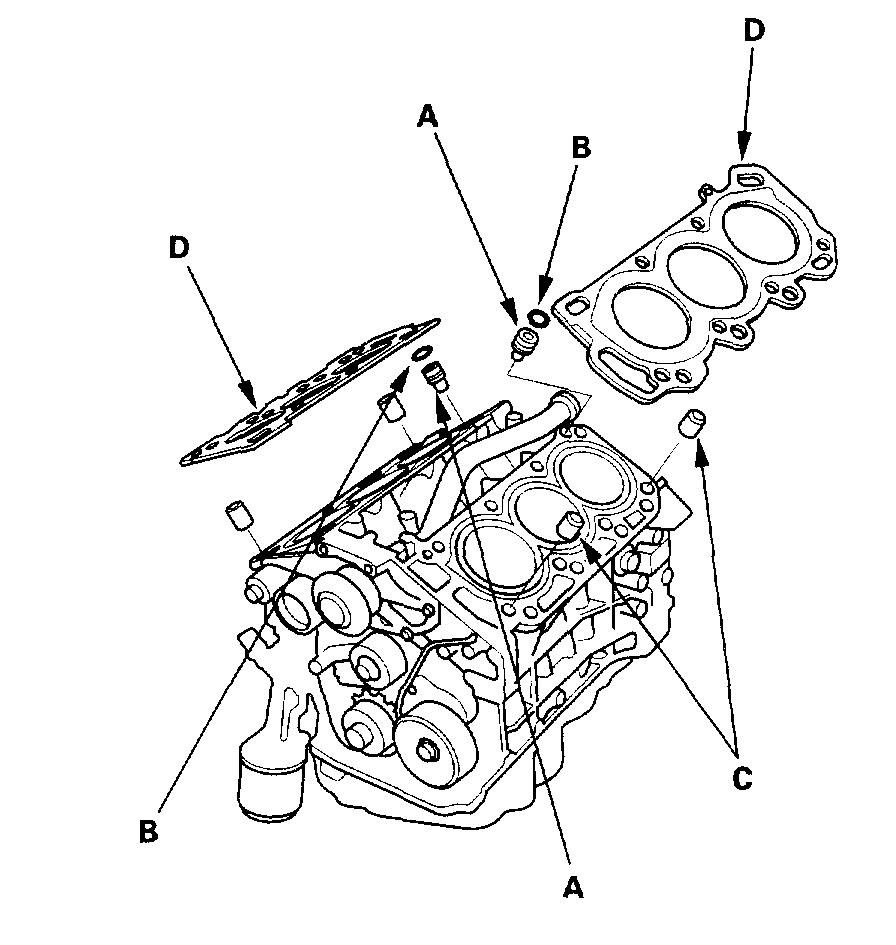
2. Clean and install the oil control orifices (A) with the new O-rings (B).
3. Install the dowel pins (C) and new cylinder head gaskets (D).
4. Clean the timing belt drive pulley.
See picture 14
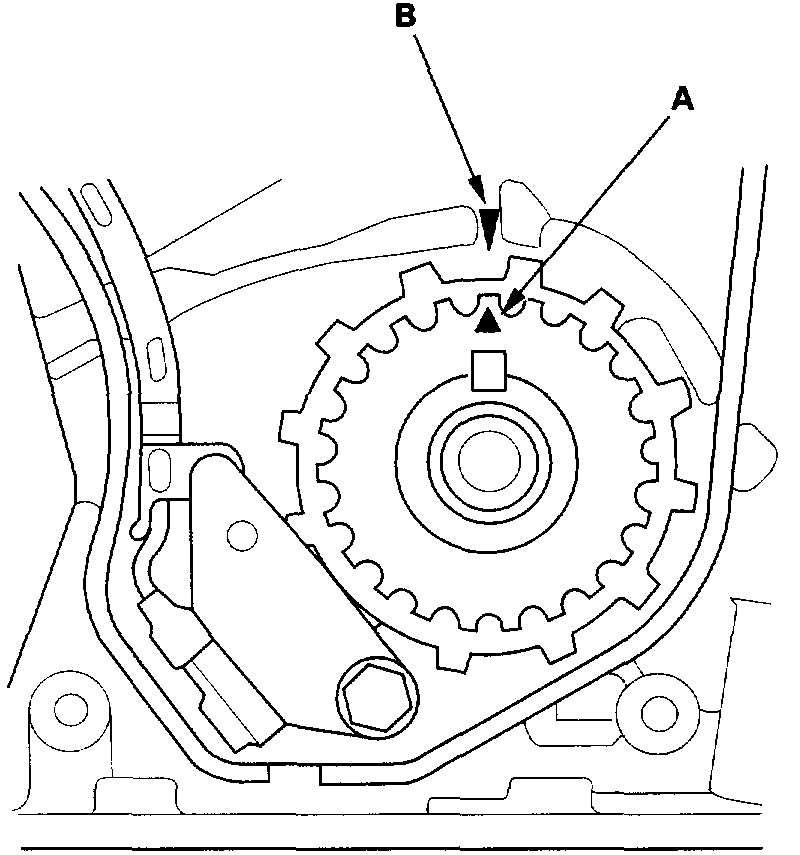
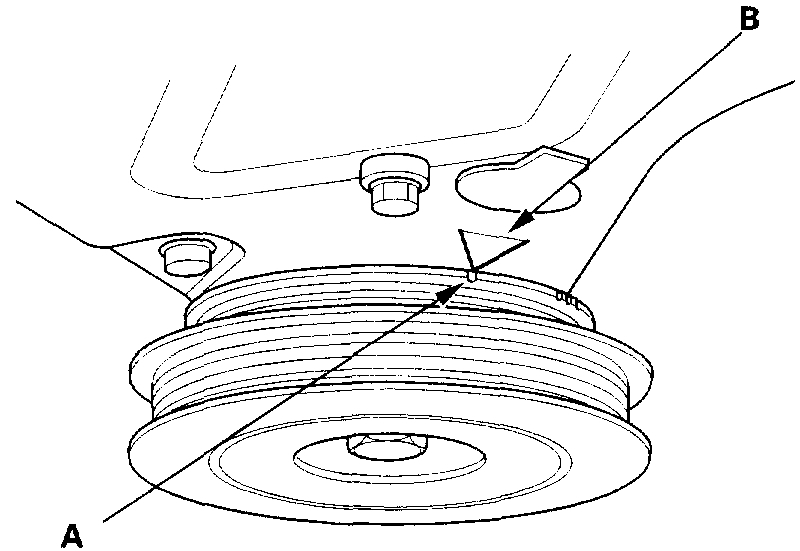
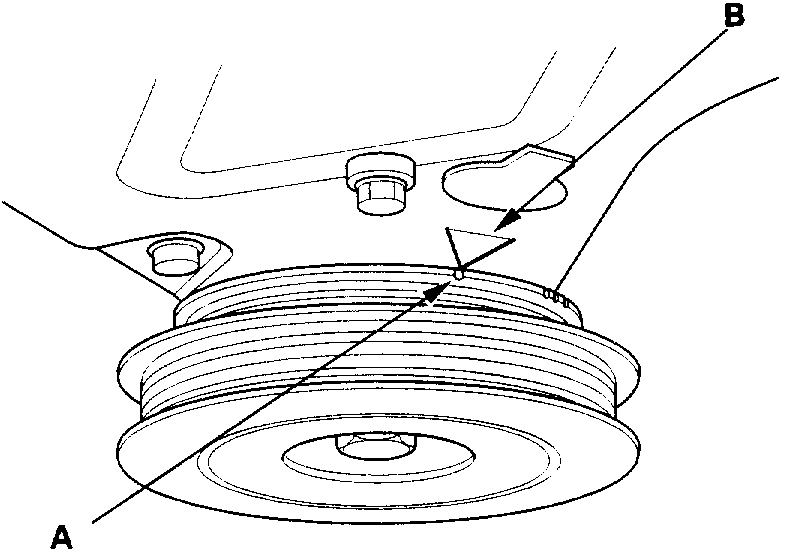
5. Set the timing belt drive pulley to Top Dead Center (TDC) by aligning the TDC mark (A) on the tooth of the timing belt drive pulley with the pointer (B) on the oil pump.
See picture 15
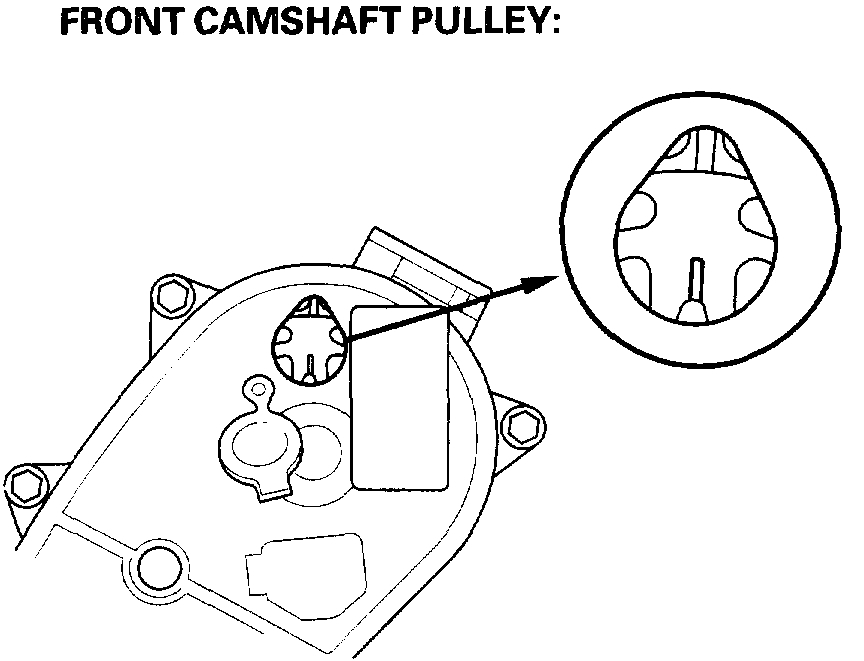
See picture 16
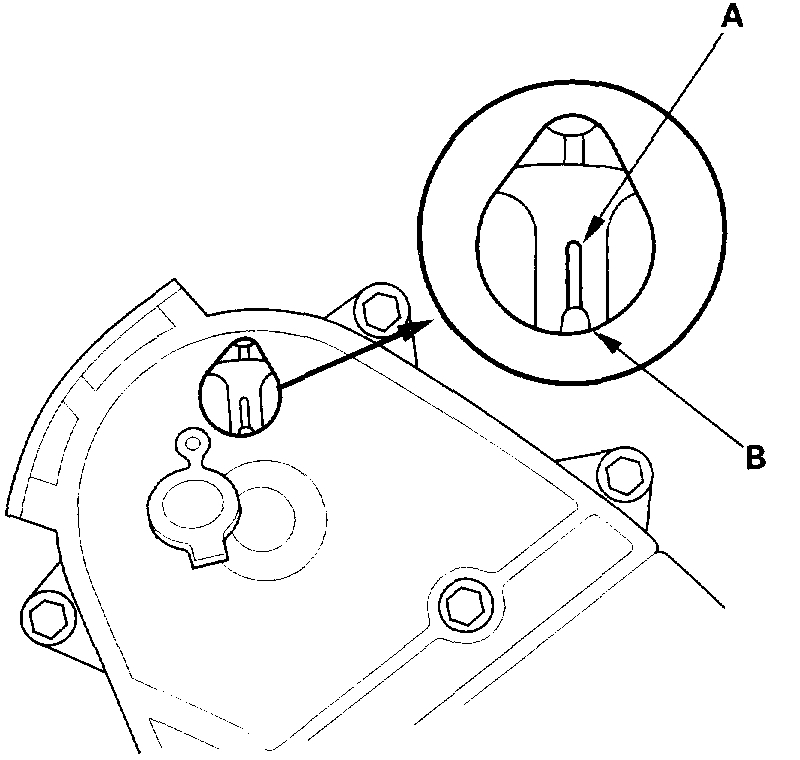
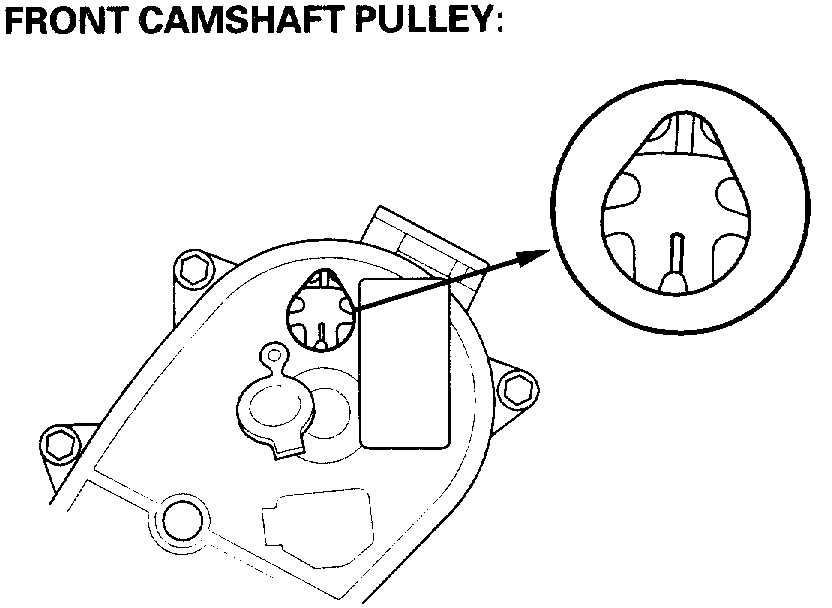
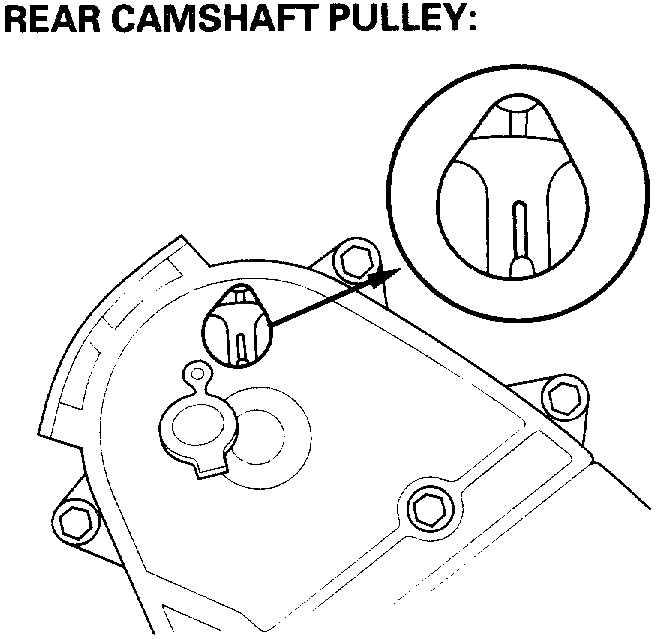
6. Clean the camshaft pulleys. Set the camshaft pulleys to TDC by aligning the TDC marks (A) on the camshaft pulleys with the pointers (B) on the back covers.
7. Apply clean engine oil to the threads and flanges of the cylinder head bolts.
See picture 17
8. Tighten the cylinder head bolts sequentially in three steps.
NOTE: Perform each step twice.
1st step torque: 39 Nm (4.0 kgf-m, 29 ft. Lbs.)
2nd step torque: 69 Nm (7.0 kgf-m, 51 ft. Lbs.)
3rd seep torque: 98.1 Nm (10.0 kgf-m, 72.3 ft. Lbs.)
Use a beam-type torque wrench. When using a preset-type torque wrench, be sure to tighten slowly and not to overtighten. If a bolt makes any noise while you are torquing it, loosen the bolt, and retighten it from the 1st step.
9. Install the timing belt.
10. Adjust the valve clearance.
11. Install the cylinder head cover.
12. Install the exhaust manifold and tighten the nuts in a crisscross pattern in two or three steps, beginning with the inner nut. Always use new exhaust manifold gasket.
13. Install the nuts securing the exhaust pipe A and exhaust manifold, then install the cover on the exhaust manifold.
See picture 18
14. Install the water passage (A). Always use a new O-ring (B) and new gaskets (C).
See picture 19
See picture 20
15. Install the fuel rails.
See picture 21
16. Install the vacuum hoses (A) on the intake air bypass control thermal valve (B).
See picture 22
See picture 23
17. Install the heater hoses.
See picture 24
18. Install the upper radiator hose (A) and lower radiator hose (B).
19. Install the intake manifold.
20. Loosely install the P/S pump and P/S pump belt.
21. Adjust the P/S pump belt.
22. Install the alternator.
23. Install the alternator belt.
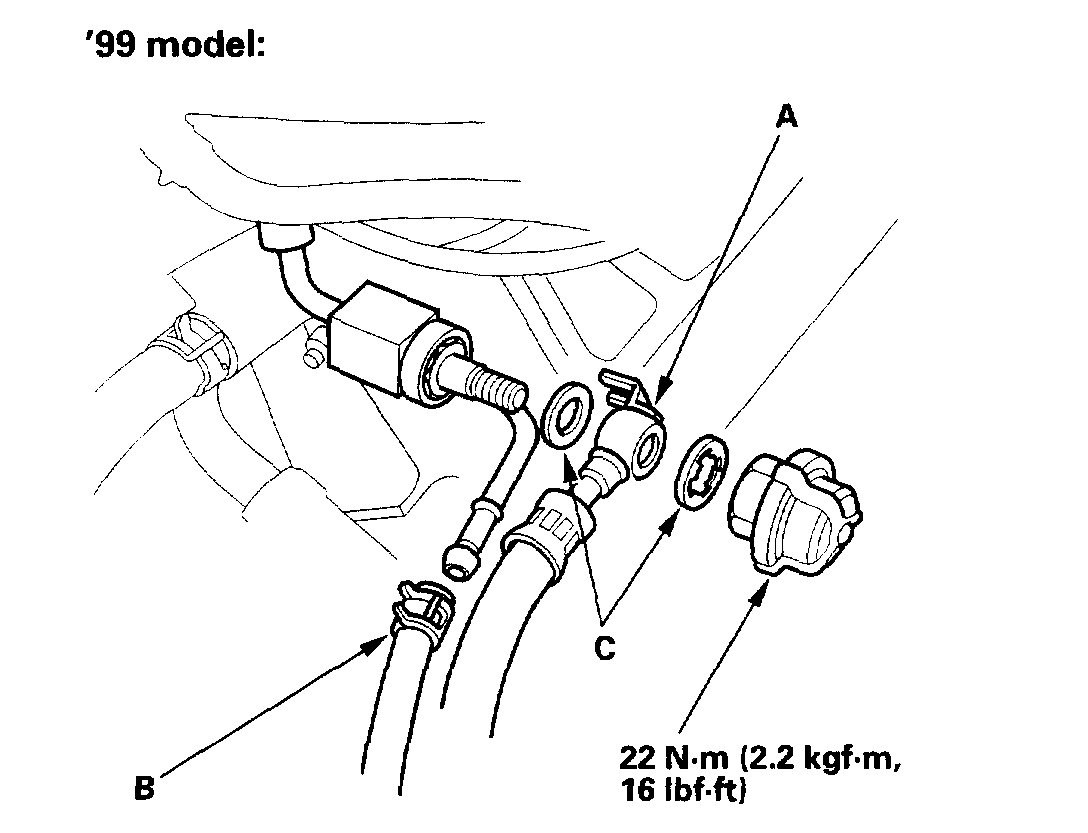
See picture 25
See picture 26
24. Install the fuel feed hose (A) and fuel return hose (B), using new washers (C).
25. Clean the battery posts and cable terminals with sandpaper, then assemble them and apply grease to prevent corrosion.
26. After installation, check that all tubes, hoses and connectors are installed correctly.
27. Inspect for fuel leaks. Turn the ignition switch ON (II) (do not operate the starter) so the fuel pump runs for about 2 seconds and pressurizes the fuel line. Repeat this operation two or three times, then check for fuel leakage at any point in the fuel line.
28. Refill the radiator with engine coolant, and bleed air from the cooling system with the heater valve open.
29. Perform the Powertrain Control Module (PCM) idle learn procedure.
30. Perform the power window control unit reset procedure ('02-03 models).
31. Inspect the idle speed.
32. Inspect the ignition timing.
____________________________________________________________________________________
Here are the directions for removing and replacing the timing belt. The first set of directions are for removal and will need to be done before head removal.
Timing Belt Removal
Vehicle Engine, Cooling and Exhaust Engine Timing Components Timing Belt Service and Repair Procedures Timing Belt Removal
TIMING BELT REMOVAL
Timing Belt Removal
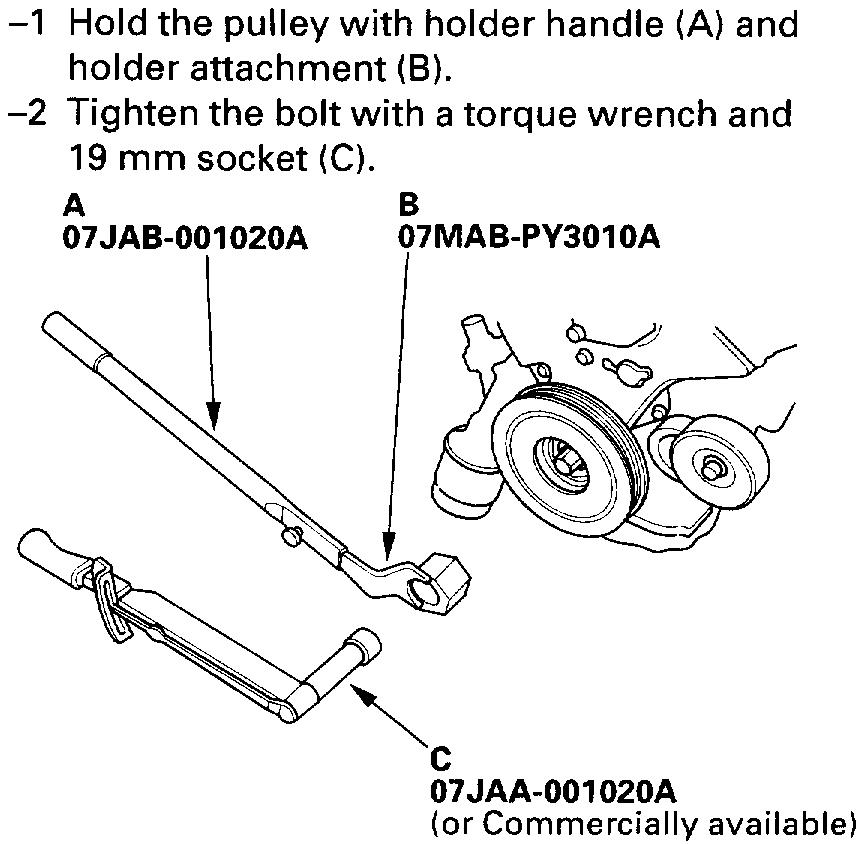
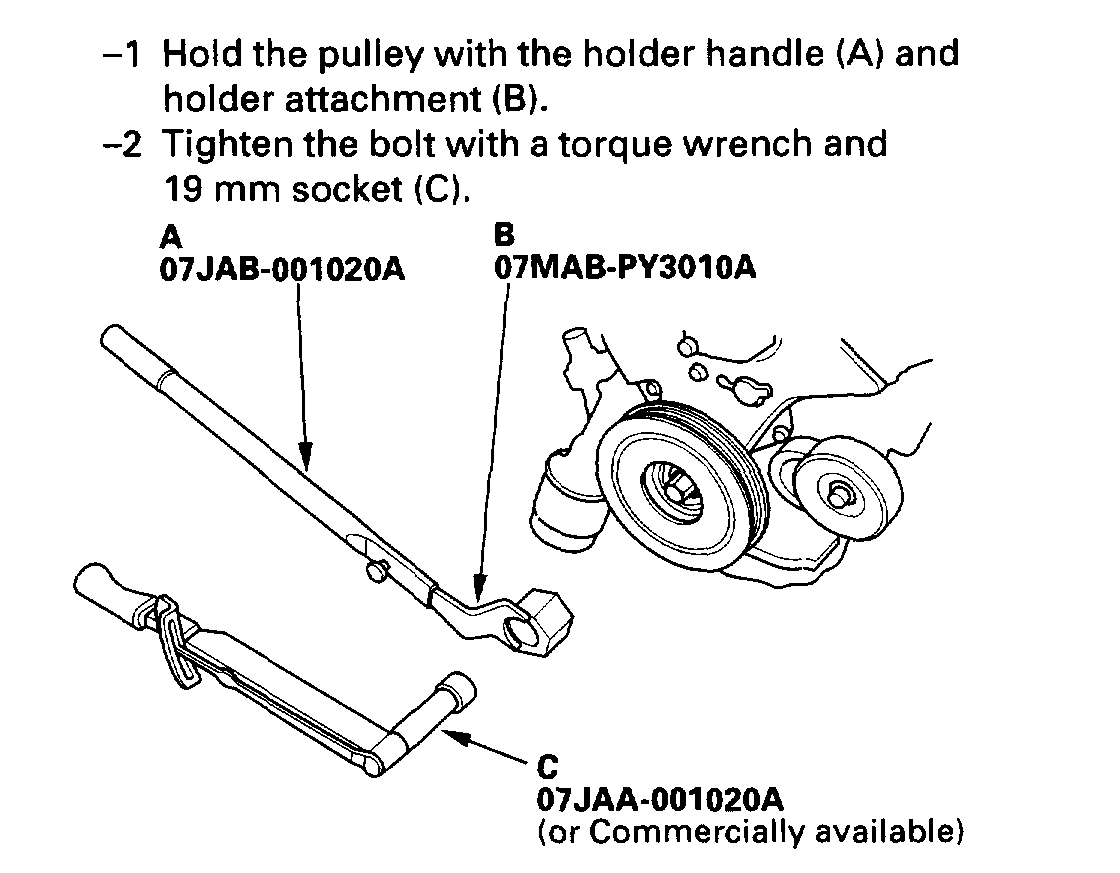
Special Tools Required
Holder Handle 07JAB-001020A
Holder Attachment, 50 mm, Offset 07MAB-PY3010A Socket, 19 mm 07JAA-001020A or a commercially available 19 mm socket
Picture 27
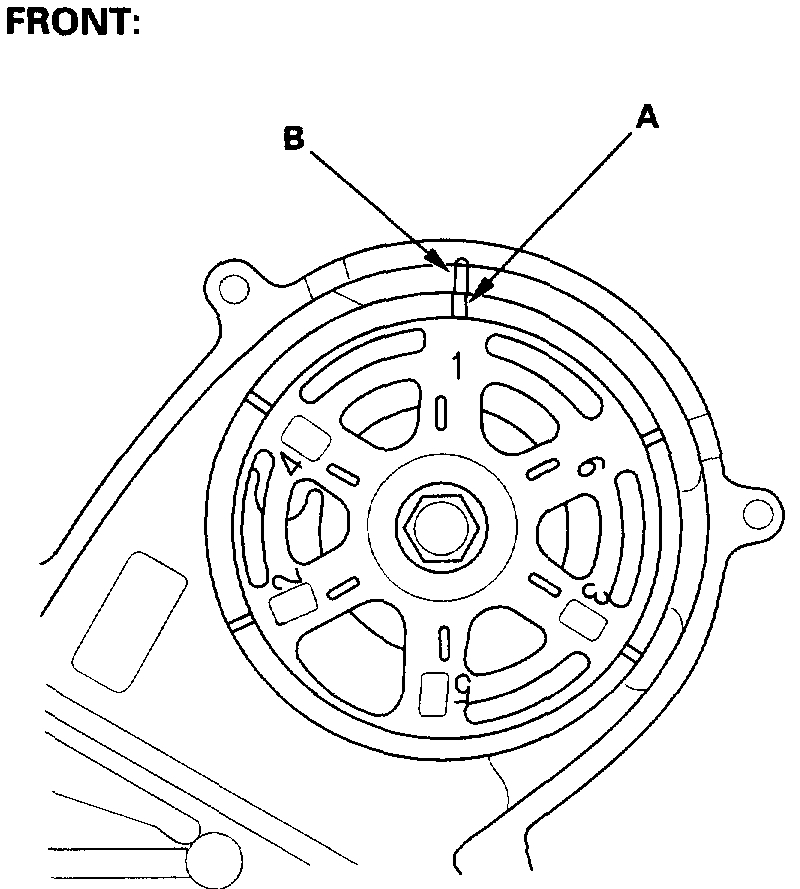
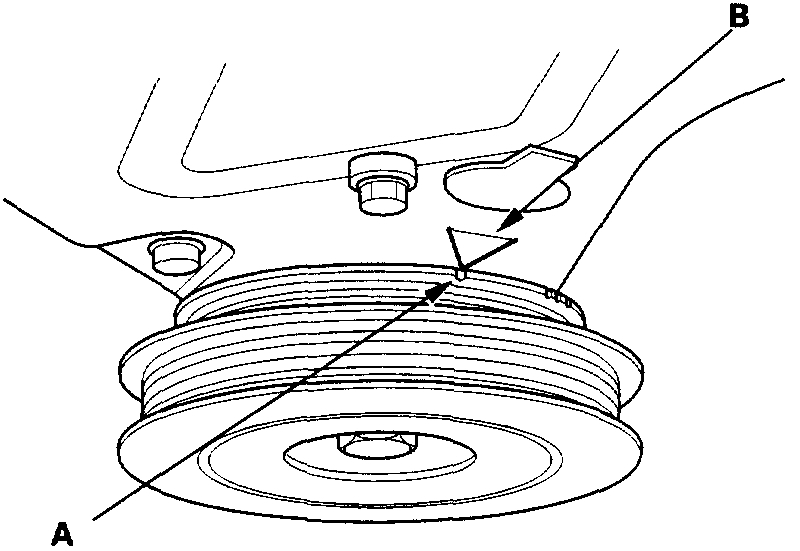
1. Turn the crankshaft so its white mark (A) lines up with the pointer (B).
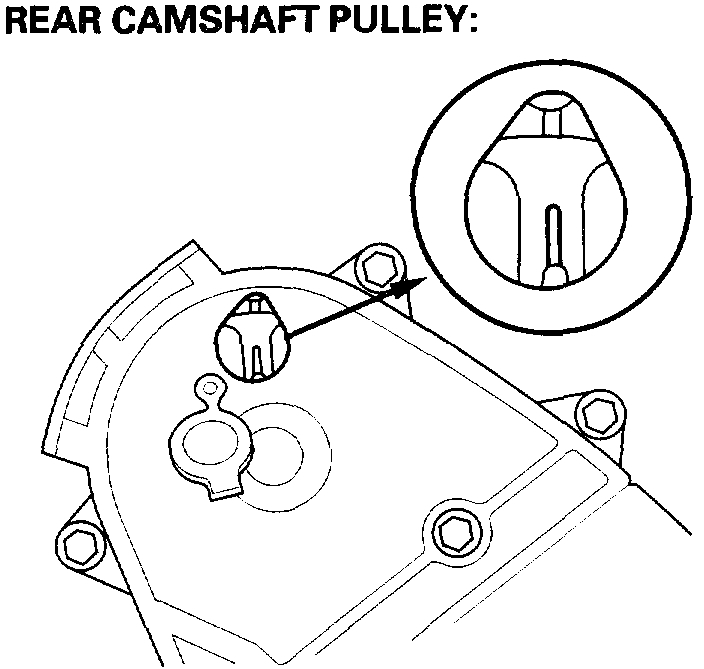
Picture 28
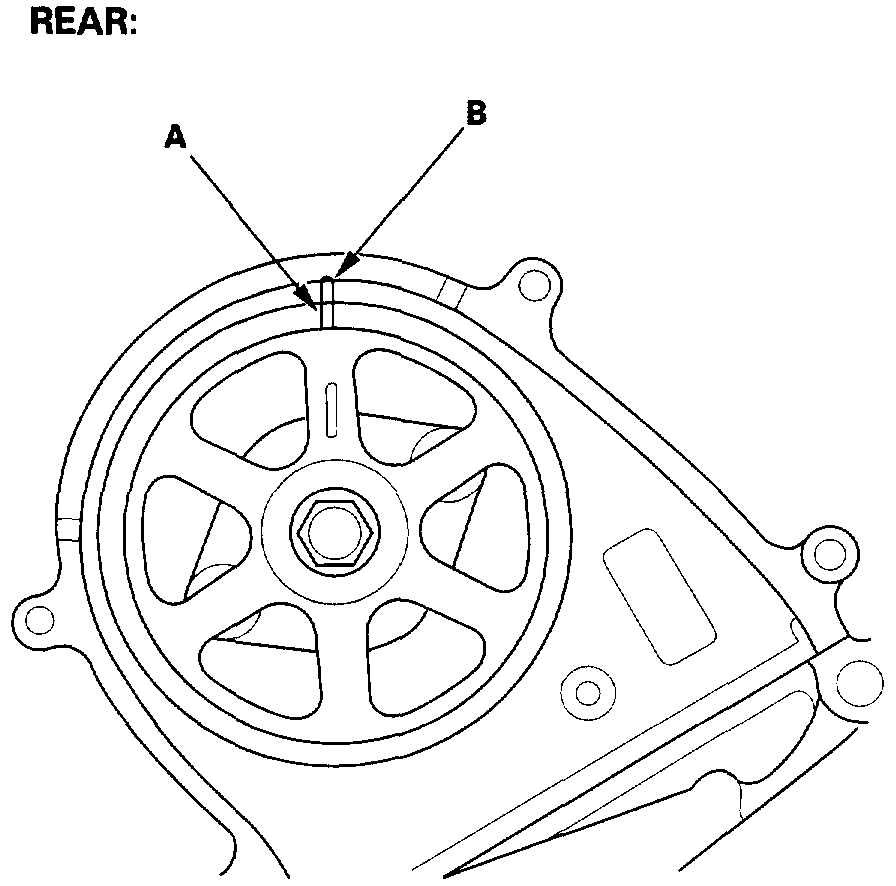
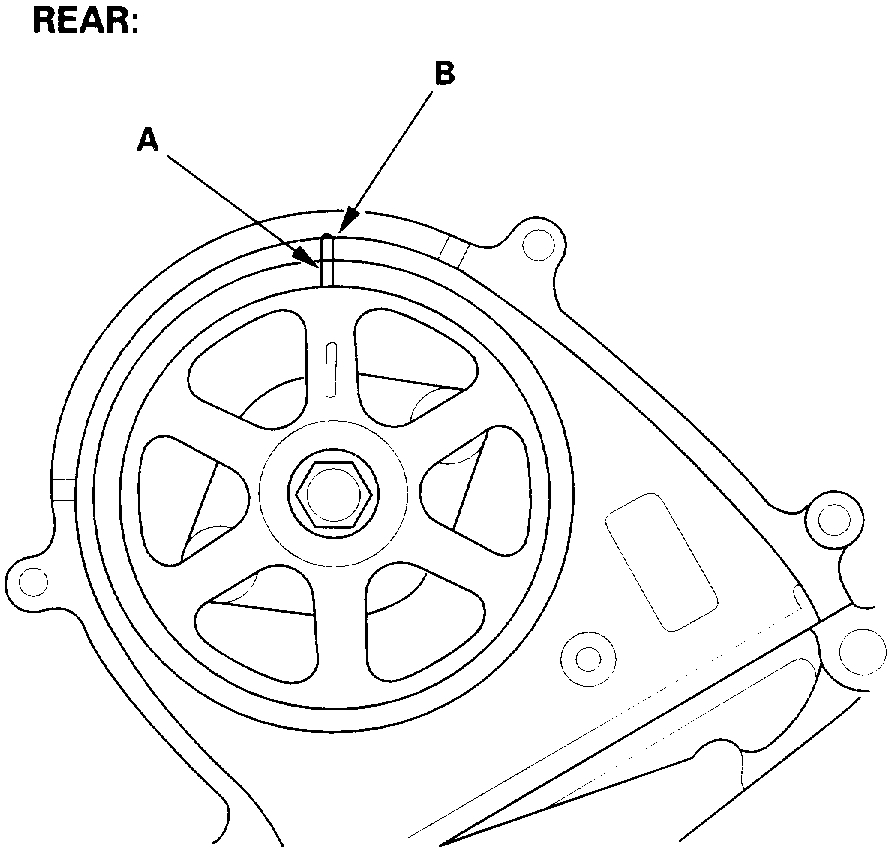
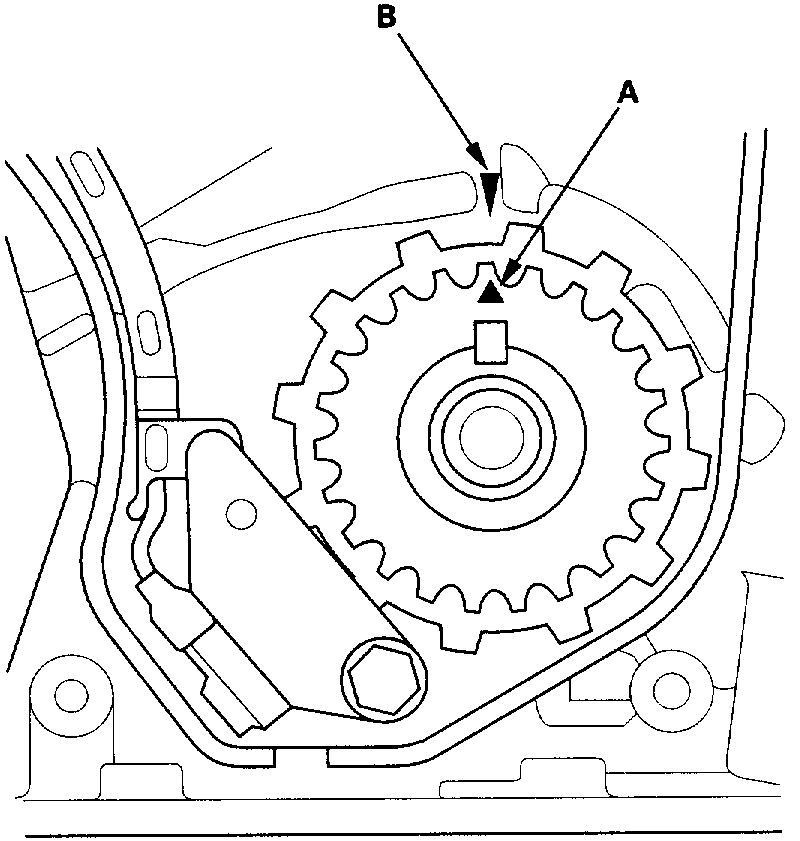
2. Check that the rear camshaft pulley mark (A) and rear upper cover mark (B) are aligned.
3. Remove the front tires/wheels.
Picture 29
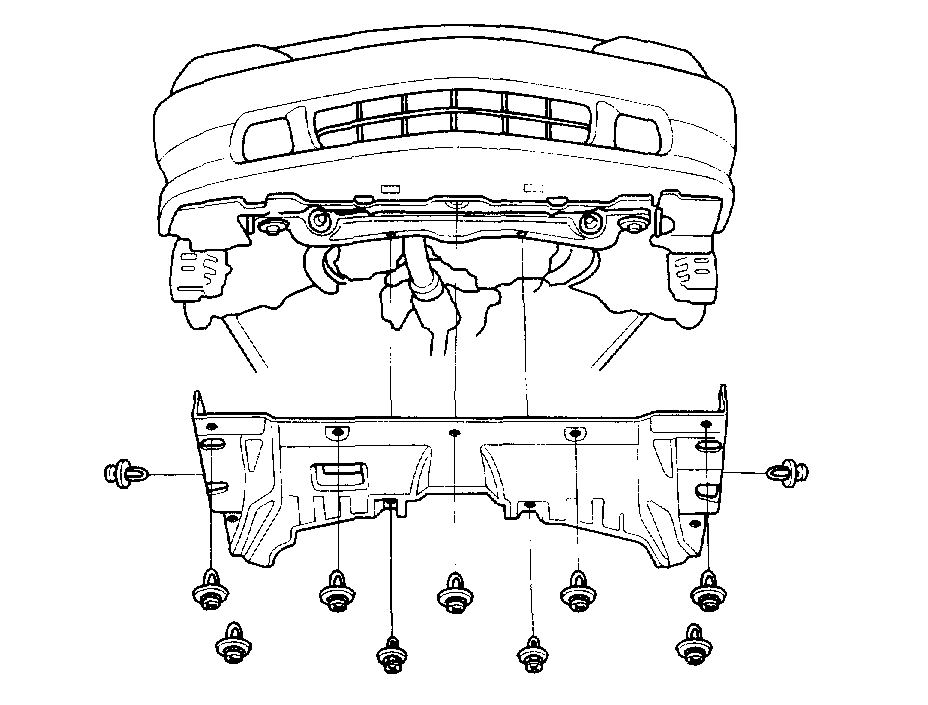
4. Remove the splash shield.
Picture 30
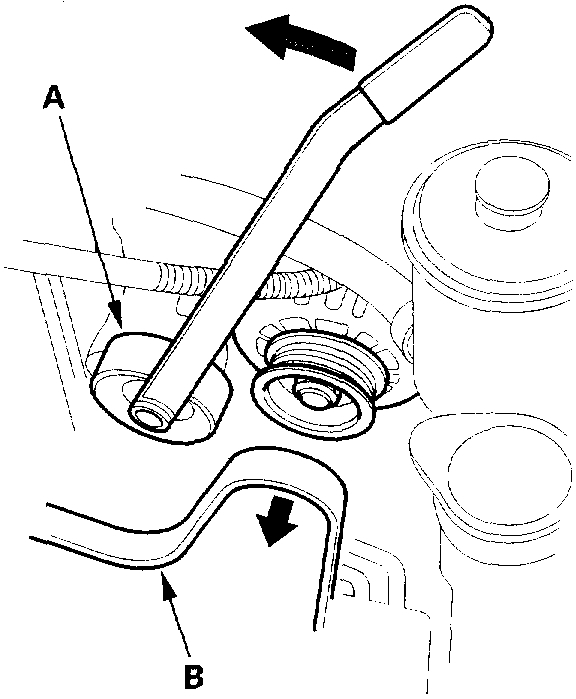
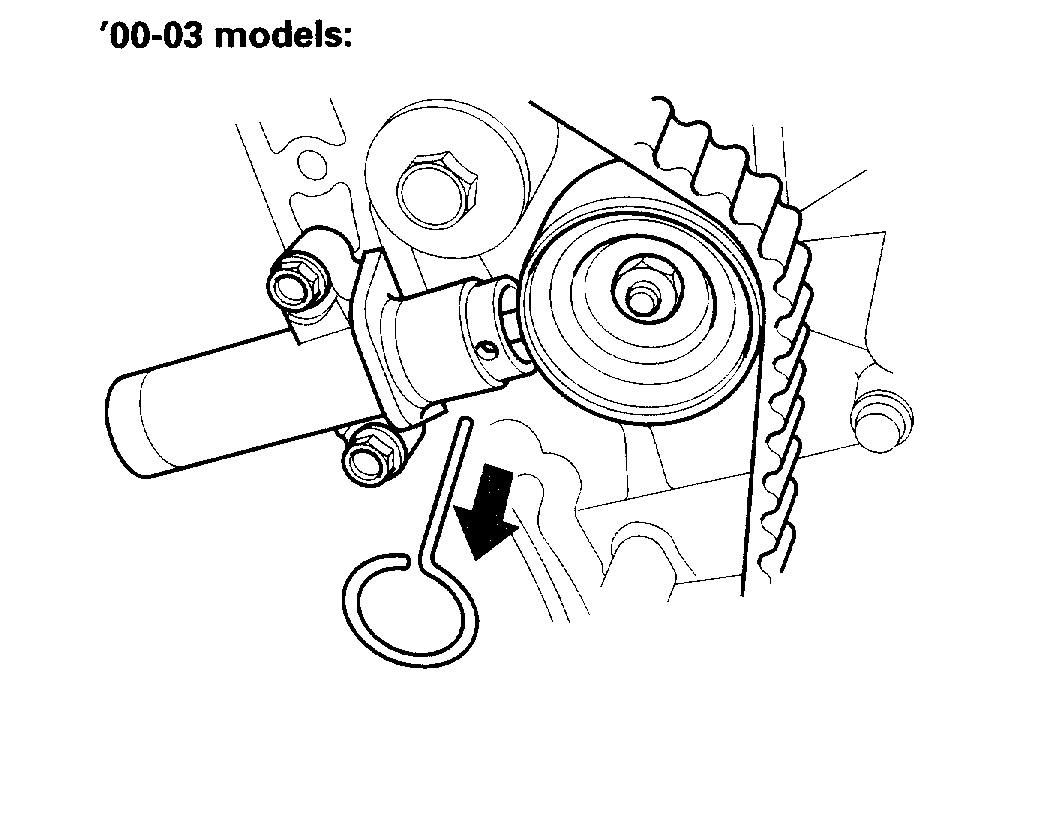
5. Move the auto-tensioner (A) to remove tension from the alternator belt (B), then remove the alternator belt.
Picture 31
6. Loosen the adjusting nut (A), locknut (B) and mounting bolt (C), then remove the Power Steering (P/S) pump belt (D).
7. Support the engine with a jack and wood block under the oil pan.
Picture 32
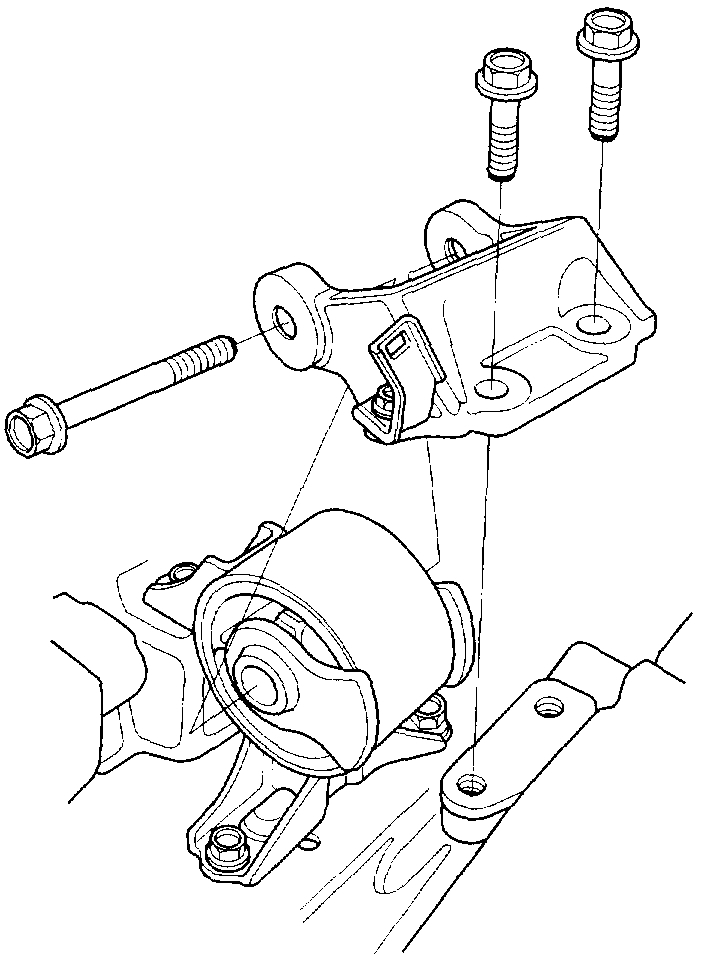
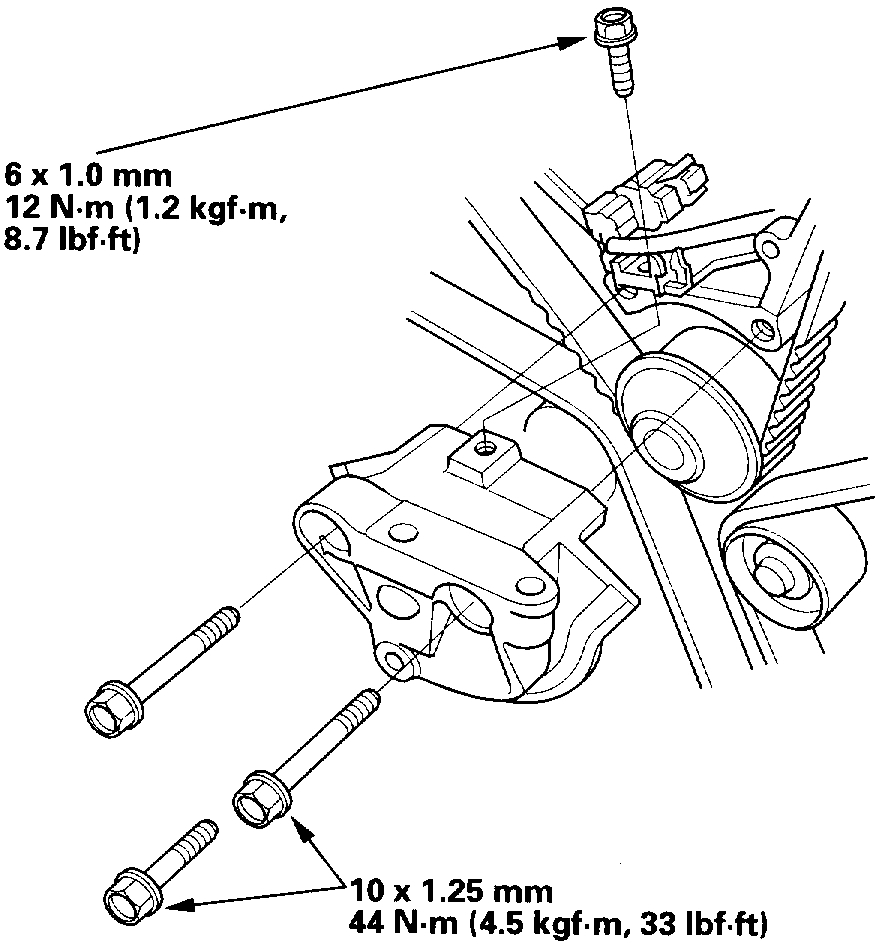
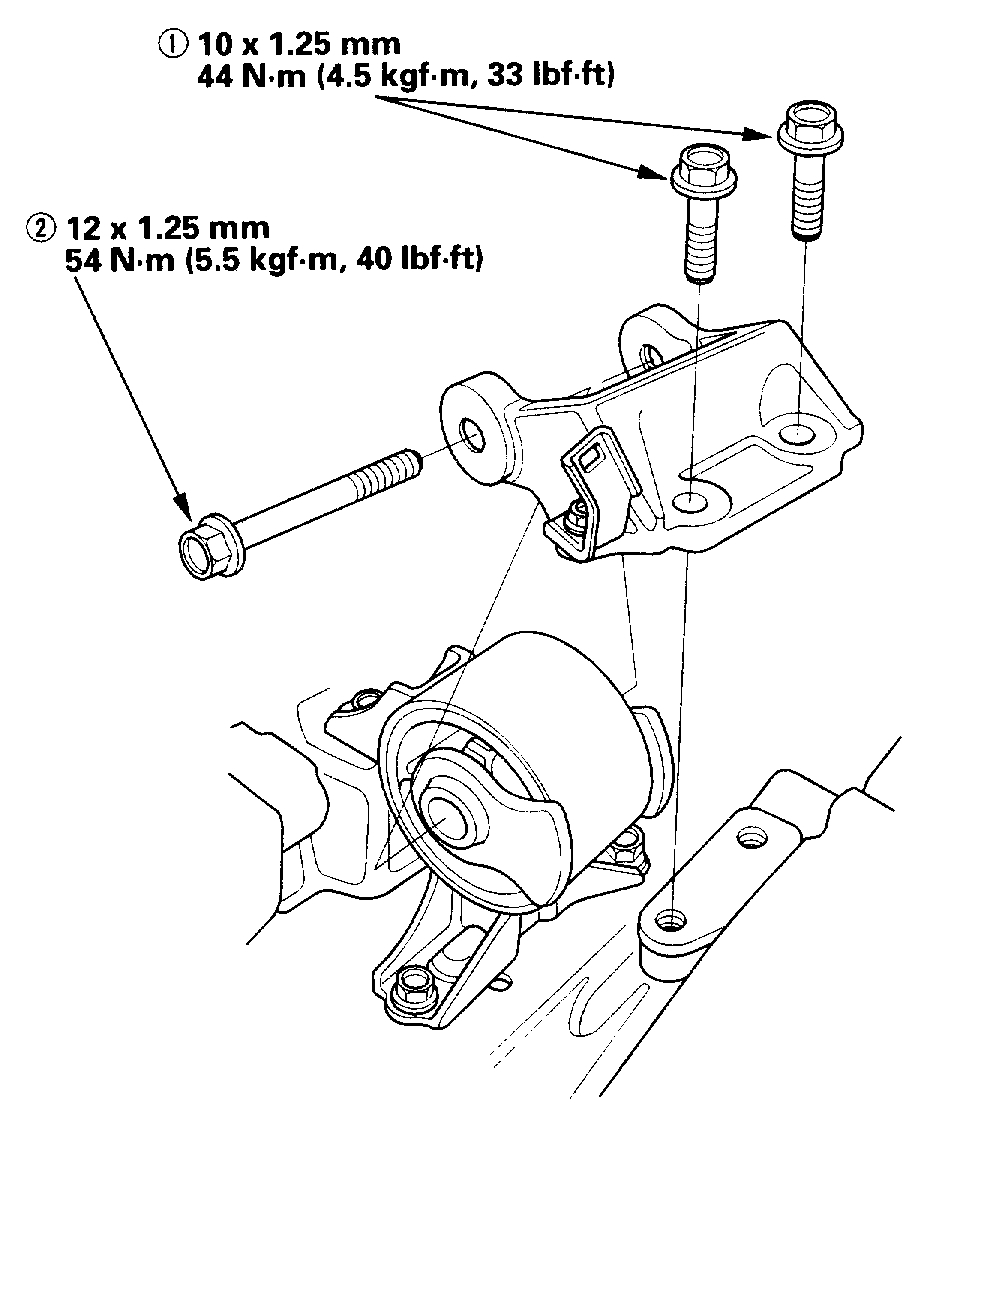
8. Remove the side engine mount bracket.
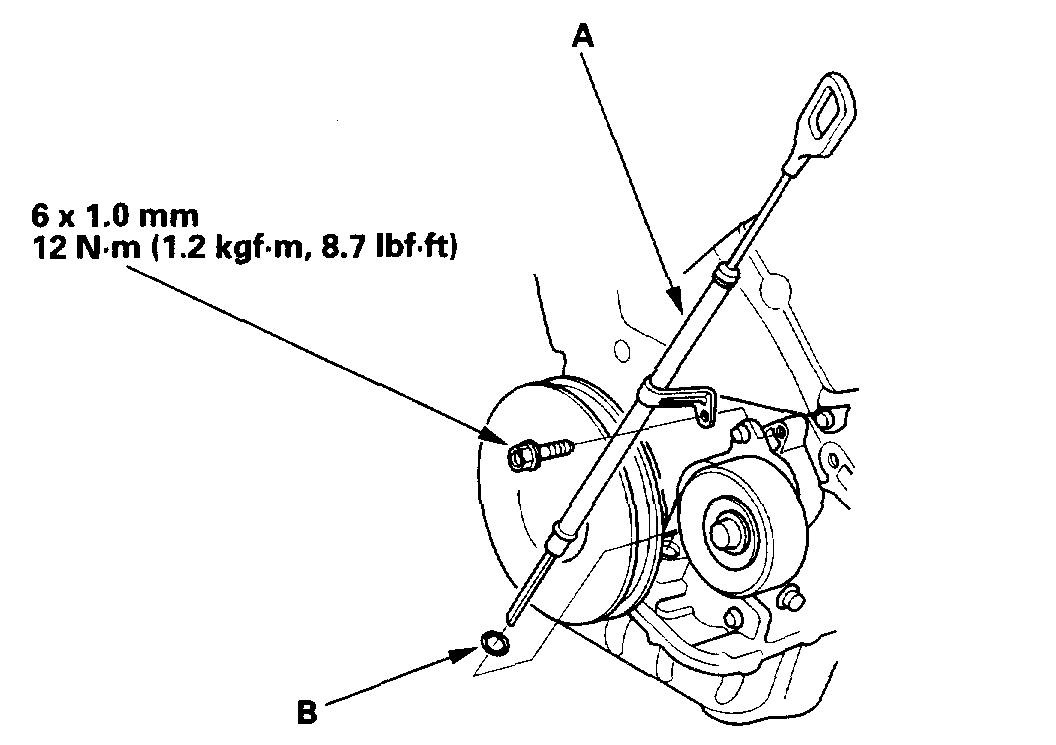
Picture 33
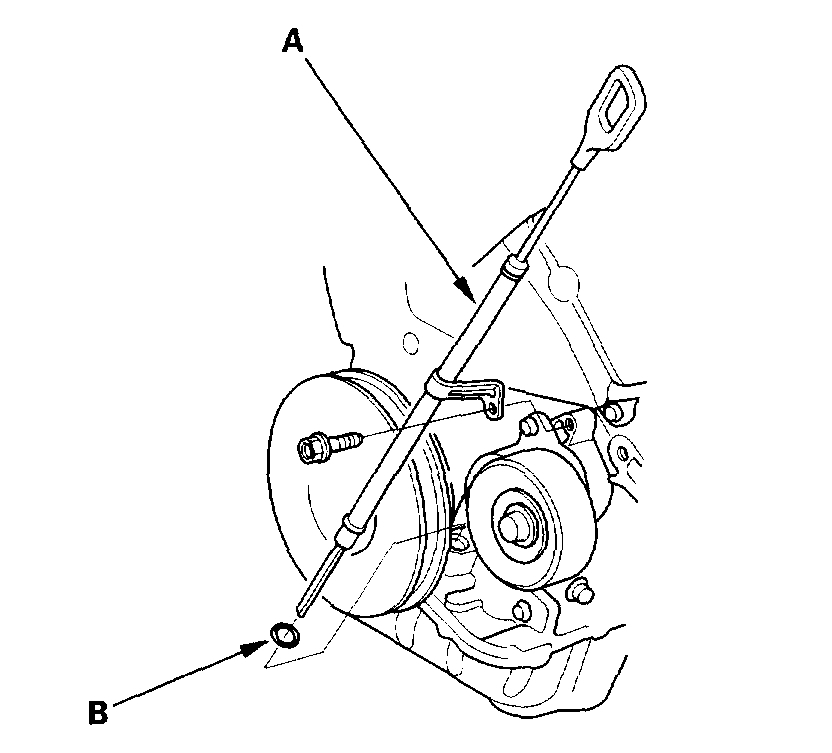
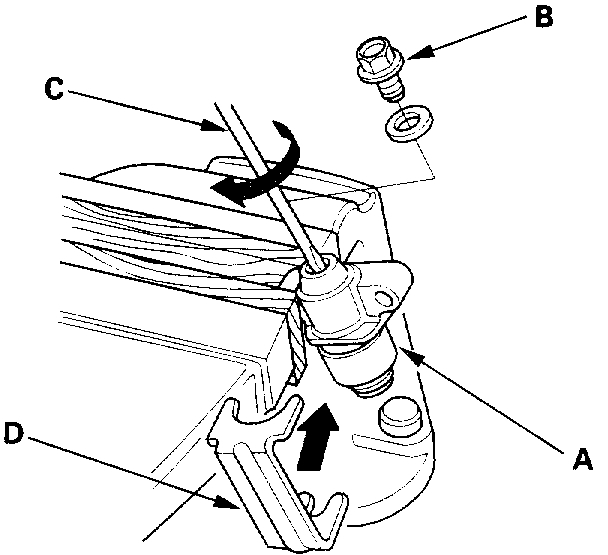
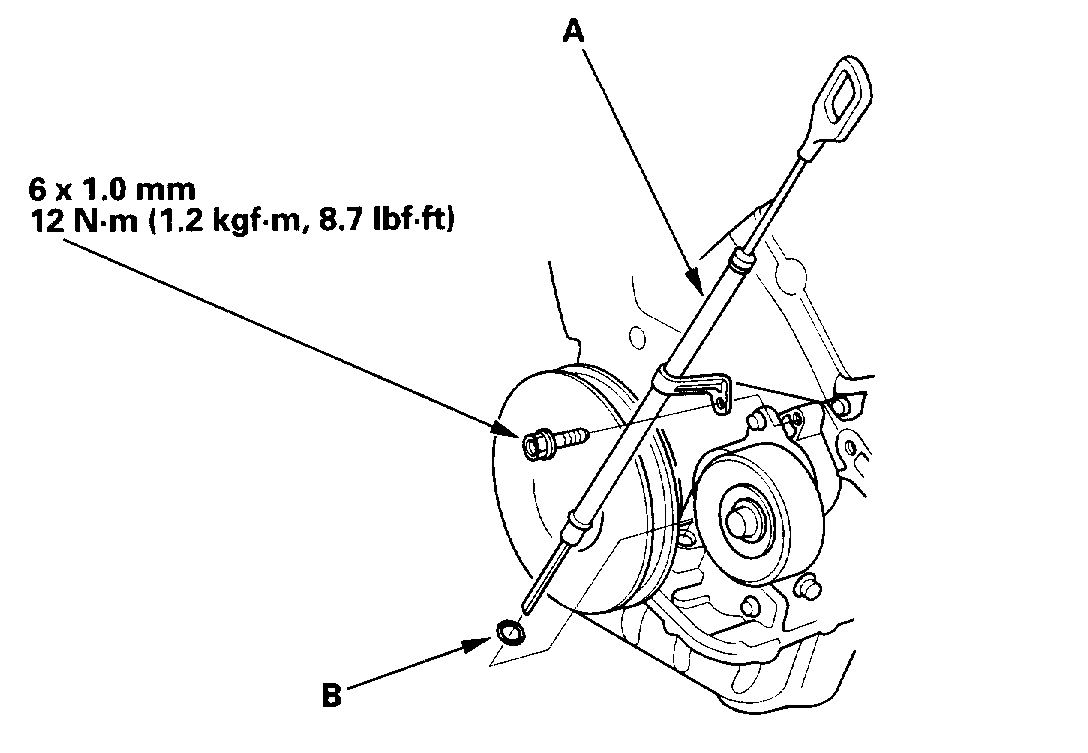
9. Remove the dipstick and tube (A); Discard the O-ring (B).
Picture 34
10. Hold the pulley with the holder handle (A) and holder attachment (B).
11. Remove the bolt with a heavy duty 19 mm socket (C) and breaker bar.
Picture 35
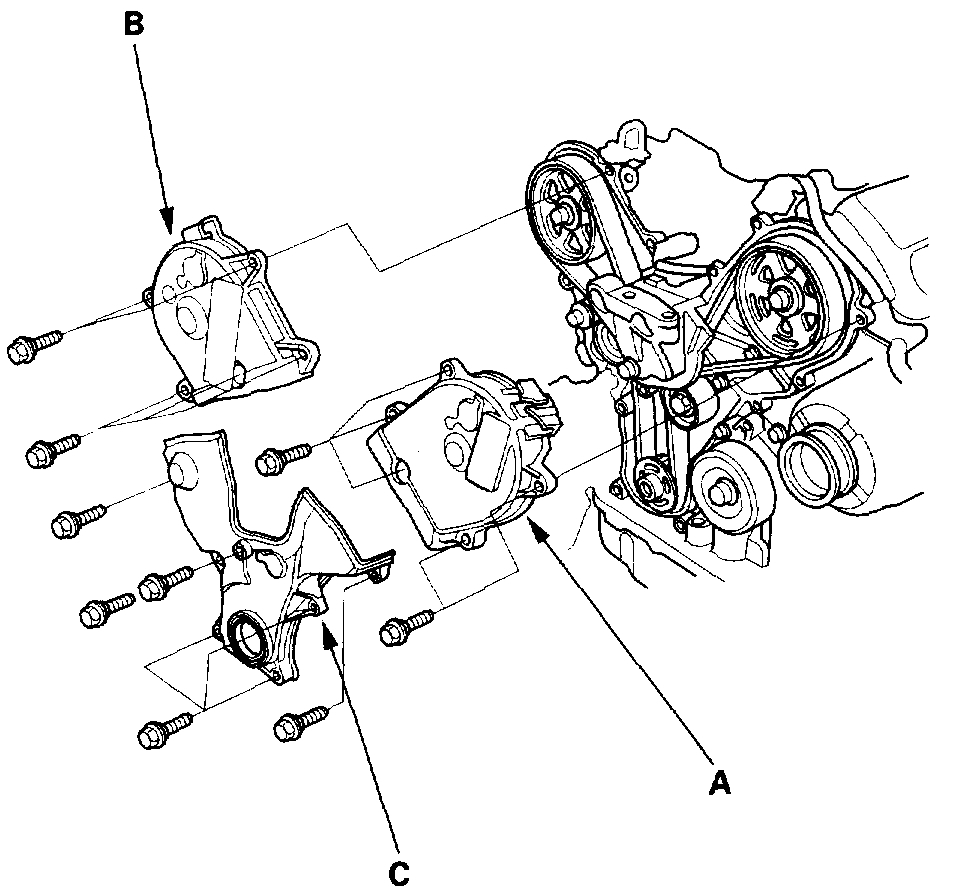
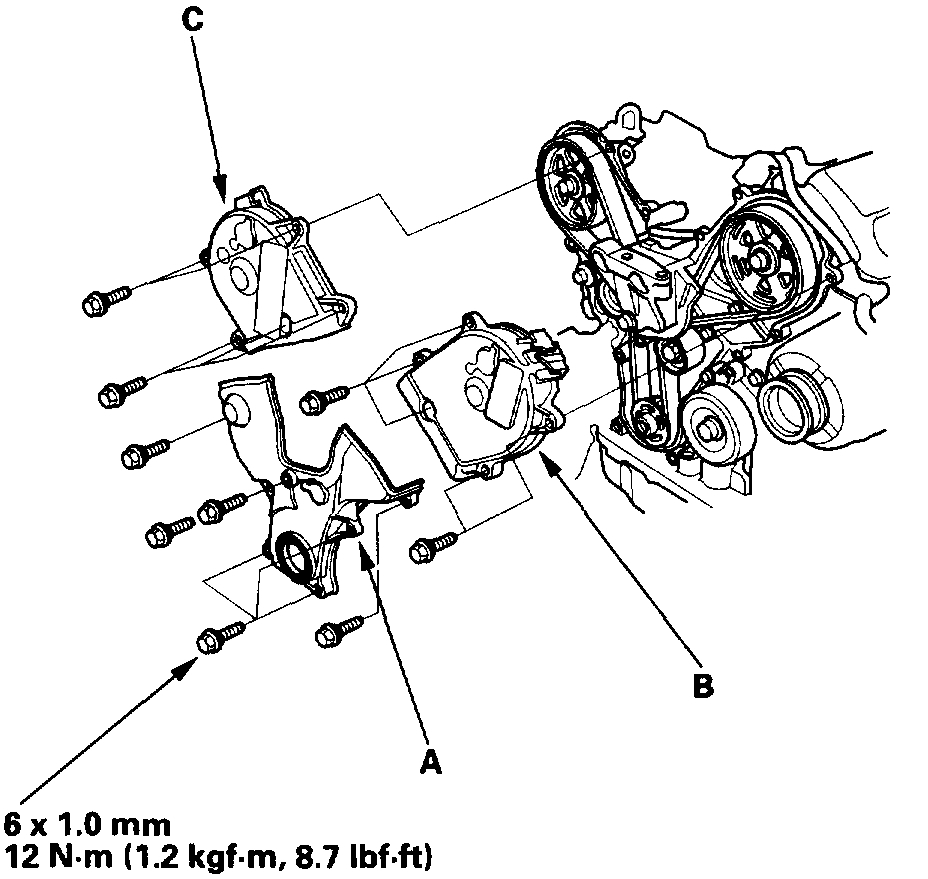
12. Remove the front upper cover (A), rear upper cover (B) and lower cover (C).
Picture 36
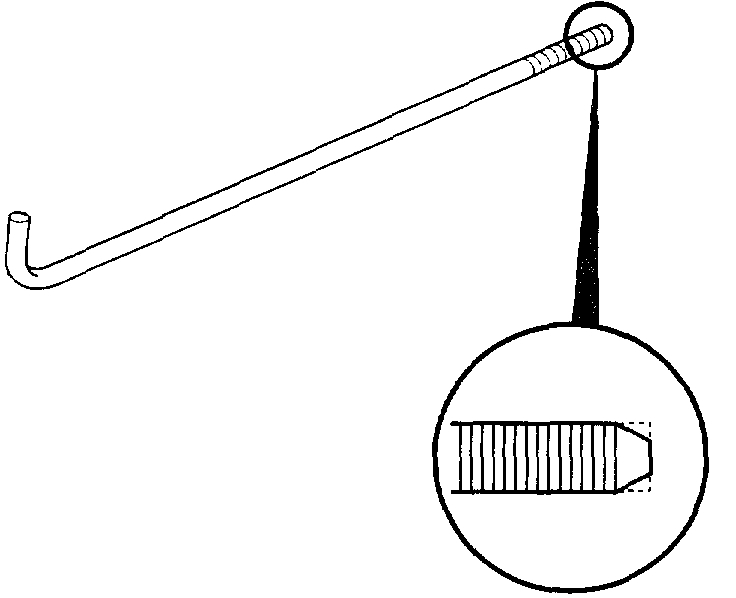
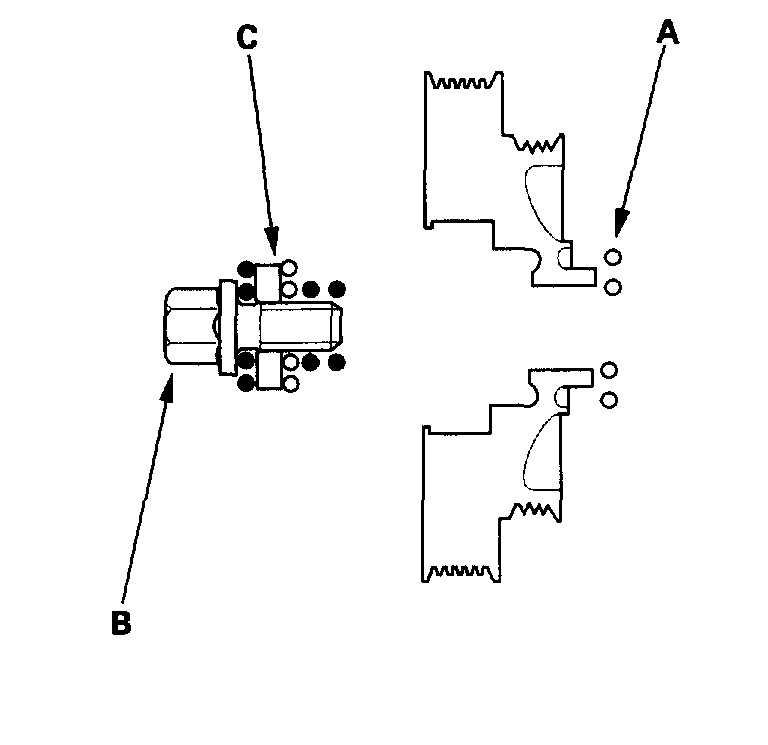
13. Remove one of the battery clamp bolts from the battery tray. And Grind the end of it as shown.
Picture 37
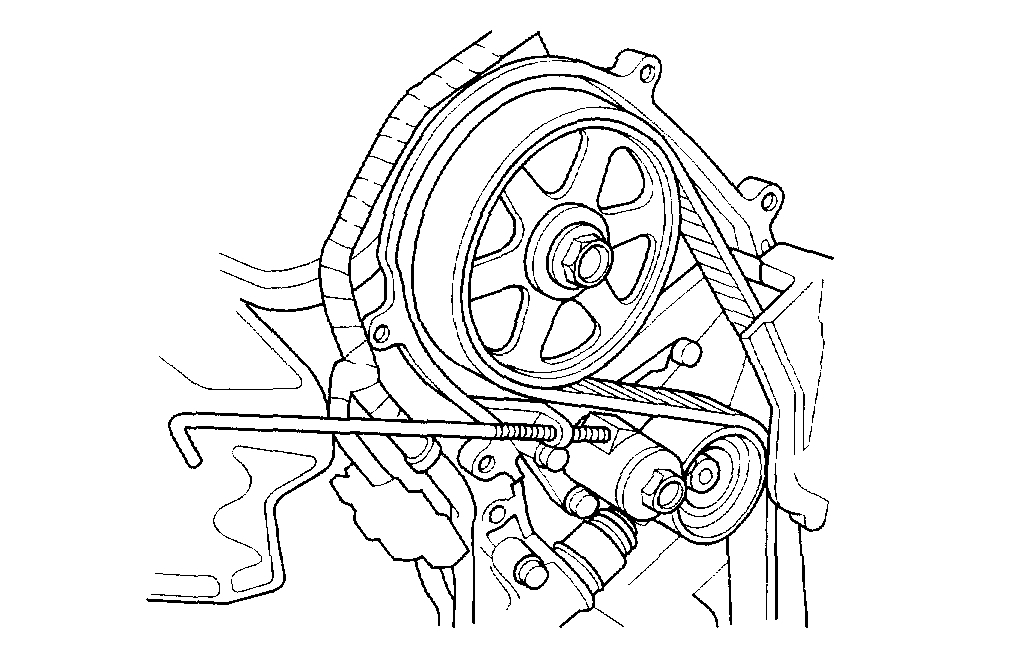
14. Screw the battery clamp bolt in as shown to hold the timing belt adjuster in its current position. Tighten it by hand, do not use a wrench.
Picture 38
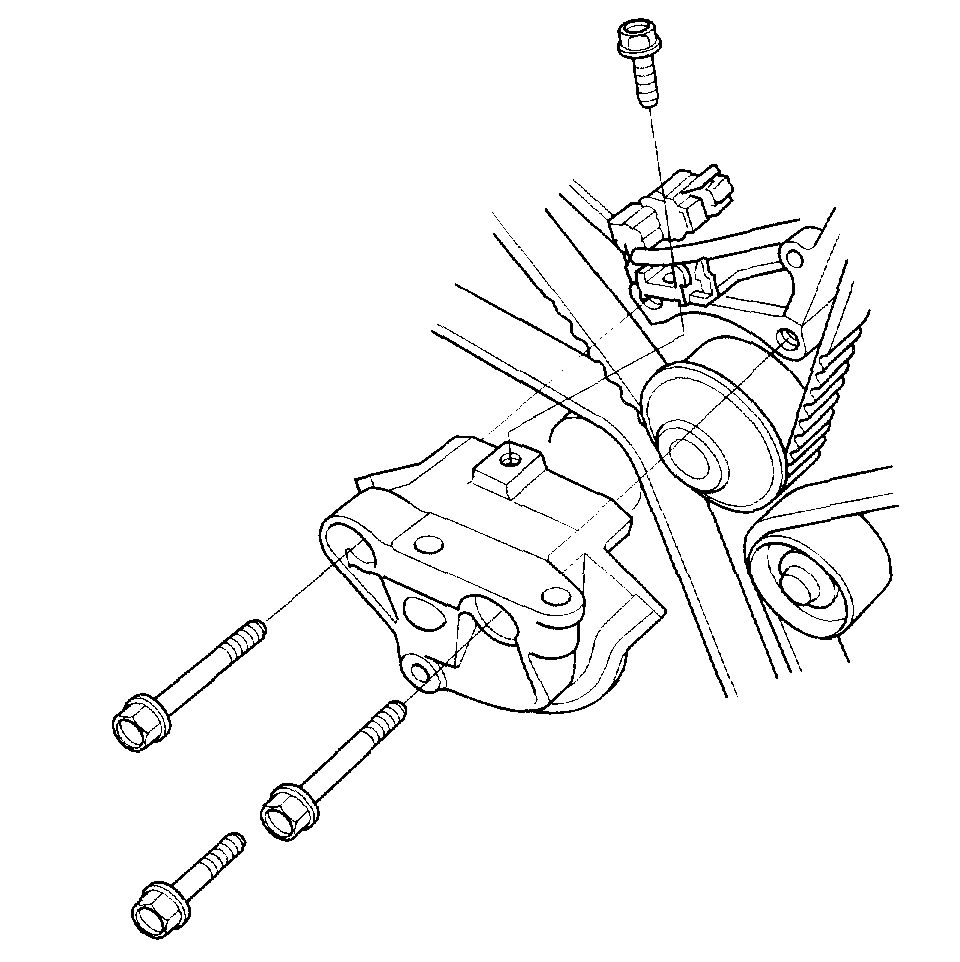
15. Remove the engine mount bracket.
Picture 39
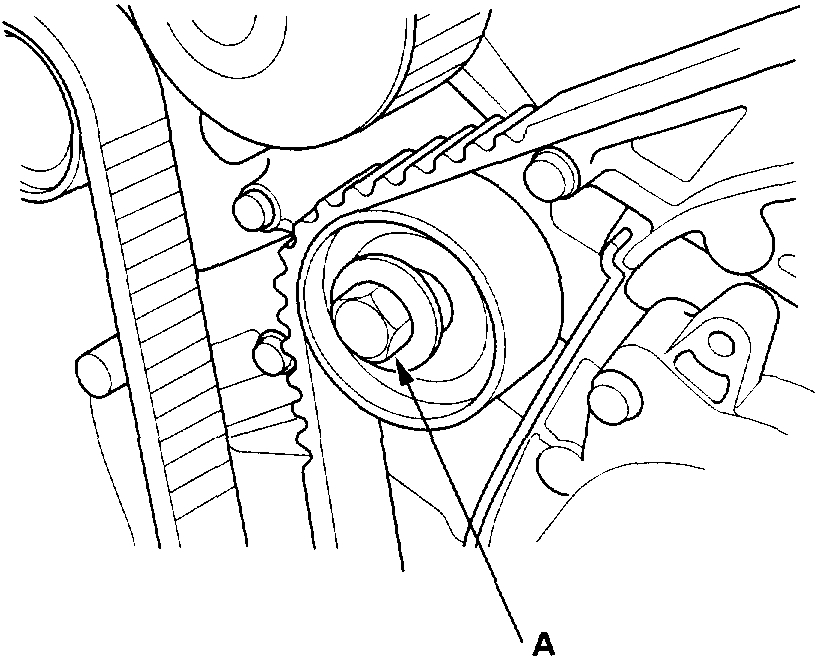
16. Loosen the idler pulley bolt (A) about five or six turns, then remove the timing belt.
____________________________________________________________________________________
Here are the directions for timing belt installation. It is very important you are certain the timing is correct prior to trying to restart the vehicle.
Timing Belt Installation
Vehicle Engine, Cooling and Exhaust Engine Timing Components Timing Belt Service and Repair Procedures Timing Belt Installation
TIMING BELT INSTALLATION
Timing Belt Installation
NOTE: The following procedure is for installing a new timing belt. If you are installing a used timing belt, refer to the next procedure.
New Belt
1. Clean the timing belt pulleys, and upper and lower covers.
Picture 40
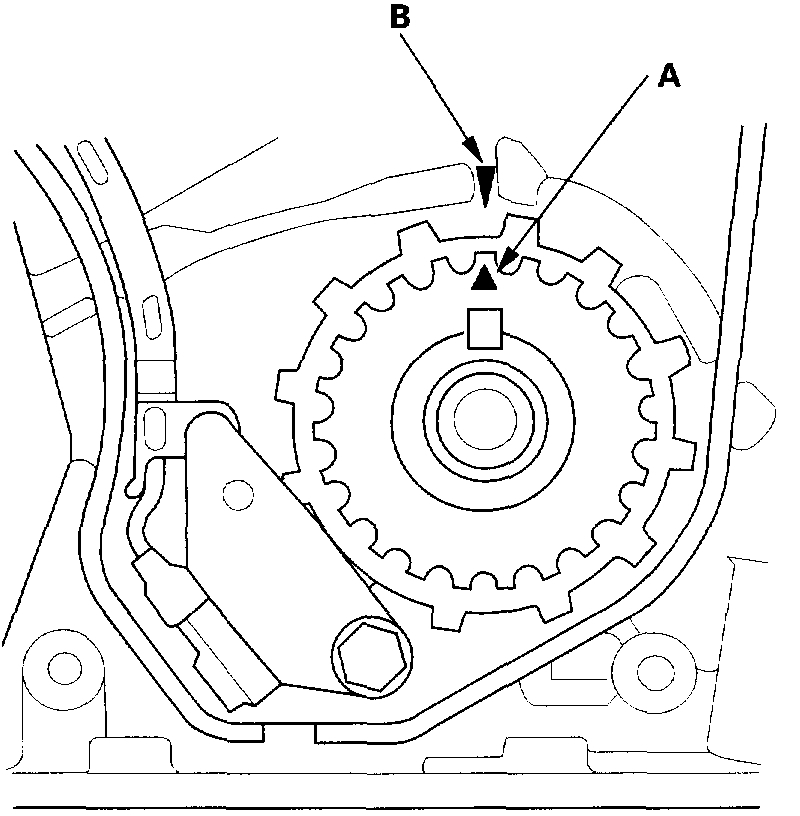
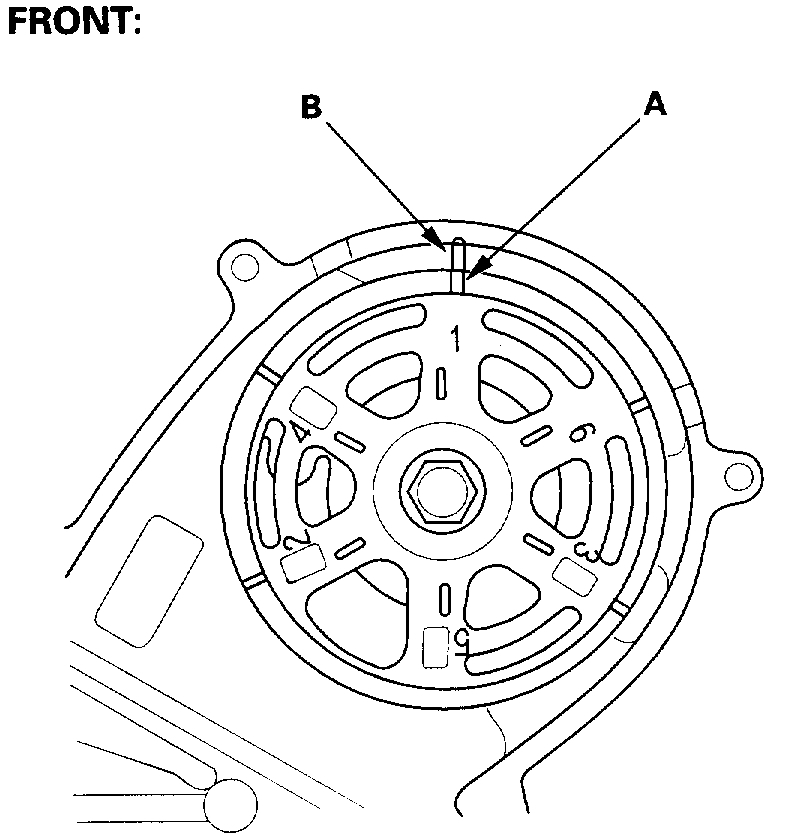
2. Set the timing belt drive pulley to Top Dead Center (TDC) by aligning the TDC mark (A) on the tooth of the timing belt drive pulley with the pointer (B) on the pulley.
Pictures 41 and 42
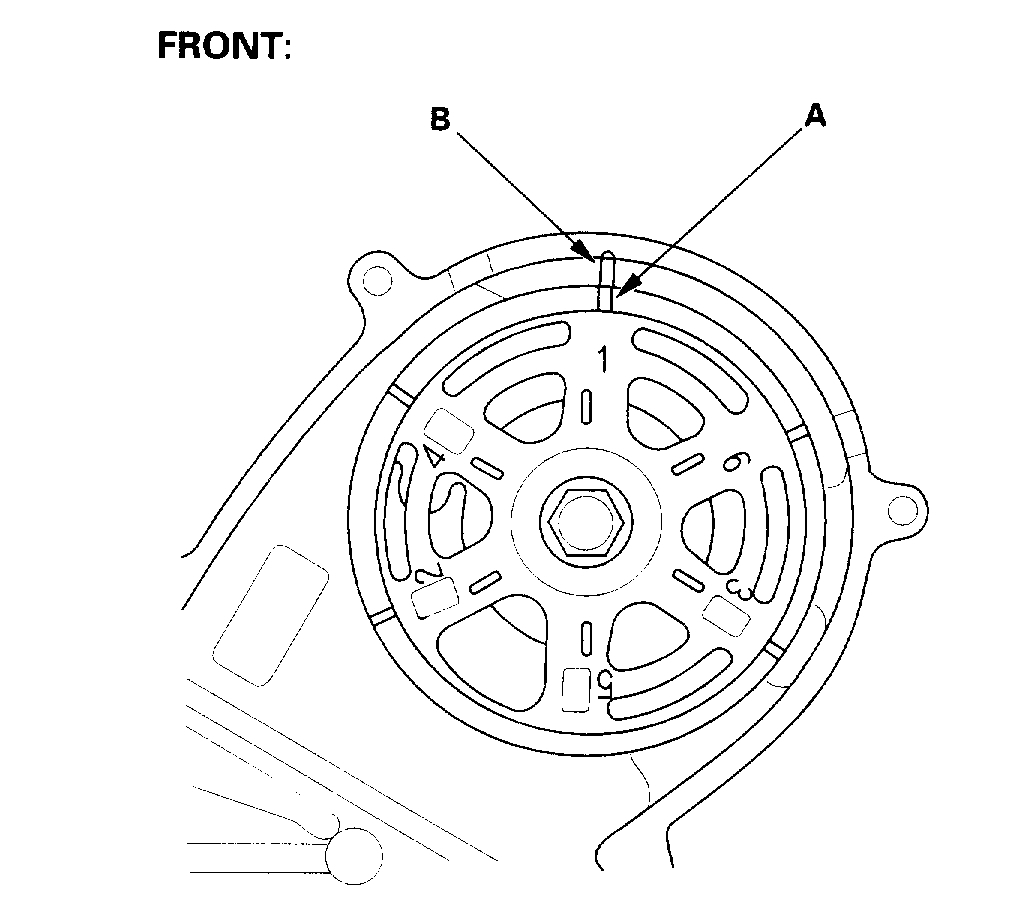
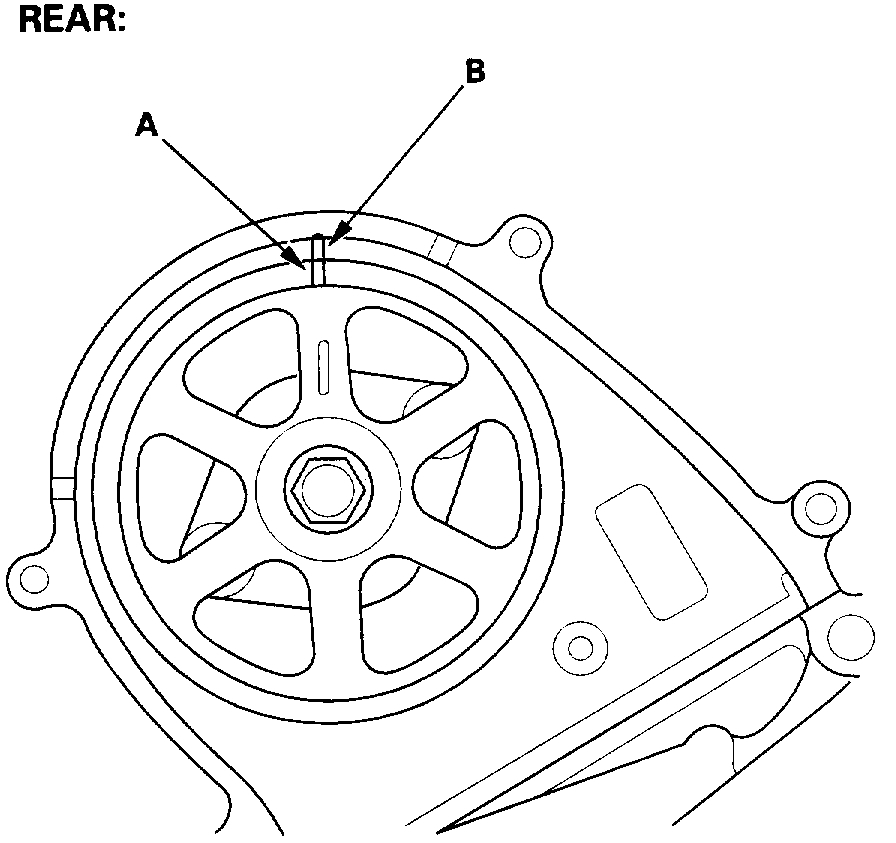
3. Clean the camshaft pulleys. Set the camshaft pulleys to TDC by aligning the TDC marks (A) on the camshaft pulleys with the pointers (B) on the back covers.
4. Remove the battery clamp bolt from the back cover.
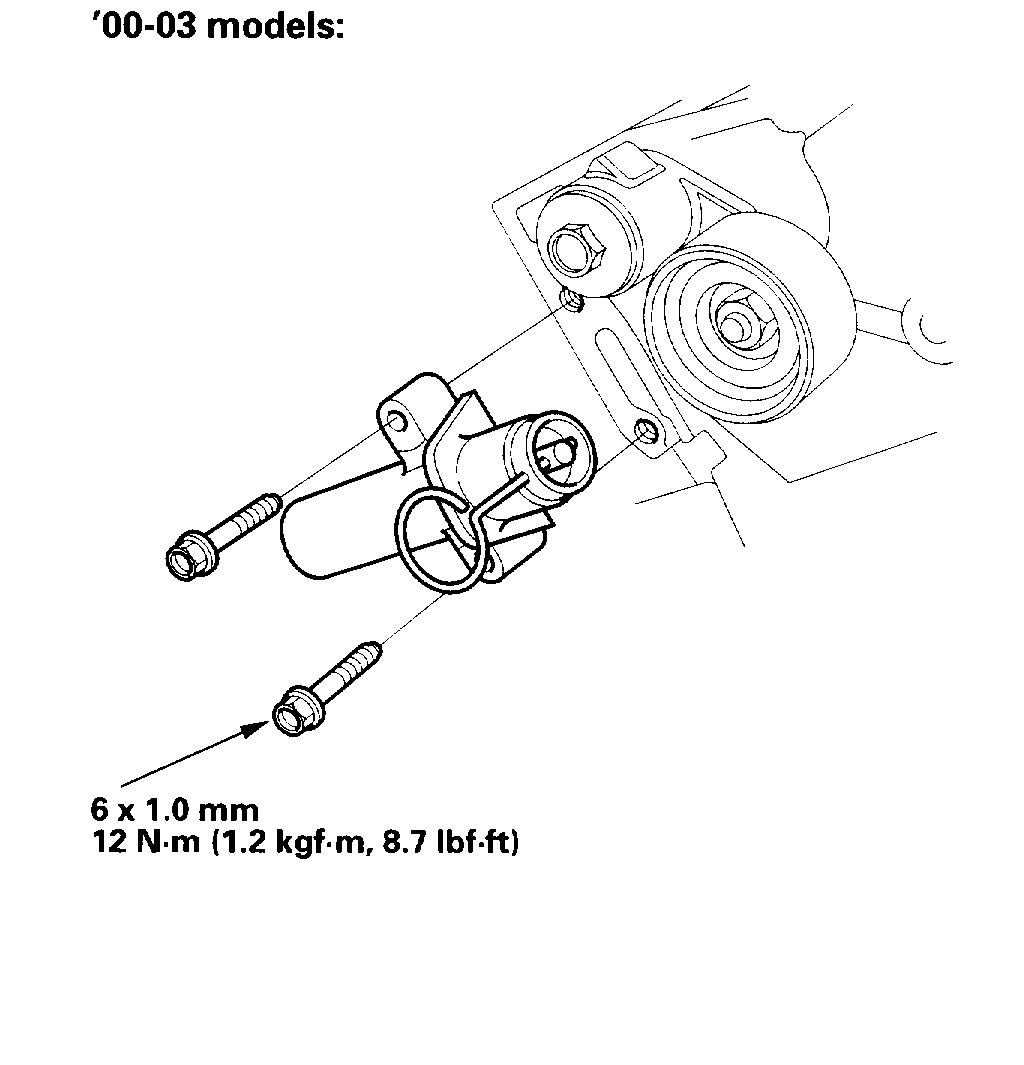
5. Remove the auto-tensioner.
Picture 43
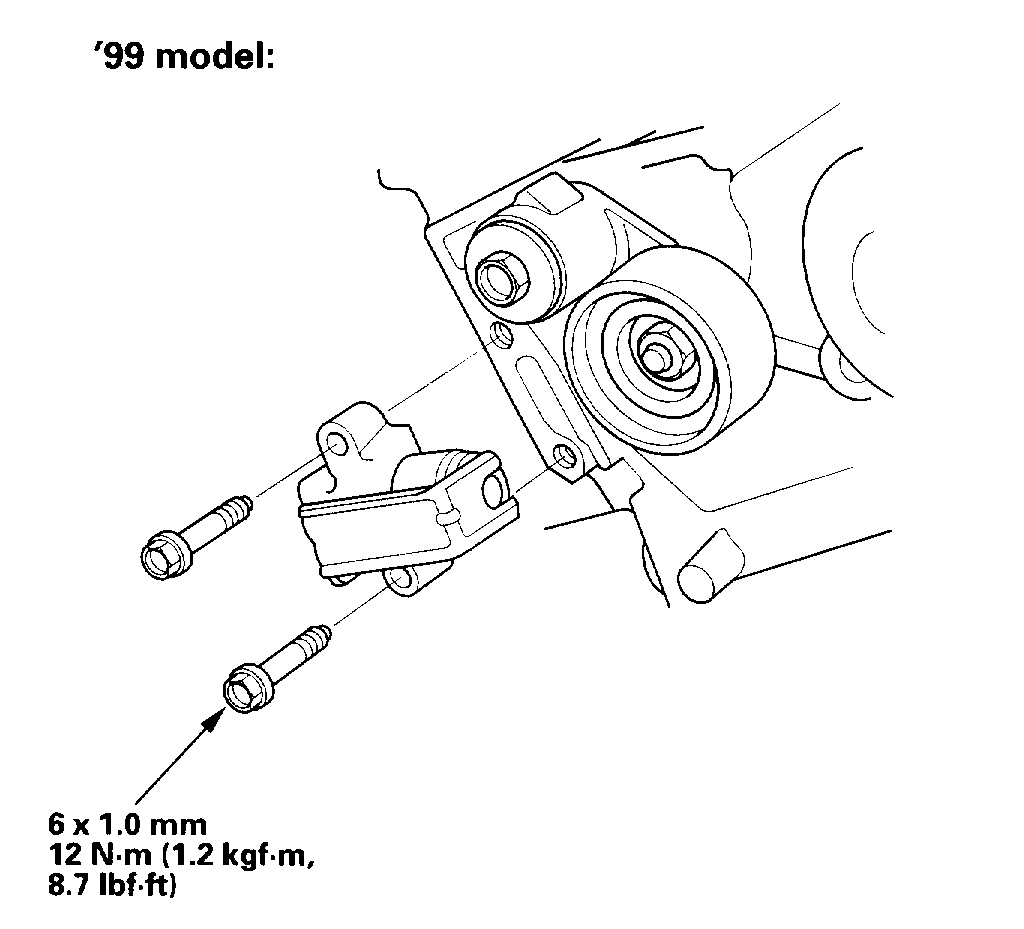
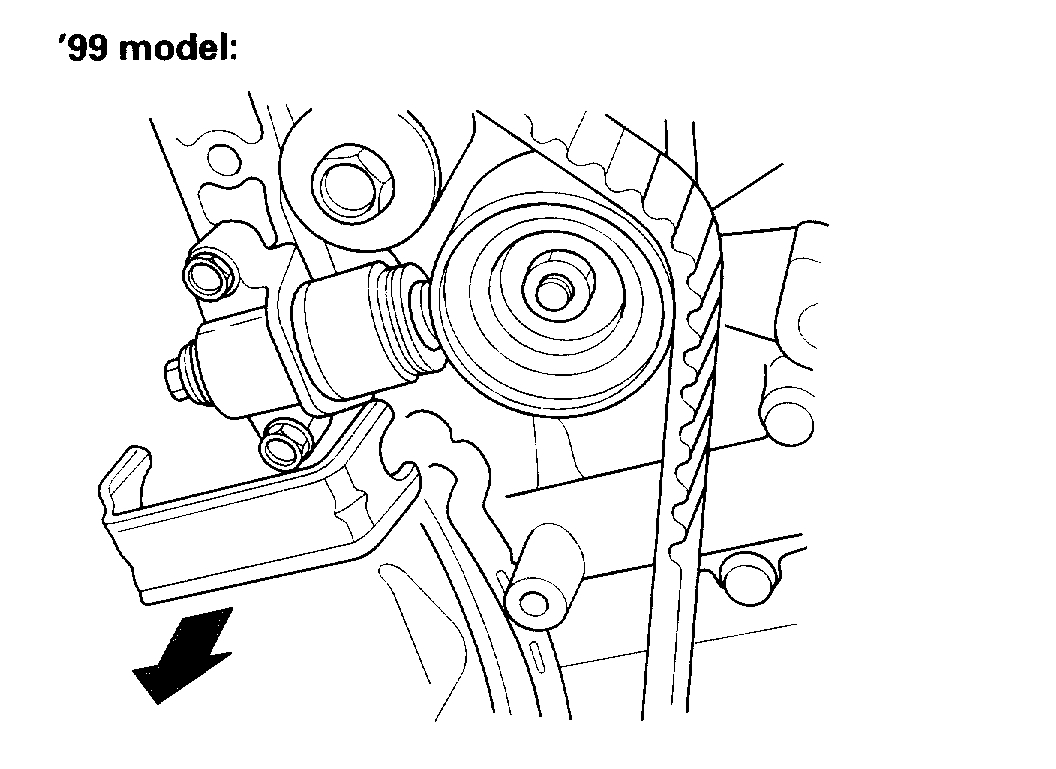
6. Hold the auto-tensioner (A) with the maintenance bolt pointing up. Loosen and remove the maintenance bolt (B) ('99 model).
NOTE: Handle the auto-tensioner carefully so the oil inside does not spill or leak. If any of the oil has spilled or leaked out of the auto-tensioner, refill it with 5W-30 motor oil. The total capacity is 6.5 ml (0.22 fl oz).
7. Clamp the boss of the auto-tensioner in a soft-jawed vise. Do not grip the housing of the autotensioner ('99 model).
Picture 44
8. Insert a flat blade screwdriver (C) into the maintenance hole. Place the retainer (D) (P/N 14540-P8A-A01) on the auto-tensioner while turning the screwdriver clockwise to compress the bottom ('99 model).
NOTE: Take care not to damage the threads or the gasket contact surface with the screwdriver.
9. Reinstall the maintenance bolt (A). Always use a new casket (B) ('99 model).
10. Make sure no oil is leaking around the maintenance bolt.
Picture 45
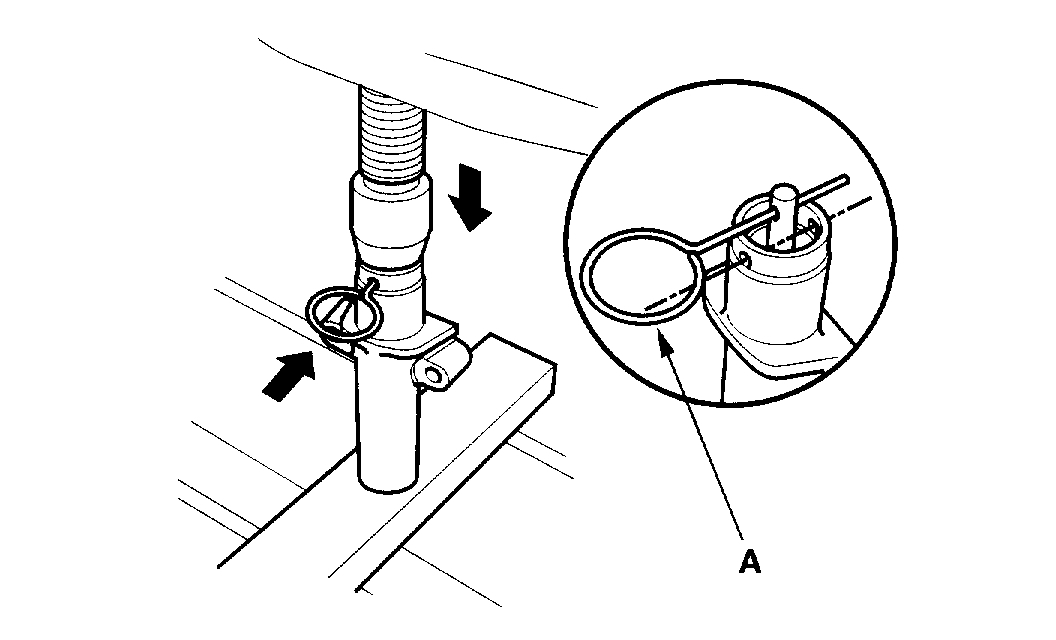
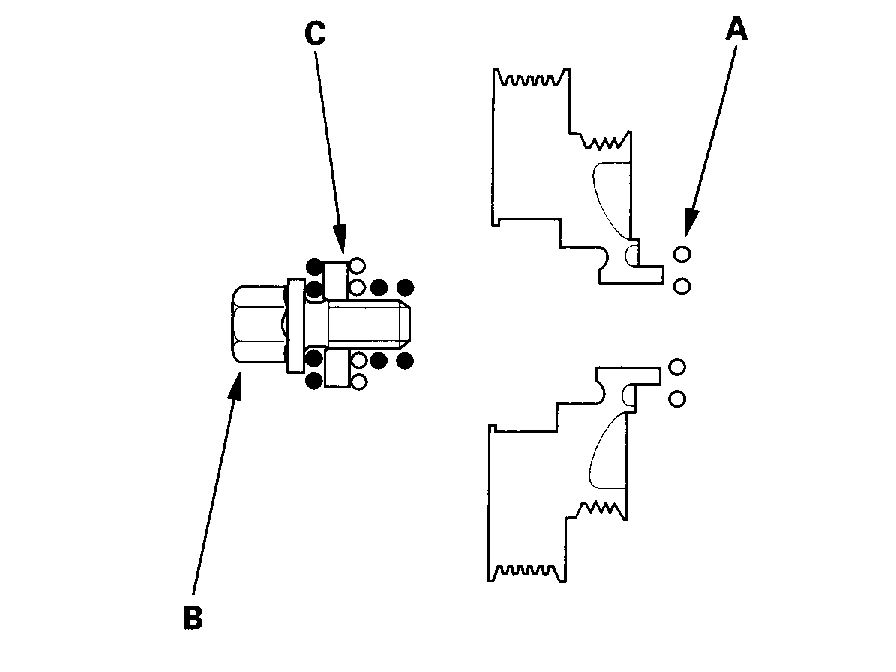
11. Align the holes on the rod and housing of the autotensioner with a pin (A)('00-03 models).
12. Set the auto-tensioner on the hydraulic press, then slowly compress the auto-tensioner. Insert a pin of 2.0 mm (0.08 inch) diameter through the housing and the rod ('00-03 models).
NOTE: The compression pressure should not exceed 9,800 N (1,000 kgf, 2,200 lbs.).
Pictures 46 and 47
13. Install the auto-tensioner.
NOTE: Make sure the retainer or pin stays in place.
Picture 48
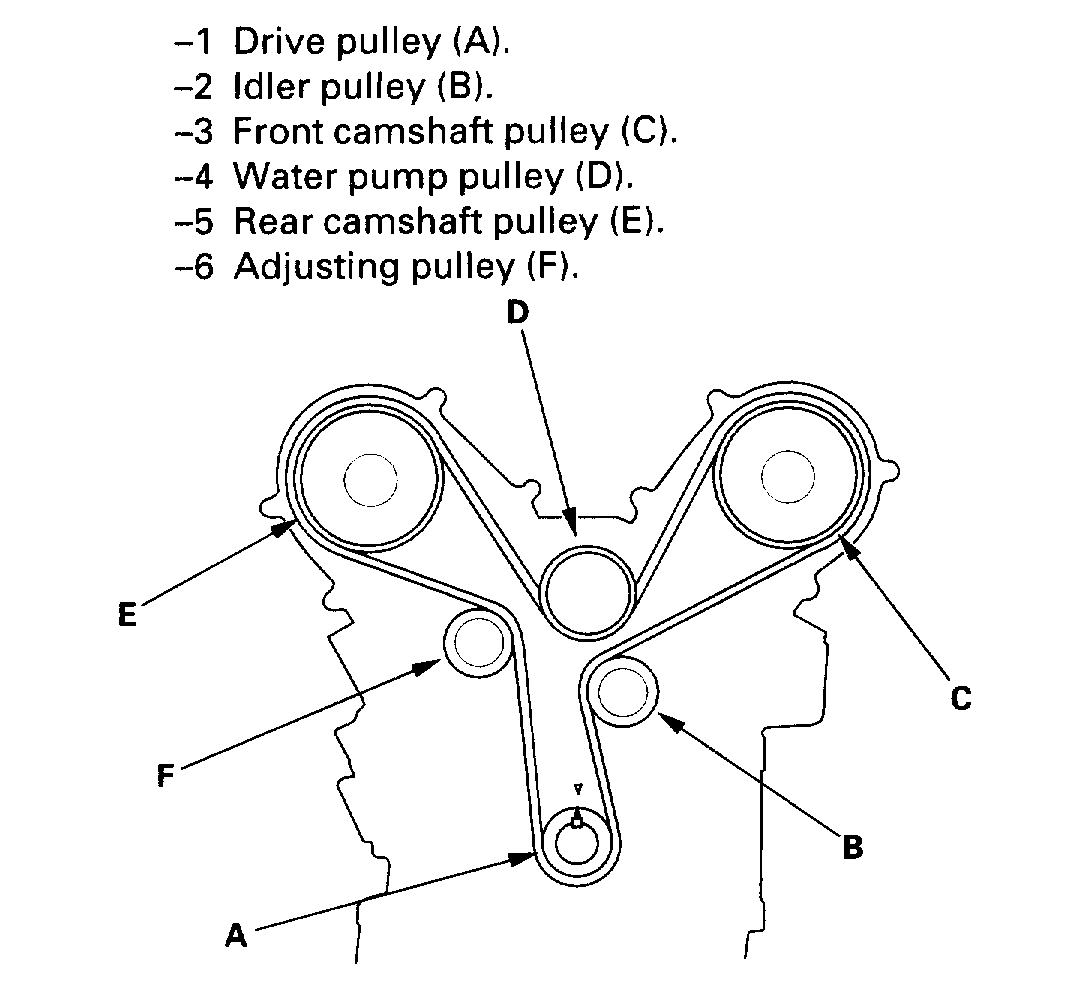
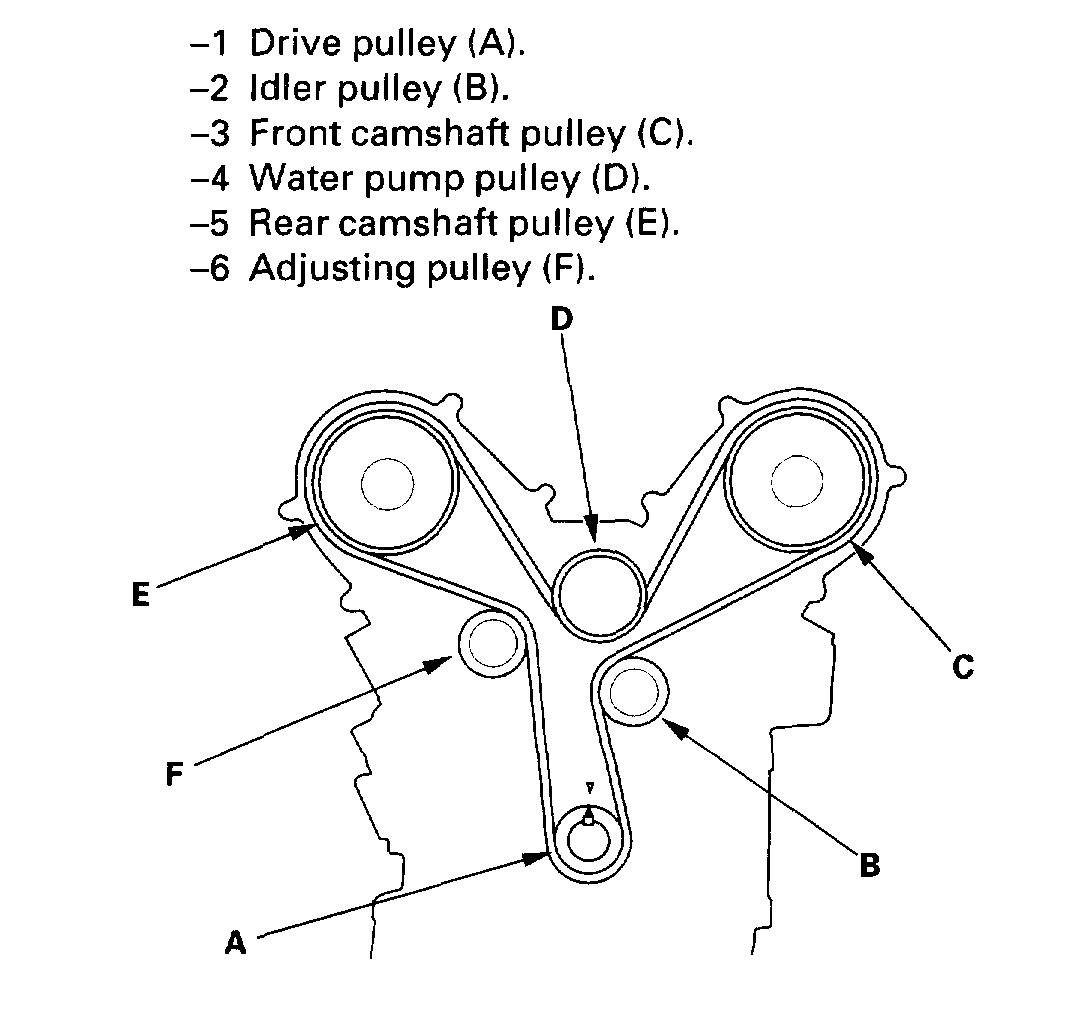
14. Install the timing belt in a counter clockwise sequence starting with the drive pulley.
Picture 49
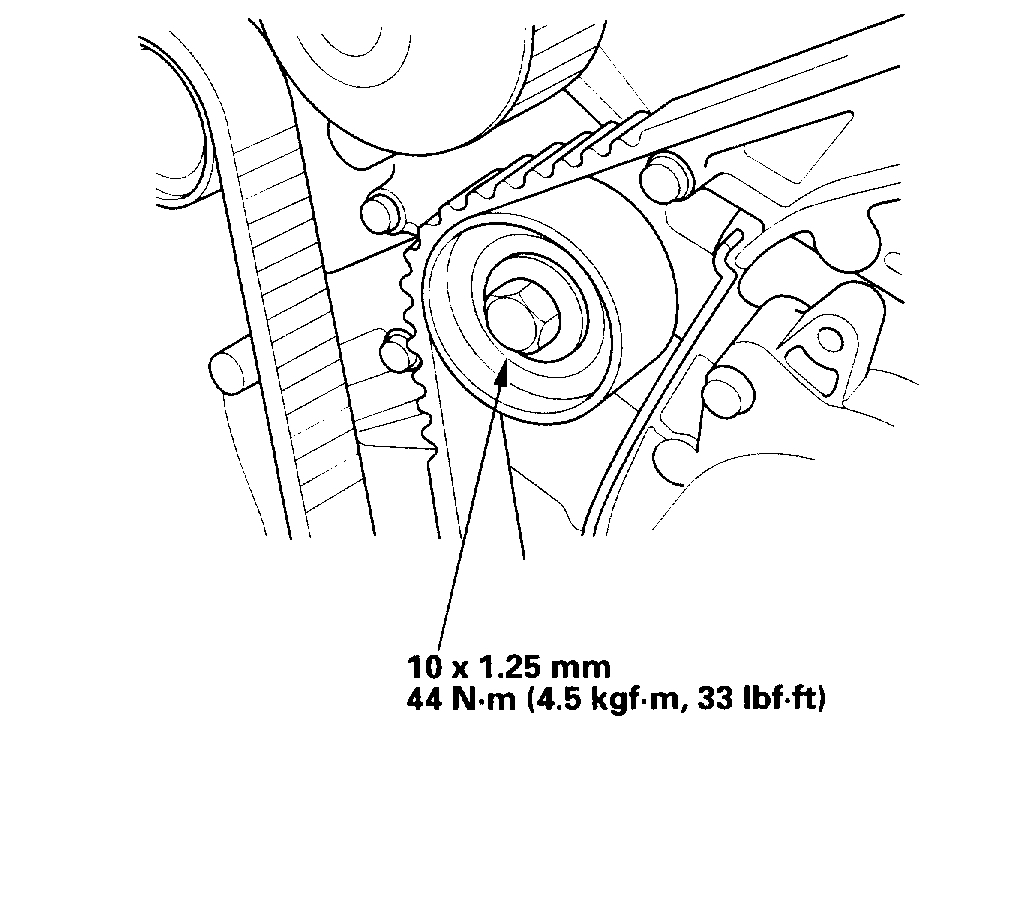
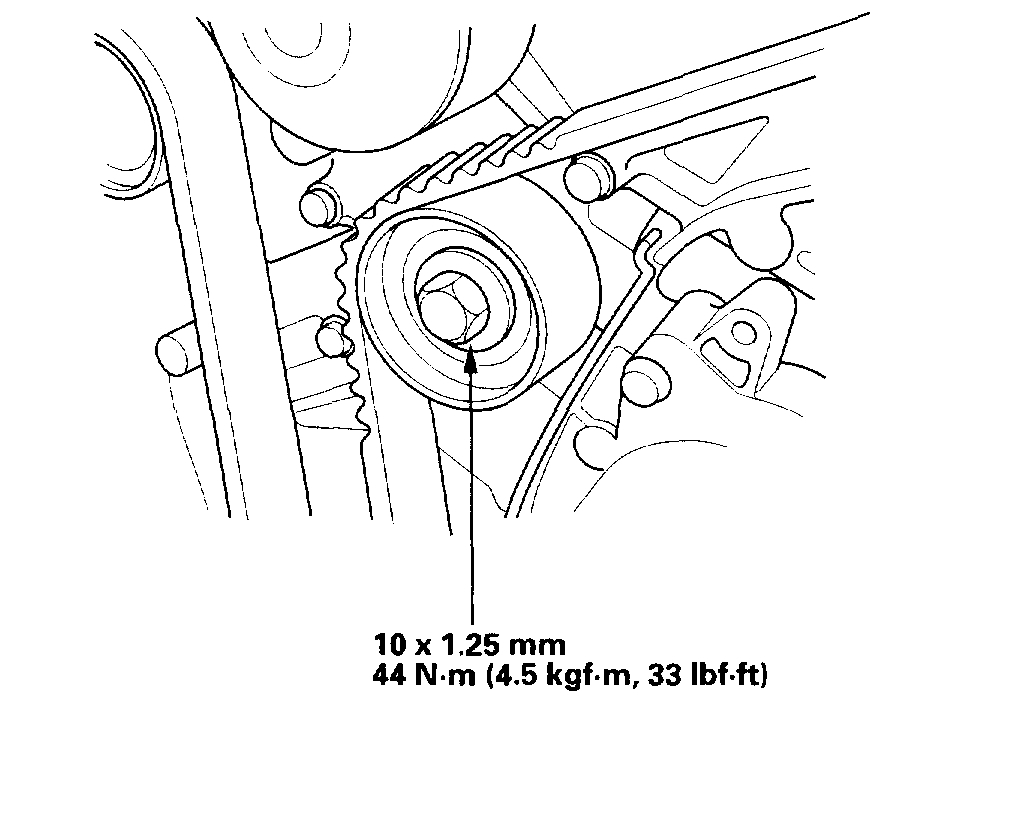
15. Tighten the idler pulley bolt.
Pictures 50 and 51
16. Remove the retainer or pin from the auto-tensioner.
Picture 52
17. Install the engine mount bracket.
Picture 53
18. Install the lower cover (A), front upper cover (B) and rear upper cover (C).
19. Clean the crankshaft pulley bolt and washer.
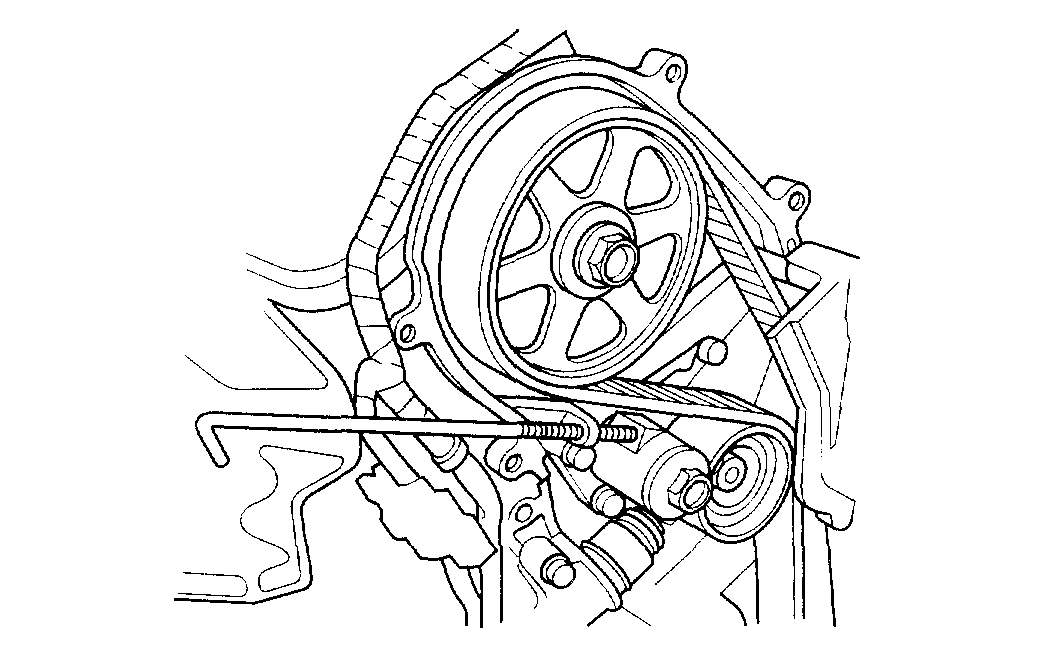
Picture 54
20. Clean all oil off the inside face (A) of the crankshaft pulley, and apply lubricant to the pulley bolt (B) and washer (C).
Picture 55
21. Install the crankshaft pulley, and tighten the bolt to 245 Nm (25.0 kg-cm, 181 ft. Lbs.). Do not use an impact wrench.
22. Rotate the crankshaft pulley about five or six turns clockwise so the timing belt positions on the pulleys.
Picture 56
23. Turn the crankshaft pulley so its white mark (A) lines up with the pointer (B).
Picture 56
Picture 57
24. Check the camshaft pulley marks.
If the camshaft pulley marks are at TDC, go to step 25.
If the camshaft pulley marks are not at TDC, remove the timing belt and repeat steps 2 through 21.
Picture 58
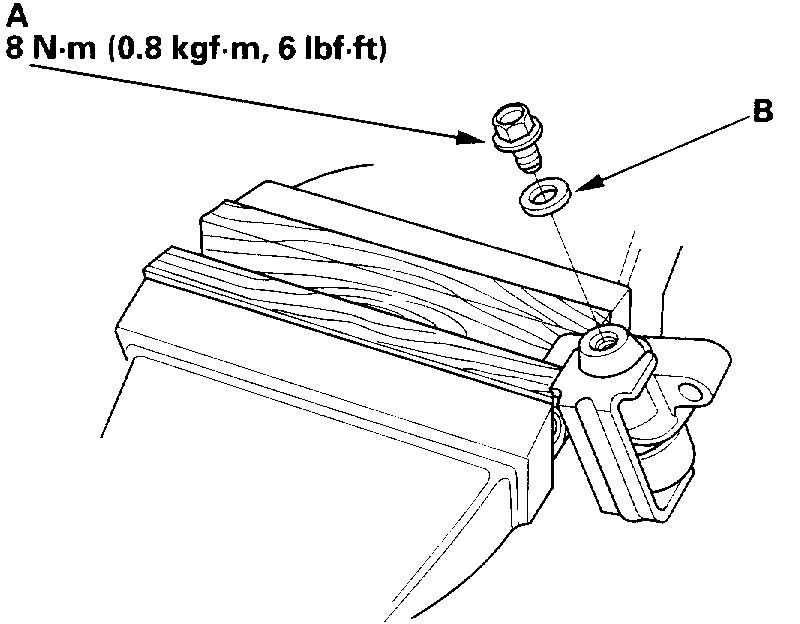
25. Install the dipstick and tube (A) with a new O-ring (B).
26. Install and adjust the P/S pump belt.
27. Install the alternator belt.
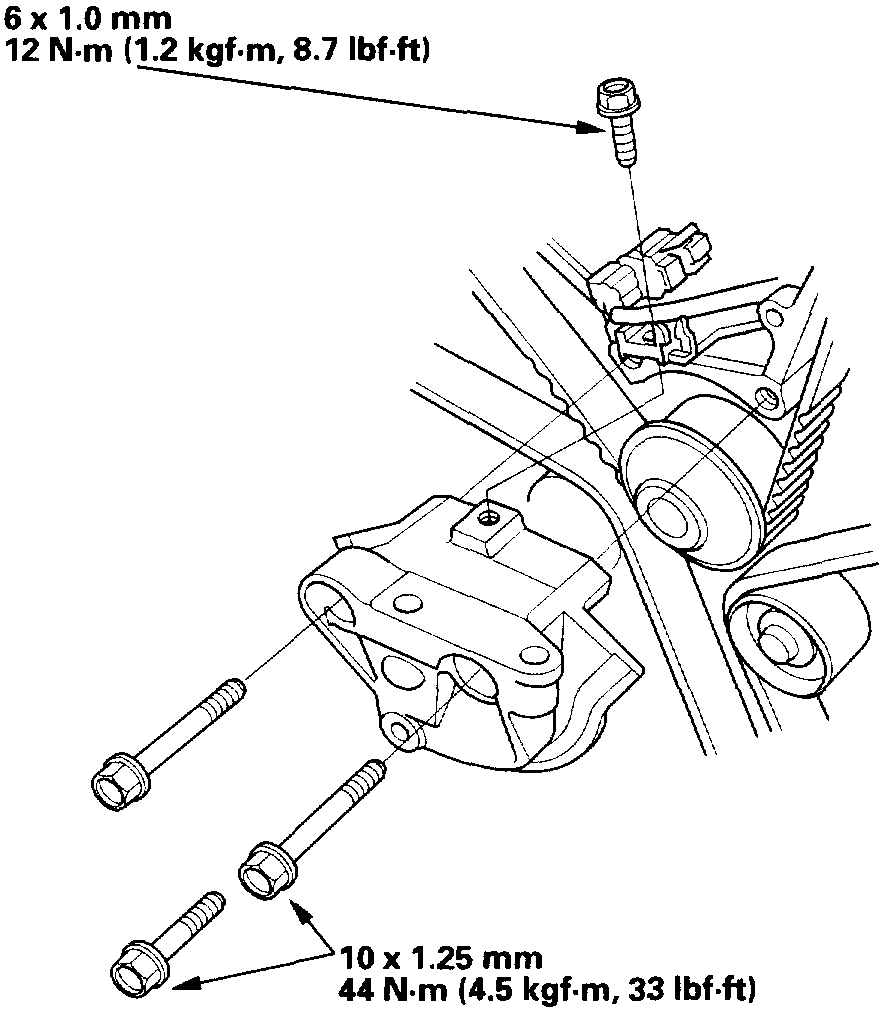
Picture 59
28. Install the side engine mount bracket, then tighten the mounting bolts in the numbered sequence shown.
Used Belt
Follow this procedure when installing a used timing belt.
1. Clean the timing belt pulleys, and upper and lower covers.
Picture 60
2. Set the timing belt drive pulley to TDC by aligning the TDC mark (A) on the tooth of the timing belt drive Pulley with the jointer (B) on the oil pump.
Pictures 61 and 62
3. Clean the camshaft pulleys. Set the camshaft pulleys to TDC by aligning the TDC marks (A) on the camshaft pulleys with the pointers (B) on the back covers.
4. If the auto-tensioner has extended and the timing belt cannot be installed, remove and compress the auto-tensioner.
Picture 63
5. Install the timing belt in a counterclockwise sequence starting with the drive pulley. Take care not to damage the timing belt when installing it.
Picture 64
6. Tighten the idler pulley bolt.
Picture 65
7. Remove the battery clamp bolt from the back cover.
Picture 66
8. Install the engine mount bracket.
Picture 67
9. Install the lower cover (A), front upper cover (B) and rear upper cover (C).
10. Clean the crankshaft pulley bolt and washer.
Picture 68
11. Clean any oil off the inside face (A) of the crankshaft pulley, and apply lubricant to the pulley bolt (B) and washer (C).
Picture 69
12. Install the crankshaft pulley, and tighten the bolt to 245 Nm (25.0 kgf-cm, 181 ft. Lbs.). Do not use an impact wrench.
13. Rotate the crankshaft pulley about five or six turns clockwise so the timing belt positions on the pulleys.
Picture 70
14. Turn the crankshaft pulley so its white mark (A) lines up with the pointer (B).
Pictures 71 and 72
15. Check the camshaft pulley marks.
If the camshaft pulley marks are at TDC, go to step 16.
If the camshaft pulley marks are not at TDC, remove the timing belt and repeat steps 2 through 11.
Picture 73
16. Install the dipstick and tube (A) with a new O-ring (B).
17. Install and adjust the P/S pump belt.
18. Install the alternator belt.
Picture 74
19. Install the side engine mount bracket, then tighten the mounting bolts in the numbered sequence shown.
______________________________________________
These are very extensive and not an easy job. If you need help or have questions, let me know. Also, let me know if this helps and is what you needed
Take care,
Joe
Images (Click to make bigger)
Tuesday, January 15th, 2019 AT 7:32 PM