Will start with p0300,p0171 and p0174,start here.99 through 05 GEN III truck engines may experience any of the following:
A cold rough idle that diminishes as the engine warms up.
Possible DTCS P0171, P0174, or P0300.
Random misfires at idle. The intake gasket seals may be leaking around the intake ports, causing a lean condition. The intake gasket seals may leak around the bottom side of the port, making it a challenge to detect the vacuum leak. If leaking intake gasket seals are found, replace the intake gaskets.The intake plenum should also be checked for excessive warpage that may cause an uneven clamping pressure of the seal. If the plenum is found to be warped it will need to be replaced. p0446 and p0449,
Models:
1999-2007 Chevrolet Silverado (Classic) Models
1999-2007 GMC Sierra (Classic) Models
2007-2009 Chevrolet Silverado Models (Excluding Hybrid)
2007-2009 GMC Sierra Models (Excluding Hybrid)
Supercede:
This bulletin is being revised to update the correction Information to include instructions on how solenoid must be installed. Please discard Corporate Bulletin Number 02-06-04-037G (Section 06 - Engine/Propulsion System).
Condition
Some customers whose vehicles are operated in dusty type environments, such as farming or mining off-road type applications, may comment about the illumination of the check engine light, with a DTC of P0446 (Restricted/Blocked EVAP Vent Path) being set.
Cause
Dirt and dust intrusion into the EVAP canister vent hose assembly, resulting in restricted air flow, may cause this condition.
Correction (1999-2007 Classic/Old Style Models)
After following the published SI diagnostics for P0446 and determining that the EVAP canister vent valve is the cause of the MIL light, replace the existing EVAP canister vent valve assembly with a new assembly. This new assembly is a sealed unit that is designed to be vented through a remote filter box. To ensure correct installation, follow the procedures below.
Important
DO NOT replace the EVAP canister assembly for this concern unless it fails the leak test.
1999-2003 Model Year (Use Service Kit P/N 19207762) 1. Raise the vehicle. Suitably support the vehicle.
2. Disconnect the EVAP canister vent valve electrical connector, if equipped.
3. Disengage the two vent valve pipe clips securing the pipe to the underbody. Remove the clips from the underbody and discard.
4. Disconnect the vent valve pipe at the EVAP canister.
5. Remove and retain the EVAP canister vent valve bracket mounting bolt.
6. Remove the complete EVAP canister vent valve assembly with bracket attached and discard.
Important
The new canister vent valve will be installed in a new location, outside of the frame.
7. Position and secure the new valve assembly to the frame bracket on the outside of the frame using the existing hole and mounting bolt.
Tighten
Tighten the bracket mounting bolt to 12 Nm (106 lb in).
8. Connect the vent valve pipe to the EVAP canister.
9. Install the two vent valve pipe clips into the existing underbody holes.
10. Connect the EVAP canister vent valve electrical connector, if equipped.
11. Attach bulk 5/8" heater hose to the vent valve port and secure using a clamp. Run a length as needed along the frame rail routing to the area above the transmission.
12. Cut the hose to determined length and install the supplied filter box. Secure using a clamp.
13. Remove the transmission support and lower the transmission assembly as necessary to allow for access to the new filter box location.
14. Secure the filter box to the transmission vent hose just forward of the hose tee-section using a tie strap. DO NOT pinch or restrict the transmission vent hose. The filter box opening should be pointing downward.
15. Raise the transmission and reinstall the transmission support.
16. Tie strap the hose as needed along the frame rail in order to keep the hose away from pinch-points and heat sources.
17. Lower the vehicle.
2004-2007 Model Year (Use Service Kit P/N 19152349) 1. Raise the vehicle. Suitably support the vehicle.
2. Disconnect the EVAP canister vent valve electrical connector.
3. Disconnect the canister pipe from the vent valve.
4. Push in the retainer and remove the existing canister vent valve from the fuel tank clip or mounting bracket. Discard the old valve.
5. Cut back the existing canister pipe approximately 51 mm (2 in) to remove the quick connect end.
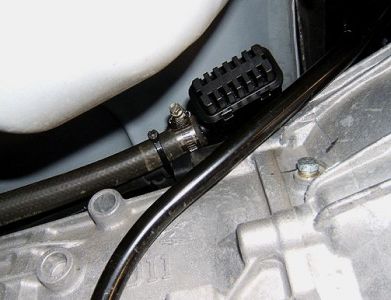
Crew Cab Short Box Shown Below, Other Configurations Similar
Extended Cab Short Box Shown Below, Other Configurations Similar
6. Install the new canister vent valve solenoid to the fuel tank clip or mounting bracket as shown above. The valve port closest to the electrical connector must point towards the canister.
7. Cut bulk 5/8" heater hose to a length of approximately 76 mm (3 in). Install the hose between the solenoid and the canister pipe and secure using clamps.
8. Attach bulk 5/8" heater hose to the vent port and secure using a clamp. Run a length as needed along the frame rail routing to the area above the transmission.
9. Cut the hose to determined length and install the supplied filter box. Secure using a clamp.
10. Remove the transmission support and lower the transmission assembly as necessary to allow for access to the new filter box location.
11. Secure the filter box to the transmission vent hose just forward of the hose tee-section using a tie strap. DO NOT pinch or restrict the transmission vent hose. The filter box opening should be pointing downward.
12. Raise the transmission and reinstall the transmission support.
13. Connect the EVAP canister vent valve electrical connector.
14. Tie strap the hose as needed along the frame rail in order to keep the hose away from pinch-points and heat sources.
15. Lower the vehicle.
Correction (2007-2009 New Style Models)
After following the published SI diagnostics for P0446 and determining that the EVAP canister vent valve is the cause of the MIL light, replace the EVAP canister vent valve assembly and relocate the remote filter box. To ensure correct installation, follow the procedures below.
Important
DO NOT replace the EVAP canister assembly for this concern unless it fails the leak test.
Use Service Kit P/N 19207763 1. Raise the vehicle. Suitably support the vehicle.
2. Disconnect the EVAP canister vent valve electrical connector.
3. Disconnect the vent valve pipe quick connect from the canister.
4. Either cut the existing valve vent pipe and leave the remaining section of pipe in the vehicle or remove along with the valve.
5. Push in the retainer and remove the existing canister vent valve from the fuel tank clip or mounting bracket.
6. Cut back the existing canister pipe approximately 51 mm (2 in) and retain the pipe for use with new valve.
7. Connect the canister pipe quick connect to the canister.
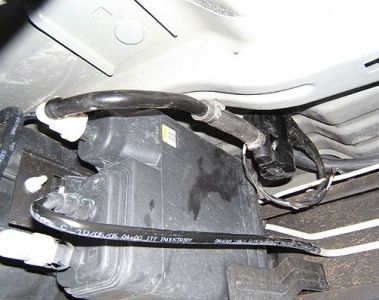
2500 Crew Cab Short Box Shown Below, Other Configurations Similar
1500 Extended Cab Short Box Shown Below, Other Configurations Similar
8. Install the new canister vent valve solenoid to the fuel tank clip or mounting bracket as shown above. The valve port closest to the electrical connector must point towards the canister.
9. Cut bulk 5/8" heater hose to a length of approximately 76 mm (3 in). Install the hose between the solenoid and the canister pipe and secure using clamps.
10. Attach bulk 5/8" heater hose to the vent port and secure using a clamp. Run a length as needed along the frame rail routing to the passenger side area above the transmission.
11. Cut the hose to determined length and install the supplied filter box. Secure using a clamp.
12. Remove the transmission heat shield, if necessary.
13. Remove the transmission support and lower the transmission assembly as necessary to allow for access to the new filter box location.
14. Secure the filter box to the transmission vent hose just forward of the hose tee-section using a tie strap. DO NOT pinch or restrict the transmission vent hose. The filter box opening should be pointing downward.
15. Raise the transmission and reinstall the transmission support.
16. Reinstall the transmission heat shield.
17. Connect the EVAP canister vent valve electrical connector.
18. Tie strap the hose as needed along the frame rail in order to keep the hose away from pinch-points and heat sources.
19. Lower the vehicle.
p1441 is EVAP system develops a vacuum more than a predetermined value when purge is not commanded.could be a possible purge valve or could be set by the p0446 and p0449.start with the above first and see how you make out.
Monday, May 24th, 2010 AT 4:33 PM