1989 Geo Prizm Timing

Tiny
CRAZYHAROLD
  • MEMBER
  • 1989 GEO PRIZM
  • 4 CYL
  • FWD
  • AUTOMATIC
  • 280,000 MILES
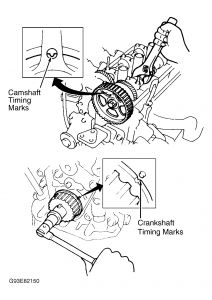
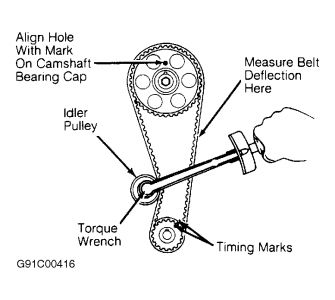
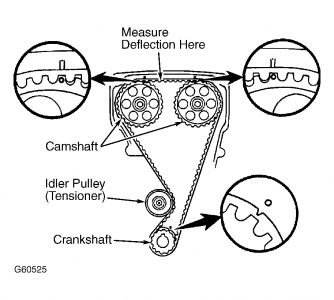
Please help! I need to know how to set the timing belt in a 1989 Geo Prizm, 1.6 motor, vin code #6. I can't seem to figure out what "marks" to set with what, on the intake cam, exhaust cam, and/or camgear. What marks do I line up with what? Thanks folks, and I will make a donation as soon as I can.
Monday, September 1st, 2008 AT 7:58 PM

4 Replies

Tiny
BMRFIXIT
  • MECHANIC
  • 19,053 POSTS
TIMING BELT REPLACEMENT - 1.6L - DOHC -1989 Geo Prizm

Installation
1.Ensure all timing marks are still aligned. See Fig. 1 . Install timing belt tensioner and spring. Move tensioner to the left and temporarily tighten bolt.

2.Install timing belt. If old timing belt is reused, ensure belt is installed in original rotating direction. Ensure marks on belt align with camshaft and crankshaft sprockets.

3.Loosen timing belt tensioner bolt and allow tension to be applied on timing belt. Rotate crankshaft CLOCKWISE 2 revolutions. DO NOT turn crankshaft counterclockwise. Ensure all timing marks are aligned. Tighten timing belt tensioner bolts to specification. See TORQUE SPECIFICATIONS .

4.Measure timing belt deflection at midway point between camshaft and crankshaft sprockets. See Fig. 2 . With 4.4 lbs. (1.9 kg) applied on timing belt, defection should be .20-.24" (5.1-6.9 mm). If belt deflection is not within specification, repeat previous step.

CAUTION:Ensure all timing marks are aligned once timing belt is adjusted.

5.Install timing belt guide with cupped side facing out. Install timing belt covers, starting with bottom cover. Install crankshaft pulley. Tighten center bolt to specification.

6.Install water pump pulley. Install engine mount. Install engine ground wire (if equipped) to right fender apron. Install valve cover with new gasket. Install spark plugs and spark plug secondary wires.

7.Install PCV valve and wiring harness on valve cover. Install A/C compressor mounting bracket (if removed). Install A/C compressor to bracket. Install accessory drive belts.

8.Install cruise control actuator (if equipped). Install windshield washer reservoir. To install remaining components, reverse removal procedure. Adjust accessory drive belts to proper tension.


https://www.2carpros.com/forum/automotive_pictures/99387_prizm1_1.jpg


https://www.2carpros.com/forum/automotive_pictures/99387_prizm_1.jpg

Was this
answer
helpful?
Yes
No
+1
Monday, September 1st, 2008 AT 8:36 PM
Tiny
CRAZYHAROLD
  • MEMBER
  • 2 POSTS
Assuming I've already installed the new timing belt, my problem is that I didn't keep all the "marks" aligned and now what I'm needing to figure out is how, or what marks align to what? I have 2 cams, one intake cam and one exhaust cam, plus the camgear, which marks from each do I align to what? I'm not a mechanic, so I seem to be struggling some. It appears there could be about 72 different possible ways to align the "marks" and I can't figure out which is the right way. Please help, thank you.
Was this
answer
helpful?
Yes
No
Monday, September 1st, 2008 AT 9:59 PM
Tiny
BMRFIXIT
  • MECHANIC
  • 19,053 POSTS
U have to remove the belt and start over


https://www.2carpros.com/forum/automotive_pictures/99387_prizm2_1.jpg

Was this
answer
helpful?
Yes
No
Monday, September 1st, 2008 AT 10:05 PM
Tiny
MMPRINCE4000
  • MECHANIC
  • 8,549 POSTS
As BMR said you remove the belt and use a cresent wrench on the square boss on the exhaust cam and rotate the cams until timing marks are aligned. Then make sure lower belt cog is aligned with mark on oil pump, then install belt.

If you removed the cams for some reason (change valve seals for example) then that is a different story.
Was this
answer
helpful?
Yes
No
Tuesday, September 2nd, 2008 AT 8:24 AM

Please login or register to post a reply.

Sponsored links