Hello,
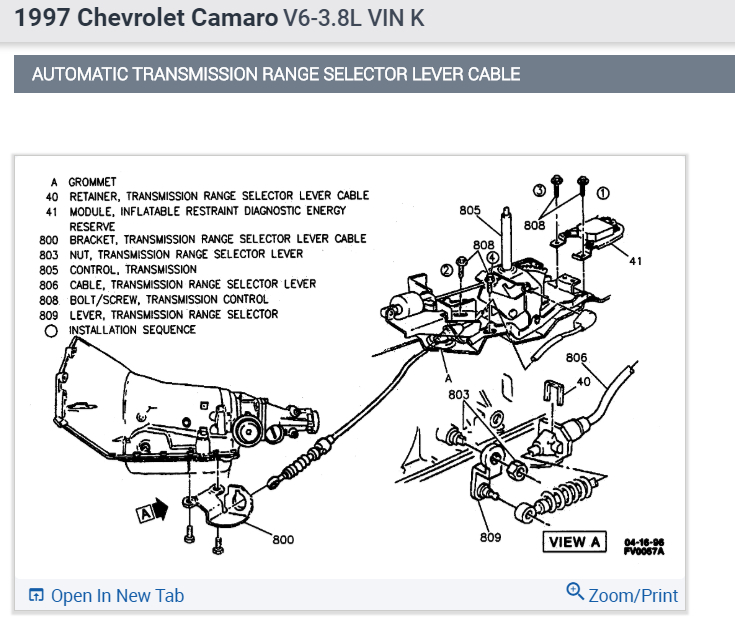
This happens when the shift cable wears out and needs to be replaced. Here are diagrams to help you replace the cable:
REMOVE OR DISCONNECT
CAUTION: This vehicle is equipped-with Supplemental Inflatable Restraint (SIR). Refer to CAUTIONS under "ON-VEHICLE SERVICE" and the SIR Component and Wiring Location View before performing service on or around SIR components or wiring. Failure to follow CAUTIONS could result in possible air bag deployment, personal injury, or otherwise unneeded SIR system repairs.
CAUTION: Before removing or Installing any electrical unit, or when a tool or equivalent could easily come in contact with "live" exposed electrical terminals, disconnect the battery negative cable to help prevent personal injury and/or damage to the vehicle or components. Unless instructed otherwise, the ignition switch must be in the "OFF" or "LOCK" position.
1. Negative battery cable.
2. Raise and suitably support vehicle.
3. Range selector lever cable (806) from range selector lever cable bracket (800).
4. Range selector lever cable (806) from range selector lever (809).
5. Lower vehicle.
6. Front floor console trim plate.
7. Range selector lever cable (806) from automatic transmission control (805).
8. Grommet on cable (806) from base of automatic transmission control (805), pulling cable (806) through hole in front compartment floor pan.
INSTALL OR CONNECT
NOTICE: Always use the correct fastener in the correct location. When you replace a fastener, use ONLY the exact part number for that application. The Manufacturer will call out those fasteners that require a replacement after removal. The Manufacturer will also call out the fasteners that require thread lockers or thread sealant. UNLESS OTHER WISE SPECIFIED, do not use supplemental coatings (paints, greases, or other corrosion inhibitors) on the threaded fasteners or fastener joint interfaces. Generally, such coatings adversely affect the fastener torque and the joint clamping force, and may damage the fastener. When you install fasteners, use the correct tightening sequence and specifications. Following these instructions can help you avoid damage to parts and systems.
1. Grommet on cable (806) to base of automatic transmission control (805) by feeding cable (806) through hole in front compartment floor pan.
2. Range selector lever cable (806) to automatic transmission control (805).
3. Front floor console trim plate.
4. Place automatic transmission control (805) in "NEUTRAL" position.
Check out the diagrams (Below). Please let us know if you need anything else to get the problem fixed.
Cheers, Ken
Oct 3, 2018 at 3:30 PM