Hi farmshop,
Here are the diagnostic procedures.
TEST B16 - RPM SENSOR
NOTE: You should perform this test when Code 14 is displayed, or when directed here by other test procedure. To prevent replacement of good components, ensure the RPM sensor is installed correctly and electrical connection is complete. This circuit test is intended to diagnose only the following: engine RPM sensor, sensor harness circuits and ECA.
1 . Continuous Memory Code 14: Erratic Engine RPM Signal. Code 14 indicates RPM signal output was missing pulses while the engine is running. Check EEC-IV system harness for loose wires or connectors, and the present of an onboard telephone or 2-way radio. If a telephone or 2-way radio is installed, ensure manufacturers cable routing instructions and specifications have been followed. With KOEO, enter Continuous Monitor Mode. Observe tester while lightly tapping sensor and "Wiggle" testing sensor connector. It may be necessary to reenter Continuous Monitor Mode during test if when a fault is found. If a fault is indicated, repair fault as necessary, and rerun QUICK TEST. If a fault is not found, go to next step.
2 . Checking EEC-IV Harness. While still in Continuous Monitor Mode as in step 1), observe test meter for a fault indication while performing "Wiggle" test on harness from sensor to ECA. If a fault is indicated, isolate and repair as necessary. Clear Code 14 and repeat QUICK TEST. If a fault is not found, go to next step.
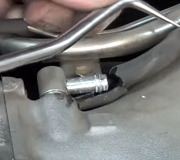
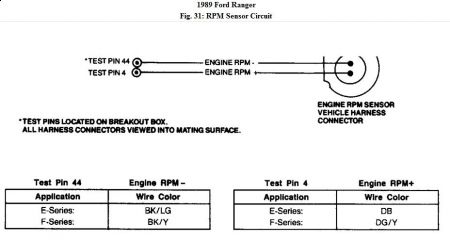
3 . Checking Continuity Of Engine RPM Sensor Harness. If an engine I.D. code other than "5" is received during the KOER Self-Test, a faulty or disconnected engine RPM sensor may be the cause. Turn key off and wait 10 seconds. Disconnect ECA 60-pin connector. Insect pins and wiring at connector for corrosion or damage, repair as necessary. Install breakout box, leaving ECA disconnected. Disconnect RPM sensor. Set DVOM on 200k-ohm scale. Measure resistance between test pin No. 4 at the breakout box and the RPM sensor harness connector. Measure resistance between test pin No. 44 at the breakout box and the RPM sensor harness connector. If both resistances are less than 5 ohms, go to next step. If not, repair open circuit as necessary. Remove breakout box, reconnect ECA and rerun QUICK TEST procedure.
4 . Check Engine RPM Sensor Harness For Short To Power Or Ground. Turn Key off and install breakout box, leaving ECA disconnected. Disconnect RPM sensor. Set DVOM on 200k-ohm scale. Measure resistance between test pins No. 4 and 37/57, 40 and 44 at the breakout box. Measure the resistance between test pin No. 44 and test pins No. 37/57 at the breakout box. If all resistances are greater than 10k-ohms, go to next step. If not, repair short circuit and rerun QUICK TEST procedure.
5 . Checking RPM Sensor. With key off and engine RPM sensor disconnected, set DVOM on 200k-ohm scale. Measure resistance between engine RPM sensor terminals at the RPM sensor. If resistance is 2400-2800 ohms, replace ECA, reconnect sensor and rerun QUICK TEST procedure. If resistance is within specifications, repair or replace sensor as necessary.
Sunday, December 20th, 2009 AT 1:14 AM