Hello,
Well, I attached how to remove and replace the back window. Hope that helps. Also, it appears that this may be a common problem as they have a technical service bulletin on it. I have provided that also.
Removal:
Remove the rear seat back.
1 Remove the bolts.
2 Lift up to remove the rear seat back.
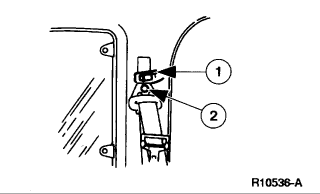
Remove the safety belt guide bolt.
1 Lift the cover.
2 Remove the bolt

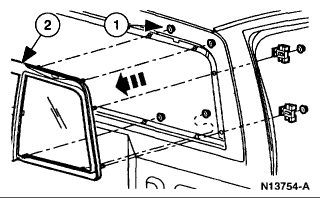
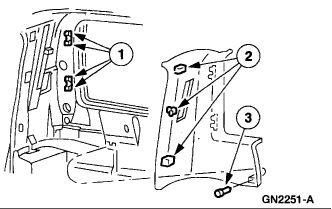
Remove the roof side rear trim panel.
1 Remove the pin-type retainers.
2 Pry and release the clips.
3 Slide the roof side trim panel out of the retainers and remove the roof side trim panel.
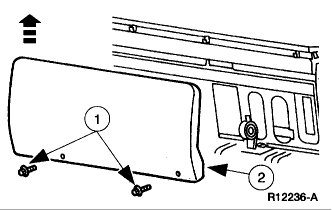
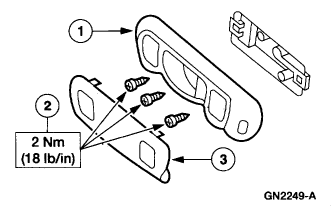
Remove the coat hooks.
1 Remove the two screws.
2 Remove the two coat hooks.
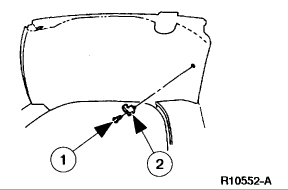
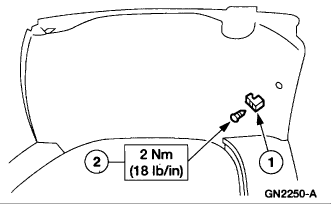
Remove the dome lamp.
1 Carefully pry the lens out of the dome lamp.
2 Remove the dome lamp screws.
3 Remove the dome lamp.
Lower the back half of the roof trim panel.
Cut the foam butyl from around the back window glass.
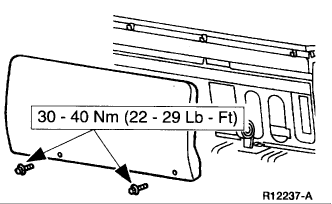
Remove the back window glass.
1 Remove the 12 nuts.
2 Remove the back window glass.
Remove any remaining foam butyl from the window glass frame.
INSTALLATION :
Clean the back window glass with an alcohol-free cleaner.
Apply 8 mm foam butyl, or equivalent meeting Ford specification WSB-M2G234-C to the back window glass.
Start at the bottom middle and work around.
Install the back window glass.
1 Position the back window glass.
2 Install the 12 nuts.
Position the roof trim panel.
Install the dome lamp.
1 Position the dome lamp.
2 Install the dome lamp screws.
3 Install the lens.
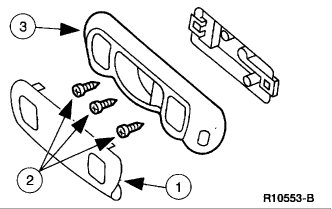
Install the coat hooks
1 Position the two coat hooks.
2 Install the two screws.
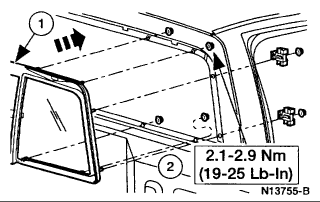
Install the roof side rear trim panel.
1 Slide the roof side rear trim panel into retainers and position the roof side trim panel.
2 Install the clips.
3 Install the pin-type retainers.

Install the safety belt guide bolt.
1 Install the bolt.
2 Install the cover.
Install the rear seat back.
TSB
Article No.
04-2-2
02/09/04
BODY - BACK GLASS - SLIDING BACK GLASS
WINDNOISE/WATER LEAK - SEAL REPLACEMENT
FORD:
1999-2003 F-150
ISSUE
Some 1999-2003 F-150 vehicles may exhibit windnoise and/or a water leak from the back glass area.
ACTION
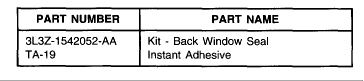
To service, order and install Service kit 3L3Z-1542052-AA. Refer, to the installation instructions included in the kit. It will also be necessary to obtain a tube of Motorcraft Instant Adhesive (TA-19) or equivalent for this repair.
NOTE THE KIT APPLIES TO BOTH MANUAL AND POWER SLIDING REAR WINDOWS.

Parts Block
OTHER APPLICABLE ARTICLES: NONE
WARRANTY STATUS: Eligible Under Provisions Of New Vehicle Limited Warranty Coverage
OPERATION DESCRIPTION TIME
040202A Install Backlight Sliding 0.6 Hr.
Seals (Includes Time To
Remove Rear Seat Back
On S/Cabs Vehicles Or To
Loosen Upper Portion Of
Back Panel On Regular
Cab And Super Crew
Vehicles
DEALER CODING
CONDITION
BASIC PART NO. CODE
15420A26 33
Tuesday, November 11th, 2008 AT 10:20 PM