Good afternoon,
The 11 is for the exhaust CVVT system for varying timing. The system may be clogged with sludge.
I would get some sea foam and add it to the oil, let it idle for about an hour. Then change the oil/filter and add new.
Then clear the code and drive it. if it comes back the valve will have to be replaced. If it does not then you are good.
Roy
Component Inspection
Check operation of OCV
1. Ignition "ON" & Engine "OFF"
2. Install scantool and select "OCV (CVVT) VALVE" in the Actuation Test mode
3. Activates "OCV (CVVT) VALVE" by pressing "STRT (F1)" key (should hear a faint click from Oil Control Valve)
4. Repeat this procedure 4 or 5 times to ensure Oil Control Valve reliability
5. Has a problem been found ?
YES
1) Check OCV for contamination, deterioration, or damage. Substitute with a known-good OCV and check for proper operation. If the problem is corrected, replace OCV and then go to "Verification of Vehicle Repair" procedure
NO
1) Go to next step as below
Check resistance of OCV
1. Ignition "OFF"
2. Disconnect intake OCV connector.
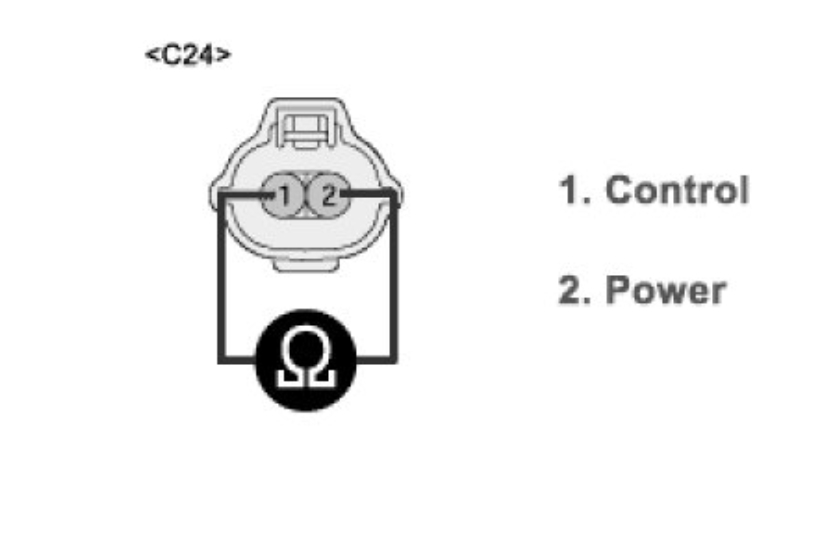
3. Measure resistance between terminals 1 and 2 of the intake OCV connector. (Component side)
A. Specification: Approx. 6.8 - 8.0 Ohms at 20 °C (68 °F)
imageOpen In New TabZoom/Print
4. Is resistance within the specification ?
YES
1) Go to next step as below
NO
1) Replace OCV and then go to "Verification of Vehicle Repair" procedure
Check the Suspected Area
1. Oil Control Valve filter for sticking or contamination
(1)Ignition"OFF"
(2)Check OCV filter for sticking or contamination.
(3)Remove the OCV and visually check the spool column of OCV for contamination
2. Engine oil filter and it's level
3. Has a problem been found ?
YES
1) Clean or replace as necessary and then go to "Verification of Vehicle Repair" procedure
NO
1) Go to next step as below
Check CVVT (Continuously Variable Valve Timing) Assembly
1. Remove the CVVT assembly.
2. Check that the CVVT assembly Is locked.
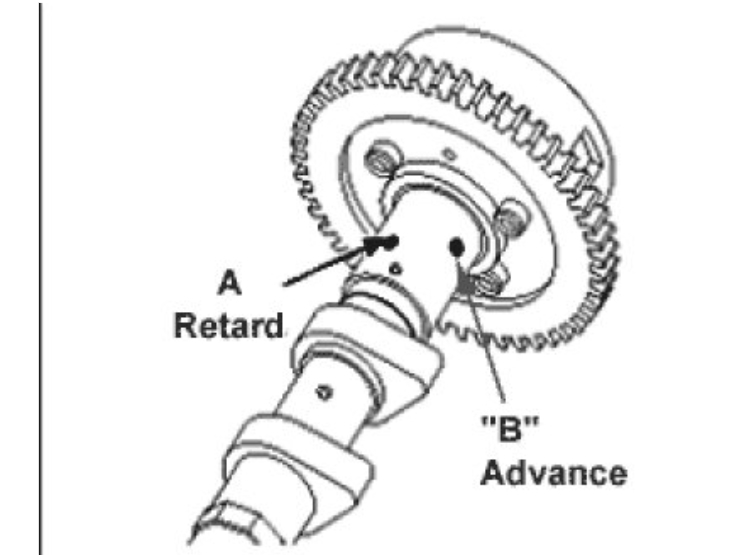
3. The one of the 2 holes on the cam journal is for advanced (upper) and the rest is for retards (lower).
Apply masking tape to all oil path holes except the one advance hole ("B") indicated by the arrow as shown in the figure.
imageOpen In New TabZoom/Print
4. To release the CVVT lock pin, wrap some tape around the tip of an air pressure adapter and apply low air pressure of approx. 150 kPa (1.5 kg/cm2, 21 psi) to the exposed camshaft port. Wrap a shop towel or rag around the CVVT because residual oil may leak out of the unit when applying air pressure.
5. With low air pressure applied, turn the CVVT to the ADVANCE direction as indicated in the figure.
CAUTION: If too much air leaks when applying the low air pressure, the CVVT lock pin may not release and the CVVT may not turn.
imageOpen In New TabZoom/Print
6. Allow the CVVT assembly to move in the ADVANCE and DELAY directions to ensure there is no binding and that it moves freely. (Movable smoothly in the range about 20 °)
7. Turn the CVVT by hand and make sure it locks in the maximum delay angle position.
8. Is CVVT assembly working properly ?
YES
1) Go to "Verification of Vehicle Repair" procedure.
NO
1) Replace the CVVT assembly and go to "Verification of Vehicle Repair" procedure.
Images (Click to enlarge)
Dec 3, 2018 at 1:03 PM