Door wiring or BCM

Tiny
DOUG STEINER
  • MEMBER
  • 2004 JEEP GRAND CHEROKEE
  • 4.0L
  • 6 CYL
  • 4WD
  • AUTOMATIC
  • 130,000 MILES
Same decade old problem with door wring breaks. Obtained a donor chassis harness to door, made corrections to broken wires I could meter. Extended the connector into the door, protected wiring with a loom. Driver door sometimes only lock itself, operates from passenger door and fob, same condition with a second extra door module. Cleaned up battery terminals, cycled engine functions. Suspect a wire but cannot correctly identify which color or plug position. Included a picture of original chassis door plug. Thanks,
Doug
Monday, October 31st, 2016 AT 3:12 PM

13 Replies

Tiny
HMAC300
  • MECHANIC
  • 48,601 POSTS
See picture. I show seven wires for Jeep 2004, yours may be for mirror, but with this diagram you should be able to see which wire is where as they are color coded.
Was this
answer
helpful?
Yes
No
+5
Tuesday, November 1st, 2016 AT 1:46 PM
Tiny
DOUG STEINER
  • MEMBER
  • 7 POSTS
It is helpful at the door itself, but that functions OK, the interface to the other door are sporadic. I somewhat suspect a possible broken wire, can I assume the same drivers door lock/unlock entends to the balance of doors? And that would indicate two wires ocasionally working? I made a wire match table from plug to plug. Most were the same colors. Let me check continuity in a failed condition for those wires to see what is ocurring. Thank you so much. Love a challenge, but like to see them end well.
Was this
answer
helpful?
Yes
No
Tuesday, November 1st, 2016 AT 6:33 PM
Tiny
HMAC300
  • MECHANIC
  • 48,601 POSTS
From what you described in question was you wanted wiring harness to driver door or at least that is what I assumed did you want something different?
Was this
answer
helpful?
Yes
No
+2
Wednesday, November 2nd, 2016 AT 6:56 AM
Tiny
DOUG STEINER
  • MEMBER
  • 7 POSTS
The chassis portion of the harness, which plugs into to door harness was what I was after. With what you sent I can "make the connection" hopefully by matching wires on the mating connectors. The big problem is the wire break in the door jamb from constant bending. I was replacing the wiring and reducing the bending by creating wire space an less restriction to movement. Something difficult to comprehend with modules, is how the passenger side lock/unlock function can operate the drivers door, while the driver door cannot perform this on the rest of the doors apparently on the same wires (as I can discern) if I have any broken wires remaining. I will have to get to a failure mode, open the door panel and trace wires from the color code provided to the point where I reconnected to the main vehicle harness, to verify wiring. After that, I'm agian lost if continuity exists. I can work from the diagram you provided, unless you have the chassis diagram at the driver's door connection. The pic I sent was the plug and wire colors of that harness. Apologize this is so confusing, been chasing this for a while. Dealerships are not of much help as service writers are not technicians and they do not let you explain needs to the person doing the work. I tend to use independents due to this.
Was this
answer
helpful?
Yes
No
+1
Wednesday, November 2nd, 2016 AT 7:39 AM
Tiny
HMAC300
  • MECHANIC
  • 48,601 POSTS
What I sent was for power door locks but this one is for power mirrors so if you have windows that are power they may all lead to same and you SHOULD let us know which is whichlike if yo uhave windows, mirrors etc as they may go to same module but are all broken down separately in manuals. At least in ours so as to not be confusing. So this one is for mirrors. As you will see goes to door module.
Was this
answer
helpful?
Yes
No
+1
Wednesday, November 2nd, 2016 AT 8:32 AM
Tiny
DOUG STEINER
  • MEMBER
  • 7 POSTS
I do have mirrors, it is a separete wire from the door mirror to the door control module, of course however the pax door mirror is also controlled throught the drivers door module so the wiring exists. As I continue I will update on either resolution or failure. Thanks
Doug
Was this
answer
helpful?
Yes
No
Wednesday, November 2nd, 2016 AT 9:01 AM
Tiny
KEN L
  • MASTER CERTIFIED MECHANIC
  • 42,822 POSTS
Please let us know what you find so it will help others.

Best, Ken
Was this
answer
helpful?
Yes
No
+1
Wednesday, November 2nd, 2016 AT 5:32 PM
Tiny
DOUG STEINER
  • MEMBER
  • 7 POSTS
Will see if I can force the fault. Thx
Was this
answer
helpful?
Yes
No
Wednesday, November 2nd, 2016 AT 6:25 PM
Tiny
KEN L
  • MASTER CERTIFIED MECHANIC
  • 42,822 POSTS
How did things turn out?
Was this
answer
helpful?
Yes
No
+1
Monday, November 7th, 2016 AT 8:28 AM
Tiny
DOUG STEINER
  • MEMBER
  • 7 POSTS
Two concealed breaks in wires. Later today I will complete connection. Made a new wire harness from the plug at door jamb to connection to main harness inside cab above driver feet. Will create a wire color and function chart as I connect and test. Thanks, and will pass along result.
Was this
answer
helpful?
Yes
No
Monday, November 7th, 2016 AT 8:48 AM
Tiny
KEN L
  • MASTER CERTIFIED MECHANIC
  • 42,822 POSTS
Looking forward to the result.
Was this
answer
helpful?
Yes
No
Monday, November 7th, 2016 AT 8:54 AM
Tiny
DOUG STEINER
  • MEMBER
  • 7 POSTS
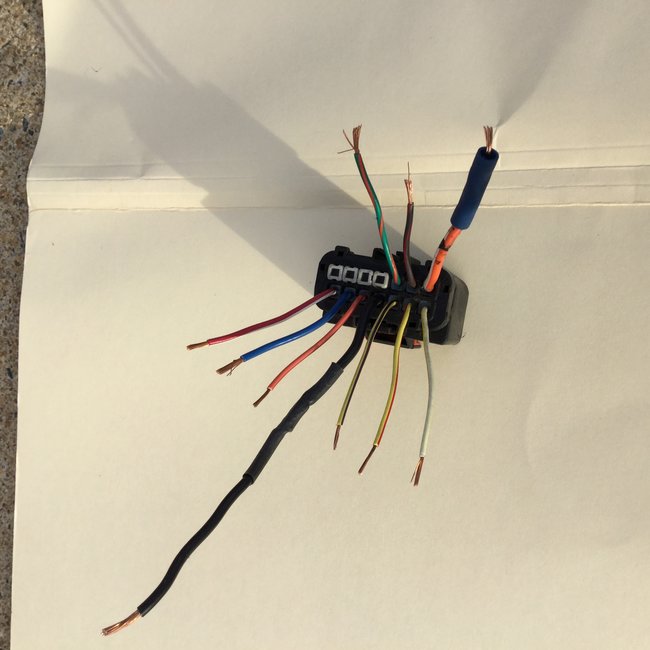
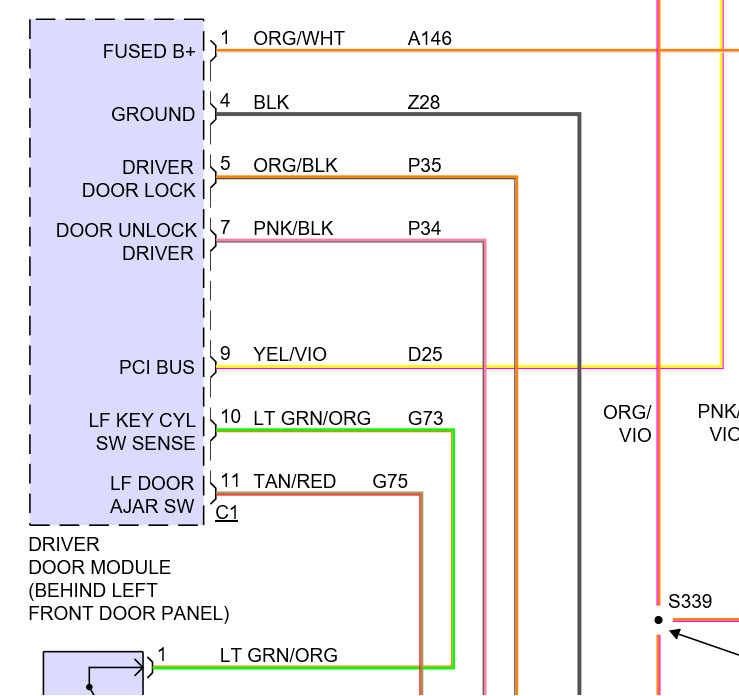
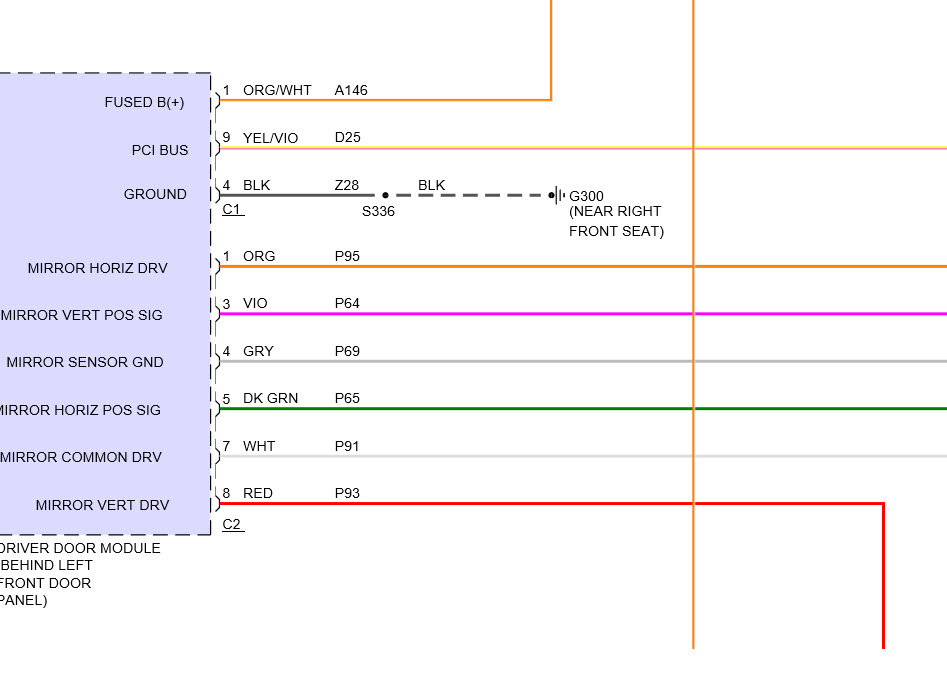
Loss of lock and window functions is due to wire bending fatigue at the front dor jambs, usually the drivers side earlier. Attempts to repair some of the wires is only buying limited time extension. There are a few good u-tube videos online. The repair is to address all the wires, relocate the plug connector into the door to relieve the tight bend space. Here are the tips I can offer. Disconnect the ground cable. The connector can be accessed by pinching the ears on the door boot and pulling the connector into the jamb. Make a chart of the wire colors and their corresponding numbered location on the plug, look close, they are there. To disconnect the connector slide the red lock open and depress the connector latch just above it toward the wires. Trace the harness into the cab, below the fuse panel, above the kick panel. What I did was create the chart, cut all the wires leaving at least 2-3 inches to crimp on new. Pull the harness into the cab remove enough to include the break areas. Obtain the correct wire and connectors. I marked corresponding marker lines on the new wires, ie 5 lnes for the number 5 (mine orange /red) to reconnect up inside the cab. I made my new harness about 16 inches long. Wrapped the new harness in a 5/8 wire loom, wrapped wire loom wrap over that. Pop off the door panel after removing the three hard fasteners. Again, check Utube for procedure. Feed the new harness into the cab, through the white boot boor connector, so the boot can be connected. Peel back the corner of the door liner. Push the connector through the door opening. The connector will reside inside the door ahead of the window track. Later make sure it doe not interfere with window operation. Inside the cab cut out no more wire than necessary to rmove the areas of breaks. Make connections, this is why the asbuilt chart and clear marking is important. Use what wire space management desired, plenty of places to tie wrap a new taped bundle out of the way. Remember when checking functions, doors will not lock with the key in and door open. It is not always possible to identify breaks without a meter and some aggressive testing. "Donor" junkyard harnesses are no better than yours. When closing up, shape the wire bundle to allow movement into and out of the door when operating the door. Same inside the cab, reduce the potential to bend. Not all that difficult, buy a few good wire tools, thest the mechanical integrity of connections. Tape or heat shrink as desired.
Was this
answer
helpful?
Yes
No
+3
Wednesday, November 9th, 2016 AT 4:41 PM
Tiny
KEN L
  • MASTER CERTIFIED MECHANIC
  • 42,822 POSTS
Wow, nice instructions, thanks for the contribution it will help anyone that has this problem.

Best, Ken
Was this
answer
helpful?
Yes
No
Thursday, November 10th, 2016 AT 9:15 AM

Please login or register to post a reply.

Sponsored links