There is a technical service bulletin on this, it is as follows:
BASE BODY CONTROL MODULE LOCK-UP TECHNICAL SERVICE BULLETIN Reference Number(s): 08-14-94, 08-14-94 REV. A, Date of Issue: December 30, 1994 Superceded Bulletin(s): 08-14-94, Date of Issue: March 25, 1994 Related Ref Number(s): 08-14-94, 08-14-94 REV. A ARTICLE BEGINNING BASE BODY CONTROL MODULE LOCK-UP Model(s): 1993-94 Chrysler (LH) Concorde, New Yorker 1993-94 Dodge (LH) Intrepid 1993-94 Eagle (LH) Vision Group: Electrical Bulletin No.: 08-14-94 Rev.A Date: December 30, 1994 SYMPTOM/CONDITION Instrument cluster gauges, panel lamps, and electric door locks do not operate, interior courtesy lamps may remain on, and air bag light illuminated (the illuminated light does not affect air bag operation). Symptoms are more prevalent in cold weather. DIAGNOSIS Verify that the battery reset of the Body Control Module (BCM) removes all symptoms and that the vehicle has a base body controller by noting software version as shown by the Scan Tool (DRB II/III), or Mopar Diagnostic System (MDS). Shown below are BCM part numbers and corresponding software versions. NOTE: This bulletin supersedes Technical Service Bulletin No. 08-14-94, dated March 25, 1994 which should be removed from your files. Body Control Module (BCM) identification and replacement information has been revised. NOTE: This bulletin applies to vehicles equipped with a base Body Control Module (BCM). These vehicles will not be equipped with Automatic Temperature (ATC), Overhead Travel Information System (OTIS), or Vehicle Theft Security System (VTSS). REPAIR PROCEDURE This bulletin involves exchanging the base BCM, P/N 4606750, 4605998, 4759217, with a base BCM, P/N 4759410 or later version. 1. Verify the vehicle has a base BCM, version 8.3, 8.4, or 8.6 software. Contact the Chrysler Authorized Service Center for a base BCM (P/N 4759410 or later version) exchange unit. 2. Remove the right instrument panel end cover. 3. Remove the right side cowl trim panel and pull carpet back exposing dash liner. 4. Cut dash liner along perforated lines and pull back dash liner. 5. Remove screw through oblong access hole at right end of knee bolster. 6. Remove push-in fastener at lower leg of module from underneath instrument panel and maneuver module down and out. Disconnect the electrical connectors to remove control module. 7. For installation, reverse above procedure. WARRANTY INFORMATION POLICY: Reimbursable within the provisions of the warranty. TIME ALLOWANCE: 0.5 Hrs. LABOR OPERATION NO: 08-19-02-94 NOTE: The base replacement body controller (P/N 4759410) supplied by the service center will install the "Rolling Door Locks" feature on 1993 LH vehicles. This feature will be activated when the base BCM is installed. It can be deactivated using the Scan Tool (DRB II/III).

And this one:
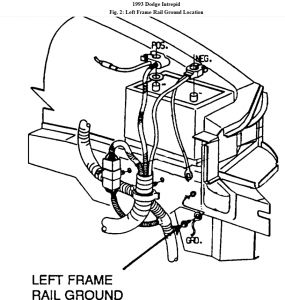
ELECTRICAL FAILURES:FRONT FRAME RAIL GROUNDING TECHNICAL SERVICE BULLETIN Reference Number(s): 08-10-93, Date of Issue: March 5, 1993 Related Ref Number(s): 08-10-93 ARTICLE BEGINNING ELECTRICAL FAILURES DUE TO LOSS OF GROUND CIRCUIT Model(s): 1993 (LH) Concorde/Intrepid/Vision Group: Electrical Bulletin No.: 08-10-93 Date: March 5, 1993 SYMPTOM/CONDITION On some vehicles, the left front and/or right front frame rail ground screws may become loose or broken causing intermittent or total lose of wiring harness ground. GROUND SCREW FAILURE SYMPTOMS ï¬ Headlamp and park/turn lamps may be noticeably dimmer on one side. ï¬ Headlamp may flash when turn signals are actuated. ï¬ Fog lamps may be inoperative. ï¬ Radiator fan may be inoperative. ï¬ Speedometer, tachometer, and warning indicators in the instrument cluster may function erratically. ï¬ Message center indicators may flash erratically. ï¬ Transmission may default to limp-in. ï¬ A/C blower motor may default to high blower mode. ï¬ ABS warning light may come on. ï¬ Horn may be inoperative. This list is not complete as a floating ground can cause unpredictable or unrepeatable results. Any time a ground problem is suspected proceed to the repair procedure. Page 1 of 1 REPAIR PROCEDURE This repair involves both the front frame rail electrical grounds. 1. Disconnect battery negative cable. 2. Remove both ground screws and all ground eyelets. Refer to Figs. 1 and 2 for locations. Fig. 1: Right Frame Rail Ground Location Fig. 2: Left Frame Rail Ground Location 3. Drill a 5/32 inch diameter hole in the general area on the bottom of the rail for easy tool access. Also make sure that once the eyelets and screws are fastened to the rail that the ground wires will not contact sharp edges or mechanical devices. 4. Use two P/N 00154552 screws to fasten all ground eyelets. 5. Fasten the screw to the rail with a torque of between 3.6-6.2 Nm (32 - 55 in.lbs.).


Sep 19, 2010 at 10:12 AM