Good afternoon,
This code is for the PCM. It either needs to be updated for the software or replaced.
Roy
P0685
Descriptor
Probable Causes
Loose Terminals On IGP Line Connectors
Powertrain Control Module (PCM)
Powertrain Control Module (PCM) Update Needed
DTC Troubleshooting: P0685
DTC P0685: PCM Power Control Circuit/Internal Circuit Malfunction
NOTE:
- Before you troubleshoot, record all freeze data and any on-board snapshot, and review the general troubleshooting information. See: Computers and Control Systems > Initial Inspection and Diagnostic Overview
- If the problem doesn't return after you clear the DTC, or if this DTC is stored intermittently, check for loose terminals at the IGP line connectors before replacing the PCM.
1. Turn the ignition switch to ON (II).
2. Clear the DTC with the HDS.
3. Start the engine, and let it idle for 30 seconds.
4. Turn the ignition switch to LOCK (0).
5. Start the engine, and let it idle for 30 seconds.
6. Turn the ignition switch to LOCK (0).
7. Turn the ignition switch to ON (II).
8. Check for Temporary DTCs or DTCs with the HDS.
Is DTC P0685 indicated?
YES - Go to step 9.
NO - Intermittent failure, the system is OK at this time.
9. Update the PCM if it does not have the latest software, See: Engine Control Module > Programming and Relearning > PCM Update or substitute a known-good PCM. See: Computers and Control Systems > Initial Inspection and Diagnostic Overview
10. Start the engine, and let it idle for 30 seconds.
11. Turn the ignition switch to LOCK (0).
12. Start the engine, and let it idle for 30 seconds.
13. Turn the ignition switch to LOCK (0).
14. Turn the ignition switch to ON (II).
15. Check for Temporary DTCs or DTCs with the HDS.
Is DTC P0685 indicated?
YES - If the PCM was updated, substitute a known-good PCM, See: Computers and Control Systems > Initial Inspection and Diagnostic Overview then go to step 10. If the PCM was substituted, go to step 1.
NO - If the PCM was updated, troubleshooting is complete. If the PCM was substituted, replace the original PCM. See: Engine Control Module > Removal and Replacement If any other Temporary DTCs or DTCs are indicated, go to the indicated DTC's troubleshooting.
PCM
PCM Replacement
Special Tools Required
- Honda diagnostic system (HDS) tablet tester
- Honda interface module (HIM) and an iN workstation with the latest software version
- HDS pocket tester
- GNA600 and an iN workstation with the latest software version
Any one of the above updating tools can be used.
NOTE:
- Make sure the HDS is loaded with the latest software version.
- If you are replacing the PCM after substituting a known-good PCM, reinstall the original PCM, then do this procedure.
- During the procedure, if any READ DATA, WRITE DATA, or other data checks fail, note the failure, then continue.
1. Connect the HDS to the data link connector (DLC) (A) located under the driver's side of the dashboard.
2. Turn the ignition switch to ON (II).
3. Make sure the HDS communicates with the PCM and other vehicles systems. If it doesn't, go to the DLC circuit troubleshooting. See: Data Link Connector > Component Tests and General Diagnostics > DLC Circuit Troubleshooting If you are returning from DLC circuit troubleshooting, skip steps 4 through 9, 19 through 25, and 28 through 30, and do the this after replacing the PCM;
- Replace the engine oil See: Engine Oil > Removal and Replacement and the engine oil filter. See: Oil Filter, Engine > Removal and Replacement
- Replace the ATF. See: Automatic Transmission/Transaxle > Removal and Replacement > ATF Replacement
- Clean the throttle body. See: Throttle Body > Procedures
4. Select the PGM-FI system with the HDS.
5. Select the INSPECTION MENU with the HDS.
6. Select the ETCS TEST, then select the TP POSITION CHECK, and follow the screen prompts.
NOTE: If the TP POSITION CHECK indicates FAILED, continue with this procedure.
7. Select the REPLACE PCM MENU, then select READ DATA and follow the screen prompts.
NOTE:
- Doing this step copies (READS) the engine oil life data from the original PCM so you can later download (WRITES) it into the new PCM.
- If READ DATA indicates FAILED, continue with this procedure.
8. Select the A/T system with the HDS.
9. Select the REPLACE TCM/PCM MENU, then select READ DATA and follow the screen prompts.
NOTE:
- Doing this step copies (READS) the ATF life data from the original PCM so you can later download (WRITES) it into the new PCM.
- If READ DATA indicates FAILED, continue with this procedure.
10. Turn the ignition switch to LOCK (0).
imageOpen In New TabZoom/Print
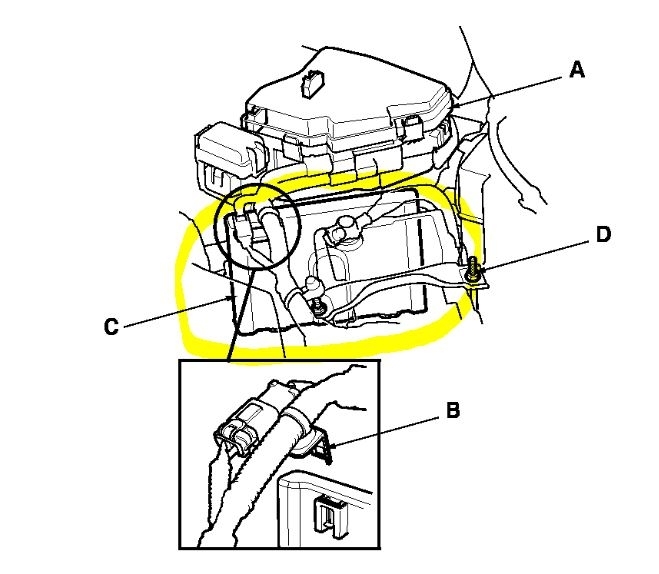
11. Remove the under-hood fuse/relay box (A).
12. Remove the harness bracket (B).
13. Loosen the battery hold down bolt (D), and reposition the battery away from the PCM.
14. Remove the PCM cover (C).
imageOpen In New TabZoom/Print
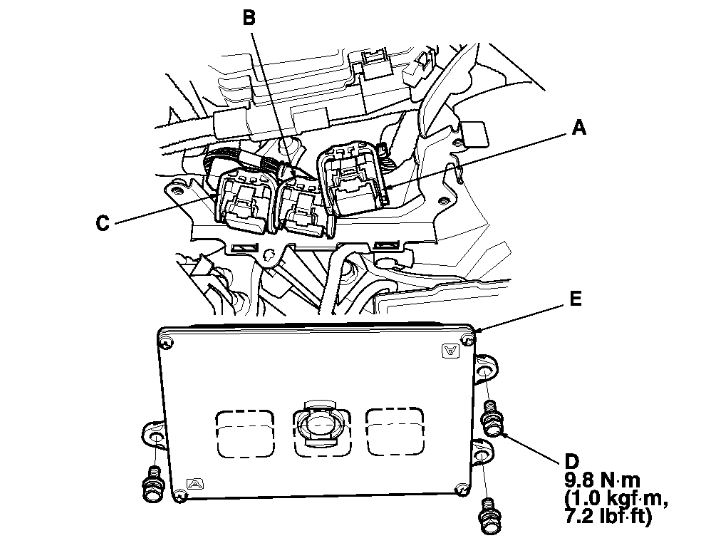
15. Remove the bolts (D), then remove the PCM (E).
16. Disconnect PCM connectors A, B, and C.
NOTE: PCM connectors A, B, and C have symbols (A=(square), B=(triangle) , C=(circle)) embossed on them for identification.
17. Install the parts in the reverse order of removal.
18. Turn the ignition switch to ON (II).
19. Manually input the VIN to the PCM with the HDS.
NOTE: DTC P0630 VIN Not Programmed or Mismatch may be stored because the VIN has not been programmed into the PCM; ignore it, and continue this procedure.
20. If the READ DATA (engine oil life) failed in step 8, go to step 23. Otherwise, go to step 21.
21. Select the PGM-FI system with the HDS.
22. Select the REPLACE PCM MENU, then select WRITE DATA, and follow the screen prompts.
NOTE: If the WRITE DATA indicates FAILED, continue with this procedure.
23. If the READ DATA (ATF life) failed in step 10, go to step 25. Otherwise go to step 24.
24. Select the A/T SYSTEM with the HDS.
25. Select the REPLACE TCM/PCM MENU, then select WRITE DATA, and follow the screen prompts.
NOTE: If the WRITE DATA indicates FAILED, continue with this procedure.
26. Select IMMOBI system with the HDS.
27. Enter the immobilizer code with the PCM replacement procedure in the HDS; it allows you to start the engine.
28. If the TP POSITION CHECK failed in step 6 clean the throttle body, See: Throttle Body > Procedures then go to step 29.
29. If the READ DATA failed in step 7 or the WRITE DATA failed in step 22, replace the engine oil See: Engine Oil > Removal and Replacement and engine oil filter, See: Oil Filter, Engine > Removal and Replacement then go to step 30.
30. If the READ DATA failed in step 10 or the WRITE DATA failed in step 25, replace the ATF, See: Automatic Transmission/Transaxle > Removal and Replacement > ATF Replacement then go to step 31.
31. Select PGM-FI system and reset the PCM with the HDS.
32. Update the PCM if it does not have the latest software. See: Engine Control Module > Programming and Relearning > PCM Update
33. Do the PCM idle learn procedure. See: Engine Control Module > Programming and Relearning > PCM Idle Learn Procedure
34. Do the CKP pattern learn procedure. See: Computers and Control Systems > Initial Inspection and Diagnostic Overview
imageOpen In New TabZoom/Print
Images (Click to enlarge)
Jun 26, 2019 at 1:03 PM