Hello -
Here is the info you requested.
POWER WINDOW REGULATOR
Removal
1. Disconnect negative battery cable. Remove door trim panel. See DOOR TRIM PANEL .
2. Remove watershield.
3. Remove door glass retaining clips and secure the window in the up position using masking tape or equivalent.
4. Disconnect wire connector from power window motor.
5. Loosen screws attaching front and rear window guide rails to inner door panel.
6. Remove screw heads on guide rails from key hole slots in inner door panel.
7. Loosen screws attaching regulator to inner door panel.
8. Remove regulator from inner door panel.
9. Extract rear guide rail through inner door panel rear access hole. See Fig. 3 .
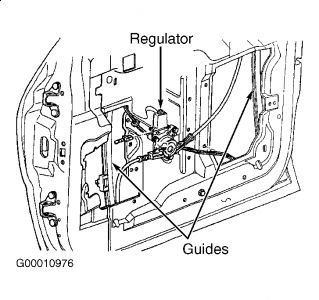
10. Extract front guide rail through front access hole.
Fig. 3: Removing Power Window Regulator
Courtesy of DAIMLERCHRYSLER CORPORATION
Installation
1. Insert front guide rail through front access hole.
2. Insert rear guide rail through rear access hole.
3. Place window regulator in position on inner door panel.
4. Place screw heads on guide rails in position through key hole slots n inner door panel.
5. Tighten screws to attach front and rear guide rails to inner door panel.
6. Connect wire connector into power window motor.
7. Install door glass.
8. Verify door glass alignment and operation.
9. Install sound shield and door trim panel. See DOOR TRIM PANEL .
DOOR TRIM PANEL
Removal
1. Remove the plug and remove screw attaching door pull cup to inner door panel.
2. Remove switch bezel and disconnect power window/memory switch.
3. Remove screws attaching trim panel to door from below map pocket.
4. Remove screw holding door trim to door panel from behind inside latch release handle.
5. Disengage clips attaching door trim to door frame around perimeter of panel.
6. Lift trim panel upward to disengage flange from inner belt molding at top of door.
7. Tilt top of trim panel away from door to gain access to latch linkage.
8. Disengage clip attaching linkage rod to inside latch release handle.
9. Separate linkage rod from latch handle.
10. Disconnect the power door switch, courtesy lamp electrical connectors.
11. Remove front door trim panel from vehicle.
Installation
1. Hold top of trim panel away from door to gain access to latch linkage.
2. Place linkage rod in position on latch handle.
3. Engage clip to hold linkage rod to inside latch release handle.
4. Place front door trim panel in position on door.
5. Install trim panel into inner belt molding at top of door.
6. Install clips to attach door trim to door frame around perimeter of panel.
7. If equipped, install screw to attach door trim to door panel behind inside latch release handle.
8. Connect power switch into wire connector.
9. Place power accessary switch in position on door trim.
10. Connect wire connector into memory seat/mirror switch and install switch into trim panel.
11. Install screws to attach accessary switch panel to door trim.
12. Install screw cover into switch panel.
13. If equipped, install screws to attach trim panel to door inside map pocket.
14. If equipped, install screw to attach door pull cup to inner door panel.
15. If equipped, install screws to attach door assist handle to inner door panel.
16. Connect wire connector into courtesy lamp.
17. Install lamp in door trim.
18. Install switch bezel.
Oct 8, 2009 at 10:24 PM