REMOVAL
1. Disconnect negative cable from auxiliary jumper terminal.
2. Remove air inlet resonator. WARNING: DO NOT REMOVE THE CYLINDER BLOCK PLUG OR THE RADIATOR DRAINCOCK WITH THE SYSTEM HOT AND UNDER PRESSURE BECAUSE SERIOUS BURNS FROM COOLANT CAN OCCUR.
3. Drain cooling system.
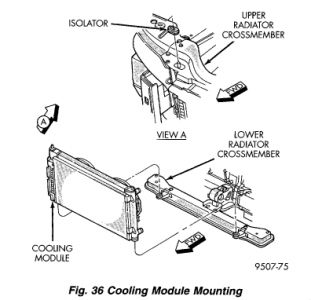
Figure 36

4. Remove upper radiator crossmember. CAUTION: Plastic tanks, while stronger then brass, are subject to damage by impact, such as wrenches.
5. Remove hose clamps and hoses from the radiator.
6. Disconnect the fan wiring connector.
7. Remove fan module.
8. Disconnect automatic transmission hoses from cooler and plug off.
9. Remove screw attaching support bracket for external transmission oil cooler lines to left side of radiator (if equipped).
10. Disconnect the engine block heater wire, if equipped. CAUTION: Avoid bending the condenser inlet tube. Care should be taken not to damage radiator or condenser cooling fins or water tubes during removal.
11. Remove screw attaching support bracket for air conditioning lines from right side of radiator. Remove support bracket.
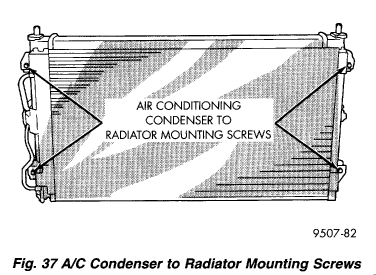
Figure 37

12. Remove the air conditioning condenser attaching screws located at the front of the radiator, if equipped. It is not necessary to discharge the air conditioning system to remove radiator.
13. Radiator can now be lifted free from engine compartment. Care should be taken not to damage radiator cooling fins or water tubes during removal.
INSTALLATION
1. Slide radiator and fan module down into position, seat the radiator assembly lower rubber isolators in the mount holes provided.
2. Attach air conditioning condenser to radiator, if equipped. Tighten mounting screws to 5 Nm (45 inch lbs.) .
3. Install air conditioning line support bracket and attaching screw to right side of radiator.
4. Connect engine block heater wire, if equipped.
5. Connect lower radiator hose and clamp.
6. Install external transmission oil cooler line support bracket and attaching screw to left side of radiator (if equipped).
7. Connect automatic transmission hoses; tighten hose clamps to 2.5 Nm (22 inch lbs.).
8. Install fan module.
9. Connect fan motor electrical connection.
10. Install upper radiator hose. Align hose so it does not interfere with the accessory drive belt or engine. Position hose clamp so it will not interfere with the hood liner.
11. Install upper radiator crossmember.
12. Connect negative cable to auxiliary jumper terminal.
13. Fill cooling system with coolant.
14. Operate engine until it reaches normal operating temperature. Check cooling system and automatic transmission for correct fluid levels
Thursday, January 21st, 2010 AT 4:18 PM


