STEERING SYSTEM - POWER -1996 Chrysler Concorde LX
RACK & PINION ASSEMBLY
Removal
WARNING: On models with Supplemental Restraint System (SRS), before any repairs are performed, disconnect and isolate battery ground cable. Failure to do so could result in accidental deployment of the air bag and possible personal injury.
CAUTION:DO NOT allow steering column to rotate with steering gear removed. Clockspring damage may occur and become inoperative.
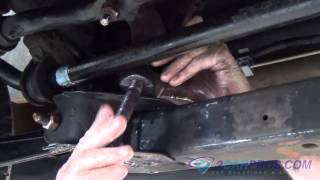
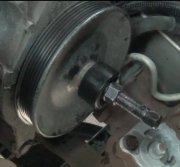
1. Turn front wheels to straight-ahead position. Disconnect and isolate negative battery cable. Raise and support vehicle. Loosen gearshift cable bolt and remove gearshift cable from transaxle shift lever. 2. Lower vehicle. On 3.5L engine, disconnect throttle cable from throttle body and cable bracket. On all models, remove wiper arms from wiper arm pivots. Remove 6 screws, cowl closure panel and weatherstrip as an assembly. 3. Disconnect air plenum from throttle body, PCV air tube and idle air control motor. Remove air plenum from right side of vehicle. Disconnect wiper module wiring harness. Remove wiper module from cowl panel. Remove power brake booster vacuum hose from intake manifold. Position hose aside. 4. On 3.5L models, disconnect and remove air inlet ducting to throttle bodies. Remove vacuum supply hose from power booster. Remove 2 nuts and remove brake master cylinder from power booster, with hydraulic lines connected, from power brake booster. Carefully position master cylinder against left shock tower. 5. Remove P/S pressure hose and return hose from P/S gear. If equipped with speed proportional steering, disconnect electrical connectors from solenoid control module. 6. Remove bolts and detach inner tie rod ends from steering gear. Lay inner tie rods, plate and bolts on top of transaxle bellhousing. Remove 4 bolts and steering gear from crossmember. Slide steering gear forward to access flex joint roll pin. Mark steering gear coupling for installation reference. Remove roll pin from coupler.
. Carefully remove steering gear through cowl opening.
Installation
1. If a replacement steering gear is being installed, carefully grasp steering gear shaft and rotate until steering gear is in full left turn position. Rotate steering gear shaft back from full left turn position until master spline on steering gear shaft is aligned with master spline on steering gear coupling. With master spline aligned, attach steering gear to steering gear coupling. 2. If original steering gear is being installed, align mark on steering gear shaft with mark on steering gear coupling. With marks aligned, attach steering gear to steering gear coupling. Align steering
gear mounting holes with crossmember. Install 4 steering gear bolts and brakeline routing clip under left steering gear mounting bracket. Tighten steering gear bolts. See TORQUE SPECIFICATIONS table.
NOTE: On 3.5L engine, correct orientation of power steering pressure hose at power steering pump must be maintained to ensure proper clearance between hose and throttle body cam.
3. Install steering gear coupling roll pin. Roll pin must be installed until it is flush with top edge of coupling. Install P/S pressure hose and return hose to P/S gear.
NOTE: Anytime steering gear assembly is removed from vehicle, or tie rod ends are loosened, a front end alignment must be performed.
4. Align center of steering gear with inner tie rod ends. Ensure washers are installed between tie rod ends and steering gear. Install plate and torque inner tie rod bolts. Bend lock tabs against bolts. Install brake master cylinder. 5. Attach power brake booster vacuum hose to intake manifold. Attach gearshift cable to transaxle shift lever. To complete installation, reverse removal procedure. Fill P/S fluid reservoir and check fluid level. See FLUID LEVEL CHECK under LUBRICATION.
Courtesy of CHRYSLER CORP.
Friday, July 11th, 2008 AT 5:37 AM