REMOVAL:
Disconnect the negative battery cable.
Raise and safely support the vehicle.
For 1991 vehicles, perform the following:
Remove the starter motor and flywheel cover.
Remove oil pan retaining nuts and bolts. Remove lower frame and powertrain onto transmission table.
Remove the front cover, as outlined earlier this section.
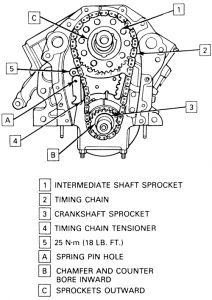
Matchmark the intermediate sprocket, chain link, front face of cylinder and crank sprocket for reference.
Retract the timing chain tensioner shoe by using J-33875 or equivalent, on both sides of the tensioner and pulling on the thru pin in the tensioner arm to retract the spring. While spring is retracted, insert a holding tool to hold it.
Remove the timing chain tensioner retaining bolts.
Raise and safely support the vehicle.
Remove the timing chain, crankshaft sprocket and intermediate sprocket using tools J 8433 and J 28611, as shown in the accompanying figure. If the intermediate gear does not slide OFF easily with the timing chain assembly, rotate the crankshaft back and forth to loosen the tight fit.
If necessary, remove the timing chain tensioner.
INSTALLATION:
Check to ensure that crankshaft key is installed and fully seated and the chain tensioner is fully installed and blade retracted.
Slip both sprockets and chain over the proper shaft and engage the slot in the key. The intermediate shaft may move against the rear cover. Slide the sprocket and chain on the shafts, maintaining the proper alignment shown in the accompanying figure. While installing note the following:
Make sure the rubber and tension blade of the tensioner does not become caught, misaligned, or dislodged.
The large chamfer and counterbore of the crankshaft sprocket are installed towards the crankshaft. The intermediate sprocket spline sockets are installed away from the case.
The crankshaft sprocket must be pressed on for the final 0.31 in. (8mm) to the seated position using tool J38612 or equivalent, as shown in the accompanying figure.
Check to make sure timing was maintained. Remove the retaining pin from tensioner.
For 1991 vehicles, install the oil pan retaining nuts and bolts, and the flywheel cover and starter.
Install the front cover, as outlined earlier in this section.
Connect the negative battery cable. Start the engine and check for leaks.
Nov 15, 2008 at 2:05 AM
