Welcome to 2CarPros.
Are you sure when you installed the park brake shoe lever to the parking brake shoe, there was a spacer there and it had proper clearance? That can cause the brake to not fully release. Also, make sure the hold down pins are installed correctly and holding. Make sure the backing plate that the shoes sit on were properly greased. See directions.
_______________________
Here are the manufacturer's directions for installing new parking brake shoes. Take a look through it to see if anything was missed. Additionally, the attached pictures correlate with the directions.
______________________
2014 Toyota Truck Sienna FWD V6-3.5L (2GR-FE)
Reassembly
Vehicle Brakes and Traction Control Parking Brake System Parking Brake Shoe Service and Repair Removal and Replacement Reassembly
REASSEMBLY
NOTICE:
Before installation, apply high temperature grease to the parts indicated by arrows See: Parking Brake Shoe > Removal and Replacement > Components.
1. INSTALL PARKING BRAKE SHOE HOLD DOWN SPRING PIN
(a)Install the 2 parking brake shoe hold down spring pins.
pic 1
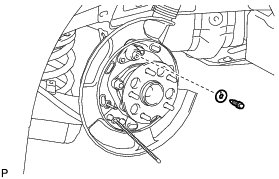
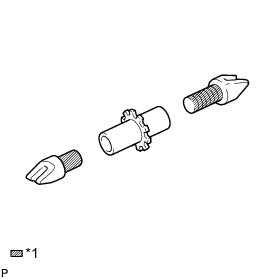
2. INSTALL PARKING BRAKE SHOE GUIDE PLATE SET BOLT
(a)Apply adhesive to the threads of the parking brake shoe guide plate set bolt.
pic 2
Adhesive:
Toyota Genuine Adhesive 1344, Three Bond 1344 or equivalent
(b)Install the parking brake shoe guide plate and parking brake shoe guide plate set bolt.
Torque : 18 Nm (184 kgf-cm, 13 ft-lbf)
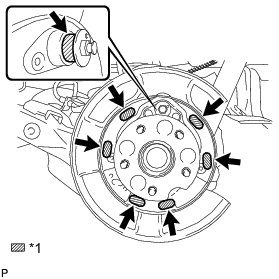
3. APPLY HIGH TEMPERATURE GREASE
(a)Apply high temperature grease to the areas of the backing plate which make contact with the shoe as shown in the illustration.
pic 3
Text in Illustration
pic 4
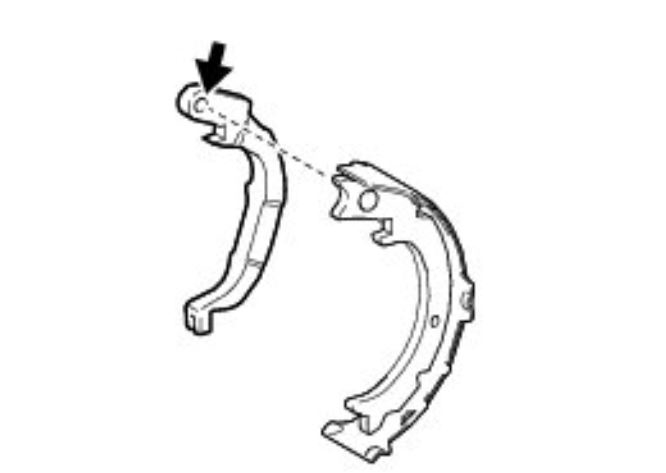
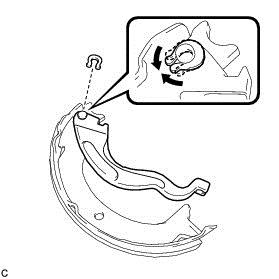
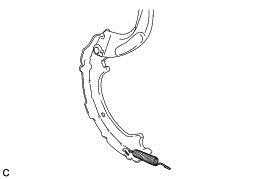
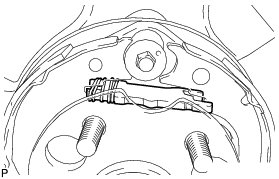
4. INSTALL PARKING BRAKE SHOE LEVER
(a)Apply high temperature grease to the areas of the parking brake shoe lever which make contact with the No. 2 parking brake shoe assembly.
pic 5
(b)Install the parking brake shoe lever and shim to the No. 2 parking brake shoe assembly with a new C-washer as shown in the illustration.
pic 6
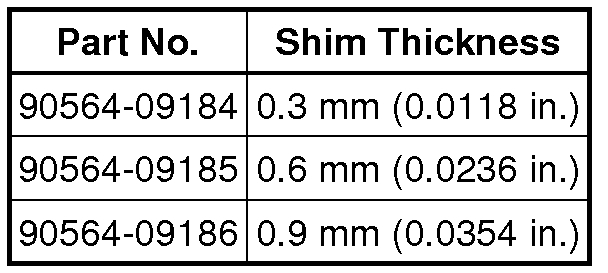
(c)Using a feeler gauge, measure the clearance between the No. 2 parking brake shoe assembly and parking brake shoe lever.
pic 7
Text in Illustration
pic 8
Standard clearance:
Less than 0.35 mm (0.0138 in.)
If the clearance is not as specified, replace the shim with one of the appropriate size.
pic 9
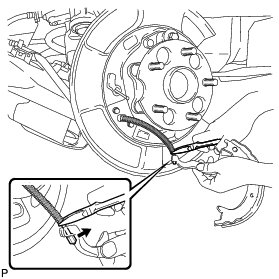
5. INSTALL NO. 2 PARKING BRAKE SHOE ASSEMBLY WITH PARKING BRAKE SHOE LEVER
(a)Using needle-nose pliers, connect the No. 3 parking brake cable assembly to the parking brake shoe lever as shown in the illustration.
pic 10
NOTICE:
Be careful not to damage the No. 3 parking brake cable assembly.
6. INSTALL NO. 2 PARKING BRAKE SHOE RETURN TENSION SPRING
(a)Install the No. 2 parking brake shoe return tension spring to the No. 2 parking brake shoe assembly.
pic 11
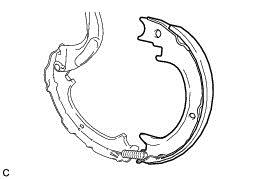
7. INSTALL NO. 1 PARKING BRAKE SHOE ASSEMBLY
(a)Connect the No. 2 parking brake shoe return tension spring to install the No. 1 parking brake shoe assembly.
pic 12
8. INSTALL PARKING BRAKE SHOE ADJUSTING SCREW SET
(a)Apply high temperature grease to the parking brake shoe adjusting screw set as shown in the illustration.
pic 13
Text in Illustration
pic 14
(b)Install the parking brake shoe adjusting screw set.
pic 15
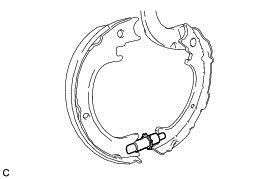
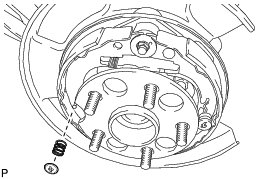
9. INSTALL NO. 2 PARKING BRAKE SHOE ASSEMBLY
(a)Install the No. 2 parking brake shoe assembly to the backing plate with the parking brake shoe hold down spring cup and parking brake shoe hold down spring.
pic 16
10. INSTALL PARKING BRAKE SHOE LEVER STRUT
(a)Install the parking brake shoe lever strut and parking brake shoe strut compression spring.
pic 17
11. INSTALL NO. 1 PARKING BRAKE SHOE ASSEMBLY
(a)Install the parking brake shoe assembly to the backing plate with the parking brake shoe hold down spring cup and parking brake shoe hold down spring.
pic 18
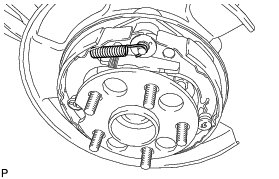
12. INSTALL NO. 1 PARKING BRAKE SHOE RETURN TENSION SPRING
(a)Install the No. 1 parking brake shoe return tension spring.
pic 19
HINT
First install the No. 1 parking brake shoe return tension spring and then the No. 3 parking brake shoe return tension spring.
13. INSTALL NO. 3 PARKING BRAKE SHOE RETURN TENSION SPRING
(a)Install the No. 3 parking brake shoe return tension spring.
pic 20
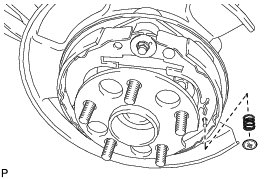
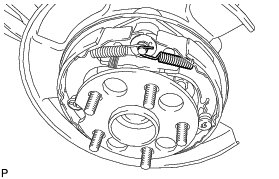
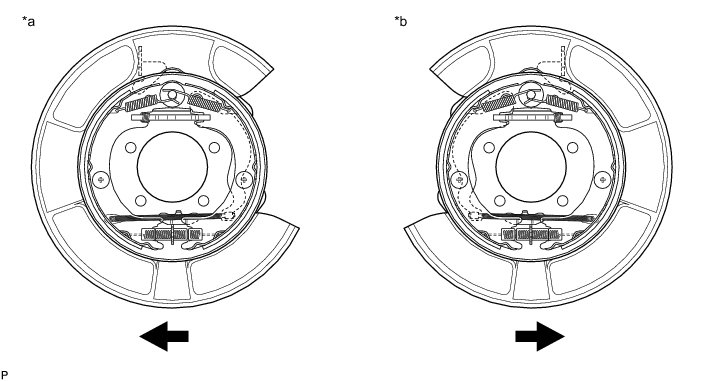
14. CHECK PARKING BRAKE INSTALLATION
(a)Check that each part is installed properly.
pic 21
Text in Illustration
pic 22
NOTICE:
There should be no oil or grease on the friction surfaces of the shoe lining and disc.
15. INSTALL REAR DISC See: Disc Brake System > Removal and Replacement > Installation
16. INSTALL PARKING BRAKE SHOE ADJUSTING HOLE PLUG See: Disc Brake System > Removal and Replacement > Installation
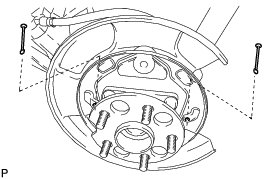
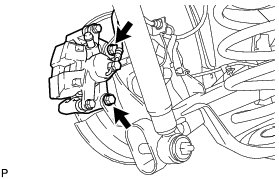
17. INSTALL REAR DISC BRAKE CALIPER ASSEMBLY
(a)Install the rear disc brake caliper assembly with the 2 bolts.
pic 23
Torque : 88 Nm (900 kgf-cm, 65 ft-lbf)
18. INSTALL REAR WHEEL
Torque : 103 Nm (1050 kgf-cm, 76 ft-lbf)
19. BED IN PARKING BRAKE SHOES TO DISCS
(a)Drive the vehicle at about 50 km/h (31 mph) on a safe, level and dry road.
(b)Depress the parking brake pedal with 150 N (15 kgf, 33.7 lbf) of force.
(c)Drive the vehicle for about 400 m (0.25 mile) in this condition.
(d)Repeat this procedure 3 times.
NOTICE:
Set a 5-minute interval between each procedure to prevent the brake assembly from overheating.
20. ADJUST PARKING BRAKE SHOE CLEARANCE AND PARKING BRAKE PEDAL TRAVEL See: Parking Brake System > Adjustments
___________________________________________
Let me know if this helps and what you find.
Take care,
Joe
Images (Click to enlarge)
Sep 15, 2019 at 6:44 PM