REMOVAL:
Raise and safely support the vehicle.
Drain the engine coolant and the engine oil. Lower the vehicle.
Remove the upper and lower intake manifold using the procedures found in this section.
Remove the rocker arm and pushrods using the procedures found in this section.
Remove the exhaust crossover pipe.
Remove the engine mount strut bracket.
If removing the left side (front) head, remove the dipstick tube.
Tag for identification, then remove the spark plug wires. Remove the spark plugs.
Remove the exhaust manifold using the procedures found in this section.
Remove the eight cylinder head bolts, then remove the cylinder head. There are locator pins that align the head to the block. Pull upwards on the head to disengage the pins, then remove the cylinder head to a suitable work area.
If the head is be overhauled, remove any remaining components such as the engine lift hook, the fuel line bracket bolts, the engine coolant temperature sensor, etc., as required.
INSTALLATION:
If the head gasket failed, determine the cause. Gasket failure is caused by the following conditions: improper installation; overheating due to a failure in the electric cooling fan system or a leak in the cooling system; loose or warped cylinder head; missing, off location or not fully seated locator dowel pins; low torque on the cylinder head bolts; warped block surface; scratched or gouged gasket surfaces; excessive intake manifold torque and even cracked engine block tapped holes.
Clean all parts well. Remove all foreign material to the bare metal. Do not use a motorized wire brush on any gasket sealing surface. It is good practice to use the proper size thread-cutting tap to clean the threaded bolt holes in the block. This helps assure an accurate torque reading.
Place a new head gasket on the clean engine block deck surface. Many gaskets will have some sort of marking denoting TOP or THIS SIDE UP. Make sure the gasket sits flat and is not hung up on the locator dowel pins. Use no sealer on the head gasket.
Carefully set the cylinder head in place, using care not to damage the gasket. Make certain that the head engages the locator dowel pins that properly position the head.
The bolts should be very clean since dirt built-up on the bolt threads makes it difficult to get an accurate torque reading. These are 'torque to yield' bolts which stretch a small amount when tightened; new bolts are always recommended. On a used vehicle, especially a high-mileage vehicle, it may be difficult to determine if the heads have been removed before and how many cycles the bolts have been removed and tightened. New bolts should be part of any cylinder head service. Use GM Sealer #1052080, or equivalent, on the threads of the head bolts and install all eight bolts, finger-tight.
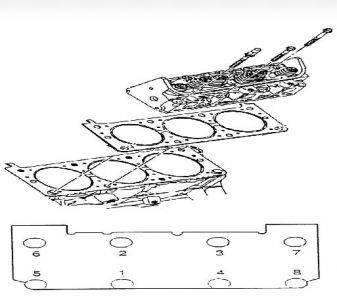
With an accurate torque wrench, tighten the bolts gradually, in sequence, working from the center outwards. Final torque should be 33 ft. lbs. (45 Nm), plus an additional 90 degrees (1/4-turn). A torque angle meter is recommended.
Install the remaining components in the reverse order of the removal process.
Thanks for using 2CarPros.com!
Apr 17, 2009 at 1:42 AM
