Axle boot replacement?

Tiny
AHARTLEY
  • MEMBER
  • 1999 BUICK LESABRE
  • 3.8L
  • V6
  • 2WD
  • AUTOMATIC
  • 150,000 MILES
I have the axle out of the car. I have the old boot and metal bands taken off.
I have a new boot kit.
Where do I go from here for sure in getting the axle apart so that I can put the new bands and boot on?
Friday, December 15th, 2023 AT 4:08 PM

10 Replies

Tiny
CARADIODOC
  • MECHANIC
  • 33,743 POSTS
Are you working on the inner or outer CV joint?
Was this
answer
helpful?
Yes
No
Friday, December 15th, 2023 AT 8:34 PM
Tiny
AHARTLEY
  • MEMBER
  • 107 POSTS
Outer.
Was this
answer
helpful?
Yes
No
Friday, December 15th, 2023 AT 8:38 PM
Tiny
CARADIODOC
  • MECHANIC
  • 33,743 POSTS
Here's the instructions. You'll need a snap ring pliers that has tips that expand when you squeeze the handles. Best is to use one with flat tips, not one with the small round tips that go into holes in the snap ring.

There is a stiff wire ring that has to be expanded. It sits inside a groove in the joint's inner cage. There's plenty of room in that groove to allow the ring to be expanded, but the secret is to not use a hammer or anything else to bang on the joint. When that ring is relaxed, it sits in a groove on the end of the shaft. Once you hold that ring expanded and have it centered over that groove, the joint will pull off very easily by hand. Just keep wiggling that ring with the pliers while pulling outward on the joint. Wiggle and irritate the joint until it slides off. If that ring is not centered, no amount of hammering will get the joint off.

When you look into the joint around the shaft, you'll see there's six marbles in there that ride on large grooves. You'll also see those six grooves right up by the shaft. In one of those six spots is where you'll find the two ears of the wire ring. They don't show that detail in the drawing. You might have to pull the joint at an angle to the shaft, then spin it until the ends of the ring show up, and you might have to wipe some grease out of the way.

Once the new boot is slid onto the shaft, the snap ring pliers is not needed to pop the joint back onto the shaft. Just line up the inner cage and push the joint onto the shaft. The end of the shaft is tapered to go into the wire ring, then expand it as the joint slides on. Once fully installed, the ring will snap into place, then just finish up with the boot and bands.

I have had a few where a gentle tap with a hammer is needed to explain to the joint what I want it to do, but heavy force isn't needed. If the joint will not pop onto the shaft easily, it's because the inner cage with the splines isn't perfectly in line with the splines on the shaft.

Don't forget to add the grease that came with the boot kit. It is sufficient to just plop it into the boot. The accordion style boot will work the grease into the marbles as the shaft and joint go through angle changes while driving.

Let me know when you're done or if you run into problems.
Was this
answer
helpful?
Yes
No
Friday, December 15th, 2023 AT 9:11 PM
Tiny
AHARTLEY
  • MEMBER
  • 107 POSTS
Okay, yes, thank you. I've cleaned the inside and can see the snap ring. It has no holes in it so the snap ring pliers with the circular tips for the holes wouldn't help anyway.
Tomorrow will tell a story.
I'd thought of buying a boot cone to put the new boot on but if money were no object, I'd have bought a new axle, maybe even paid someone else to do it. :-)
I had wondered if "hammering" might not do more harm than good if any good at all.
Tomorrow I'll start on this again.
You all have been of great help to me in the past and I appreciate you.
I'll let you know how this goes, and contact you if any more help is needed.
Was this
answer
helpful?
Yes
No
Friday, December 15th, 2023 AT 9:45 PM
Tiny
AHARTLEY
  • MEMBER
  • 107 POSTS
I've gotten the boot on. The snap ring worked fairly easily.
I do not have one of those tools to tighten the bands with. Is it possible to do without? It appears as though it may be, however, I do not want to leave it too loose.
Was this
answer
helpful?
Yes
No
Friday, December 15th, 2023 AT 10:38 PM
Tiny
CARADIODOC
  • MECHANIC
  • 33,743 POSTS
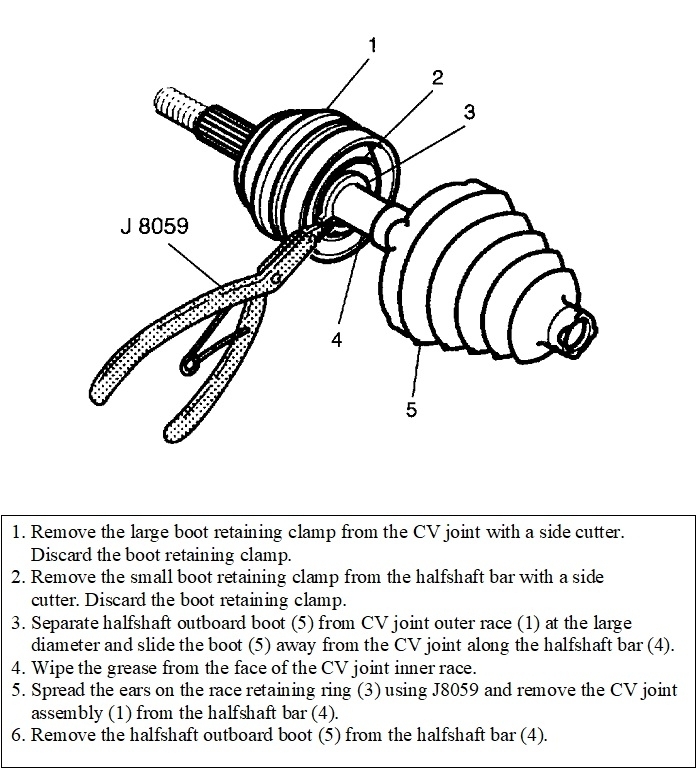
There's two different kinds of bands. With the less desirable style, you pull it tight, bend two tabs over, then bend the band back over on itself so it can't slide loose, and cut off the excess.

The better style has the ends of the band snapped together already. While it can be taken apart to wrap it around the boot, it's much easier to slide it over the boot while it's still snapped together. There's a raised section, roughly 3/8" to 1/2" long formed into that band. It sticks up less than a quarter inch, but that's enough to catch it with a special crimping pliers. I use that because it also has a center "poker" that pushes that crimp down as it is squeezed tight. On some rare applications, if that crimp sticks up too high, it can hit the bottom of the strut and tear the band off.

With this style, you have two options. I do not recommend buying that crimping pliers unless you're going to have more use for it in the future. Instead, you can borrow one from an auto parts store that rents or borrows tools. In my city, they make you buy the tool, then you get a full refund when you return it. If you choose to keep a tool, you still return it, then they give or order you a brand new one.

The second option is to crimp the band with a large side cutter used for cutting wire. You won't cut the band as it's too tough. You must, however, be careful to not get too aggressive. It's possible to squeeze the crimp so tight that the ends tear apart where they're snapped together. The pliers won't let you crimp it that tight. Using the side cutter is where the crimped section can bend up high enough to hit something. See if you can hold the crimp in the pliers, and at the same time, tap the crimp down with a small ball peen hammer.

The band on the small end of the boot is less critical as far as that crimp lifting up too high. There's nothing nearby for it to hit.

As a point of interest, with that better crimp-style band, the special pliers works well for loosening them too. Grab the crimp with the pliers as though you were going to squeeze it tighter, but instead, relax the pliers a little, then push the handles left and right a few times. If that's difficult to visualize, think of doing this with the half shaft installed. Grab the crimp, then push the pliers handles toward the transmission, then away from it, towards the wheel and tire. Each time you do that, the side of the crimp that's lifting up will stretch out a little. That can stretch it enough to let you unsnap the ends or to reposition the band on the boot.

Another trick, if you have to reuse a band of this type, is to unsnap the ends, then put one end in a vise and pull on the other end with a pair of pliers or a Vise-grip pliers. You can stretch the crimp out that way, but be careful to not stretch it too far. Doing that will leave the sides at too little of an angle. The crimping pliers or side cutter will slip off rather than squeeze it tighter. This works well too when removing an old band that is going to be discarded. I use an air-powered cutoff tool sometimes, but that means finding it, putting some oil in it, finding the air hose, etc. By the time I'm ready to use the tool, I could have three or four bands pulled off with the pliers.

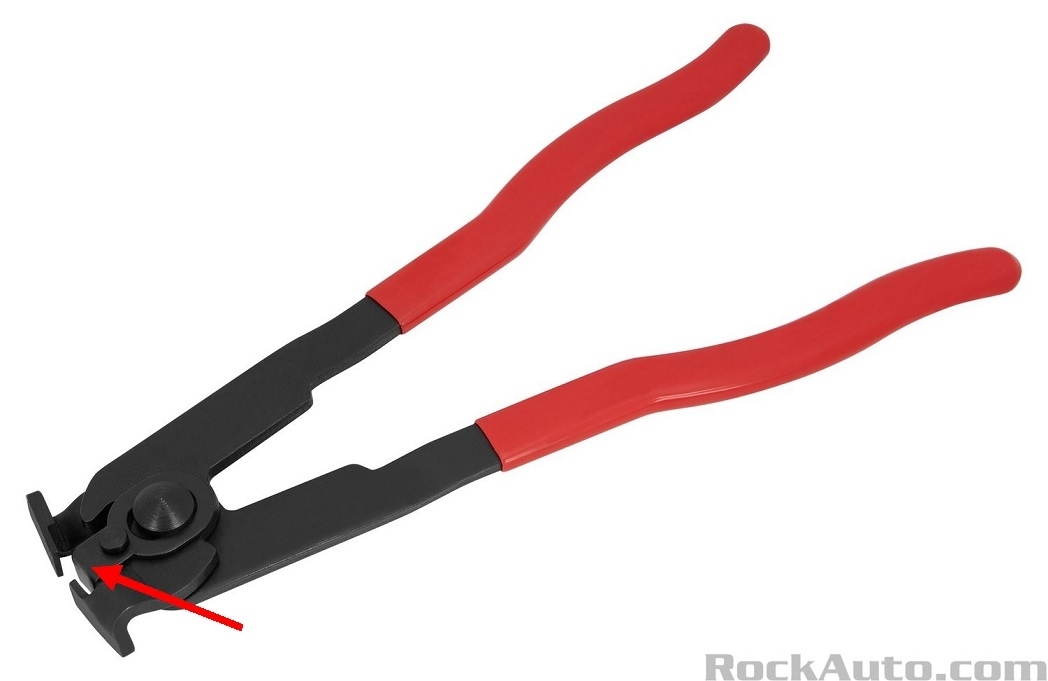
This photo shows what the special pliers can look like. I added a red arrow pointing to the plunger in the middle that extends to press the crimp down as it's being squeezed.

For my final comment of value tonight, be sure to fully tighten the axle nut on the end of the outer CV joint before you lower the car down onto the tire. Many competent do-it-yourselfers install the wheel and tire, then set the tire on the ground to hold the axle from spinning when they tighten the nut. Doing it that way will instantly make that wheel bearing noisy. It will make a buzzing noise like an airplane engine. The better alternative is to stick a screwdriver or punch into one of the cooling slots in the brake rotor to hold everything from turning. The torque spec for that axle nut is 107 foot-pounds. That really surprised me as it's much more common to find it calls for close to 180 foot-pounds, and a lot of GM vehicles call for as much as 240 foot-pounds. Use a click-type torque wrench to set the tightness of that nut, then it's okay to let the car down onto the tire.
Was this
answer
helpful?
Yes
No
Friday, December 15th, 2023 AT 11:20 PM
Tiny
AHARTLEY
  • MEMBER
  • 107 POSTS
Thank you for the "tip" on axle nut. I, also, have torqued it after lowering the car. I am grateful.
Quite honestly, I forget about the vents in the brake rotor, isn't that funny; ha, ha, ha.
It appears I have the "less desirable" bands. And yes, I see why.
It's 2:18 a.M. Here. I'll work on this later.
I'll let you know if it turns out okay.
Was this
answer
helpful?
Yes
No
Saturday, December 16th, 2023 AT 12:19 AM
Tiny
KEN L
  • MASTER CERTIFIED MECHANIC
  • 42,904 POSTS
CARADIODOC is one of our best, please let us know what happens.
Was this
answer
helpful?
Yes
No
Tuesday, December 19th, 2023 AT 12:36 PM
Tiny
AHARTLEY
  • MEMBER
  • 107 POSTS
I appreciate CARADIODOC.
For the time being I've placed zip ties to keep the boot in place.
I've driven a few hundred miles, it's okay thus far.
Was this
answer
helpful?
Yes
No
Thursday, December 21st, 2023 AT 6:27 PM
Tiny
CARADIODOC
  • MECHANIC
  • 33,743 POSTS
When I was at the dealership, I was known for saving a stash of new and good used parts in case someone needed something. That included quite a few CV joint bands. You might consider asking a friendly mechanic at a shop you often do business with if he has a crimp-type band you can have. They can be unsnapped to allow you to place it around the boot that is already installed, then you clip the ends back together and squeeze the crimp. Remember, you can squeeze the crimp with a side cutter. Don't be discouraged if the ends take some doing to get them apart. There will be two or three small hooks on one end that go into holes on the other end, but one of those hooks is longer and gets bent over a little. When you reconnect the two ends, tap that longer hook over again just a little to prevent the ends from coming apart when you squeeze the crimp.

Your style boot is less likely to pop off the joint than most other designs, so a nylon tie strap can do the job, but I wouldn't rely on that as a permanent repair, especially in cold weather when the boot is less likely to want to flex and stretch. The more common boot style will want to pull off the joint when steering far left or right due to the high angle the joint goes through. Tie straps can't hold up to those forces.

Besides just holding the boot to the joint, the straps have to keep the boot sealed so water sitting by them can't sneak in. Crimping the crimp-style band makes them extremely tight. If the original band was the type you pull tight, then bend over, those are a one-size-fits-all band, but you won't get them much tighter than you will with a nylon tie strap. If that type of band was considered acceptable when the car was built, it's more likely your nylon strap is less likely to fail or not do the job.

Please let us know if there are any updates or if you need more of our wondrous wisdom.
Was this
answer
helpful?
Yes
No
Thursday, December 21st, 2023 AT 7:48 PM

Please login or register to post a reply.

Sponsored links