Hi and thanks for using 2CarPros.
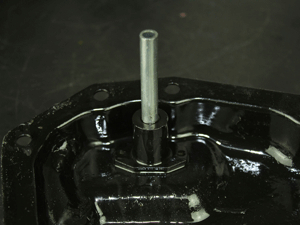
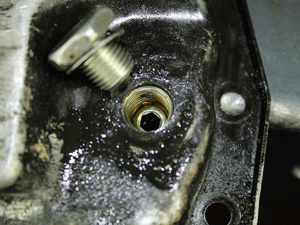
Basically, the drain plug is the location you refill from. A special charging pipe is placed into the drain and fluid is pumped back into the transmission via that port. Here is what you will need to do. Once the drain plug is removed, you will see a drain tube inside the pan (picture 2 shows from inside of pan and picture 3 shows what is under the drain) which needs removed with a hex. Normally, it needs removed to drain the pan, but since you just replaced the pan, it will not need removed. However, since the pan is new, make sure that tube is in there. Otherwise, you will not be able to keep fluid in the pan and get it to the correct level. Next, you will need a special tool to fill the transmission. The tool, a charging pipe, is screwed back into the threads where the drain plug was removed. You will pump fluid into the transmission via the charging pipe.
Here are the directions specific to your vehicle for doing this. The attached pictures show the tool and the second pic shows the drain pipe. Make sure it is there. The transmission temperature has to be specific to determine if it is full. If you do not have a scanner to do this, I have used an infrared thermometer to determine temperature. Pan temperature is a good place to do this.
Replacement
CVT fluid : Refer to General Specification.
Fluid capacity : Refer to General Specification.
CAUTION:
Use only Genuine NISSAN CVT Fluid NS-3. Using transmission fluid other than Genuine NISSAN CVT Fluid NS-3 will damage the CVT, which is not covered by the (NISSAN new vehicle limited) warranty.
Always use shop paper. Never use shop cloth.
Replace a drain plug gasket with new ones at the final stage of the operation when installing.
Use caution when looking into the drain hole as there is a risk of dripping fluid entering the eye.
After replacement, always perform CVT fluid leakage check.
Select "Data Monitor" in "TRANSMISSION" using CONSULT.
Select "FLUID TEMP" and confirm that the CVT fluid temperature is 40°C (104°F) or less.
Check that the selector lever is in the "P" position, then completely engage the parking brake.
Lift up the vehicle.
Remove the drain plug and overflow tube (SEE PIC 2) and drain the CVT fluid from the oil pan. Exploded View.
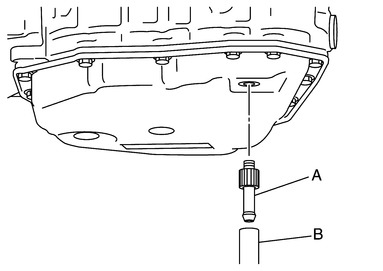
Install the charging pipe set (KV311039S0) (A) into the drain hole.
image
CAUTION: Tighten the charging pipe by hand.
Install the ATF changer hose (B) to the charging pipe.
CAUTION: Press the ATF changer hose all the way onto the charging pipe until it stops.
Fill approximately 3 liter (3-1/8 US qt, 2-5/8 lmp qt) of the CVT fluid.
Remove the ATF changer hose and charging pipe, then install the drain plug.
NOTE: Perform this work quickly because CVT fluid leaks.
Lift down the vehicle.
Start the engine.
While depressing the brake pedal, shift the selector lever to the entire position from "P" to "L", and shift it to the "P" position.
NOTE: Hold the lever at each position for 5 seconds.
Check that the CONSULT "Data monitor" in "FLUID TEMP" is 35°C (95°F) to 45°C (113°F).
Stop the engine.
Lift up the vehicle.
Remove the drain plug, and then drain CVT fluid from oil pan.
Repeat steps 6 to 16 (one time).
Install the overflow tube. Refer to Exploded View.
CAUTION: Be sure to tighten to the specified torque. If it is not tightened to the specified torque, the tube may be damaged.
Install the charging pipe set (KV311039S0) (A) into the drain hole.
image
CAUTION: Tighten the charging pipe by hand.
Install the ATF changer hose (B) to the charging pipe.
CAUTION: Press the ATF changer hose all the way onto the charging pipe until it stops.
Fill approximately 3 liter (3-1/8 US qt, 2-5/8 lmp qt) of the CVT fluid.
Remove the ATF changer hose and charging pipe, then install the drain plug.
NOTE: Perform this work quickly because CVT fluid leaks.
Lift down the vehicle.
Start the engine.
While depressing the brake pedal, shift the selector lever to the entire position from "P" to "L", and shift it to the "P" position.
NOTE: Hold the lever at each position for 5 seconds.
Check that the CONSULT "Data monitor" in "FLUID TEMP" is 35°C (95°F) to 45°C (113°F).
Lift up the vehicle.
Remove the drain plug and confirm that the CVT fluid is drained from the overflow tube.
CAUTION: Perform this work with the vehicle idling.
NOTE: If the CVT fluid is not drained, refer to "Adjustment" and refill with the CVT fluid.
When the flow of CVT fluid slows to a drip, tighten the drain plug to the specified torque. Exploded View.
CAUTION: Never reuse drain plug gasket.
Lift down the vehicle.
Select "Work Support" in "TRANSMISSION" using CONSULT.
Select "CONFORM CVTF DETERIORTN".
Touch "Erase".
Stop the engine.
Let me know if this is helpful. If you have other questions, let me know. Also, make sure you use the correct transmission fluid. This is a CVT transmission and damage will occur if the incorrect fluid is used.
Take care,
Joe
Images (Click to enlarge)
Nov 22, 2018 at 8:04 PM