Instrument cluster lights don't work?

Tiny
ANONYMOUS
  • MEMBER
  • 2005 FORD TAURUS
  • 98,000 MILES
Radio console lights and adjusts properly. Cruise control indicators on steering wheel light and adjust normally. Gauges function properly. All indicator (CEL, seatbelt, etc.) Lights self-check properly.

I found a bad solder pad that connects to another pad on the opposite side of the circuit board. Re-soldered the connection from one side of the circuit board, and it worked temporarily. The joint failed again because I couldn't do a proper repair.

For a proper repair, I need to remove the gauge needles so I can get to the back side of the circuit board. How do the needles come off (without breaking them), and do the stepper motors need special recalibration when the needles are replaced?

Thanks for any help.
-Dale
Saturday, November 3rd, 2012 AT 4:59 PM

4 Replies

Tiny
CARADIODOC
  • MECHANIC
  • 33,742 POSTS
On every cluster I've ever worked on the face plate comes off with the pointers and the stepper motors behind them. The motors just unplug from the circuit board. The circuit board is normally screwed to the other side of a plastic frame and can also be removed separately.

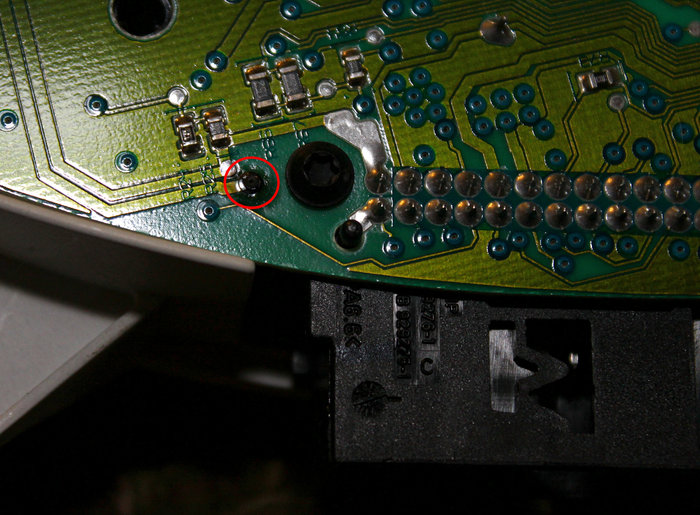
From what I can see it looks like that's the end of the copper circuit and you circled a "griplet" that connects to another circuit on the other side of the circuit board. GM had a huge problem with those in their car radios in the early '70s. GE tried that in their tvs in the late '80s and had all kinds of problems. The first thing you can try for the repair is to resolder them on both sides, but that is rarely a permanent fix. You must also scratch off a good 1/8" of the protective coating to expose the shiny copper circuit, then run the solder onto that copper too. Bridging a crack with solder must always include a small piece of wire to prevent the crack from forming again but that won't help here. (For cracked circuit boards I use one strand of wire from an old power cord). With griplets, you need to find any point on that circuit on one side of the circuit board, and another point on the other side of the board, and add a jumper wire between them. Some of them have a center hole that is large enough to feed a wire through after you melt the solder. With those, scratch 1/8" of coating off the copper traces and solder the ends of the wire to both sides.

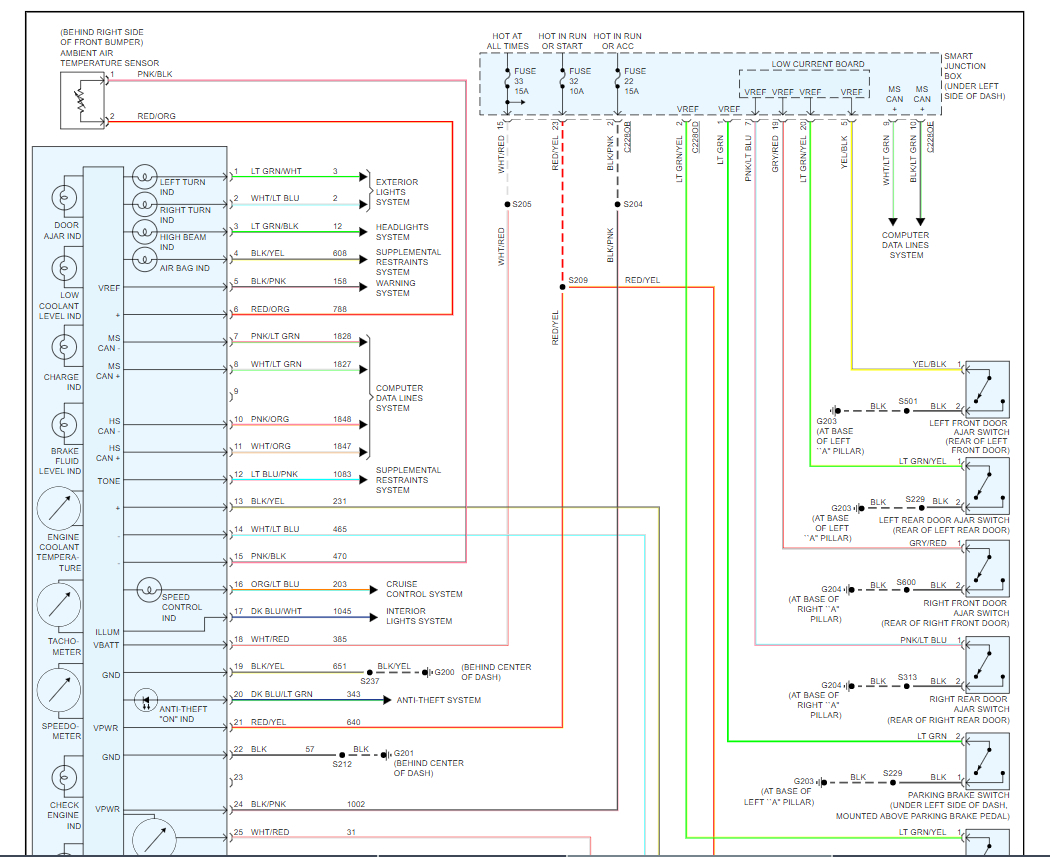
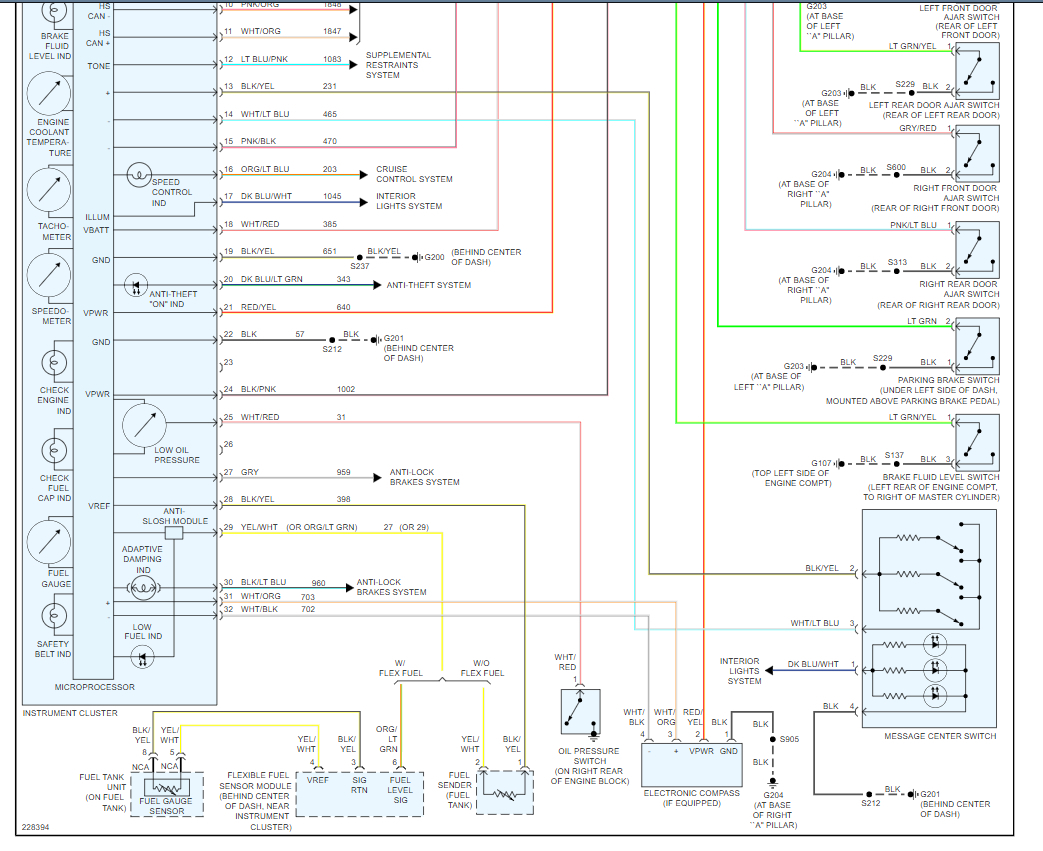
Here are the wiring diagrams so you can see how the system works. Check out the diagrams (Below). Please let us know what happens.
Was this
answer
helpful?
Yes
No
Sunday, March 24th, 2019 AT 10:45 AM
Tiny
DALESTANTON
  • MEMBER
  • 2 POSTS
That's exactly what's wrong and what I intended to do - passing the wire through to the other side. I've done it many times before on other jobs, so the repair itself is not an issue. My problem is getting it apart so I can repair it without damaging it. The faceplate seems to be solidly mounted (glued?) To the plastic frame and I can't get to the steppers to unplug them. How would you recommend I disassemble it?

Thanks again,
-Dale
Was this
answer
helpful?
Yes
No
Sunday, March 24th, 2019 AT 10:45 AM
Tiny
CARADIODOC
  • MECHANIC
  • 33,742 POSTS
There's a screw right next to the connection and there will be more. What happens when you remove all of them?

You have to look too at how they put this together on the assembly line. They may have let the stepper motor pins slide through the circuit board, then soldered them, but they wouldn't have riveted them. That seems like a strange way of putting it together but anything is possible.

You shouldn't have to remove the pointers. Doing so might get the face plate off but there will still be the plastic frame in between covering many of the copper traces. I never had to do that so I don't know how to tell when they get put back on in the correct orientation.
Was this
answer
helpful?
Yes
No
Sunday, March 24th, 2019 AT 10:45 AM
Tiny
DALESTANTON
  • MEMBER
  • 2 POSTS
The screw next to the connection is one of two for the harness connector. When I have all the other screws out, the board is loose in the frame. It appears loose enough that the board should fall right out if the needles weren't there. Wish I could see the assembly process.

I've looked it over and over, but they've got it sewed up so well, I can't see much of anything inside.

Thanks again for your help.
-Dale
Was this
answer
helpful?
Yes
No
Sunday, March 24th, 2019 AT 10:45 AM

Please login or register to post a reply.

Sponsored links