Here are the procedures for removing the cylinder head.
To loosen the timing chain, you need to release the tensioner.
CYLINDER HEAD & MANIFOLDS
Removal
1. Release fuel pressure. Drain cooling system.
2. Disconnect control cables at throttle body and cruise control actuator (if equipped). Remove air cleaner cap and airflow meter with air cleaner hose. Remove intake air connector and A/C idle-up valve (if equipped).
3. Remove power steering pump drive belt. Remove power steering pump idler pulley. Remove nut and pulley from power steering pump.
4. Remove bolts and power steering pump with hoses attached, and secure aside. Remove bolts and power steering pump bracket from cylinder head.
5. Disconnect PCV hoses. Disconnect spark plug wires at spark plugs. Remove ignition coils. Remove bolts, coolant outlet and gasket from front of cylinder head. Remove bolts, cylinder head rear cover and gasket from rear of cylinder head.
6. Disconnect necessary coolant hoses, vacuum hoses and engine wiring connectors. Remove EGR pipe and gaskets. Remove EGR valve and vacuum modulator with gasket (if necessary).
7. Remove intake manifold brace from bottom of air intake chamber. Remove air intake chamber and gasket from intake manifold.
8. Disconnect electrical connectors at injectors. Remove union bolts, fuel inlet pipe and gaskets. Disconnect fuel lines, and remove fuel return pipe.
CAUTION:DO NOT allow injectors to fall from delivery pipe when
removing delivery pipe.
9. Remove delivery pipe bolts. Remove delivery pipe with injectors. Remove insulators on top of spacers in cylinder head.
10. Remove injectors from delivery pipe (if necessary). Remove intake manifold and gasket. Remove front exhaust pipe from exhaust manifold.
11. Remove heat insulator from exhaust manifold. Remove exhaust manifold and gasket. Remove bolts and No. 1 and 2 engine hangers from cylinder head.
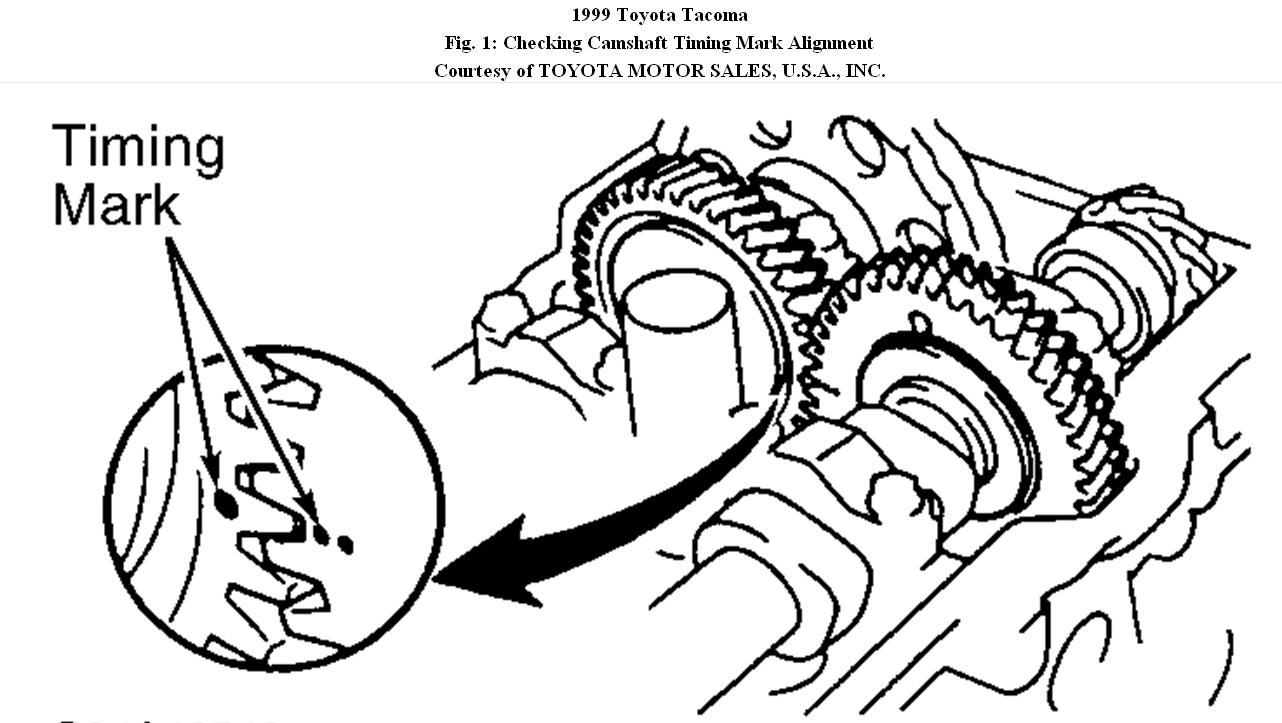
12. Remove valve cover and gasket. Remove spark plugs. Remove camshafts. See CAMSHAFT. Rotate crankshaft clockwise (viewed from front of engine) so cylinder No. 1 (front cylinder) is at TDC on compression stroke. Ensure timing mark on crankshaft pulley aligns with "0" mark on front cover.
13. Ensure timing marks on camshaft gears align. See Fig. 1. If timing marks do not align, rotate crankshaft clockwise 1 full revolution (360 degrees).
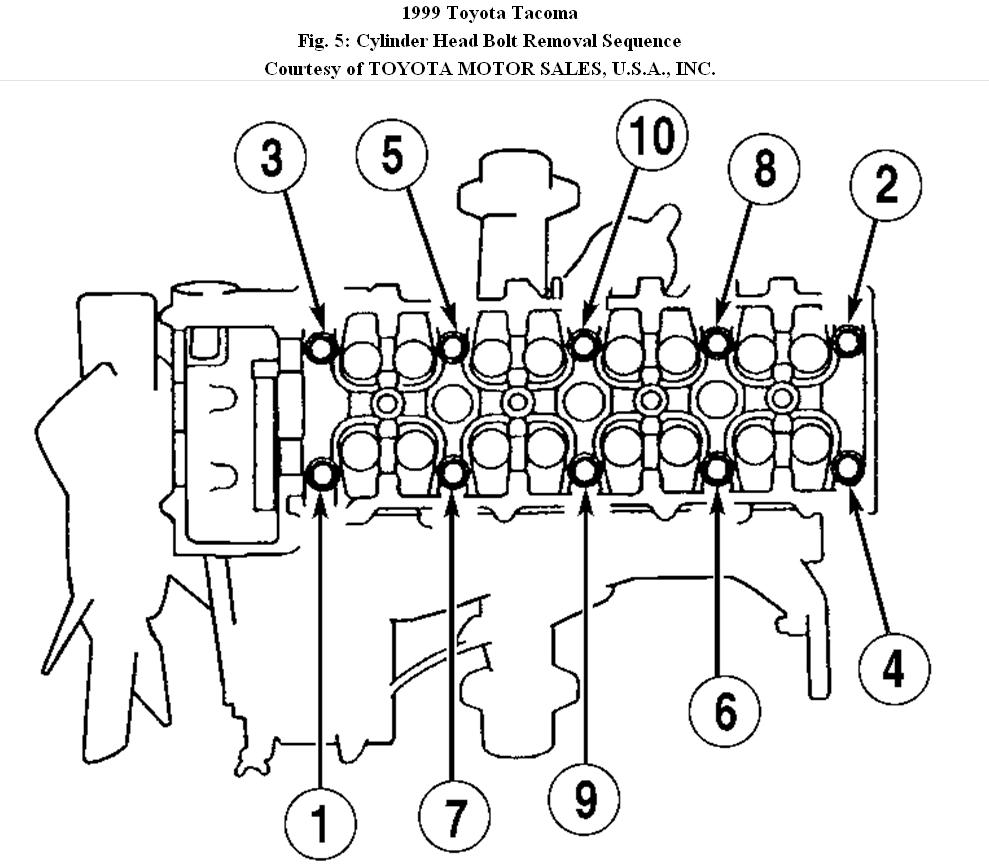
CAUTION:To prevent cylinder head warpage, loosen cylinder head bolts
in proper sequence.
14. Remove 2 cylinder head-to-front cover bolts, located on cylinder head, in front of camshaft sprocket area. Loosen cylinder head-to-cylinder block bolts in sequence using several steps. See Fig. 5.
15. Remove cylinder head-to-cylinder block bolts with washers, cylinder head and cylinder head gasket. Note location of adjusting shims and valve lifters for reassembly reference. Remove adjusting shims and valve lifters from cylinder head (if necessary).
CAMSHAFT
Removal
1. Remove nuts and No. 1 timing chain tensioner. Remove gasket from cylinder head. Remove both semi-circular plugs from cylinder head.
2. Place alignment marks on camshaft sprocket and No. 1 timing chain for reassembly reference. Hold exhaust camshaft from rotating by holding camshaft with wrench on hexagonal area at center of exhaust camshaft.
3. Hold intake camshaft by holding camshaft with wrench on hexagonal area at center of intake camshaft. Remove camshaft sprocket bolt from intake camshaft.
CAUTION:DO NOT allow No. 1 timing chain to become disengaged from
No. 1 crankshaft sprocket on crankshaft during removal.
4. Remove camshaft sprocket with No. 1 timing chain from intake camshaft. Allow No. 1 timing chain and camshaft sprocket to set in front cover, No. 1 timing chain tensioner slipper and No. 1 vibration damper located on each side of timing chain. DO NOT disengage No. 1 timing chain from No. 1 crankshaft sprocket.
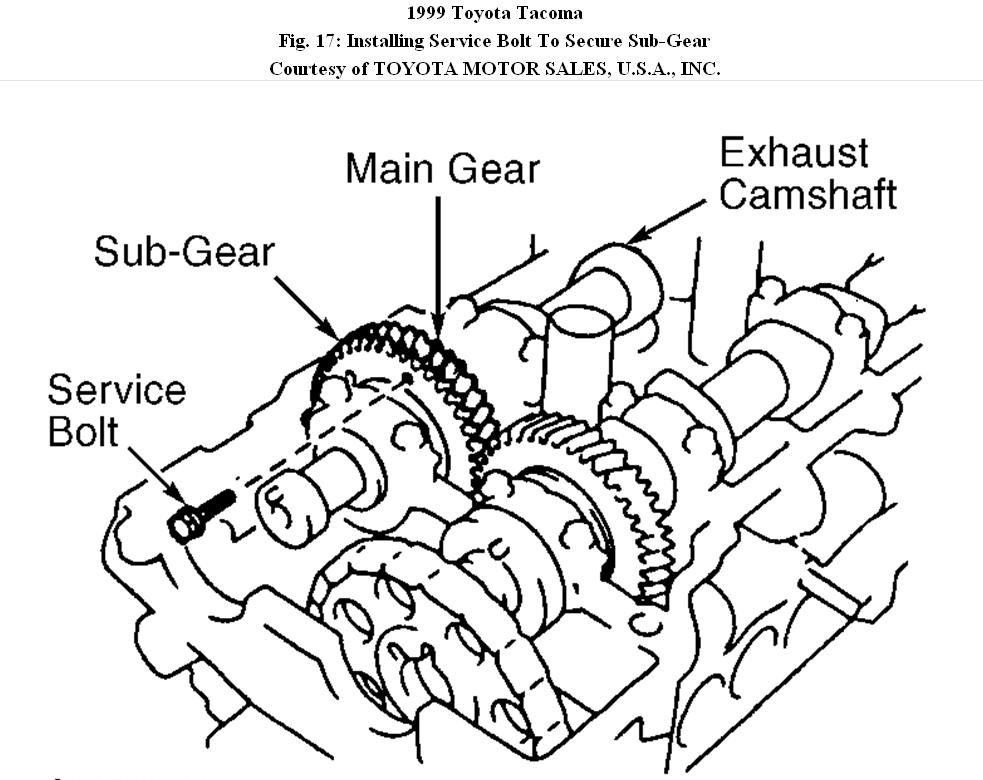
5. Secure sub-gear on exhaust camshaft to main gear with a 6 x 1.0 x 18 mm service bolt. See Fig. 17. Before removing camshaft bearing cap bolts, ensure torsional spring force of sub-gear is held by service bolt.
CAUTION: When removing camshaft, use proper procedure to hold
camshaft level. If camshaft is not held level, cylinder head thrust area may be damaged, causing camshaft to seize or break. To prevent damage to cylinder head and camshaft, remove camshaft bearing cap bolts in proper sequence.
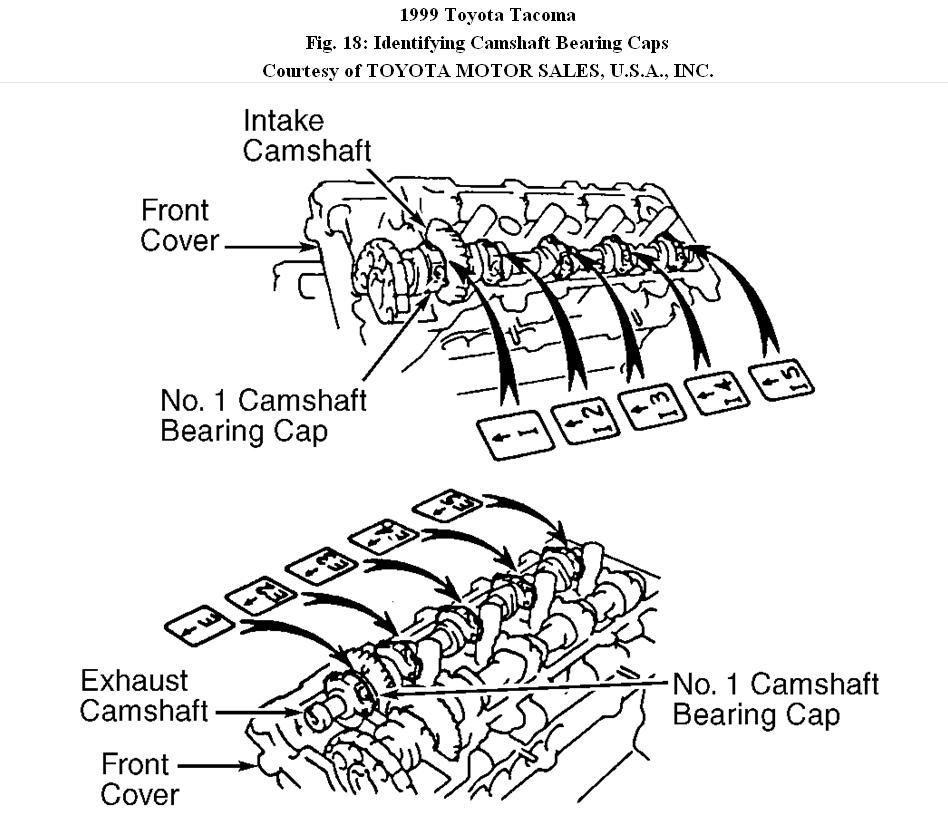
6. Note location of camshaft bearing caps. Camshaft bearing caps are numbered for location on top of camshaft bearing cap on all except No. 1 camshaft bearing caps. Camshaft bearing cap is also stamped with either an "I" for intake camshaft or an "E" for exhaust camshaft. Position arrows on top of camshaft bearing caps toward front of engine. See Fig. 18.
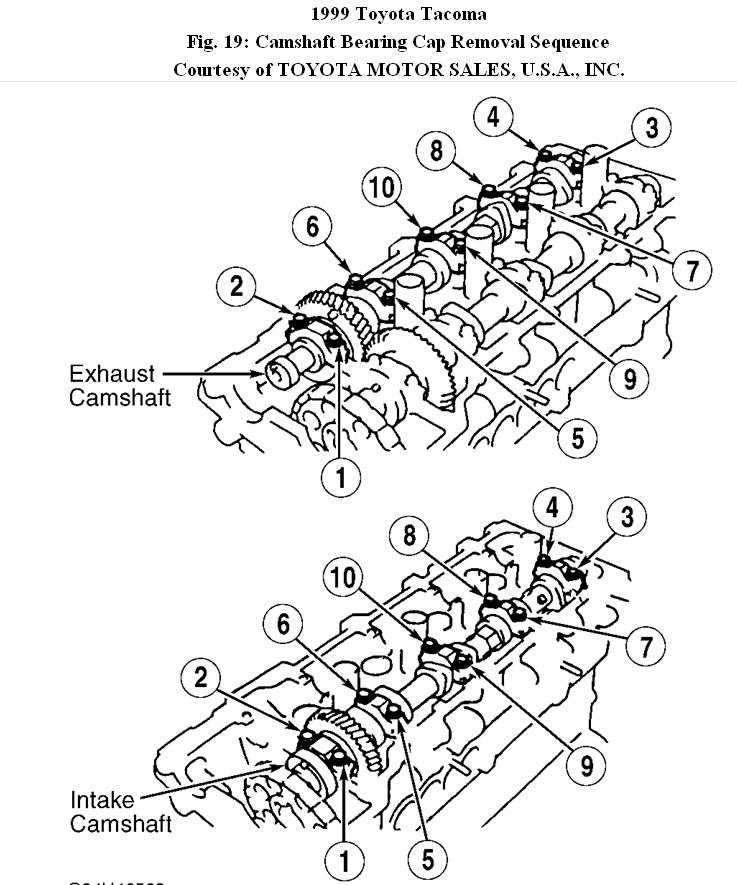
7. Remove exhaust camshaft bearing cap bolts in sequence. See Fig. 19. If exhaust camshaft is not lifted upward when removing camshaft bearing cap bolts, reinstall camshaft bearing cap bolts on No. 3 camshaft bearing cap. Alternately loosen bearing cap bolts. Remove camshaft bearing caps and exhaust camshaft.
8. Remove intake camshaft bearing cap bolts in sequence. See Fig. 19. If intake camshaft is not lifted upward when removing camshaft bearing cap bolts, reinstall camshaft bearing cap bolts on No. 3 camshaft bearing cap. Alternately loosen cap bolts. Remove camshaft bearing caps and intake camshaft.
9. If removing sub-gear from exhaust camshaft, mount hexagonal area of camshaft in soft-jaw vise. Using spanner wrench, rotate sub-gear clockwise and remove service bolt. See Fig. 20. Remove snap ring, wave washer, sub-gear and gear spring from exhaust camshaft.
Images (Click to enlarge)
Apr 24, 2011 at 3:59 PM