Could be a know chafed wire problem, a technical service buuelin covers it, the info is below with pictures.
ACCESSORIES INOPERATIVE - FRONT DOOR HARNESS CHAFED
TECHNICAL SERVICE BULLETIN
Reference Number(s): 99-T-43, Date of Issue: September, 1999
Related Ref Number(s): 99-T-43
ARTICLE BEGINNING
REMOTE KEYLESS ENTRY (RKE) OR SECURITY SYSTEM
INOPERATIVE AND/OR ENGINE WILL NOT CRANK, POWER DOOR
LOCKS INOPERATIVE OR INTERMITTENTLY INOPERATIVE,
POWER WINDOWS INOPERATIVE, POWER MIRROR INOPERATIVE,
DOOR SPEAKER VOLUME CUTTING OUT, 10A BODY FUSE OPEN
OR 10A CHIME FUSE OPEN (REPAIR BODY WIRING HARNESS)
Model(s): 1996-1999 Saturn S-Series Sedans and Wagons
Group/Seq. No.: Electrical - 03
Corporation No.: 99-08-45-002
Bulletin No.: 99-T-43
Date: September, 1999
CONDITION
Customer may comment that on occasion, one or more of the following conditions occur:
? Remote keyless entry (RKE) or security system inoperative, and/or engine will not crank.
(Must be equipped with RPO code AU0.)
? Power door locks inoperative or intermittently inoperative. (Must be equipped with RPO code
AU0.)
? Power windows inoperative. (Must be equipped with RPO code A31.)
? Power mirror inoperative. (Must be equipped with RPO code D35.)
? Front door speaker volume cuts out intermittently.
CAUSE
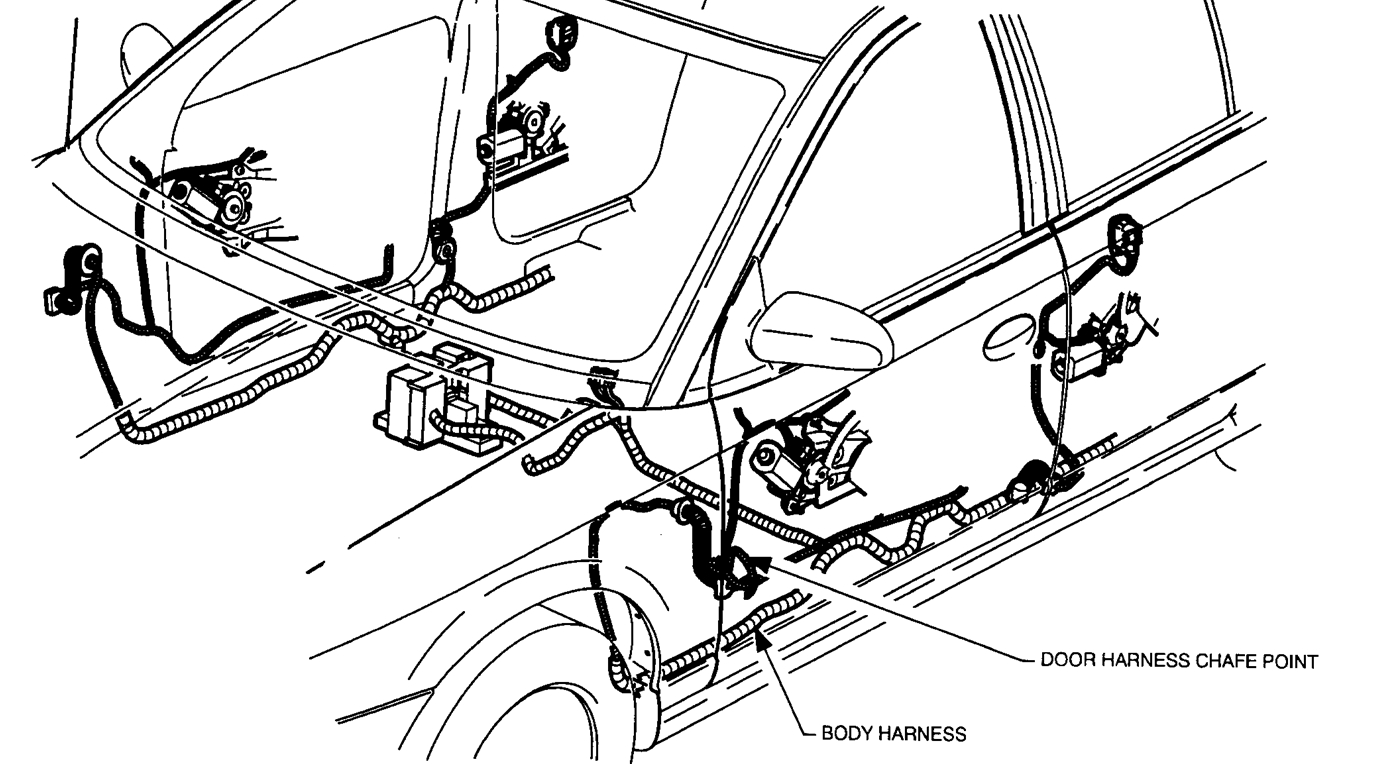
The cause of the above conditions may be the main body to front door wire harness coming into
contact with front door hinge reinforcement bracket. Refer to Fig. Fig. 1 .
The harness is routed into the front doors through a grommet as it enters the outer door structure. It is
then routed across the front door hinge reinforcement (about 51 mm [2 in.] from end of grommet)
Press Ctrl+F to find exact text
before it is anchored by a rosebud. Depending on variation in either the manufacturing or routing of
the wire harness, there is a chance that the wire harness can come into contact with hinge
reinforcement bracket and chafe, causing a short to ground on one or more of the circuits listed
below.
IMPORTANT: On 1996 model year vehicles, Circuit 294 from RKE and security system module
may be affected, but will not cause an engine no crank condition.
? Circuit 294/TAN (driver's door unlock output from RKE and security system module) - Engine
will not crank and RKE and security system inoperative. A short to ground on this circuit may
cause internal damage to the RKE and security system module. On 1997 vehicles (up to and
including VZ264043) the 10A BODY fuse may be open. On 1997 vehicles (after VZ264043),
1998, and 1999 model year vehicles, the 10A CHIME fuse may be open.
? Circuit 294/TAN (right front door lock motor), and Circuit 295/GRA (right and left front door
lock motor) - Power door locks may be inoperative due to an open on the 20A LOCKS fuse.
? Circuit 340/ORN, 194/WHT, 195/LT BLU (power door lock switch circuit) - Power door locks
may be inoperative due to an open on the 10A BODY fuse.
? Circuit 164/DK BLU, 165/BRN (left front power window motor) or Circuit 166/LT BLU,
167/TAN (right front power window motor) - Power window(s) may be inoperative due to an
open on the 30A PWR CONVCE fuse.
? Circuit 81/WHT, 82/LT BLU, 89/LT GRN (Passenger side power mirror) Power mirror may
be inoperative due to an open on the 10A BODY fuse.
? Circuit 200/LT GRN, 117/DK GRN (right front speaker) and/or Circuit 201/TAN, 118/GRA
(left front speaker) - Door speaker volume cutting out.
CORRECTION
After all appropriate diagnostic steps have been followed and the condition is not resolved, proceed
with the procedure in this bulletin
PROCEDURE
1. Remove front door outer panel on side of vehicle that is affected. (Refer to "Front Door Outer
Panel - Sedan/Wagon" removal procedure in the Doors section of the appropriate model year
Body/Repair service manual.)
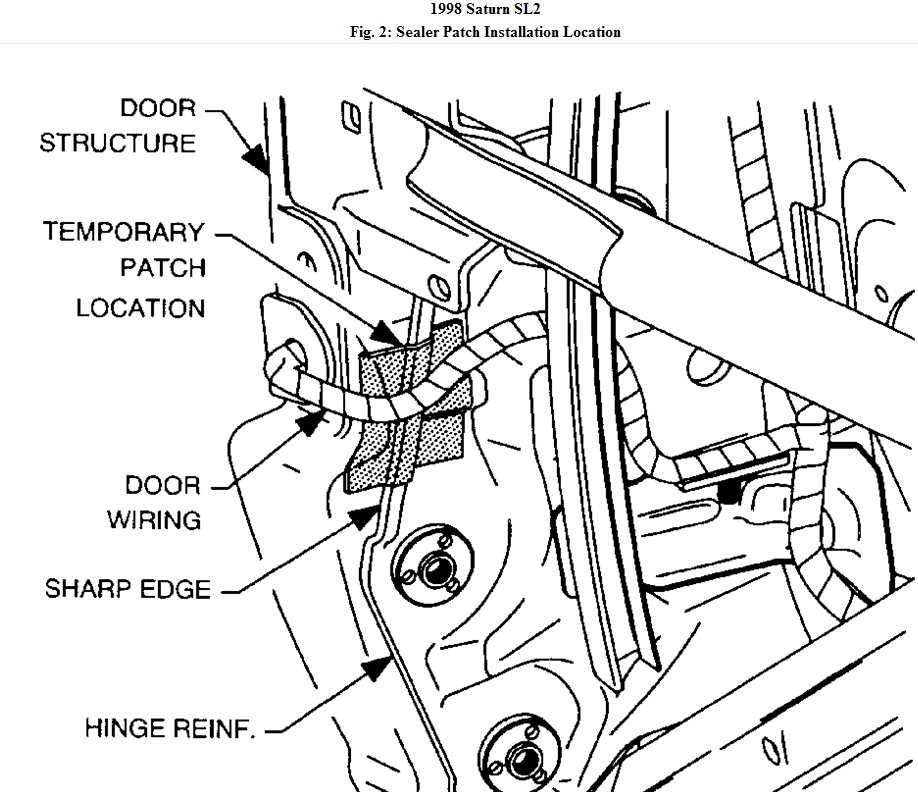
2. Inspect door wiring harness for signs of damage. See Fig. 2 . If water deflector is obstructing
wiring harness inspection, carefully peel it out of the way.
? If damage has occurred to any wire(s), continue to step 3.
? If no damage has occurred, refer to the appropriate model year Electrical service manual
for further diagnostic information.
3. Cut damaged wire at location of chafe.
4. Remove insulation from both ends of cut wire, recommended wire strip length is 9.5 mm (3/8
in). Caution must be used when stripping wire to prevent cutting wire strands. Locate new
splice a minimum of 40 mm (1.5 in.) from other splices.
NOTE:
With wiring used in Saturn vehicles, it is recommended that
approved Packard Electric Crimp and Seal Splice Sleeves (or
5. Using a Saturn approved crimp and seal sleeve (found in special tools kit SA9138Z) position
stripped ends of wires in sleeve until wires hit stop.
CRIMP SLEEVE INFORMATION
6. Hand crimp sleeve using appropriate crimping tool. See Fig. 3 . Gently tug on wires to ensure
they are secure before applying heat to seal sleeve.
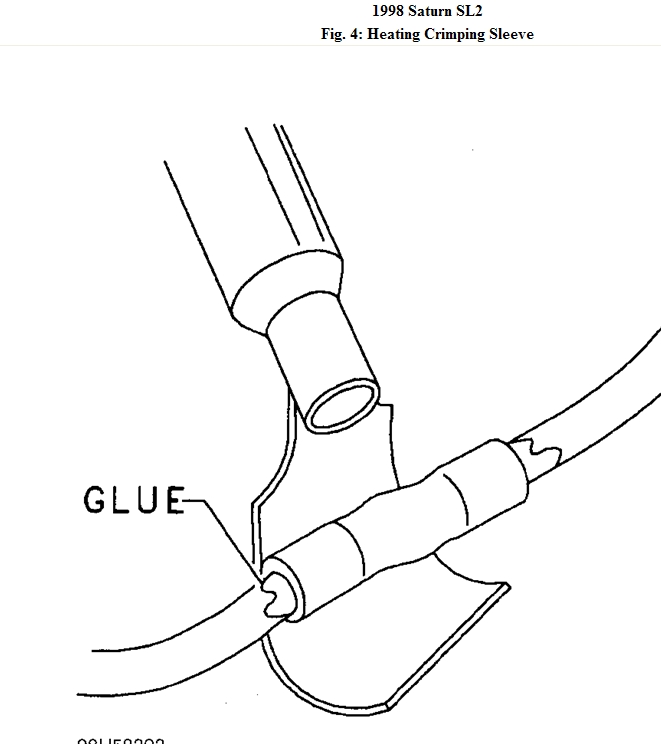
7. Apply heat using Ultratorch or some other device, heating to 175°C (347°F) until glue flows
around edges of sleeve. See Fig. 4 .
8. Check for continuity in the wire and verify repair.
9. If electrical tape was removed to perform wire harness inspection or repair, re-tape wires and
harness to original condition.
10. Install one Sealer Patch (P/N 21124362) to sharp metal edge(s) of hinge support under wire
harness to protect against further wire harness damage. See Fig. 2 .
11. Install front door outer panel. (Refer to "Front Door Outer Panel - Sedan/Wagon" installation
procedure in the Doors section of the appropriate model year Body/Repair service manual.)
PARTS REQUIREMENTS
PARTS INFORMATION
CLAIM INFORMATION
To receive credit for this repair during the warranty coverage period, submit a claim through the
equivalent) be used.
Wire Size
(Gage)
Packard Part
Number (1)
Special Tools
Part Number
(2)
Color
.35 (22), .50
(20), .80 (18)
12089189
(217670)
Salmon
1.0 (16) 2.0
(14)
12089190
(217671)
Blue
3.0 (12) 5.0
(10)
12089191
(217672)
Yellow
(1)= Order through Packard at 1-800-PACKARD (1-800-722-
5273)
(2)= Order through Saturn Special Tool Catalog Included with
Terminal Repair Kit (SA9138Z)
CAUTION: Do not use a match or open flame to apply heat to splice
sleeve.
Part Number
Description
21124362
Sealer Patch
Saturn Dealer System as follows:
CLAIM INFORMATION
Fig. 1: Door Wiring Harness Chafe Point
Fig. 2: Sealer Patch Installation Location
Fig. 3: Crimping Wire Splice With Crimping Tool
Fig. 4: Heating Crimping Sleeve
Case Type
Description
Labor
Operation Code
Time
VW
Repair Chaffed Wire(s) in Door Wiring
Harness INC: Time to check continuity of
repaired wire(s).
Z4036
0.8 hrs
Add:
A. To repair each additional chaffed wire
---
0.1 hrs
Images (Click to enlarge)
Jan 23, 2011 at 7:49 PM